
1. Introduction
This manual provides essential information for the safe and efficient operation of your new SHARP 9 kg Fully Automatic Top Load Washing Machine (Model ES-T90N-GY). Please read these instructions thoroughly before installation and use, and retain them for future reference. Proper use and maintenance will ensure optimal performance and extend the lifespan of your appliance.

Figure 1: SHARP 9 kg Fully Automatic Top Load Washing Machine (ES-T90N-GY) with dimensions and energy label.
2. Safety Information
Always follow basic safety precautions when using electrical appliances to reduce the risk of fire, electric shock, or injury. This washing machine is designed for household use only.
- Ensure the power cord is not damaged and is properly grounded.
- Do not allow children to play on or in the appliance.
- Keep flammable materials away from the washing machine.
- Do not wash items that have been soiled with gasoline, dry-cleaning solvents, or other flammable or explosive substances.
- Unplug the appliance before cleaning, maintenance, or if it will not be used for an extended period.
- Do not attempt to repair or replace any part of the appliance unless specifically recommended in this manual. All other servicing should be referred to a qualified technician.
3. Product Overview
The SHARP ES-T90N-GY is a 9 kg fully automatic top load washing machine designed for efficient and convenient laundry care. Key features include a toughened glass lid, soft close mechanism, hot & cold water dual inlet, and an 'Add Laundry' function.
Key Components:
- Control Panel: Touch panel with digital display for program selection and settings.
- Washing Tub: Stainless steel drum for durability and effective cleaning.
- Pulsator: Stainless steel insert pulsator for powerful washing action.
- Lid: Toughened glass lid with soft close mechanism.
- Water Inlets: Separate inlets for hot and cold water.
- Drain Hose: For water discharge.

Figure 2: Front view of the washing machine.

Figure 3: Side view of the washing machine.
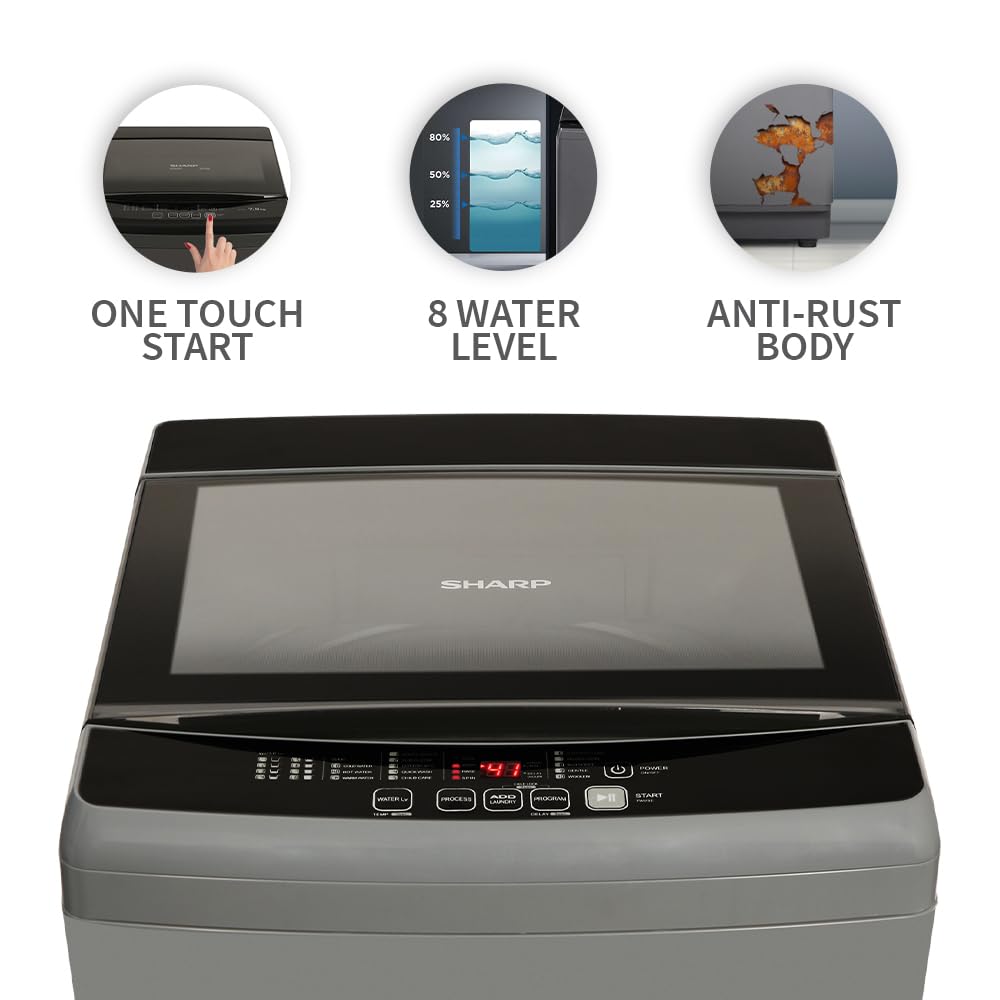
Figure 4: Rear view of the washing machine with water inlet and drain hose connections.
4. Setup and Installation
Proper installation is crucial for the performance and longevity of your washing machine. It is recommended to have the appliance installed by a qualified technician.
4.1 Unpacking
- Carefully remove all packaging materials.
- Check for any damage during transit. Contact your dealer immediately if any damage is found.
- Ensure all included components are present: 1 Washing machine unit, 1 User Manual, 1 Warranty Card, Fill Hose, Drain Hose.
4.2 Location and Leveling
- Place the washing machine on a firm, level surface. Avoid direct sunlight or excessively damp environments.
- Adjust the leveling legs at the bottom of the machine to ensure it is perfectly stable and balanced. An unbalanced machine can cause excessive vibration and noise.
- Install the protective rat mesh at the bottom of the machine to prevent rodent entry.
4.3 Water Connection
- Connect the fill hoses to the hot and cold water inlets at the back of the machine and to the corresponding hot and cold water taps. Ensure connections are tight to prevent leaks.
- Position the drain hose into a suitable drain pipe or sink, ensuring it is securely fastened and allows for proper water drainage without kinking.
4.4 Power Connection
- Plug the power cord into a grounded electrical outlet. Ensure the voltage and frequency match the specifications of the washing machine.
5. Operating Instructions
This section guides you through the basic operation and special features of your SHARP washing machine.
5.1 Control Panel Overview
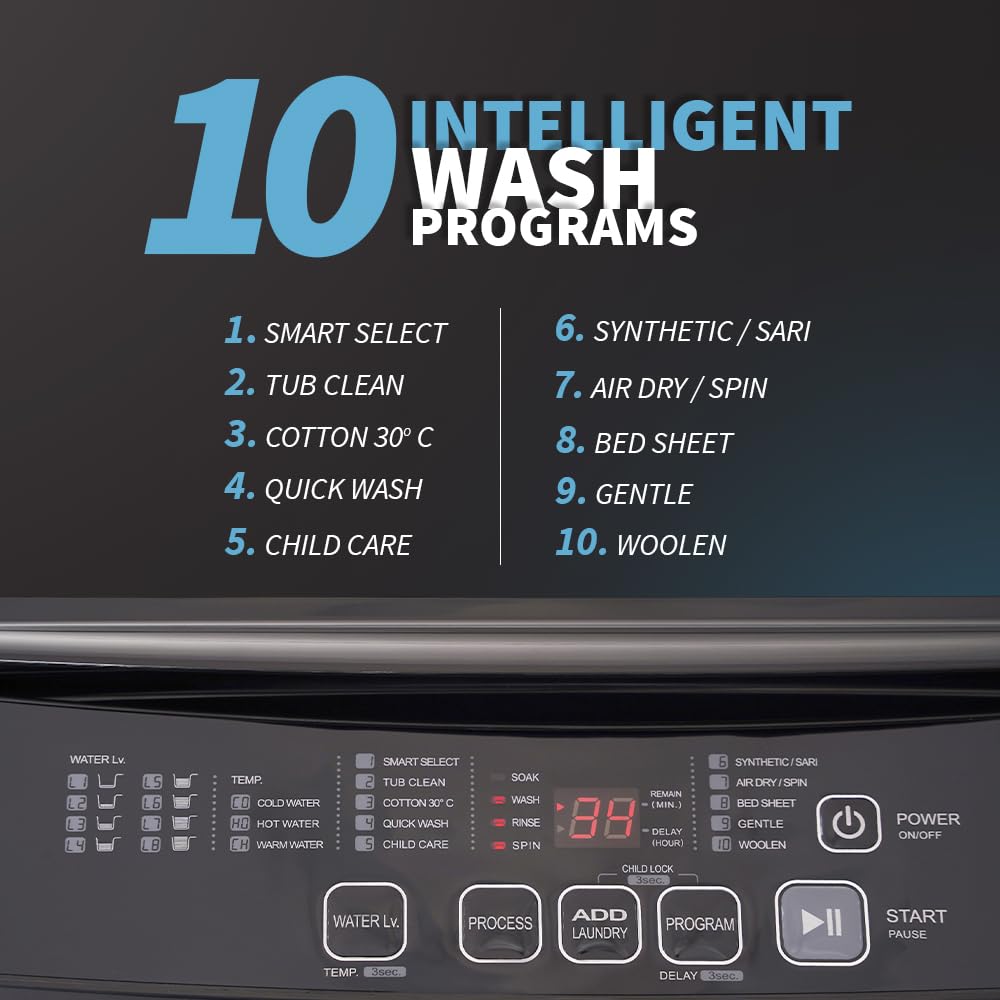
Figure 5: Control Panel with One Touch Start, Water Level indicator, and Anti-Rust Body indication.
The touch panel and digital display allow for easy selection of wash programs and settings. Indicators show water level, temperature, remaining time, and selected program.
5.2 Basic Wash Cycle
- Load Laundry: Open the soft-closing lid and place clothes loosely into the drum. Do not overload.
- Add Detergent: Dispense appropriate detergent and fabric softener into their respective compartments.
- Power On: Press the 'Power' button to turn on the machine.
- Select Program: Choose one of the 10 wash programs using the 'Program' button. The digital display will show the selected program and estimated time.
- Adjust Settings (Optional): Modify water level, temperature (if using hot water inlet), or delay start if desired.
- Start Cycle: Press the 'Start/Pause' button to begin the wash cycle.
5.3 Wash Programs
Your washing machine offers 10 intelligent wash programs:
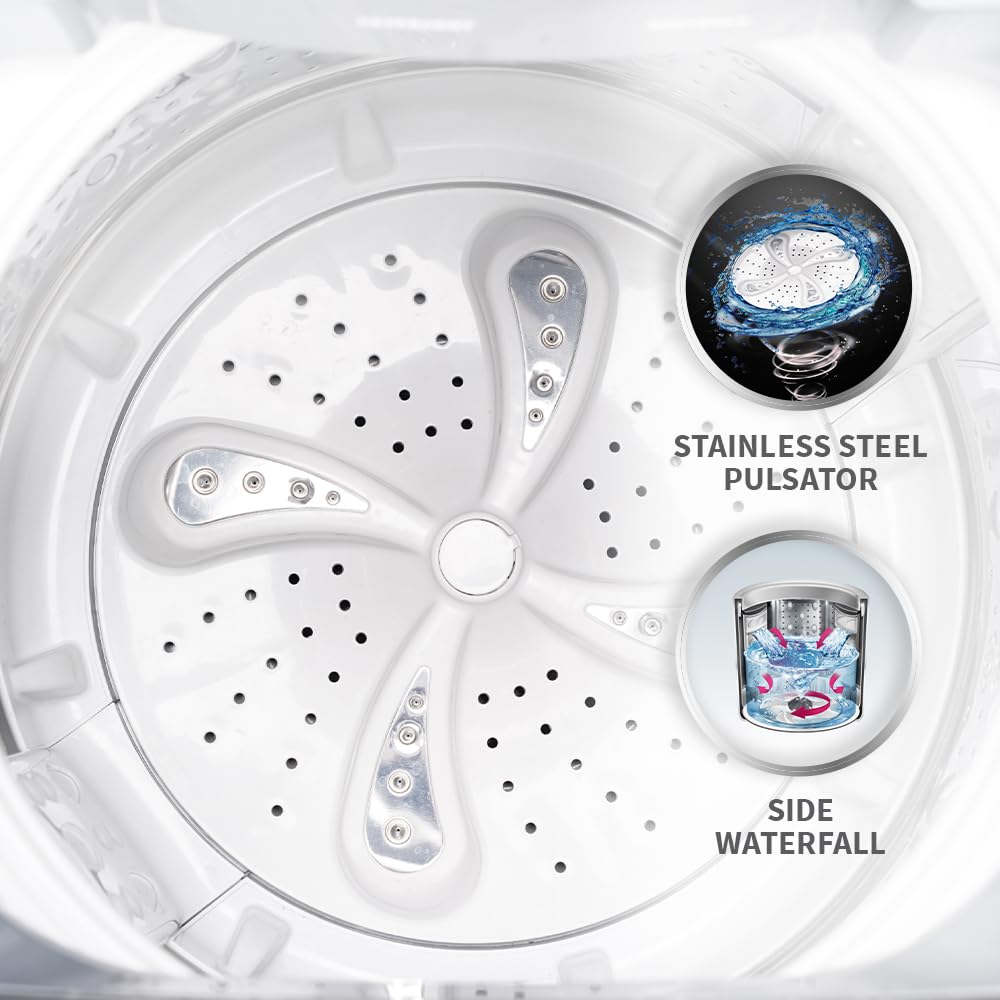
Figure 6: The 10 Intelligent Wash Programs available.
- Smart Select
- Tub Clean
- Cotton 30°C
- Quick Wash
- Child Care
- Synthetic / Saree
- Air Dry / Spin
- Bed Sheet
- Gentle
- Woollen
5.4 Special Features
- Add Laundry: Allows you to add forgotten clothes to the wash cycle at any time before the main wash phase ends.
- Hot & Cold Water Dual Inlet: Provides flexibility to wash clothes with either hot or cold water, or a mix, depending on the fabric and soil level.
- Waterfall Wash: Ensures even water spray from the side during the wash cycle for thorough and hygienic cleaning.
- One-Touch Start: Simplifies operation by initiating a standard wash cycle with a single button press.
- Child Lock: Prevents accidental changes to settings by locking the control panel.
- Delay Start: Allows you to set a delayed start time for the wash cycle, useful for off-peak hours.
- Soft Closing Lid: The toughened glass lid closes gently and quietly, preventing sudden drops.

Figure 7: Hot & Cold Water Dual Inlet and Soft Closing Lid features.

Figure 8: Stainless Steel Pulsator and Side Waterfall for effective cleaning.
6. Maintenance
Regular maintenance helps keep your washing machine in optimal condition and prevents issues.
6.1 Cleaning the Drum (Tub Clean)
Use the dedicated 'Tub Clean' program periodically to remove detergent residue and bacteria from the stainless steel drum. Follow these steps:
- Ensure the drum is empty.
- Add a suitable washing machine cleaner or a small amount of bleach to the detergent dispenser.
- Select the 'Tub Clean' program.
- Press 'Start/Pause' to begin the cycle.
6.2 Cleaning the Filter
The lint filter should be cleaned regularly to ensure efficient drainage and prevent lint buildup on clothes. Refer to your specific model's diagram in the full manual for filter location and removal instructions.
6.3 Cleaning the Exterior
Wipe the exterior surfaces of the washing machine with a soft, damp cloth. Avoid abrasive cleaners or solvents that could damage the finish.
7. Troubleshooting
If you encounter issues with your washing machine, refer to the following common problems and solutions. If the problem persists, contact customer support.
| Problem | Possible Cause | Solution |
|---|---|---|
| Machine does not start | Power cord unplugged; Lid not closed properly; 'Start/Pause' not pressed. | Check power connection; Ensure lid is fully closed; Press 'Start/Pause'. |
| No water filling | Water taps closed; Water supply cut off; Fill hose kinked. | Open water taps; Check household water supply; Straighten fill hoses. |
| Machine vibrates excessively | Machine not level; Load unbalanced. | Adjust leveling legs; Redistribute laundry evenly in the drum. |
| Error code displayed (e.g., due to slow water) | Insufficient water pressure or flow. | Check water supply and pressure. Often, opening and re-closing the lid can reset the machine to resume the cycle. |
| Water not draining | Drain hose kinked or blocked; Drain filter clogged. | Check and clear drain hose; Clean the drain filter. |
8. Specifications
Technical details for the SHARP 9 kg Fully Automatic Top Load Washing Machine (ES-T90N-GY).
| Feature | Detail |
|---|---|
| Model Name | ES-T90N-GY |
| Capacity | 9 kg |
| Operation Mode | Fully Automatic |
| Access Location | Top Load |
| Energy Rating | 5 Star |
| Spin Speed (RPM) | 700 RPM |
| Wash Programs | 10 (Smart Select, Tub Clean, Cotton 30°C, Quick Wash, Child Care, Synthetic/Saree, Air Dry, Bed Sheet, Gentle, Woollen) |
| Drum Material | Stainless Steel |
| Pulsator Type | Stainless-Steel Insert Pulsator |
| Controls Type | Touch Panel & Digital Display |
| Product Dimensions (D x W x H) | 62D x 60.5W x 100H Centimeters |
| Item Weight | 41.5 Kilograms |
| Special Features | Add Laundry, Hot & Cold Water Dual Inlet, Waterfall Wash, One-Touch Start, Soft Close Lid, Child Lock, Delay Start, Protective Rat Mesh |
9. Warranty and Support
Your SHARP washing machine is covered by a comprehensive warranty and dedicated customer support.
9.1 Warranty Information
The SHARP ES-T90N-GY washing machine comes with a 2 Years Comprehensive Warranty on the appliance and a Total 10 Years Warranty on the Motor. Please refer to the warranty card included with your product for detailed terms and conditions.
Figure 9: Warranty details for the SHARP washing machine.
9.2 Customer Support
For any queries, service requests, or technical assistance, please contact SHARP customer support:
- Toll-Free: 1800-419-4322
- E-Mail: support@sharp-oa.com
Please have your model number (ES-T90N-GY) and purchase details ready when contacting support.


