
ANDTE PD120K
ANDTE 120 Pints Energy Star Dehumidifier User Manual
Model: PD120K
1. Introduction
Thank you for choosing the ANDTE 120 Pints Energy Star Dehumidifier. This manual provides essential information for the safe and efficient operation, maintenance, and troubleshooting of your new appliance. Please read it thoroughly before use and retain it for future reference.
2. Safety Instructions
To prevent injury to the user or others and property damage, the following instructions must be followed. Incorrect operation due to ignoring instructions may cause harm or damage.
- Always plug into a grounded 3-prong outlet. Do not remove the ground prong.
- Do not use an adapter.
- Do not use an extension cord.
- Unplug the dehumidifier before cleaning or servicing.
- Do not operate the dehumidifier with a damaged power cord or plug.
- Place the unit on a level, sturdy surface to prevent tipping.
- Maintain at least 8 inches of clearance around the unit for proper airflow.
- Do not block air inlets or outlets.
- This appliance is not intended for use by persons (including children) with reduced physical, sensory or mental capabilities, or lack of experience and knowledge, unless they have been given supervision or instruction concerning use of the appliance by a person responsible for their safety.
3. Product Overview
The ANDTE 120 Pints Dehumidifier is designed for efficient moisture removal in large spaces up to 6500 sq. ft. It features smart humidity control, multiple operating modes, and convenient drainage options.
Components Included:
- ANDTE 120 Pints Dehumidifier x 1
- Removable Water Tank x 1
- Detachable & Washable Filter x 1
- 6.56 Feet Drain Hose x 1
- Power Cord x 1
- User Manual x 1
Unit Diagram:

Figure 1: Front view of the ANDTE 120 Pints Dehumidifier, showcasing its compact design and digital display.
Control Panel:
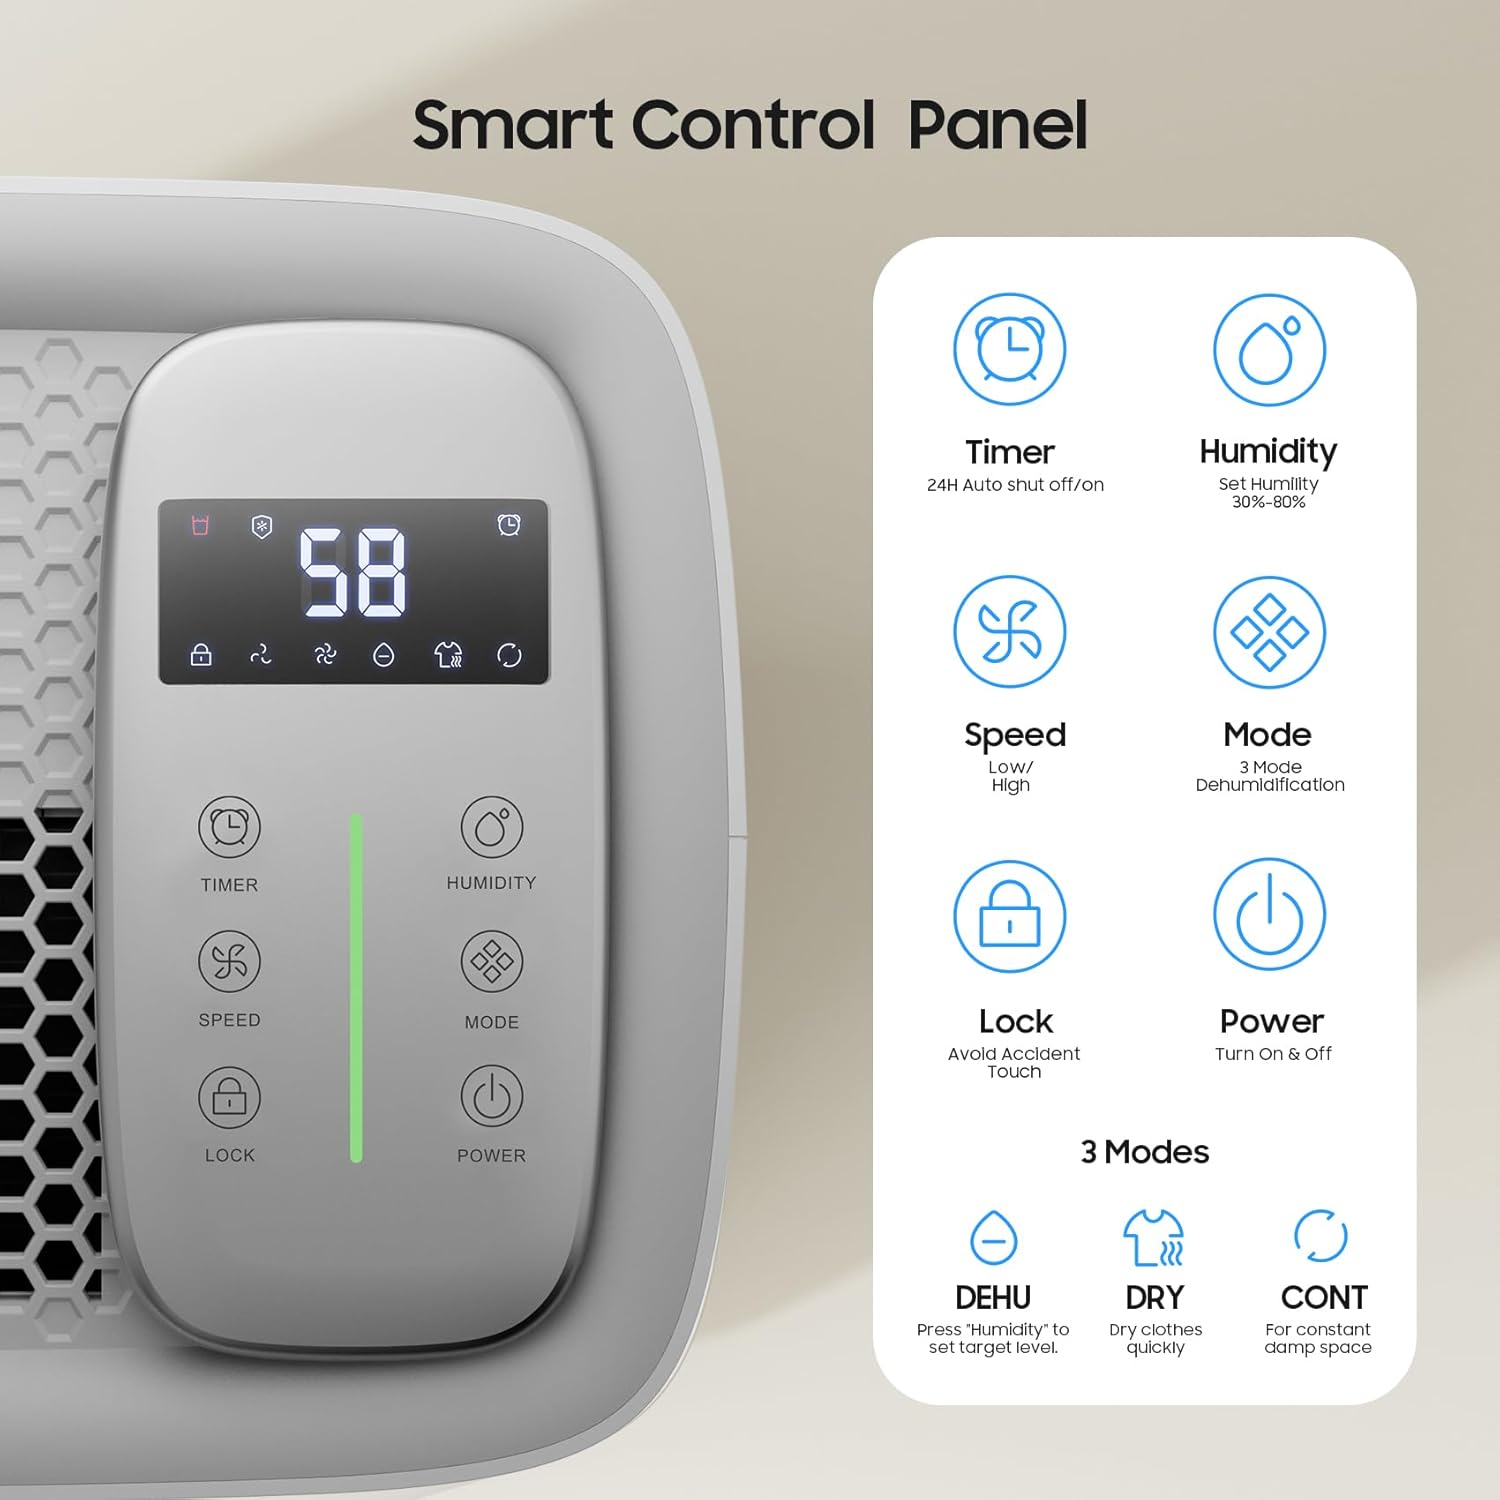
Figure 2: A detailed view of the touch control panel, showing buttons for Timer, Humidity, Speed, Mode, Lock, and Power, along with the digital display.
- Digital Display: Shows current humidity level and settings.
- Timer Button: Sets the 24-hour auto shut-off/on timer.
- Humidity Button: Adjusts the target humidity level (30%-80%).
- Speed Button: Selects fan speed (Low/High).
- Mode Button: Cycles through DEHU, DRY, and CONT modes.
- Lock Button: Activates/deactivates child lock.
- Power Button: Turns the unit On/Off.
4. Setup
Unpacking:
Carefully remove the dehumidifier and all accessories from the packaging. Inspect the unit for any shipping damage. Keep packaging materials for future storage or transport.
Placement:
For optimal performance, place the dehumidifier in a location where the humidity is highest and air circulation is good. Ensure there is at least 8 inches of space around the unit for proper airflow. The unit is equipped with wheels for easy mobility.
Power Connection:
Plug the power cord into a grounded 3-prong electrical outlet. The unit will enter standby mode.
Drainage Options:
Your dehumidifier offers two drainage methods:
- Manual Drainage (1.32 Gal / 5L Tank): The unit will automatically shut off and alert you when the water tank is full. Remove the tank, empty the collected water, and reinsert it securely.
- Continuous Drainage (Drain Hose): For uninterrupted operation, connect the included 6.56ft drain hose to the drainage port on the back of the unit. Ensure the hose is sloped downwards to allow gravity to drain water to a suitable floor drain.

Figure 3: An illustration demonstrating how to connect the continuous drain hose and how to manually empty the 1.32-gallon water tank.
5. Operating Instructions
Powering On/Off:
Press the Power button to turn the dehumidifier on or off.
Setting Humidity (DEHU Mode):
In DEHU mode, press the Humidity button to set your desired humidity level between 30% and 80% Relative Humidity (RH). The unit will operate until the set humidity is reached, then cycle on and off to maintain it.
Mode Selection:
Press the Mode button to cycle through the available operating modes:
- DEHU Mode: Precise humidity control for maintaining a comfortable environment.
- DRY Mode: Designed for fast clothes drying. Place the unit near damp clothes.
- CONT Mode: Continuous operation for highly damp spaces, such as basements or bathrooms, without a specific humidity target.

Figure 4: Visual representation of the DEHU mode for customized humidity, DRY mode for clothes drying, and CONT mode for continuous operation in damp spaces.
Fan Speed:
Press the Speed button to select between Low and High fan speeds. Low speed offers quieter operation, while High speed provides faster dehumidification.
Timer Function:
Use the Timer button to set a 24-hour timer for automatic power on or off. This feature helps conserve energy by operating only when needed.

Figure 5: The dehumidifier operating quietly in a living space, emphasizing its low noise level and 24-hour timer function for scheduled operation.
Child Lock:
Press and hold the Lock button to activate or deactivate the child lock feature, preventing accidental changes to settings.
6. Maintenance
Emptying the Water Tank:
When the water tank is full, the unit will beep and display a 'Full' alert. Carefully pull out the water tank from the front of the unit, discard the collected water, and slide the tank back into place until it clicks securely.
Continuous Drainage:
If using the continuous drainage option, regularly check the drain hose for kinks or blockages to ensure proper water flow. Ensure the hose outlet is lower than the unit's drainage port.
Filter Cleaning:
The dehumidifier is equipped with a detachable and washable filter. It is recommended to clean the filter every two weeks or more frequently depending on usage and air quality. Remove the filter, wash it with warm, soapy water, rinse thoroughly, and allow it to air dry completely before reinserting.
Auto Defrost:
The unit features an auto-defrost function that automatically melts frost buildup on the evaporator coils. This protects the internal components and prolongs the service life of the dehumidifier. During defrosting, the dehumidification function will temporarily pause, and the fan may continue to run.
7. Troubleshooting
Before contacting customer support, please refer to the following troubleshooting guide for common issues:
| Problem | Possible Cause | Solution |
|---|---|---|
| Dehumidifier does not turn on. | No power, power cord loose, tank full. | Check power connection, ensure tank is empty and correctly inserted. |
| No water collected. | Humidity too low, temperature too low, filter clogged, unit in fan-only mode. | Increase target humidity, ensure room temperature is above 41°F (5°C), clean filter, select DEHU or CONT mode. |
| Unit runs continuously. | Set to CONT mode, target humidity not reached. | Switch to DEHU mode and set desired humidity, or allow more time for dehumidification. |
| Loud noise during operation. | Unit not on a level surface, filter clogged, internal component issue. | Place on a level surface, clean filter. If noise persists, contact support. |
8. Specifications
| Feature | Detail |
|---|---|
| Brand | ANDTE |
| Model Name | Energy Star Dehumidifier |
| Item Model Number | PD120K |
| Dehumidification Capacity | 120 Pints/Day (95°F, 90% RH) |
| Coverage Area | Up to 6500 Square Feet |
| Water Tank Capacity | 1.32 Gallons / 5 Liters |
| Humidity Setting Range | 30% to 80% RH |
| Fan Speeds | 2 (Low, High) |
| Operation Modes | DEHU, DRY, CONT |
| Timer | 24 Hours |
| Special Features | Removable Tank, Digital Control Panel, Washable Filter, Continuous Drain, Auto Defrost, Child Lock |
| Product Dimensions | 9.65"D x 13.78"W x 19.8"H |
| Item Weight | 2 Pounds |
| Wattage | 720 watts |
| Energy Efficiency | Energy Star Certified |
9. Warranty and Support
Your ANDTE dehumidifier comes with a 1-year warranty from the date of purchase. Additionally, a 30-day new exchange/refund policy is provided. For any inquiries, technical assistance, or warranty claims, please contact ANDTE customer support. Please refer to the contact information provided on the product packaging or the official ANDTE website.
Related documentsPD120K


Ask a question about this manual
Ask about setup, troubleshooting, compatibility, parts, safety, or missing instructions. Manuals+ will review the question and use this page’s manual context to help answer it.