
InSinkErator 79880-ISE
InSinkErator Badger 1 Garbage Disposal User Manual
Model: 79880-ISE
Introduction
This manual provides essential information for the safe and efficient operation, installation, and maintenance of your InSinkErator Badger 1 Garbage Disposal. Please read all instructions thoroughly before installation and use. Keep this manual for future reference.
Important Safety Information
- Always disconnect power before servicing or cleaning the disposal.
- Do not put hands or foreign objects into the disposal.
- Never use caustic drain cleaners in the disposal, as they can cause serious damage and hazardous fumes.
- Ensure proper grounding to reduce the risk of electric shock.
- This appliance is designed for household use only.
Setup and Installation
The InSinkErator Badger 1 is designed for straightforward installation, often fitting existing InSinkErator hardware. For detailed plumbing and electrical connections, refer to the full installation manual provided with your product.

Figure 1: The InSinkErator Badger 1 Garbage Disposal, a compact and efficient unit designed for under-sink installation.
Pre-Installation Checklist
- Verify all components are present as listed in the "What's Included" section.
- Ensure you have the necessary tools (e.g., screwdriver, pliers, pipe wrench).
- Confirm power supply is disconnected at the circuit breaker.
Key Installation Features
The Badger 1 features Lift & Latch Technology, which simplifies the sink connection process, allowing for easier attachment with two hands. Its compact design saves valuable under-sink space.

Figure 2: Diagram illustrating the Lift and Latch Technology, which simplifies the installation of the disposal to the sink flange.
What's Included

Figure 3: The standard components included with the InSinkErator Badger 1, typically comprising the disposal unit, plastic stopper, wrench, instruction manual, and discharge tube assembly. Note that a power cord kit is sold separately.
Operating Instructions
Your InSinkErator Badger 1 is designed for continuous feed operation, efficiently grinding food waste into fine particles that can be flushed away.
Daily Use
- Turn on a medium flow of cold water.
- Turn on the disposal switch.
- Scrape food waste into the disposal opening.
- Continue running water for a few seconds after grinding stops to flush the drain line.
- Turn off the disposal.

Figure 4: A person demonstrating the proper method of scraping everyday food scraps into the sink for disposal, with cold water running.
Acceptable Food Waste
The Badger 1 is suitable for most common food scraps, including fruit and vegetable peels, small bones, and coffee grounds. It features a 1/3 HP Dura-Drive Induction Motor for reliable performance.

Figure 5: A comparison highlighting the benefits of the Dura-Drive Induction Motor used in the Badger 1, emphasizing its heavy-duty nature, fixed RPM for consistent grind performance, and suitability for heavy-duty appliances.
Items to Avoid
- Large bones, corn husks, artichokes, and other fibrous materials.
- Grease, fats, or oils (pour down the drain with hot water, not into disposal).
- Non-food items such as plastic, metal, glass, or paper.
- Harsh chemicals or drain cleaners.
Maintenance
Regular maintenance ensures the longevity and optimal performance of your garbage disposal.
Cleaning Your Disposal
- For Odors: Grind citrus peels (lemon, orange) with cold water to freshen the disposal.
- For Buildup: Grind a tray of ice cubes with cold water to help dislodge food particles and clean the grind chamber.
- Do not use abrasive cleaners or harsh chemicals.
General Tips
- Always use cold water when operating the disposal. Cold water solidifies grease, allowing it to be ground and flushed away.
- Run the disposal regularly, even if you don't have much food waste, to prevent rust and keep components moving.
Troubleshooting
If your disposal is not operating correctly, consult the following common issues and solutions before contacting service.
| Problem | Possible Cause | Solution |
|---|---|---|
| Disposal hums but does not grind. | Jam in the grind chamber. | Turn off power. Insert the hex wrench (provided) into the center hole on the bottom of the disposal and turn it back and forth until the jam is cleared. Remove the object with tongs or pliers. Press the red reset button on the bottom of the disposal. |
| Disposal does not operate at all. | No power, tripped circuit breaker, or tripped reset button. | Check your home's circuit breaker. Press the red reset button on the bottom of the disposal. Ensure the power cord is securely plugged in (if applicable). |
| Leaking from the disposal. | Loose connections, cracked housing, or worn seals. | Check all plumbing connections for tightness. If the housing is cracked or seals are worn, professional service or replacement may be required. |
Specifications
Key technical specifications for the InSinkErator Badger 1 Garbage Disposal.
- Brand: InSinkErator
- Model Number: 79880-ISE (Badger 1)
- Motor: 1/3 HP Dura-Drive Induction Motor
- Installation Type: Built-In
- Material: Stainless Steel (grind components)
- Voltage: 120 Volts
- Item Weight: Approximately 12.79 pounds
- Product Dimensions: 6.31 x 6.31 x 11.38 inches (or 6.38"D x 11.38"W x 6.32"H)
- Capacity: 2 Pounds

Figure 6: An overview of the InSinkErator Badger 1's key features, including its 1/3 HP Dura-Drive Motor, Lift & Latch Technology, 3D Grind Zone, Septic Safe compatibility, and rugged construction with galvanized steel components. It is also highlighted as invented, designed, and assembled in the USA.
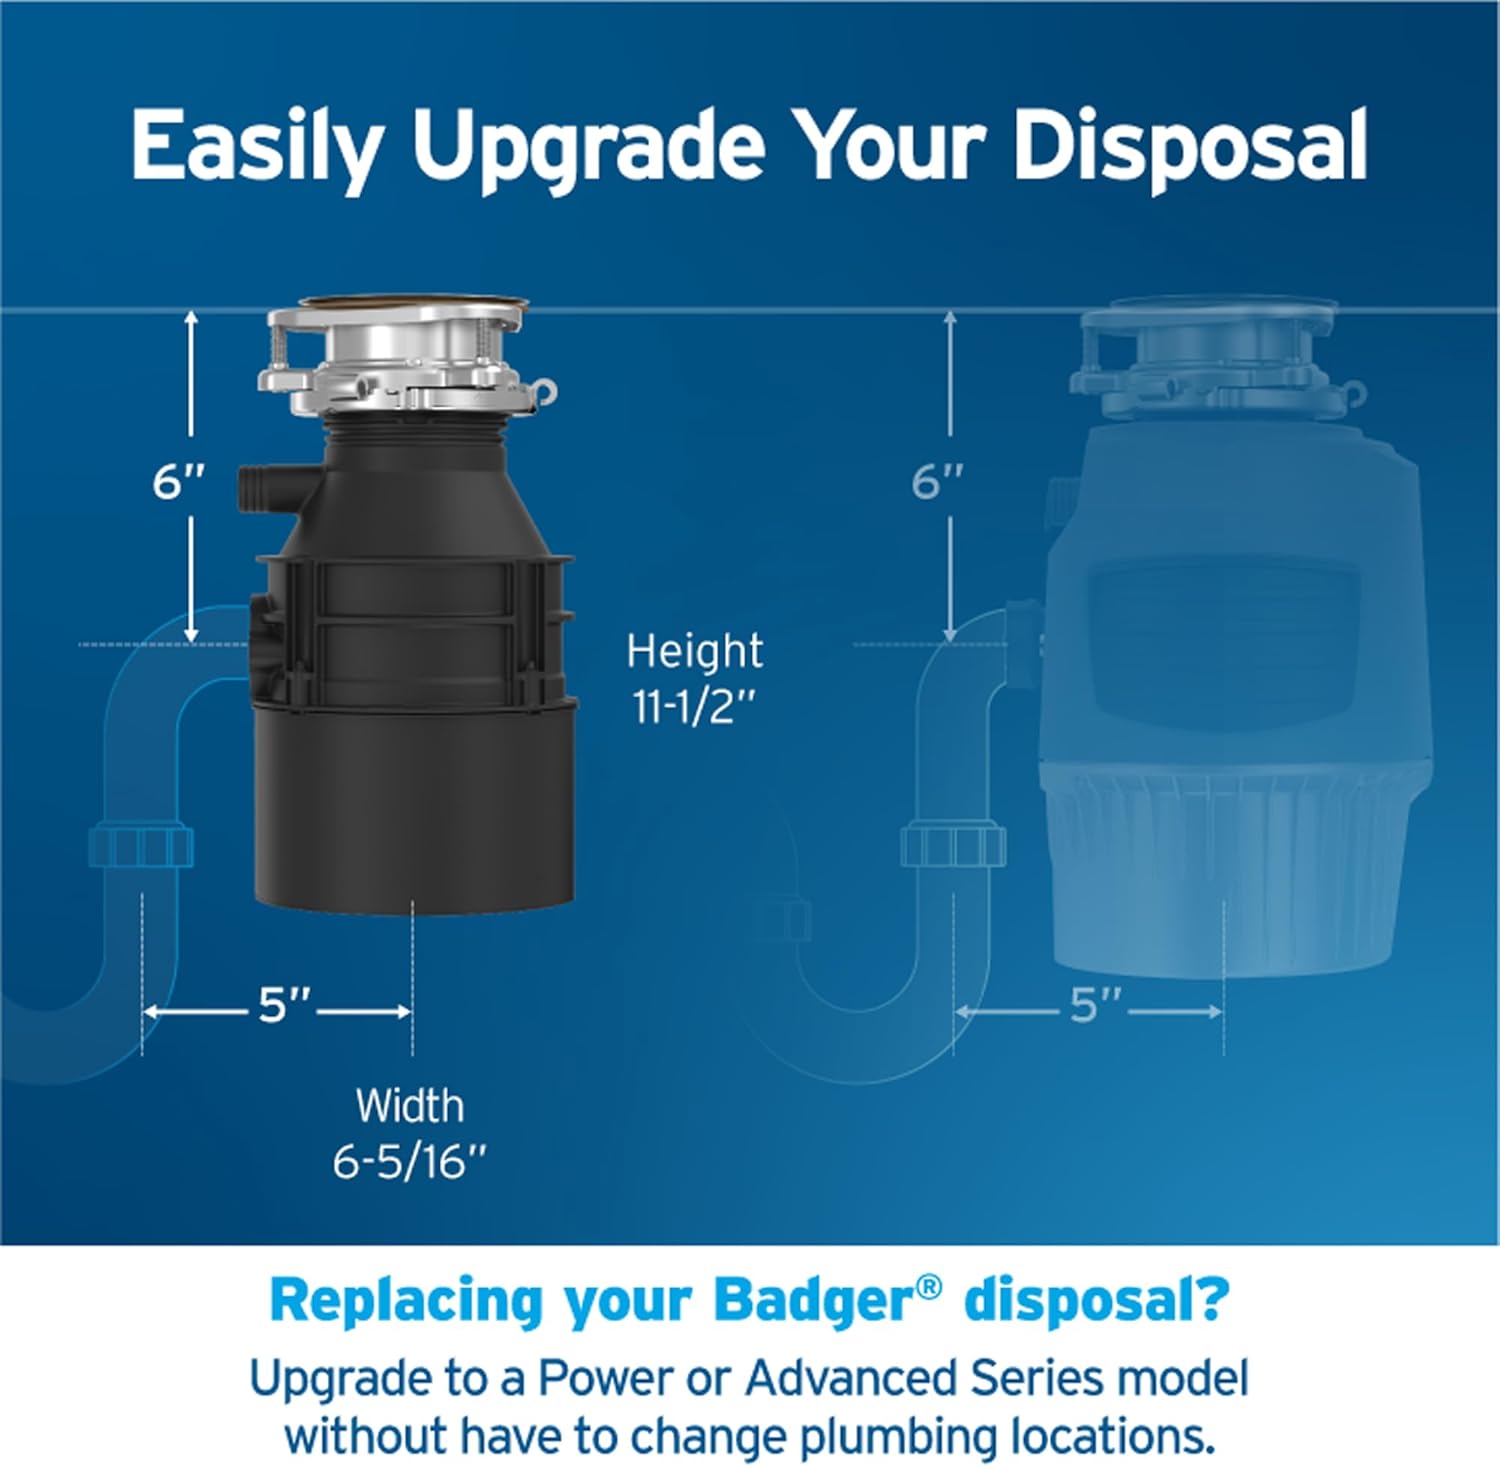
Figure 7: A diagram showing the dimensions of the InSinkErator Badger 1 (Height 11-1/2", Width 6-5/16") and indicating that upgrading to Power or Advanced Series models may not require changing plumbing locations.
Warranty and Support
InSinkErator products are built with quality and durability in mind. For specific warranty details, please refer to the documentation included with your product or visit the official InSinkErator website.
For further assistance, troubleshooting, or to access the complete installation and user manuals, please visit the InSinkErator support page or refer to the PDF documents provided:
Product Videos
No official product videos from the seller were found that meet the criteria for inclusion in this manual.
Related documents79880-ISE


Ask a question about this manual
Ask about setup, troubleshooting, compatibility, parts, safety, or missing instructions. Manuals+ will review the question and use this page’s manual context to help answer it.