
1. Introduction
This manual provides detailed instructions for the assembly, operation, maintenance, and troubleshooting of your LOEWAY Queen Size Metal Platform Bed Frame, Model LA-HDH036. Please read these instructions carefully before assembly and retain for future reference. This bed frame features a metal construction with a butterfly pattern design on the headboard and footboard, designed for use with a queen-size mattress without the need for a box spring.
2. Safety Information
Always follow the assembly instructions carefully to ensure stability and prevent collapse. Do not overload the bed frame; while it is sturdy, the exact weight capacity is not specified. Be cautious of potential pinch points and sharp edges during assembly and use.
- Ensure all bolts and screws are securely tightened before use.
- Periodically check all connections to ensure they remain tight.
- Do not allow children to play on or under the bed frame without supervision.
- Place the bed frame on a level surface to prevent instability.
3. Package Contents
Before beginning assembly, verify that all parts listed below are present and undamaged. If any parts are missing or damaged, please contact customer support.
| Part | Description | Quantity |
|---|---|---|
| Headboard | Main decorative top section | 1 |
| Footboard | Main decorative bottom section | 1 |
| Side Rails | Connects headboard and footboard | 2 |
| Center Support Beam | Runs lengthwise for central support | 1 |
| Metal Slats | Horizontal supports for mattress | 12 |
| Support Legs | Additional legs for stability | 3 (center) + 4 (corner) |
| Hardware Pack | Bolts, washers, Allen wrench | 1 set |
An illustrated installation manual is included in the package to guide you through the assembly process.
4. Assembly Instructions
Assembly of this bed frame is designed to be straightforward. It is recommended to assemble the bed frame with two people. All necessary tools are provided.
- Unpack and Identify Parts: Lay out all components on a clean, soft surface (like a carpet) to prevent scratches. Compare with the package contents list.
- Attach Side Rails: Connect the side rails to the headboard and footboard using the provided bolts and Allen wrench. Ensure connections are firm but do not fully tighten yet.
- Install Center Support Beam: Secure the center support beam to the designated points on the headboard and footboard. Attach the three center support legs to this beam.
- Place Metal Slats: Position the metal slats across the side rails. The slats are designed to fit into specific slots or attach with screws. Ensure even spacing.
- Secure T-shaped Plates: The frame utilizes T-shaped plates for enhanced stability. Ensure these are correctly fastened at connection points as per the illustrated manual.
- Final Tightening: Once all parts are in place, systematically tighten all bolts and screws. Do not overtighten.
- Attach Anti-slip Foot Pads: Ensure the anti-slip foot pads are securely attached to the bottom of all support legs to protect floors and reduce noise.

Figure 4.1: Bed frame dimensions and maximum weight capacity.
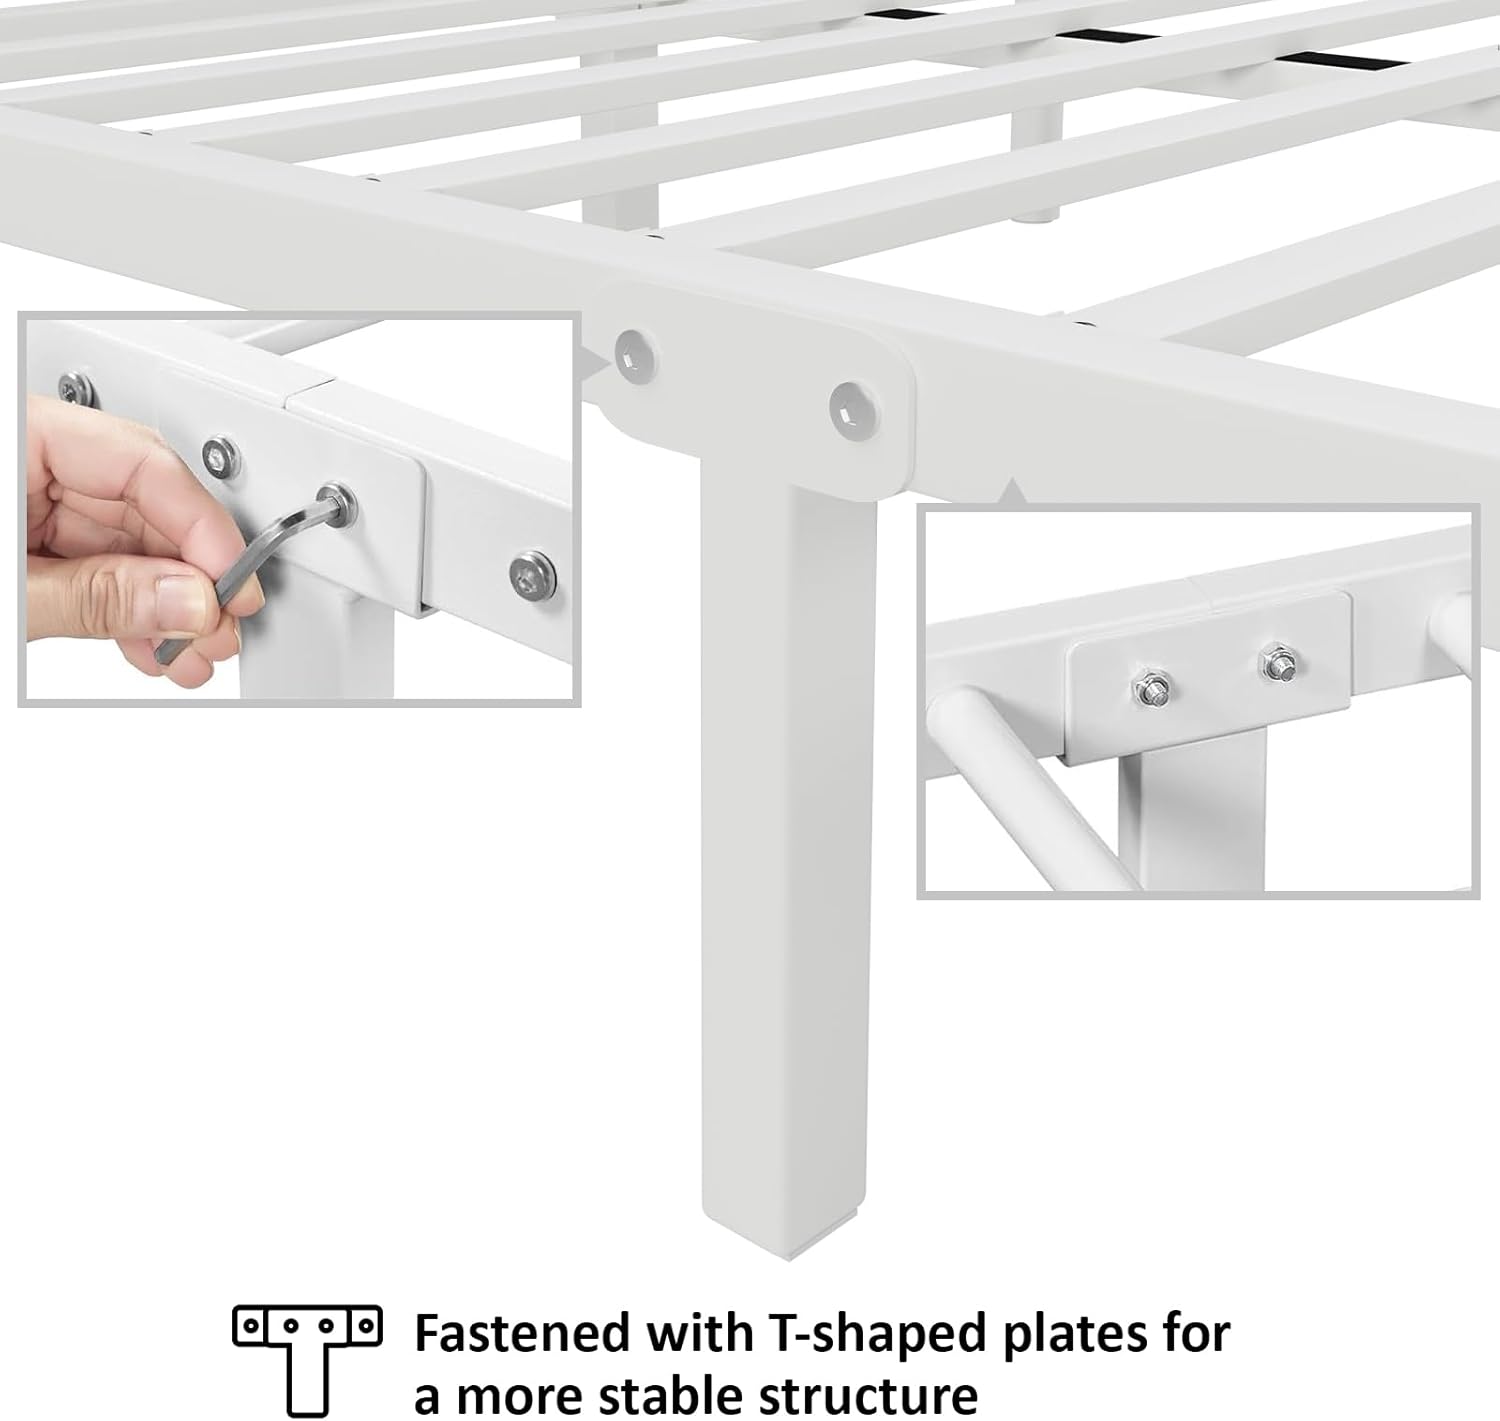
Figure 4.2: Fastening T-shaped plates for a stable structure.
5. Operating Instructions
Your LOEWAY bed frame is designed for optimal support and comfort.
- Mattress Placement: Place your queen-size mattress directly onto the metal slats. A box spring is not required.
- Weight Capacity: The bed frame is designed to support a maximum weight of 1200 lbs (including mattress and occupants). Do not exceed this limit.
- Under-Bed Storage: Utilize the 10.4 inches of clearance under the bed for storage. This space is suitable for storage boxes or baskets to keep your room organized.

Figure 5.1: Under-bed storage space.
6. Maintenance
Regular maintenance will help prolong the life and appearance of your bed frame.
- Cleaning: Wipe the metal frame with a soft, damp cloth. Avoid abrasive cleaners or harsh chemicals that could damage the powder-coated finish.
- Connection Checks: Periodically (e.g., every 3-6 months) check all bolts and screws to ensure they are tight. Re-tighten if necessary.
- Noise Reduction: The center beam includes an EVA mute foam strip to prevent squeaking. Ensure this strip remains intact.
- Floor Protection: Verify that all anti-slip foot pads are in place and undamaged to protect your flooring.

Figure 6.1: EVA Mute Foam for noise reduction.
7. Troubleshooting
If you encounter any issues with your bed frame, refer to the following common problems and solutions:
| Problem | Possible Cause | Solution |
|---|---|---|
| Squeaking noises | Loose connections; friction between metal parts or mattress | Tighten all bolts and screws. Ensure the EVA mute foam strip is correctly positioned. |
| Bed frame feels unstable/wobbly | Loose connections; uneven floor surface | Re-tighten all bolts. Ensure the bed is on a level surface. Check if all support legs are touching the floor. |
| Mattress sagging between slats | Incorrect slat placement; damaged slats | Verify all slats are correctly installed and evenly spaced. Contact support if slats are damaged. |
| Difficulty during assembly | Misaligned parts; incorrect hardware usage | Refer to the illustrated manual. Ensure parts are oriented correctly before tightening. Do not force connections. |
8. Specifications
Key specifications for the LOEWAY Queen Size Metal Platform Bed Frame (Model LA-HDH036):
- Model Number: LA-HDH036
- Size: Queen
- Color: White
- Material: Thickened Carbon Steel Pipes
- Finish Type: Powder Coated
- Compatible Mattress Size: Queen (No Box Spring Needed)
- Item Dimensions (L x W x H): 83.07 x 61.02 x 45.28 inches
- Under-Bed Clearance: 10.4 inches
- Maximum Weight Capacity: 1200 lbs
- Assembly Required: Yes (Instructions Included)
- Noise Reduction: Features EVA Mute Foam strip on center beam.
- Floor Protection: Equipped with anti-slip foot pads.

Figure 8.1: LOEWAY Queen Size Metal Platform Bed Frame.
9. Warranty and Support
For warranty information or customer support regarding your LOEWAY Queen Size Metal Platform Bed Frame, please refer to the documentation included with your purchase or contact the retailer where the product was acquired. Keep your purchase receipt as proof of purchase for any warranty claims.