
1. Introduction
The Behringer RD-78 Classic Analog Drum Machine is a versatile instrument designed for music production and live performance. It combines vintage charm with modern functionality, offering a rich palette of drum sounds and rhythmic possibilities.
Key Features:
- 15 Authentic Drum Sounds: Enjoy a variety of classic analog drum sounds, perfect for a wide range of music genres and production styles.
- 34 Rhythm Presets: Choose from 34 iconic rhythm patterns to kickstart your creative process or enhance your live performances.
- 16-Step Sequencer: Program intricate beats with ease using the intuitive 16-step sequencer for complex rhythms and creative flexibility.
- Simple and Intuitive Interface: Designed with ease of use in mind, providing both beginners and professionals a seamless experience for immediate use.
- Compact and Durable Design: Built to withstand constant use in both studio environments and live performances, offering portability and reliability.
2. Setup
2.1 Unpacking and Inspection
Carefully unpack your RD-78 unit and inspect it for any signs of damage during transit. Retain the packaging materials for future transport or storage.
2.2 Power Connection
Connect the included power adapter to the POWER DC INPUT on the rear panel of the RD-78 and then to a suitable power outlet. Ensure the power switch is in the OFF position before connecting.
2.3 Audio Connections
For stereo output, connect the OUT jacks to your mixer or audio interface. For individual drum sound outputs, use the dedicated VOICE OUT jacks for each instrument (G, TB, LC/LH.B, C/CB, M, MB, CY/HH, CP/RS, SD, BD).
Use the PHONES jack for headphone monitoring.
2.4 MIDI and USB Connections
Connect the MIDI IN and MIDI OUT/THRU ports to other MIDI devices for synchronization or control. The USB port allows for MIDI over USB connection to a computer.
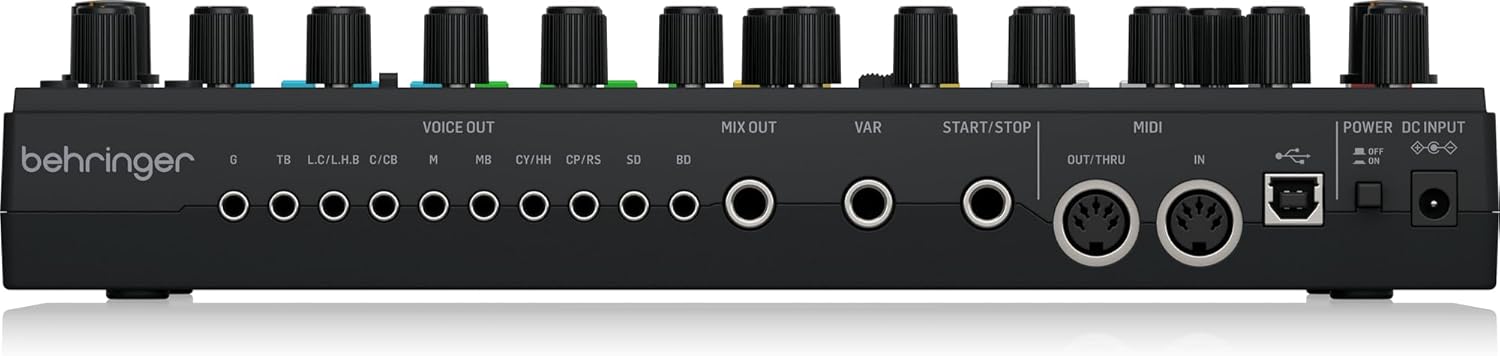
Figure 1: Rear panel connections of the Behringer RD-78. This image displays the various input and output ports including individual voice outs, mix out, MIDI in/out/thru, USB, and power input.
3. Operating Instructions
3.1 Powering On/Off
Flip the POWER switch on the rear panel to the ON position to power on the unit. To power off, flip the switch back to OFF.
3.2 Basic Rhythm Playback
To start a rhythm, press the START/STOP button. To stop, press it again. Adjust the overall tempo using the TEMPO knob.
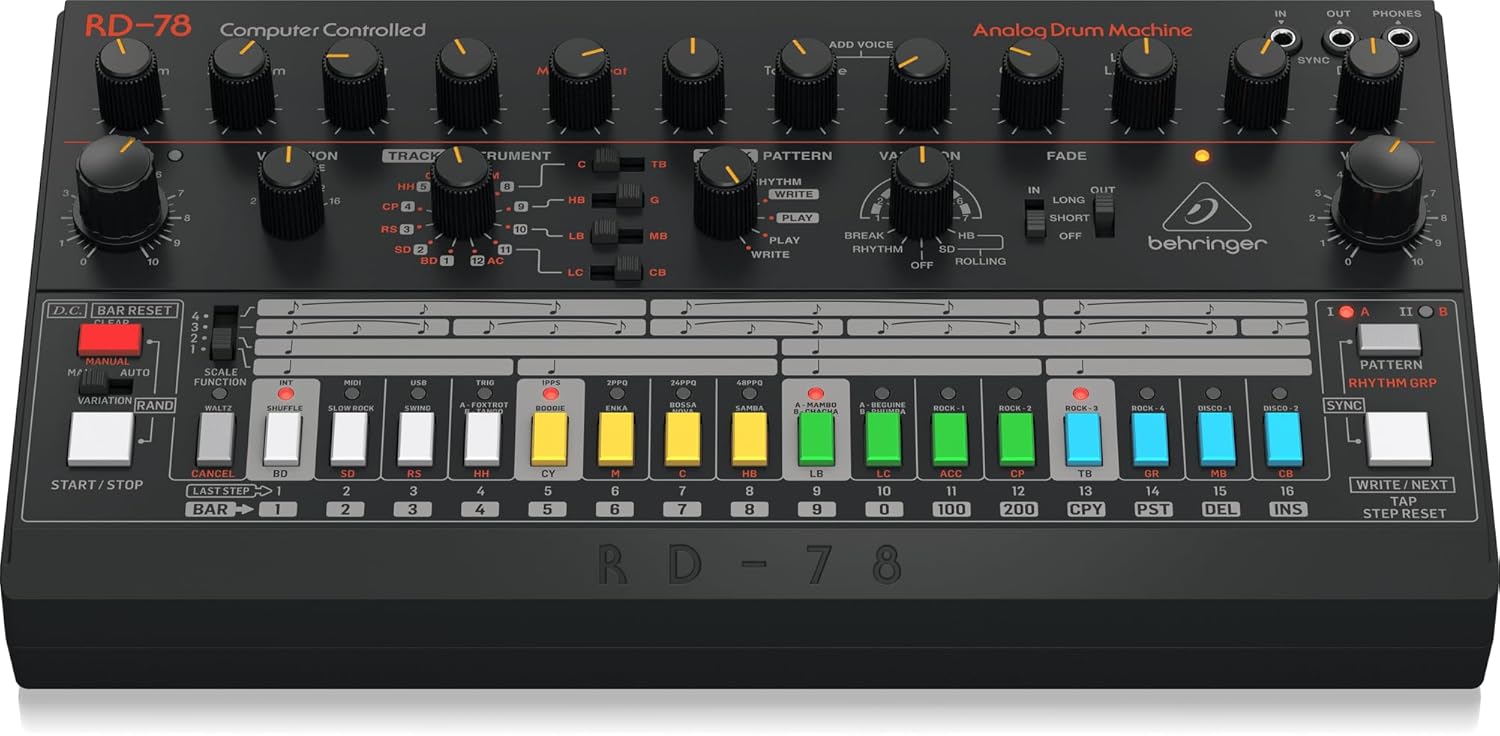
Figure 2: Top-down view of the RD-78. This image highlights the main control panel, including the tempo knob, instrument selection, pattern controls, and the 16-step sequencer buttons.
3.3 Selecting Instruments and Patterns
Use the TRACK INSTRUMENT section to select individual drum sounds. The TRACK PATTERN section allows you to select and switch between the 34 built-in rhythm presets.
3.4 Programming a 16-Step Sequence
- Press the WRITE button in the TRACK PATTERN section.
- Select an instrument using the INSTRUMENT buttons.
- Use the 16 step buttons (1-16) to add or remove steps for the selected instrument.
- Repeat for other instruments to build your desired pattern.
- Press WRITE again to exit pattern write mode and save your changes.

Figure 3: Angled view of the RD-78. This image provides a clearer perspective of the knobs and buttons for instrument selection and pattern programming.
3.5 Adjusting Sound Parameters
Each drum sound has dedicated knobs for adjusting parameters like LEVEL, DECAY, and TONE. Experiment with these controls to shape your sounds.
3.6 Variation and Fade Controls
The VARIATION section allows for adding fills and breaks to your patterns. The FADE section controls the fade-in/out duration of the rhythm.

Figure 4: Close-up angled view of the RD-78. This image focuses on the variation, fade, and volume controls, essential for dynamic performance.
4. Maintenance
To ensure the longevity and optimal performance of your Behringer RD-78, follow these maintenance guidelines:
- Cleaning: Use a soft, dry cloth to clean the exterior of the unit. Avoid abrasive cleaners or solvents.
- Storage: When not in use, store the unit in a cool, dry place away from direct sunlight and extreme temperatures.
- Handling: Handle the unit with care to prevent physical damage to knobs, buttons, and connectors.
- Ventilation: Ensure proper ventilation around the unit to prevent overheating.
5. Troubleshooting
| Problem | Possible Cause | Solution |
|---|---|---|
| No power | Power adapter not connected or faulty. | Check power adapter connection and power outlet. Try a different outlet. |
| No sound output | Audio cables not connected correctly or volume too low. | Verify audio cable connections to mixer/interface. Increase RD-78 volume and mixer channel volume. |
| MIDI not working | Incorrect MIDI settings or cable connection. | Check MIDI cable connections. Ensure correct MIDI channel settings on both RD-78 and external device. |
| Sequencer not playing | START/STOP button not pressed or tempo set to zero. | Press START/STOP. Adjust TEMPO knob to a suitable speed. |
6. Specifications
| Feature | Detail |
|---|---|
| Brand | Behringer |
| Model Name | RD-78 |
| Model Number | 0704-AAR |
| Material | Alloy Steel |
| Item Dimensions (L x W x H) | 15.5 x 7.75 x 3.62 inches |
| Item Weight | 2.02 Pounds |
| UPC | 787790569558 |
| Manufacturer | Music Tribe |
| Connector Type | USB |
7. Warranty and Support
For warranty information and product support, please visit the official Music Tribe community and support pages:
- Support: Community.Musictribe.Com/Support


