
Introduction
Thank you for choosing the Tedeligo 433MHz Wireless Remote Control DC 12V 1-Channel Relay Receiver Module. This device is designed to provide convenient wireless control for various DC 12V applications, including lighting, garage door systems, access control, and more. This manual will guide you through the installation, setup, and operation of your new device.

Figure 1: Tedeligo Wireless Remote Control Receiver and Transmitter
Package Contents
- 1 x Wireless Remote Control Transmitter (4-button)
- 1 x Wireless Relay Receiver Module
- 1 x User Manual
Specifications
| Feature | Specification |
|---|---|
| Operating Mode | ON-OFF |
| Operating Voltage | DC 12V |
| Contact Type | Normally Open |
| Connector Type | Crimping |
| Switch Type | Push Button |
| Terminal | Through Hole |
| Material | Plastic |
| Item Dimensions (L x W x H) | 28 x 47 x 22 mm |
| Circuit Type | 1 Way |
| Mounting Type | Wall Mount |
| Number of Positions | 1 |
| Upper Rated Temperature | 70 Degrees Celsius |
| Control Method | Remote Control |
| Connectivity Protocol | 433 MHz RF |
| Power | 120 Watts |
| International Protection Rating | IP00 |
| Compliant Specification | CE |

Figure 2: Receiver and Remote Control Dimensions
Safety Information
- Ensure the power supply is disconnected before any wiring or installation to prevent electric shock.
- Verify that the operating voltage of your device matches the receiver's DC 12V requirement.
- Do not expose the receiver or transmitter to extreme temperatures, humidity, or corrosive environments.
- Keep the device out of reach of children.
- If you are unsure about any wiring steps, consult a qualified electrician.
Product Overview
The Tedeligo wireless remote control system consists of a compact receiver module and a handheld transmitter. The receiver features a learning button and indicator light for mode configuration and status feedback. The transmitter has 'ON' and 'OFF' buttons for control.
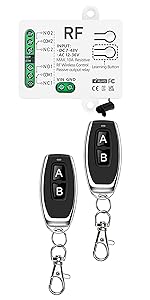
Figure 3: Receiver Module and Remote Controls
Installation and Wiring
The receiver module is designed for easy integration into existing DC 12V circuits. Always ensure power is disconnected before wiring.
General Wiring Principles
The receiver has terminals for power input (V+, V-) and output (NO, COM). Connect your DC 12V power supply to V+ and V-. The device to be controlled should be connected between NO (Normally Open) and COM (Common) terminals. When the relay is activated, it closes the circuit between NO and COM.

Figure 4: Wiring for a DC Light (50M Control Range)
Example: Garage Door System Wiring
For garage door systems, the receiver acts as a dry contact switch, mimicking a wall button. Connect the NO and COM terminals of the receiver to the corresponding input terminals on your garage door opener's control board, where the wall button would normally connect.

Figure 5: Garage Door System Wiring
Example: Electromagnetic Lock Wiring
To control an electromagnetic lock, connect the lock's power input to the NO and COM terminals of the receiver. Ensure the lock's power requirements are compatible with the receiver's 12V DC output and 10A maximum current.

Figure 6: Electromagnetic Lock Wiring
Operating Modes and Pairing
The receiver supports four operating modes: Momentary, Toggle, Latched, and Delay. Each mode offers different control behaviors. The device is pre-configured in Latched mode. To change the mode or pair additional transmitters, follow the instructions below. The 'Learning Button' is located on the receiver module.

Figure 7: Overview of Control Modes
1. Momentary (Monostable) Mode
In Momentary mode, the relay activates only while the remote button is pressed and held. It deactivates upon release.
- Pairing: Press the receiver's Learning Button 1 time. The indicator light will turn on. Then, press the 'ON' button on the remote control 1 time. The indicator light will flash and turn off, indicating successful pairing.

Figure 8: Momentary Mode Pairing
2. Toggle (Bistable) Mode
In Toggle mode, one press of the remote button activates the relay, and another press deactivates it.
- Pairing: Press the receiver's Learning Button 2 times. The indicator light will turn on. Then, press the 'ON' button on the remote control 1 time. The indicator light will flash and turn off, indicating successful pairing.

Figure 9: Toggle Mode Pairing
3. Latched Mode
In Latched mode, pressing the 'ON' button activates the relay, and it remains active until the 'OFF' button is pressed to deactivate it. This is the default mode.
- Pairing: Press the receiver's Learning Button 3 times. The indicator light will turn on. Then, press the 'ON' button on the remote control 1 time, followed by pressing the 'OFF' button 1 time. The indicator light will flash and turn off, indicating successful pairing.

Figure 10: Latched Mode Pairing
4. Delay Mode
In Delay mode, pressing the 'ON' button activates the relay for a set duration (5, 10, 15, or 20 seconds) before automatically deactivating.
- Pairing: Press the receiver's Learning Button 4, 5, 6, or 7 times to set the delay to 5, 10, 15, or 20 seconds respectively. The indicator light will turn on. Then, press the 'ON' button on the remote control 1 time. The indicator light will flash and turn off, indicating successful pairing.

Figure 11: Delay Mode Pairing
Clearing Paired Transmitters
To clear all paired transmitters from the receiver's memory, press and hold the Learning Button on the receiver for approximately 8 seconds until the indicator light flashes rapidly and then turns off. All previously paired transmitters will be removed.
Applications
This versatile wireless remote control system can be used in a wide range of DIY applications:

Figure 12: Diverse Application Scenarios
- Lighting Control: Turn on/off lamps, LED strips, and other DC 12V lighting fixtures.
- Garage Door/Gate Openers: Integrate with existing garage door or gate systems for remote access.
- Access Control: Control electromagnetic locks for doors or gates.
- Motor Control: Operate small DC 12V motors, such as those in electric fans or automated systems.
- Water Pumps: Control garden irrigation pumps or fish pond aerators.
- Security Alarms: Use as part of a wireless security alarm system.
Troubleshooting
- Device not responding:
- Check if the receiver is properly powered (DC 12V).
- Ensure the remote control battery is not depleted.
- Verify that the remote control is paired correctly to the receiver in the desired operating mode. Try re-pairing.
- Check wiring connections for looseness or incorrect polarity.
- Short control range:
- Ensure there are no significant obstructions (thick walls, metal structures) between the remote and the receiver.
- Avoid strong electromagnetic interference sources.
- Check the receiver's antenna for proper positioning.
- Incorrect mode behavior:
- Re-pair the remote control to the receiver, ensuring you follow the correct steps for the desired operating mode.
Maintenance
To ensure the longevity and optimal performance of your device:
- Keep the receiver and transmitter clean and dry. Wipe with a soft, dry cloth.
- Avoid dropping or subjecting the devices to strong impacts.
- Replace the remote control battery when its performance degrades.
Warranty and Support
Tedeligo products are manufactured to high-quality standards. If you encounter any issues or have questions regarding your product, please refer to the retailer's return policy or contact Tedeligo customer support for assistance. Please retain your proof of purchase for warranty claims.


