
1. Introduction
This manual provides detailed instructions for the safe and effective operation of your AKEYDIY 5 in 1 Heat Press Machine. Please read this manual thoroughly before using the machine to ensure proper function and to prevent injury or damage.

Image 1: AKEYDIY 5 in 1 Heat Press Machine.
2. Important Safety Instructions
WARNING: To reduce the risk of fire, electric shock, or injury, read and understand all instructions before use.
- Always operate the machine on a stable, heat-resistant surface.
- Keep hands and body clear of the heating platen during operation to avoid burns. The surface temperature can reach 450°F (232°C).
- Ensure the machine is properly grounded.
- Do not use the machine in wet or damp conditions.
- Unplug the machine from the power outlet when not in use or before cleaning.
- Do not attempt to modify or repair the machine yourself. Contact qualified service personnel.
- Keep children and pets away from the machine during operation.
3. Package Contents
Verify that all components are included in your package:

Image 2: Included components of the 5-in-1 heat press machine.
- 1x Main Heat Press Machine (12" x 15" platen)
- 1x Hat Press Attachment (5.5" x 3" curved platen)
- 1x Mini Mug Press Attachment (3"-3.5" diameter, 11oz)
- 1x Plate Press Attachment (6"/8" diameter)
- 1x Power Cable
- 1x User Manual (this document)
4. Product Features
The AKEYDIY 5 in 1 Heat Press Machine is designed for versatile heat transfer applications, offering several key features:
- 5-in-1 Versatility: Includes attachments for T-shirts, mugs, hats, and plates, allowing for a wide range of customization projects.
- 12" x 15" Heat Platen: Provides ample surface area for various garment sizes.
- 360-Degree Swing-Away Design: Allows the heating element to be safely moved aside, reducing the risk of accidental contact and providing a clear workspace.
- Digital Temperature and Time Control: Features an LCD display for precise setting and monitoring of temperature (up to 450°F / 232°C) and time.
- Upgraded Double Heat Tube: Ensures more even heating across the platen, minimizing temperature differences and improving transfer quality.
- Teflon-Coated Platen: Prevents scorching of transfers and simplifies cleaning.
- Adjustable Pressure Knob: Allows for precise pressure adjustment based on the thickness of the material being pressed.
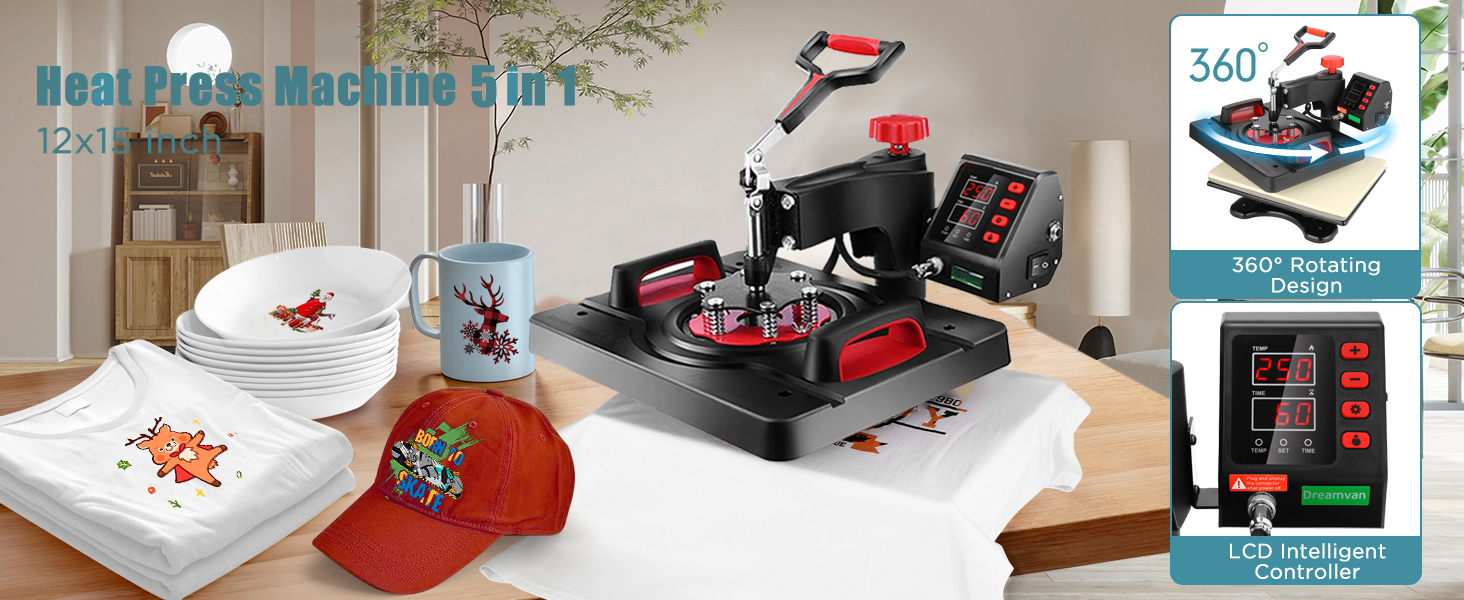
Image 3: Multiple functions of the heat press machine.

Image 4: The 360-degree swing-away function for safe operation.

Image 5: Digital controller and key components.
5. Setup and Assembly
Follow these steps to set up your heat press machine:
- Unpack: Carefully remove all components from the packaging.
- Placement: Place the main heat press unit on a sturdy, level, and heat-resistant surface. Ensure there is adequate space around the machine for safe operation and heat dissipation.
- Identify Parts: Familiarize yourself with the main components as shown in Image 6.
- Attach Accessories: To use specific functions (hat, mug, or plate press), attach the corresponding accessory to the main unit. Refer to the specific operating instructions for each attachment.
- Power Connection: Ensure the machine's power switch is in the OFF position. Connect the power cable to the machine and then to a grounded 110V AC power outlet.

Image 6: Labeled components of the heat press machine.
6. Operating Instructions
This section outlines the general operation and specific instructions for different attachments.
6.1 General Operation
- Power On: Flip the ON/OFF switch to the 'ON' position. The digital controller will light up.
- Set Temperature: Press the 'SET' button. Use the '+' and '-' buttons to adjust the desired temperature. Press 'SET' again to confirm.
- Set Time: Press the 'MODE' button to switch to time setting. Use the '+' and '-' buttons to adjust the desired time in seconds. Press 'MODE' again to confirm.
- Preheat: Allow the machine to preheat until it reaches the set temperature. The 'TEMP' indicator will show the current temperature.
- Prepare Item: Place your item (e.g., T-shirt, mug) on the appropriate platen. Position your transfer design.
- Apply Pressure: Swing the heating platen over the item. Lower the handle to apply pressure. Adjust the pressure knob if needed.
- Start Transfer: The timer will automatically start counting down once the platen is closed and pressure is applied.
- Finish: Once the timer reaches zero, lift the handle and swing the heating platen away. Carefully remove your item.
6.2 Specific Applications
The machine is versatile for various items. Typical settings are provided as a guide; always test with scrap materials first.

Image 7: Main steps for printing with the heat press.
6.2.1 T-Shirt Press
- Attach the flat platen.
- Place the T-shirt on the platen, ensuring it is flat and wrinkle-free.
- Position your transfer material.
- Typical Settings: Temperature 200°C (392°F), Time 60 seconds.
6.2.2 Hat Press
- Attach the hat press attachment.
- Place the hat onto the curved platen.
- Position your transfer material.
- Typical Settings: Temperature 200°C (392°F), Time 40 seconds.
6.2.3 Plate Press
- Attach the plate press attachment.
- Place the plate onto the attachment.
- Position your transfer material.
- Typical Settings: Temperature 200°C (392°F), Time 420 seconds.
6.2.4 Mug Press
- Attach the mug press attachment.
- Place the mug into the attachment.
- Position your transfer material.
- Typical Settings: Temperature 180°C (356°F), Time 180 seconds.
6.3 Instructional Video
Watch this video for a visual guide on operating the AKEYDIY 5 in 1 Heat Press Machine and its various attachments.
Video 1: Digital 5 in 1 Heat Press Machine operation by AkeydiyDirect.
7. Maintenance
Proper maintenance ensures the longevity and optimal performance of your heat press machine.
- Cleaning the Platen: After each use, especially if any transfer material residue is present, allow the platen to cool down. Wipe the Teflon-coated platen with a soft, damp cloth. Do not use abrasive cleaners or sharp objects that could damage the coating.
- General Cleaning: Wipe down the exterior of the machine with a dry or slightly damp cloth.
- Storage: Store the machine in a dry, dust-free environment when not in use.
- Inspection: Periodically check the power cord for any signs of damage. Ensure all attachments are securely fastened.
8. Troubleshooting
Refer to this section for common issues and their solutions.
| Problem | Possible Cause | Solution |
|---|---|---|
| Machine does not power on | Power cord not connected; Power switch off; Outlet malfunction | Check power cord connection; Ensure switch is ON; Test outlet with another device |
| Uneven heat transfer | Uneven pressure; Damaged heating element; Incorrect temperature setting | Adjust pressure knob; Contact support if heating element is faulty; Verify temperature settings |
| Transfer not adhering | Insufficient temperature; Insufficient time; Incorrect pressure; Wrong transfer material | Increase temperature/time; Adjust pressure; Ensure correct transfer material for fabric type |
| Burning smell or smoke | Overheating; Residue on platen; Incorrect material | Immediately power off and unplug. Allow to cool. Clean platen. Ensure correct material and settings. If problem persists, contact support. |
9. Specifications
| Feature | Specification |
|---|---|
| Brand | AKEYDIY |
| Model | B0DVQ49FZC |
| Main Platen Size | 12" x 15" |
| Material | Alloy Steel |
| Color | Red & Black |
| Product Dimensions (L x W x H) | 15.8" x 15.5" x 14" |
| Item Weight | 21 Kilograms |
| Upper Temperature Rating | 450 Degrees Fahrenheit (232°C) |
| Voltage | 110 Volts |
| Wattage | 800 Watts |
| Certifications | UL, FCC |
10. Warranty and Support
Your AKEYDIY 5 in 1 Heat Press Machine comes with a manufacturer warranty for 365 days from the date of purchase. This warranty covers defects in materials and workmanship under normal use.
For warranty claims, technical support, or any questions regarding your product, please contact AKEYDIY customer service. Please have your model number (B0DVQ49FZC) and proof of purchase ready when contacting support.
Manufacturer: YIWU SUNMETA TECHNOLOGY CO.,LTD.
