
Important Safety Information
Always read and understand the entire instruction manual before operating the snow blower. Failure to follow all instructions may result in electric shock, fire, and/or serious injury. Keep hands, feet, and clothing away from moving parts. Ensure the work area is clear of debris and other individuals. Wear appropriate personal protective equipment, including eye protection and sturdy footwear.
Product Overview
The SENIX 60V 21" Cordless Snow Blower is designed for efficient and convenient snow removal. It features a powerful brushless motor, a durable steel auger, and a range of user-friendly features to tackle winter conditions.
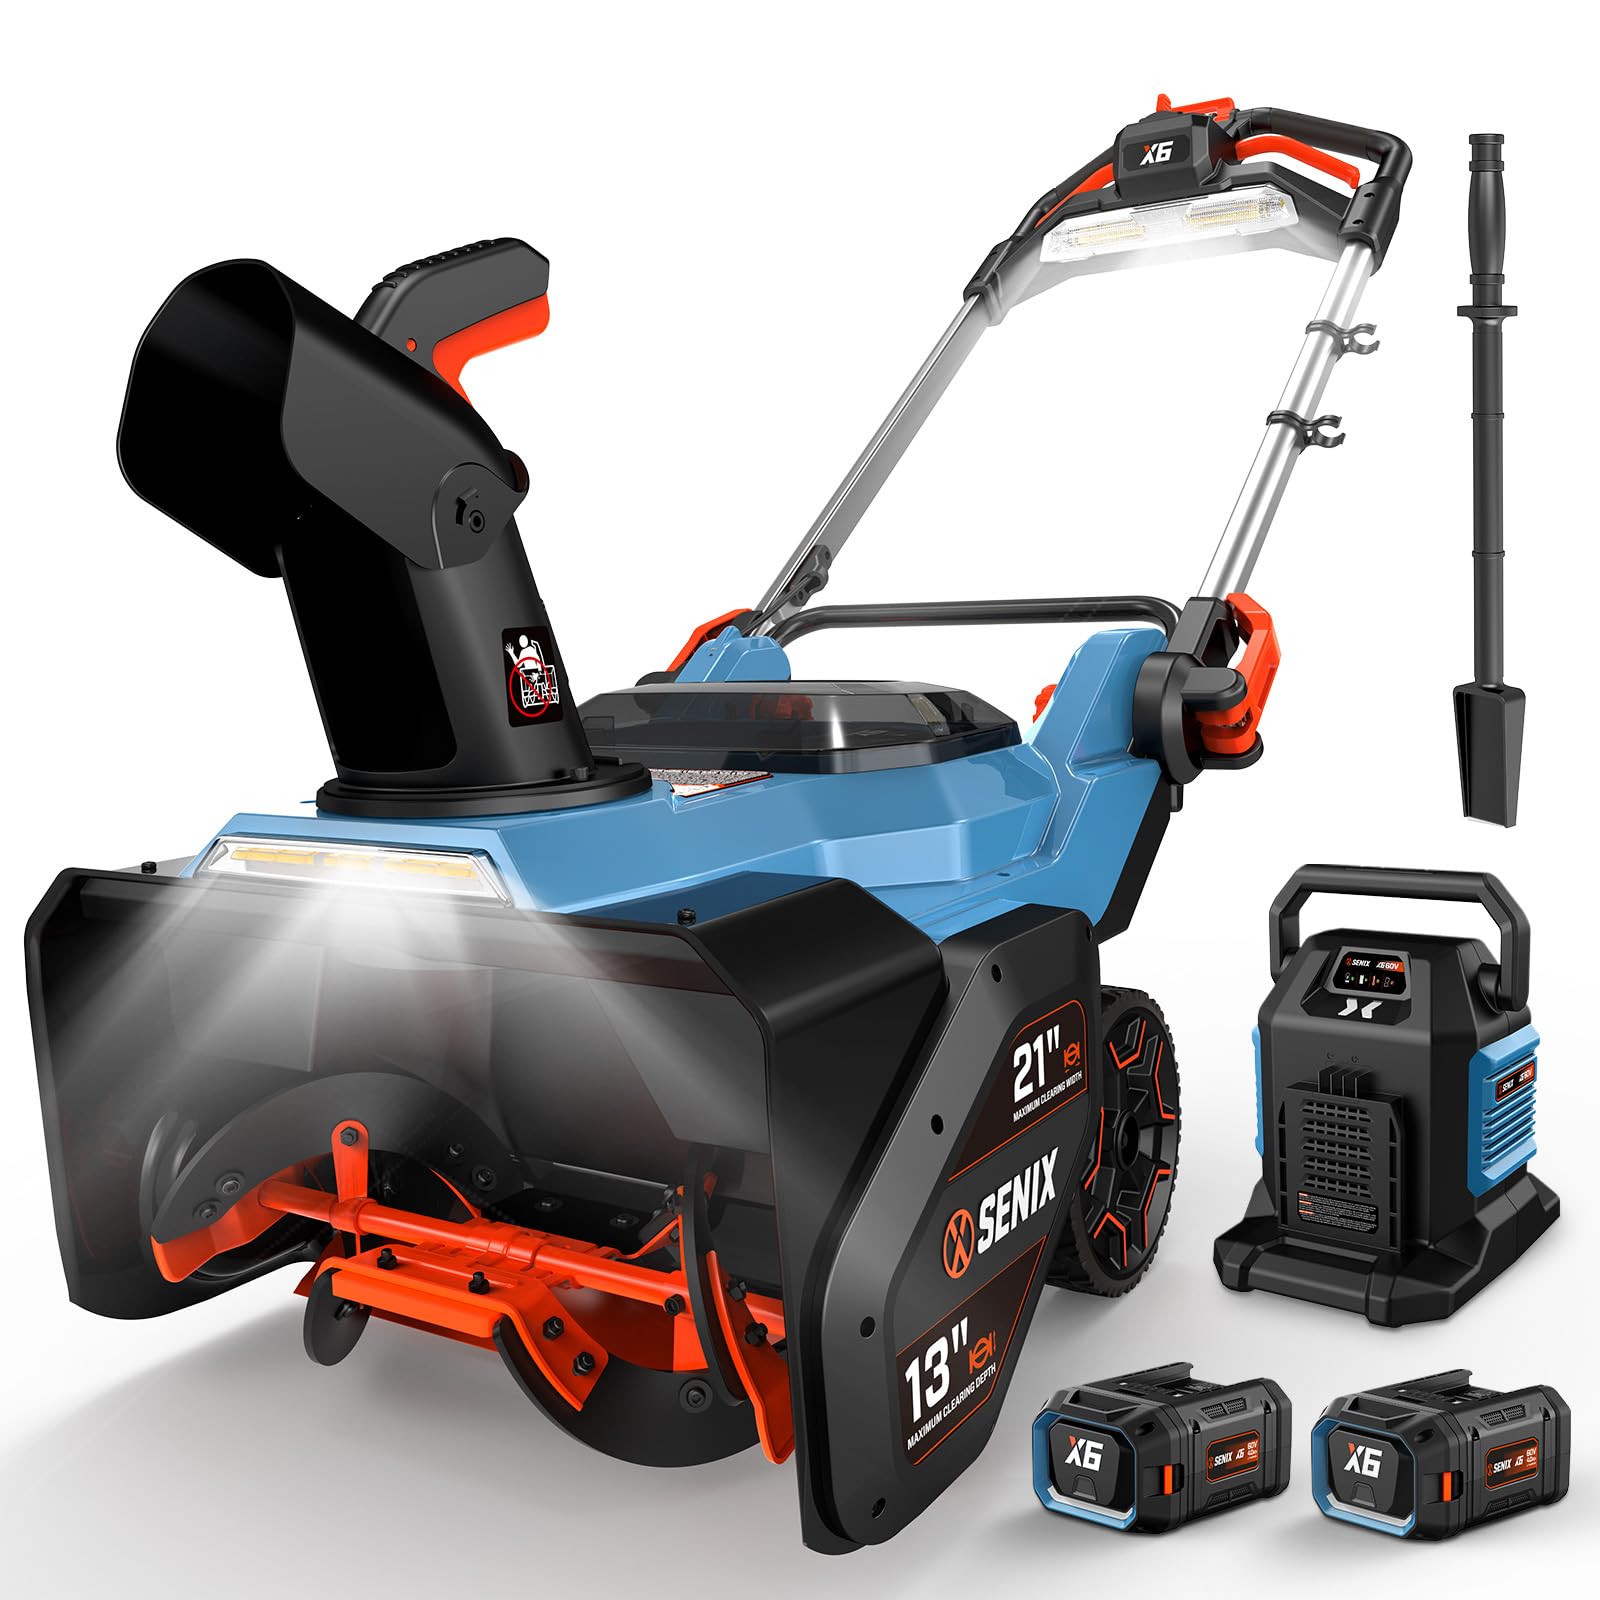
Figure 1: SENIX 60V 21" Cordless Snow Blower. This image shows the overall design of the snow blower, highlighting its compact and robust structure.
1. Setup and Assembly
1.1 Unboxing and Initial Inspection
Carefully remove all components from the packaging. Inspect for any damage that may have occurred during shipping. Ensure all parts listed in the packing list are present.
Video 1.1: Unboxing and initial component overview. This segment demonstrates the careful unpacking process and identification of main parts.
1.2 Handle Assembly
Attach the lower handle section to the main unit using the provided hand-tighten screws. Ensure the cables are routed correctly and secured with the retainer clips. Then, attach the upper handle section, aligning the holes and securing it with the remaining hand-tighten screws.
Video 1.2: Step-by-step guide for assembling the handle sections and securing cables. This video shows how to correctly attach the handle components.
1.3 Chute Assembly
Align the discharge chute with the opening on the snow blower. Insert the chute into the opening, ensuring the tabs engage correctly. Rotate the chute until it is securely in place and the bolt hole aligns. Insert the plastic bolt to secure the chute.
Video 1.3: Instructions for attaching the snow discharge chute. This video demonstrates the proper alignment and securing of the chute.
1.4 Battery Charging and Installation
The snow blower comes with two 16000mAh (2x8000mAh) lithium-ion batteries and a dual-port charger. Fully charge both batteries before first use. Insert the batteries into the dual-port charger. The indicator lights will show charging status (red for charging, green for fully charged). Once charged, open the battery compartment on the snow blower and slide both batteries into their respective slots until they click into place. Close the battery compartment cover.

Figure 1.4: The dual-port charger with two 16000mAh batteries. The image shows the batteries inserted into the charger, ready for charging.
Video 1.5: Demonstrates charging the batteries and checking their charge level. This video shows how to place batteries in the charger and interpret indicator lights.
Video 1.6: Shows how to install the charged batteries into the snow blower's battery compartment. This video illustrates the correct insertion of batteries.
2. Operating Instructions
2.1 Starting the Snow Blower
To start the snow blower, first press and hold the safety lock-off button, then squeeze the switch lever on the handle. The auger will begin to rotate. Release the safety lock-off button once the auger is engaged.

Figure 2.1: Illustration of the dual safety switch mechanism for starting the snow blower. This image highlights the two-step process for safe operation.
Video 2.2: Demonstration of starting the snow blower using the safety button and switch lever. This video shows the correct sequence to power on the unit.
2.2 Adjusting Chute Direction and Height
The snow blower features an electronic adjustable chute that can rotate up to 200 degrees for precise snow placement. Use the chute adjustment knob on the control panel to change the direction. The chute height can also be adjusted manually to control the throw distance.

Figure 2.3: Visual representation of the 220-degree rotating chute and 190-degree height adjustment. This image illustrates the flexibility of the snow chute.
Video 2.4: Shows how to electronically adjust the chute direction using the controls on the handle. This video demonstrates the ease of changing snow throw direction.
2.3 Using LED Lights and Heated Handle
The snow blower is equipped with upper and lower LED headlights for improved visibility in low-light conditions. Activate them using the dedicated button on the control panel. The heated grips provide comfort during cold weather operation. Activate the heated grips using the button on the control panel.

Figure 2.5: Close-up of the heated grips feature, indicating maximum temperature. This image highlights the comfort feature for cold weather.
Video 2.6: Shows how to turn the LED lights on and off. This video demonstrates the light activation for improved visibility.
2.4 Snow Clearing Operation
Push the snow blower forward at a steady pace. The 3500W brushless motor powers the dual blade steel auger through snow, clearing a 21-inch width and up to 13-inch depth. The rubber auger minimizes damage to surfaces. Choose from two selectable auger speeds to maximize either power or runtime, depending on your needs.

Figure 2.7: Illustrates the 21-inch clearing width and 13-inch snow depth capacity of the snow blower. This image visually represents the snow clearing capabilities.
Video 2.8: Snow blower in action, clearing snow from a driveway. This video demonstrates the snow blower's performance in real-world conditions.

Figure 2.9: Shows the snow blower being used in various settings like decks, patios, driveways, and sidewalks. This image highlights the versatility of the product.
3. Maintenance
3.1 Battery Care
Always store batteries in a cool, dry place. For optimal performance, bring batteries indoors and allow them to warm up before use in cold temperatures. Fully charge batteries after each use and before long-term storage.
3.2 Auger Inspection
Regularly inspect the steel auger for any signs of wear or damage. The rubber auger is designed to minimize surface damage but should also be checked periodically. Replace worn parts as necessary to maintain optimal performance.
Video 3.1: Close-up view of the auger mechanism. This video provides a detailed look at the auger for inspection purposes.
3.3 Storage
The snow blower's handle can be folded down for compact storage. Loosen the hand-tighten screws on the handle sections to fold them. Store the unit in a dry, protected area when not in use.
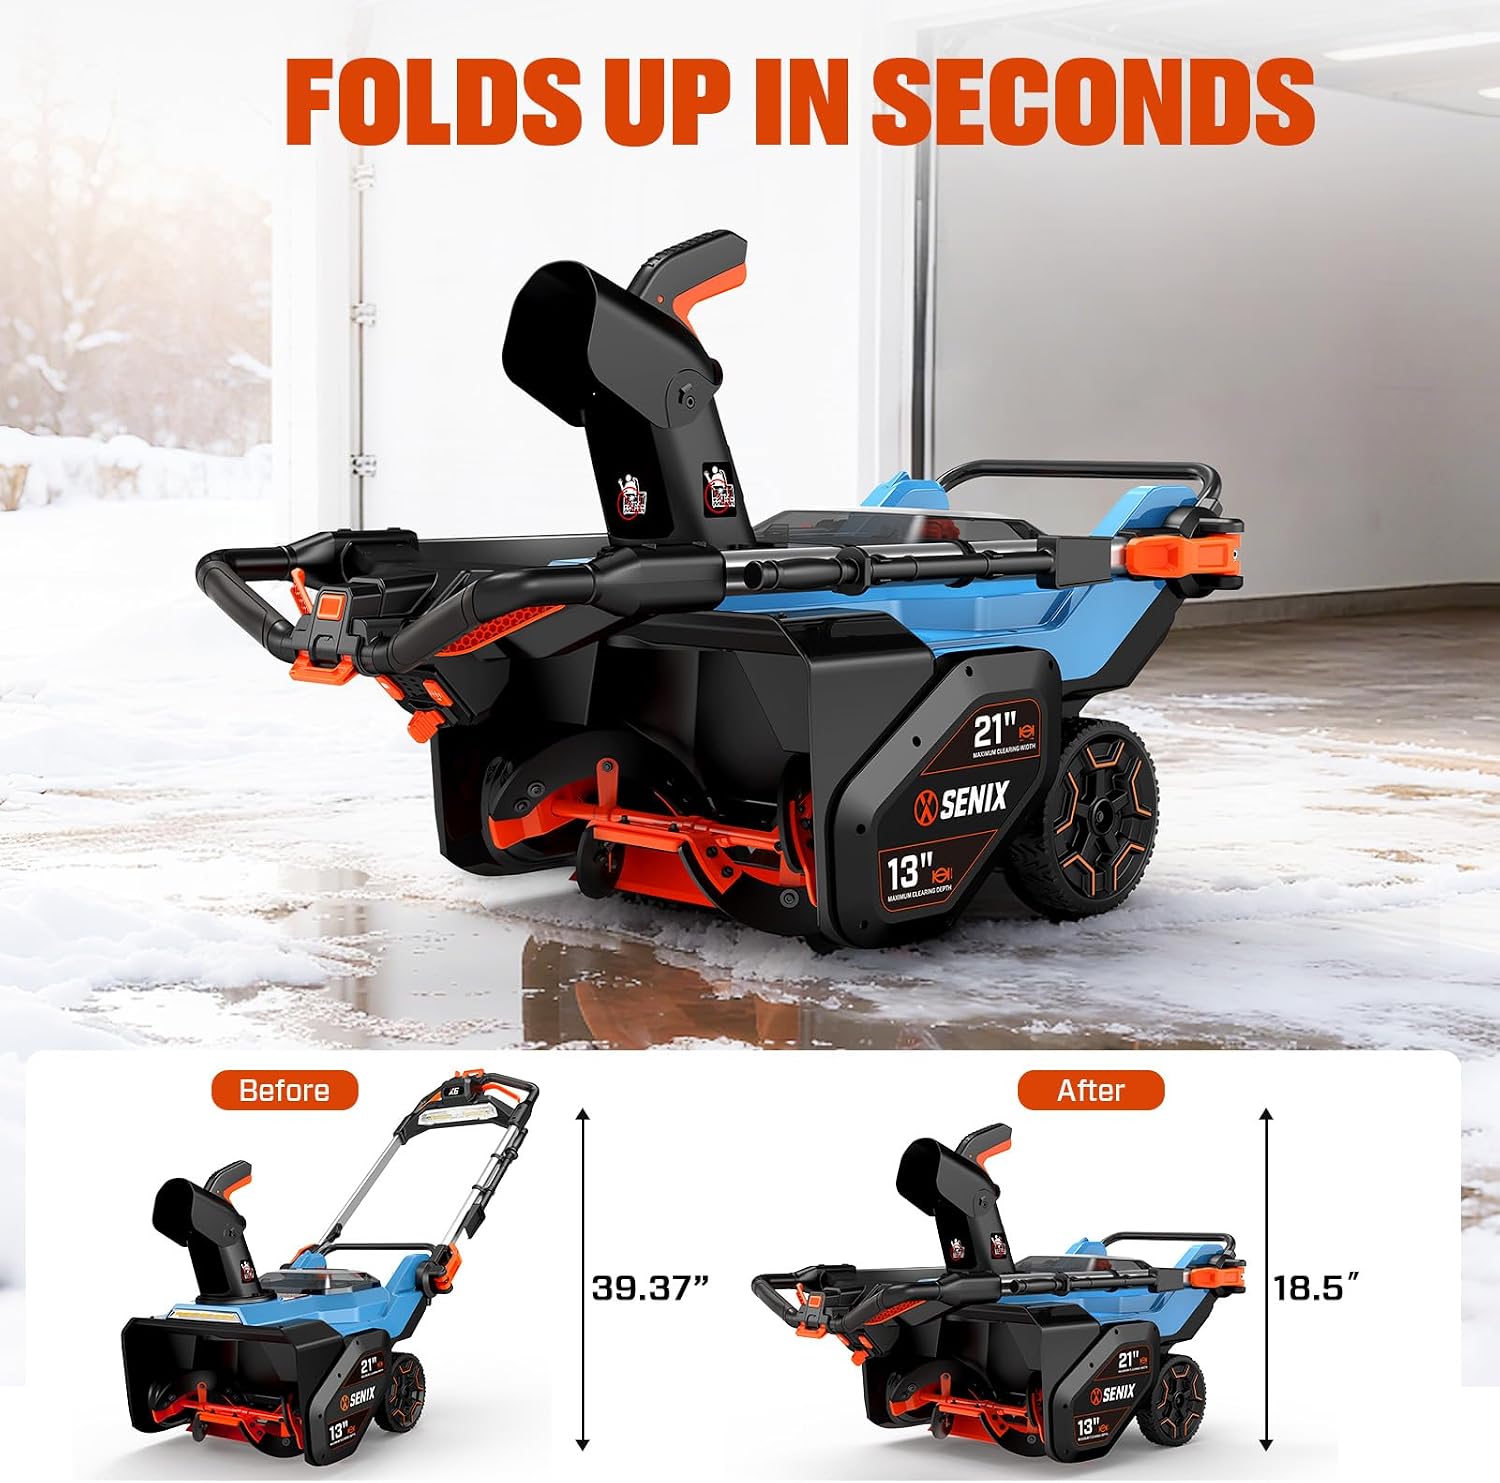
Figure 3.2: The snow blower shown in both upright and folded positions, demonstrating its space-saving storage capability. This image illustrates how the handle folds for compact storage.
4. Troubleshooting
4.1 Unit Not Starting
- Ensure batteries are fully charged and correctly inserted into the snow blower.
- Verify the safety lock-off button is pressed before squeezing the switch lever.
- Check for any obstructions in the auger area.
4.2 Reduced Performance in Cold Weather
- Ensure batteries are warmed to room temperature before use. Cold batteries may have reduced power output.
- Clear snow at a slower pace if it is particularly wet or heavy.
5. Specifications
| Feature | Specification |
|---|---|
| Brand | SENIX |
| Model Number | STX6-H |
| Power Source | Battery Powered (60V DC) |
| Motor | 3500W Brushless Motor |
| Batteries | 2 x 8000mAh (16000mAh Total) Lithium-ion |
| Charger | Dual Port Charger |
| Clearing Width | 21 inches |
| Clearing Depth | 13 inches |
| Throw Distance | Up to 45 feet |
| Snow Capacity | 1200 lbs/min |
| Auger Type | Steel Auger with Rubber Paddles |
| Chute Adjustment | Electronic, 200° Rotation |
| Lights | Upper and Lower LED Headlights |
| Handle Features | Heated Grips |
| Item Weight | 55.8 pounds |
| Product Dimensions | 44"D x 20"W x 23"H |
6. Warranty and Support
6.1 Product Warranty
The SENIX 60V 21" Cordless Snow Blower is covered by a 5-year limited warranty. The included batteries and charger are covered by a 3-year limited warranty. Please refer to the warranty card included in your packaging for full details and terms.
6.2 Customer Support
For technical assistance, troubleshooting, or warranty claims, please contact SENIX customer support. Contact information can be found on the SENIX website or in your product manual.

