
1. Introduction
This manual provides comprehensive instructions for the assembly, operation, maintenance, and troubleshooting of your TRIUMPHKEY Pop-Up Gazebo. Please read this manual carefully before use to ensure safe and efficient operation. This gazebo is designed for temporary outdoor use, providing shade and protection from light rain and UV rays.
2. Safety Information
- Always ensure the gazebo is properly anchored using the provided stakes and ropes. Failure to do so may result in damage or injury, especially in windy conditions.
- Do not use the gazebo in severe weather conditions, including strong winds, heavy rain, or snow.
- Keep all flame and heat sources away from the gazebo fabric.
- Ensure all locking mechanisms are fully engaged during setup and before use.
- Supervise children around the gazebo to prevent accidents.
- Do not hang heavy objects from the gazebo frame.
- Assembly requires the cooperation of two people for safety and ease of setup.
3. Package Contents
Please verify that all components listed below are present before beginning assembly:
- 1 x Pre-assembled Gazebo Frame
- 1 x Canopy Fabric (Beige, Oxford 210D coated with silver)
- 1 x Carry Bag
- 8 x Anchoring Stakes
- 4 x Ropes

Figure 1: Overview of TRIUMPHKEY Pop-Up Gazebo and included accessories.
4. Setup Instructions
Follow these steps for quick and easy assembly. It is recommended that two people perform the setup.
- Step 1: Extend the Frame
Place the folded gazebo frame on a flat, level surface. With a person on each side, gently pull the outer legs of the frame outwards until it begins to expand. Do not force the frame.

Figure 2: Extending the gazebo frame and placing the canopy.
- Step 2: Install the Canopy
Unfold the canopy fabric and place it over the top of the partially extended frame. Align the corners of the canopy with the corners of the frame. Secure the canopy to the frame using any attached fasteners (e.g., Velcro straps) at the corners and along the edges.
- Step 3: Lock the Frame
From underneath the canopy, push up on the center hub of the frame until it locks into place. Then, lift each corner of the frame and press the slide buttons to lock the legs into their fully extended position. Ensure all four corners are securely locked.
Figure 3: Locking the frame corners.
- Step 4: Adjust Height and Secure
Locate the red adjustment buttons on each leg. Press the button and slide the inner leg up or down to your desired height. Release the button to lock the leg in place. Repeat for all four legs to ensure the gazebo is level. Finally, use the provided anchoring stakes and ropes to secure the gazebo to the ground for stability, especially in outdoor conditions.
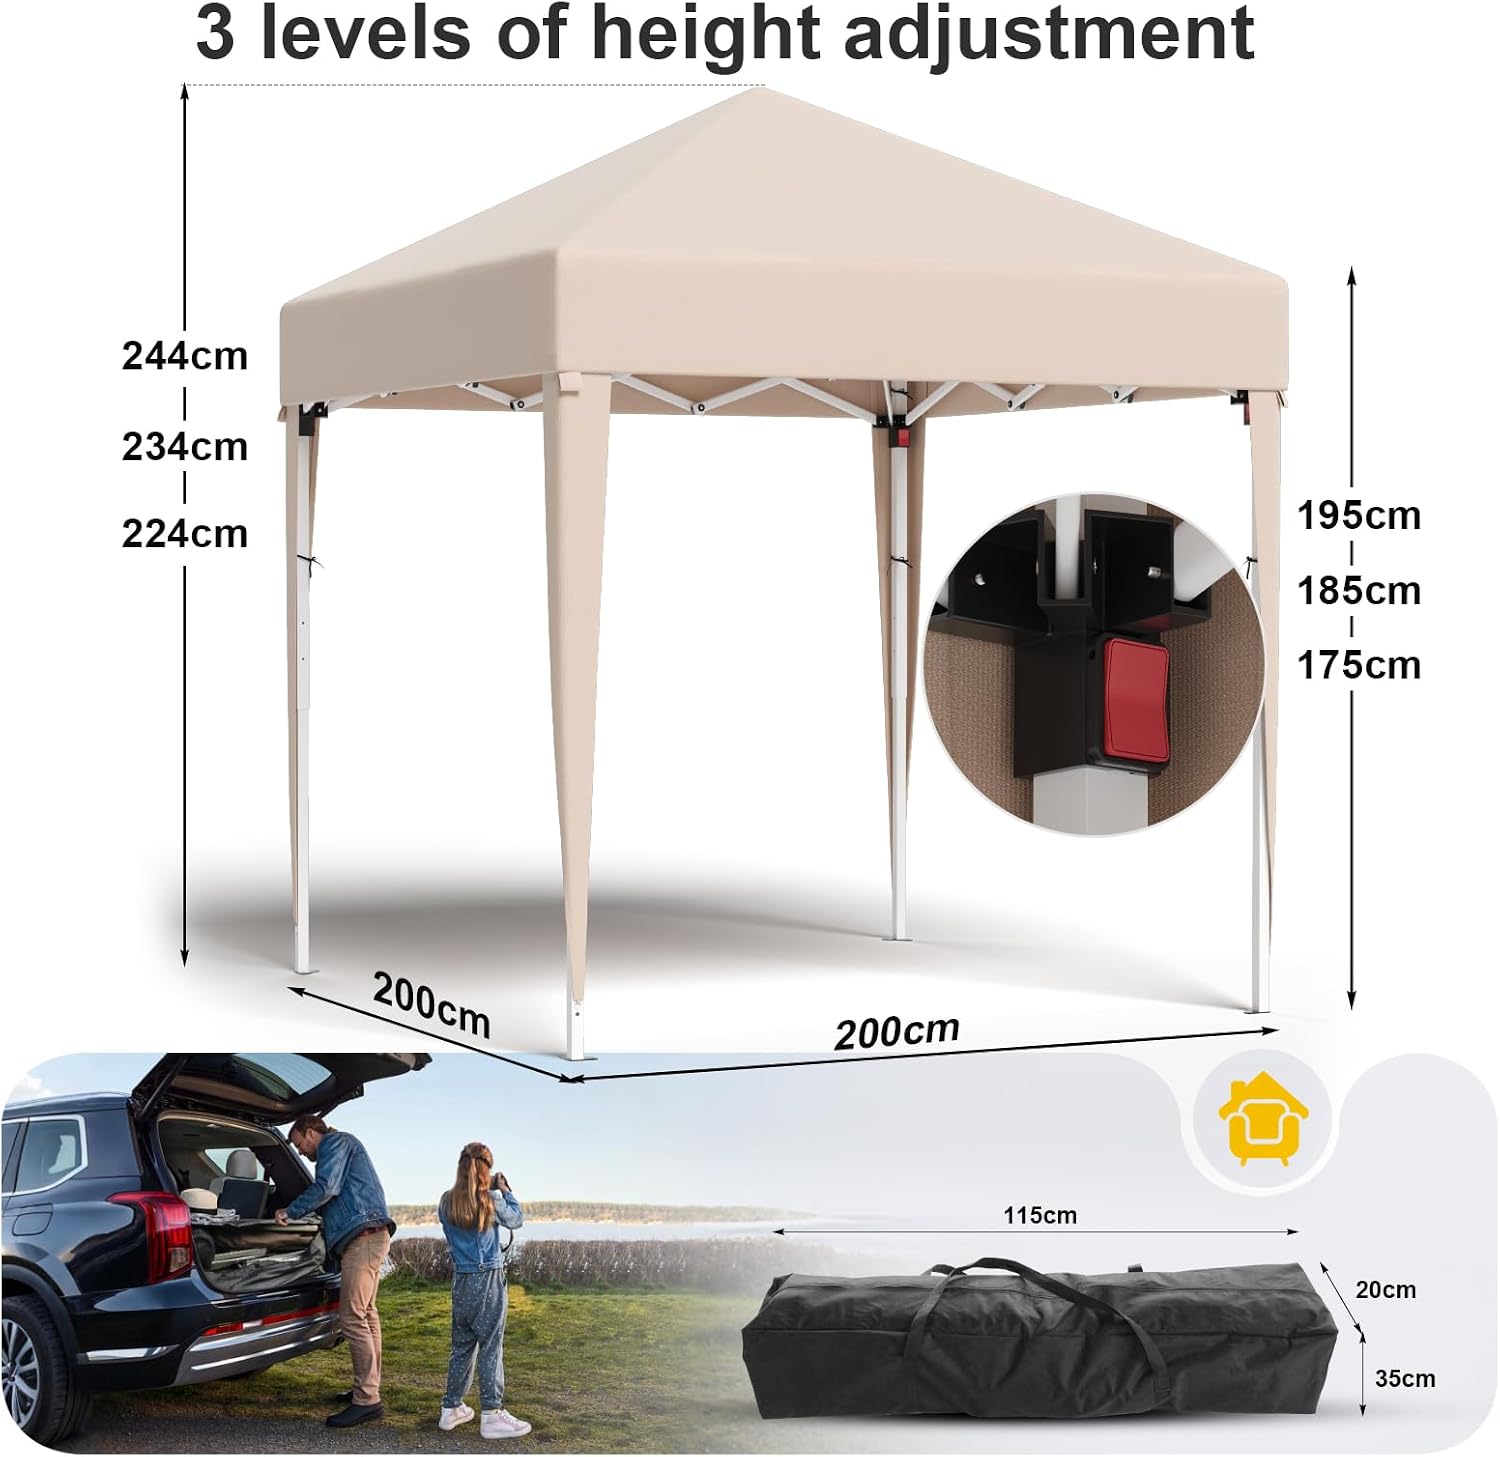
Figure 4: Gazebo height adjustment mechanism and dimensions.

Figure 5: Details of rope and stake anchoring points.
5. Operating Instructions
5.1 Height Adjustment
The TRIUMPHKEY Pop-Up Gazebo features 3 adjustable height settings. To adjust the height, locate the red adjustment buttons on each leg. Press the button and carefully slide the inner leg to the desired height. Ensure the button clicks into place, indicating it is securely locked. Adjust all four legs to the same height for stability.
5.2 Usage in Various Conditions
The gazebo canopy is made from Oxford 210D fabric with a silver coating, providing excellent waterproof performance and blocking approximately 98% of UV rays (UV 50+ protection). It is suitable for providing shade and protection from light rain during outdoor activities such as gardening, camping, picnics, and market events.

Figure 6: Gazebo providing shade and UV protection.
5.3 Folding and Storage
To fold the gazebo, reverse the assembly steps. Unlock the height adjustment buttons on each leg and fully retract the inner legs. Then, unlock the frame's corner mechanisms and gently push the outer legs inwards until the frame collapses. Once folded, the gazebo can be placed into the provided carry bag for compact storage and easy transport.
Figure 7: Compact size of the gazebo when packed in its carry bag.
6. Maintenance
- Cleaning: Clean the canopy fabric with mild soap and water. Do not use harsh detergents or abrasive cleaners. Allow the fabric to air dry completely before folding and storing to prevent mildew.
- Frame Care: Wipe the stainless steel frame with a damp cloth to remove dirt. Ensure the frame is dry before storage to prevent rust.
- Storage: Store the gazebo in its carry bag in a cool, dry place, away from direct sunlight and extreme temperatures.
- Inspection: Periodically inspect the frame, canopy, ropes, and stakes for any signs of wear, damage, or corrosion. Replace any damaged parts immediately to ensure safe operation.
7. Troubleshooting
| Problem | Possible Cause | Solution |
|---|---|---|
| Gazebo is unstable or sways. | Not properly anchored; legs not fully extended/locked; uneven ground. | Ensure all stakes and ropes are securely fastened. Check that all leg locking mechanisms are engaged. Move to a level surface. |
| Difficulty extending/folding the frame. | Frame components are misaligned or stuck; dirt/debris in joints. | Ensure no fabric is caught in the frame. Gently wiggle joints to free them. Clean any visible dirt or debris from the joints. Apply a silicone-based lubricant if necessary. |
| Water pooling on canopy. | Canopy not taut enough; improper setup. | Ensure the canopy is stretched tightly over the frame. Verify that the frame is fully extended and locked. Adjust height if possible to create more slope. |
| Canopy tearing or fraying. | Exposure to sharp objects; prolonged exposure to harsh weather; improper folding. | Avoid contact with sharp objects. Do not use in extreme weather. Ensure canopy is folded smoothly without creasing or pinching. Small tears can be repaired with a fabric repair kit. |
8. Specifications
| Model Number | B0DTT21F5W |
| Color | Beige |
| Dimensions (L x W x H) | 200 x 200 x 244 cm (78.7 x 78.7 x 96.1 inches) |
| Weight | 10.1 Kilograms (22.27 lbs) |
| Canopy Material | Oxford 210D fabric with silver coating |
| Frame Material | Stainless Steel |
| UV Protection | UV 50+ |
| Waterproof Performance | Excellent |
| Height Adjustment | 3 levels |
| Assembly Required | Yes |
| Country of Origin | China |

Figure 8: Frame dimensions comparison.
9. Warranty and Support
TRIUMPHKEY is committed to customer satisfaction and provides the following support:
- Warranty: Up to 3 years of warranty service from the date of purchase.
- Returns & Exchanges: Free return and exchange service within 30 days of purchase for any quality problems.
- Customer Service: For any questions or issues, please contact TRIUMPHKEY customer service. We are committed to providing a satisfactory solution within 24 hours.
For further assistance, please refer to the contact information provided with your purchase or visit the official TRIUMPHKEY website.