
1. Introduction
This manual provides essential information for the safe and efficient operation, installation, and maintenance of your Hanchen 3/4 HP Shallow Well Pump with Pressure Tank. This unit functions as both a shallow well pump and an automatic booster system, designed for various water transfer and pressurization needs. Please read this manual thoroughly before installation and use.
2. Safety Information
Always observe basic safety precautions to reduce the risk of fire, electric shock, and personal injury. Keep this manual for future reference.
- Ensure the power supply matches the pump's voltage requirements (110V AC).
- Do not operate the pump with damaged cords or plugs.
- Always disconnect power before performing any maintenance or service.
- Install the pump in a dry, well-ventilated area, protected from freezing temperatures.
- Ensure all plumbing connections are secure and leak-free.
- Do not pump flammable or corrosive liquids.
3. Product Components
The Hanchen 3/4 HP Shallow Well Pump system includes the following main components:
- 3/4 HP Booster Pump Unit
- Integrated Pressure Tank
- Water Flow Switch
- Water Pressure Switch
- Check Valve
- Outlet Adapter
- Sealing Tape
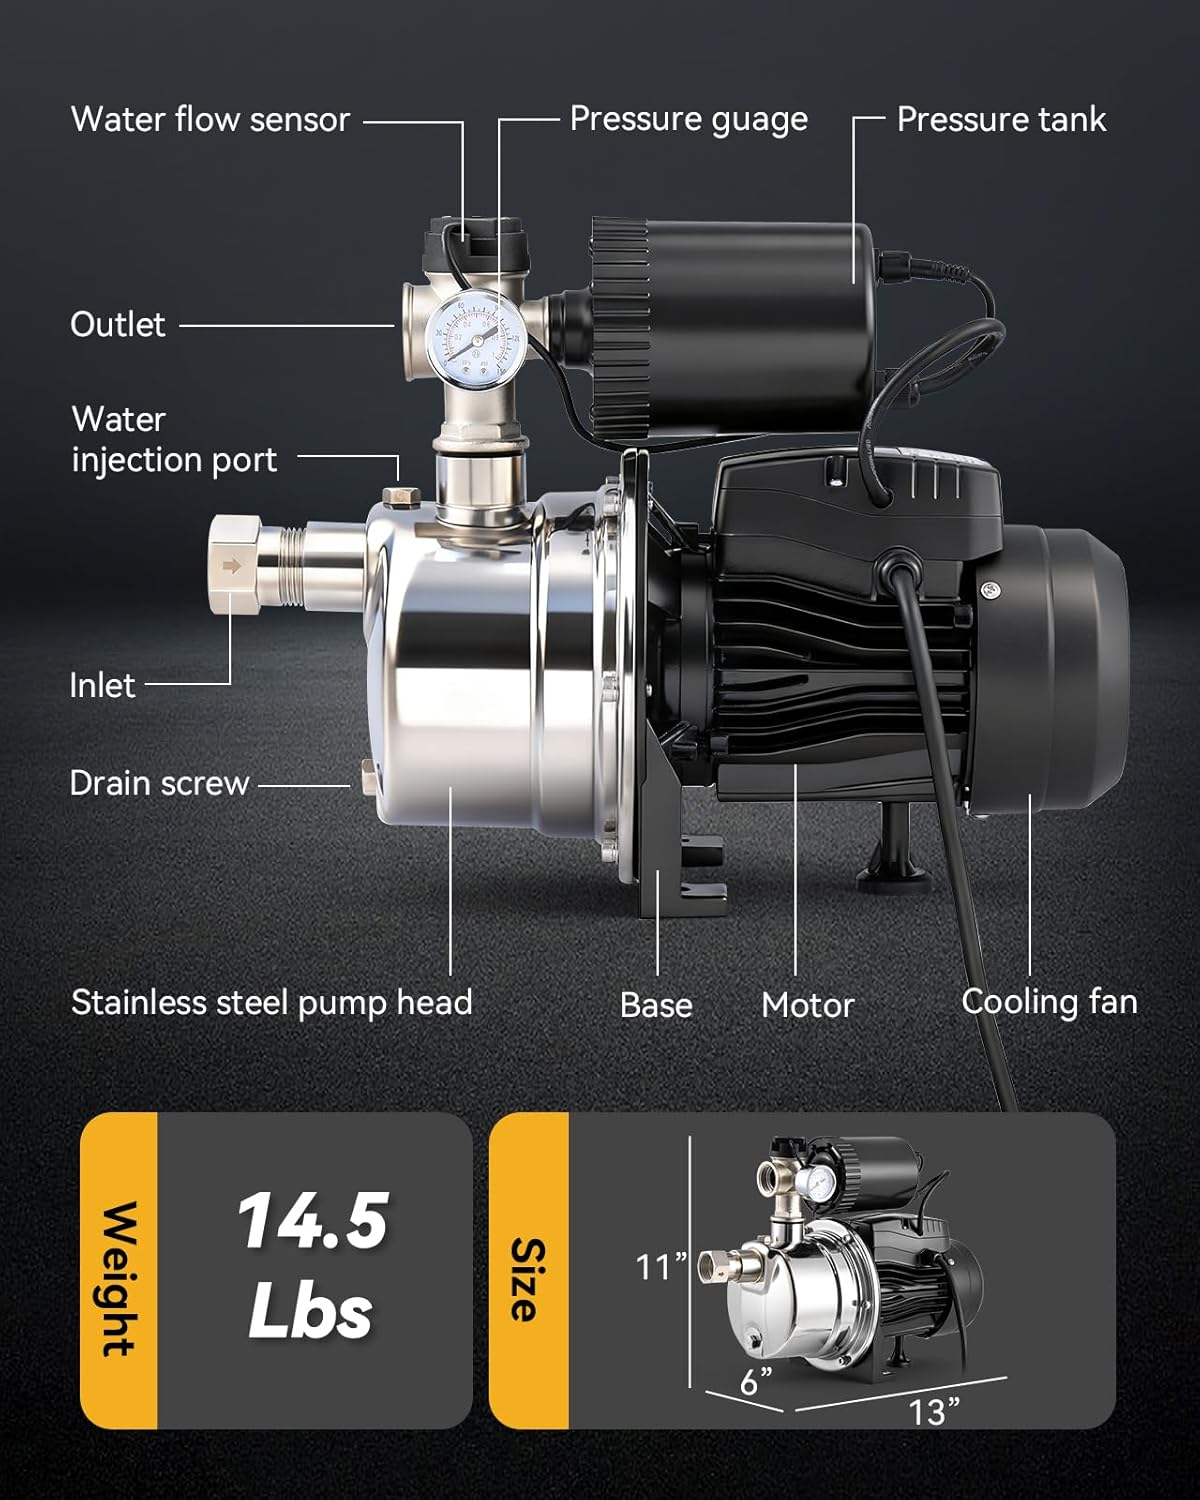
Figure 3.1: Labeled components of the Hanchen Shallow Well Pump, including the water flow sensor, pressure gauge, pressure tank, outlet, water injection port, inlet, drain screw, stainless steel pump head, base, motor, and cooling fan.
4. Specifications
| Feature | Specification |
|---|---|
| Brand | Hanchen |
| Model Number | HT-2518-MYF |
| Horsepower | 0.75 HP |
| Voltage | 110V AC |
| Material | Stainless Steel (SUS 304 Pump Head) |
| Maximum Lifting Height | 100 feet |
| Product Dimensions (L x W x H) | 13" x 6" x 11" |
| Item Weight | 14.5 pounds |
| Included Components | 3/4 HP booster pump, Check valve, Outlet adapter, Tape |
5. Setup
Proper installation is crucial for the pump's performance and longevity. Follow these steps carefully:
5.1. Placement
Position the pump on a stable, level surface in a location protected from weather and freezing temperatures. Ensure adequate ventilation around the motor.
5.2. Plumbing Connections
- Connect the inlet pipe to the pump's inlet port. Ensure a tight, leak-free seal using the provided sealing tape.
- Install the check valve on the inlet line as recommended to ensure proper operation of the water flow sensor.
- Connect the outlet pipe to the pump's outlet port. Use the provided outlet adapter and sealing tape for a secure connection.
- Consider installing a bypass circuit for easier servicing, if needed.

Figure 5.1: Illustration of the pump connected as a shallow well jet pump and a household booster pump, showing water flow to a shower head.
5.3. Priming the Pump
Before initial operation, the pump must be primed to ensure it is filled with water.
- Unscrew the cap of the water injection port located on the top of the pump head.
- Slowly fill the pump head with clean water until it is full.
- Replace the cap securely.

Figure 5.2: Visual guide for priming the pump by unscrewing the cap and filling the water injection port with clean water.
5.4. Electrical Connection
Connect the pump to a grounded 110V AC power outlet. Ensure the electrical connection is secure and protected from moisture.
6. Operating Instructions
The Hanchen Shallow Well Pump is designed for automatic operation based on water demand.
6.1. Automatic Start and Stop
The pump features built-in water pressure and water flow sensors. When a tap is opened and water flow is detected, the pump automatically starts. When the tap is closed and water flow ceases, the pump automatically stops. This ensures seamless operation and energy efficiency.

Figure 6.1: Illustration of the pump's automatic start and stop function based on faucet usage.
6.2. Adjustable Start Pressure
The pump allows for adjustment of the start pressure to meet varying inlet water pressure requirements. This adjustment can be made via the control unit. Note: The stop pressure is not adjustable.

Figure 6.2: Detail of the adjustable start pressure mechanism on the pump's control unit.
6.3. Dual Detection Switches
Equipped with both flow and pressure detection switches, the system provides enhanced safety and reliable automatic operation, preventing dry running and ensuring consistent water supply.
7. Maintenance
Regular maintenance helps ensure the longevity and optimal performance of your pump.
- Inspect for Leaks: Periodically check all plumbing connections for any signs of leaks and tighten as necessary.
- Clean the Pump: Keep the exterior of the pump clean and free from debris to prevent overheating. The integrated cooling fan assists in heat dissipation.
- Winterization: If the pump is installed in an area subject to freezing temperatures, drain the pump completely or protect it from freezing to prevent damage.
- Pump Head Material: The SUS 304 stainless steel pump head offers superior rust resistance compared to cast iron, reducing the likelihood of rusty water and extending component life.

Figure 7.1: Visual comparison highlighting the rust resistance of the SUS 304 stainless steel pump head.
8. Troubleshooting
Refer to the table below for common issues and their potential solutions.
| Problem | Possible Cause | Solution |
|---|---|---|
| Pump does not start | No power; Clogged inlet/outlet; Dry run protection activated; Motor locked up. | Check power connection and circuit breaker. Inspect and clear any blockages. Ensure pump is primed. If motor is locked, contact support. |
| Low water pressure | Insufficient priming; Leaks in plumbing; Incorrect start pressure setting; Worn impeller. | Re-prime the pump. Check all connections for leaks. Adjust the start pressure setting. Inspect impeller for damage. |
| Pump runs continuously | Leak in the system; Faulty flow/pressure sensor; Check valve issue. | Inspect entire plumbing system for leaks. Check functionality of flow and pressure sensors. Ensure check valve is installed correctly and functioning. |
| Water connections leak | Improperly tightened connections; Damaged sealing tape/washers. | Ensure all connections are tightened securely. Reapply sealing tape or replace washers if damaged. |
9. Warranty and Support
Hanchen is committed to providing high-quality products and customer satisfaction. We stand behind our products and offer support for any issues you may encounter.
For technical assistance, troubleshooting, or warranty inquiries, please contact Hanchen customer service. Refer to your purchase documentation for specific warranty terms and contact information.