
1. Important Safety Information
Please read and understand all instructions before beginning assembly and installation. Failure to follow these instructions may result in injury or product damage. Keep this manual for future reference.
- Always wear appropriate safety gear, including safety glasses, during assembly.
- Ensure all parts are present and undamaged before assembly. Do not use damaged parts.
- This vanity is designed for wall mounting. Ensure the wall structure can support the weight of the vanity and its contents. Consult a professional if unsure.
- Do not overtighten fasteners, as this may cause damage.
- Keep small parts away from children during assembly.
- Professional plumbing installation is recommended for the sink and faucet connections.
2. Package Contents
Verify that all components listed below are included in your package:
- Vanity Cabinet (1)
- Resin Sink Top (1)
- Drawer Slides (Set)
- Drawer Handles (2)
- Mounting Hardware (Screws, Wall Anchors)
- Assembly Instructions Manual (1)
3. Tools Required
The following tools are recommended for assembly and installation:
- Phillips Head Screwdriver
- Drill with appropriate drill bits (for pilot holes and wall anchors)
- Level
- Measuring Tape
- Pencil
- Stud Finder (recommended for wall mounting)
- Caulk Gun and Silicone Sealant (for sink installation)
4. Setup and Assembly Instructions
Follow these steps carefully for proper assembly and installation of your Zyerch bathroom vanity.
4.1 Unpacking and Inspection
Carefully unpack all components. Inspect each part for any damage. If any part is damaged or missing, do not proceed with assembly. Contact customer support.
4.2 Cabinet Assembly (if required)
The main cabinet structure may come pre-assembled or require minimal assembly. Refer to the included detailed assembly booklet for specific steps on attaching side panels, back panel, and internal supports if necessary.
4.3 Drawer Slide and Handle Installation
- Attach the drawer slides to the cabinet interior and to the drawer boxes according to the instructions in the assembly booklet. Ensure they are level and aligned for smooth operation.
- Install the drawer handles onto the drawer fronts using the provided screws.

Image: Internal view of the vanity drawers, highlighting the storage compartments and handles.
4.4 Wall Mounting the Cabinet
- Determine the desired height for your vanity. Use a level and pencil to mark the mounting points on the wall. It is highly recommended to mount the vanity into wall studs for maximum stability. Use a stud finder to locate studs.
- Drill pilot holes at the marked locations. If mounting into drywall without studs, use appropriate heavy-duty wall anchors (not always included, may need to be purchased separately based on wall type).
- Carefully lift the vanity cabinet and align the mounting brackets on the back of the cabinet with the drilled holes.
- Secure the cabinet to the wall using the provided mounting screws. Ensure the cabinet is level and securely fastened before proceeding.

Image: The Zyerch vanity installed in a bathroom, showcasing its wall-mounted design.
4.5 Sink Top Installation
- Apply a bead of silicone sealant along the top edges of the vanity cabinet where the sink will rest.
- Carefully place the resin sink top onto the cabinet, aligning it properly. Press down gently to ensure a good seal.
- Allow the sealant to cure according to the manufacturer's instructions before connecting plumbing.
- Install your chosen faucet and drain assembly into the sink top according to their respective instructions.
- Connect the water supply lines and drain trap. Check for leaks thoroughly before regular use.

Image: Detailed view of the resin sink features, including overflow and faucet holes.
5. Operating Instructions
Your Zyerch vanity is designed for functional use in a bathroom environment.
- Drawer Use: The vanity features two soft-close drawers. To open, gently pull the handles. To close, push the drawers until the soft-close mechanism engages, allowing them to close quietly and smoothly. Avoid slamming the drawers.
- Storage: Utilize the internal compartments for organizing bathroom essentials. The design includes specific cutouts for plumbing, allowing for efficient use of space around the P-trap.
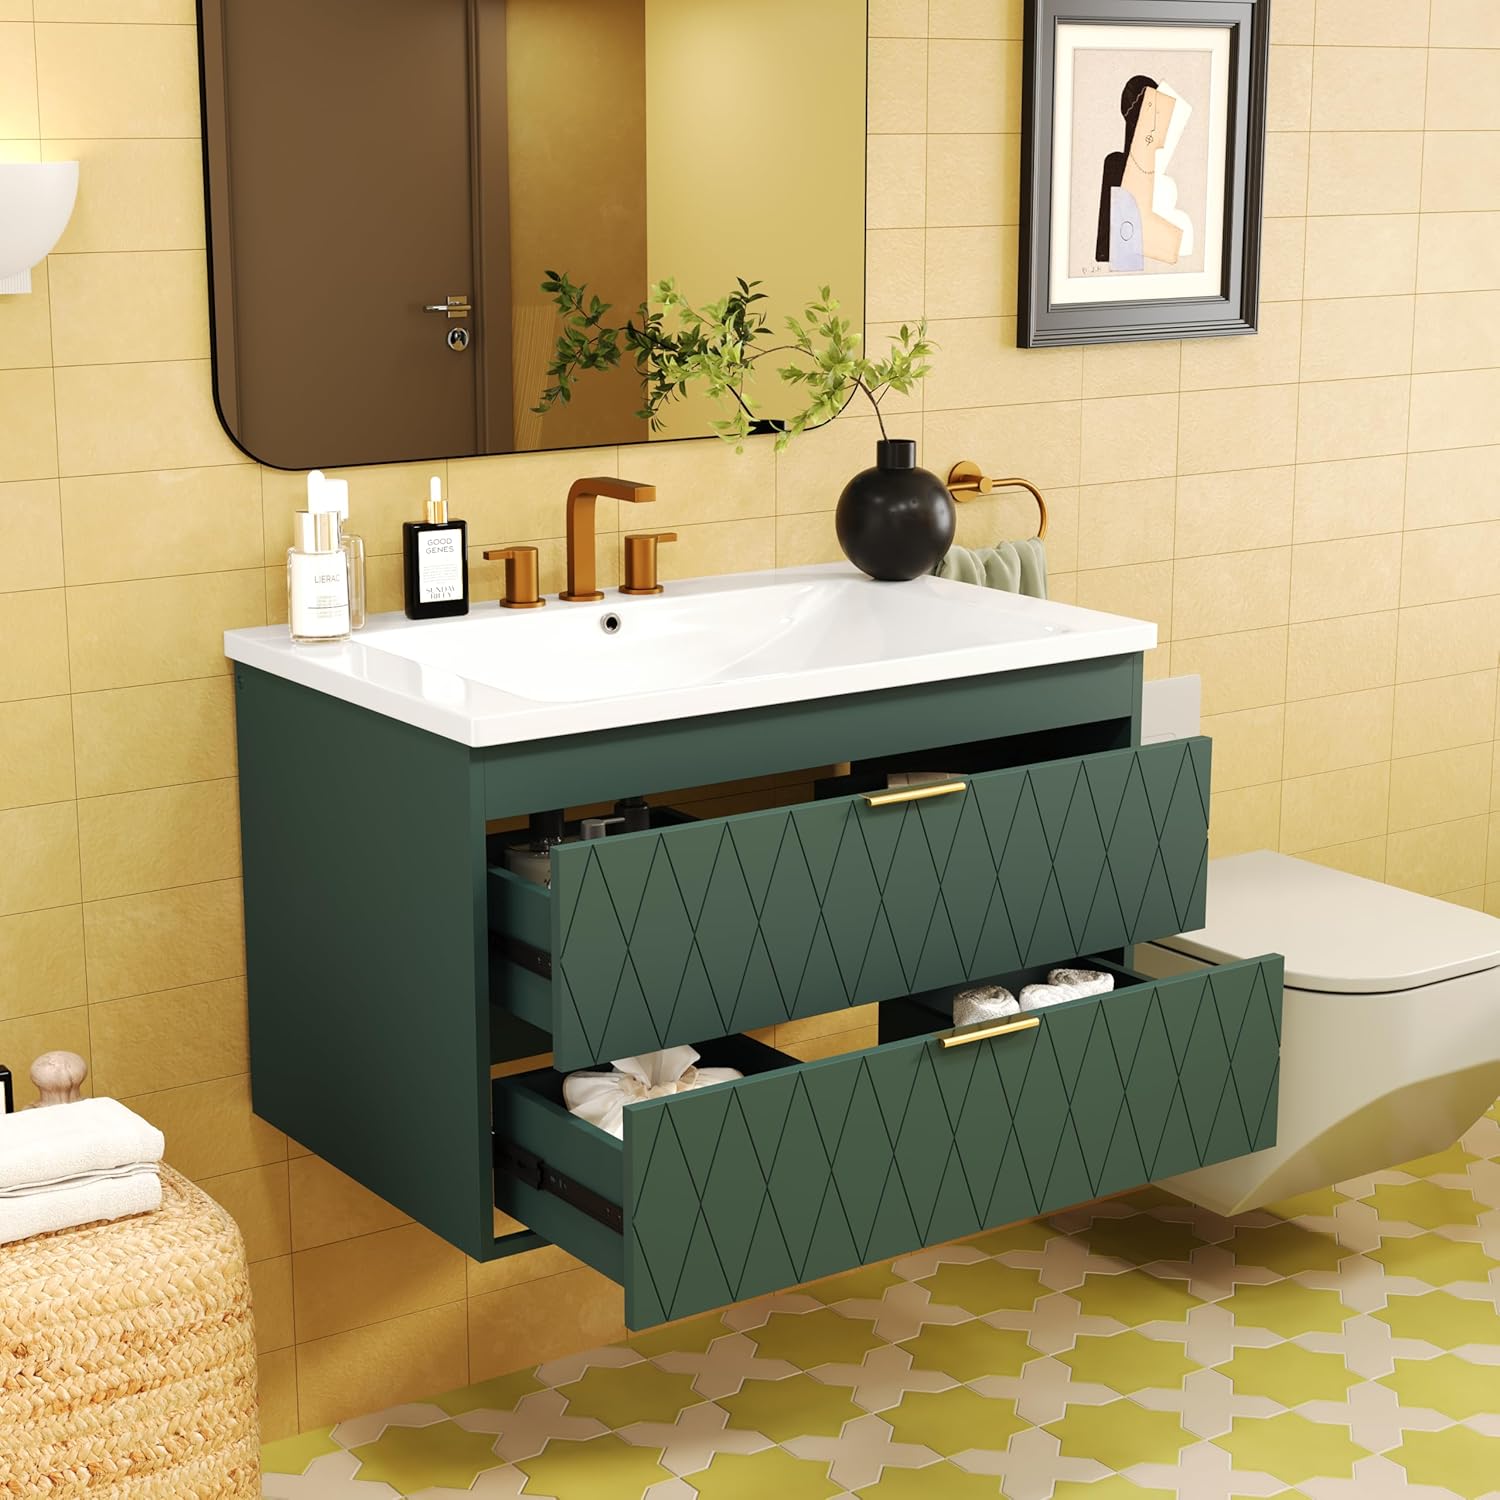
Image: The vanity with drawers open, demonstrating storage capacity and organization.
6. Maintenance and Care
Proper care will ensure the longevity and appearance of your vanity.
- Cabinet Cleaning: Wipe the cabinet surfaces with a soft, damp cloth. Avoid abrasive cleaners, harsh chemicals, or solvents, as these can damage the finish. Dry immediately with a clean cloth.
- Sink Cleaning: The resin sink is stain-resistant and easy to clean. Use mild soap and water with a soft sponge or cloth. Rinse thoroughly and dry to prevent water spots. Avoid abrasive pads or strong chemical cleaners.
- Spills: Wipe up spills immediately to prevent moisture damage to the cabinet.
- Hardware: Periodically check and tighten any loose screws on handles or drawer slides.
7. Troubleshooting
Refer to this section for common issues and their solutions.
| Problem | Possible Cause | Solution |
|---|---|---|
| Drawers do not close smoothly or are misaligned. | Improperly installed drawer slides; loose screws; obstruction. | Check that drawer slides are correctly installed and all screws are tightened. Ensure no items are obstructing the drawer path. Adjust drawer slides if they have adjustment features. |
| Vanity feels unstable after wall mounting. | Insufficient wall support; loose mounting screws. | Ensure the vanity is mounted into wall studs. If not, use appropriate heavy-duty wall anchors for your wall type. Tighten all mounting screws securely. If instability persists, consult a professional. |
| Water leaks from sink or plumbing connections. | Loose plumbing connections; improper sealant application. | Check all plumbing connections (faucet, drain, supply lines) for tightness. Ensure silicone sealant around the sink is fully cured and provides a watertight seal. Reapply sealant if necessary. |
8. Specifications
Detailed product specifications for the Zyerch 30-Inch Wall Mounted Floating Bathroom Vanity:
| Feature | Detail |
|---|---|
| Brand | Zyerch |
| Model Name | Vanity Bathroom with Sink Combo |
| Item Model Number | N710P177301F |
| Color | Turquoise |
| Overall Product Dimensions | 30"W x 18"D x 19"H |
| Storage Cabinet Dimensions | 29.5''W x 17.9''D x 18''H |
| Basin Sink Dimensions | 30''W x 18''D x 6.61''H |
| Inner Basin Dimensions | 23''W x 13.2''D |
| Item Weight | 70.55 lbs |
| Material | Solid Wood Frame, MDF Boards, Resin Sink |
| Mounting Type | Wall Mount |
| Special Features | Dustproof, Heavy Duty, Rust Resistant, Scratch Resistant |
| Assembly Required | Yes |
| UPC | 753947726457 |
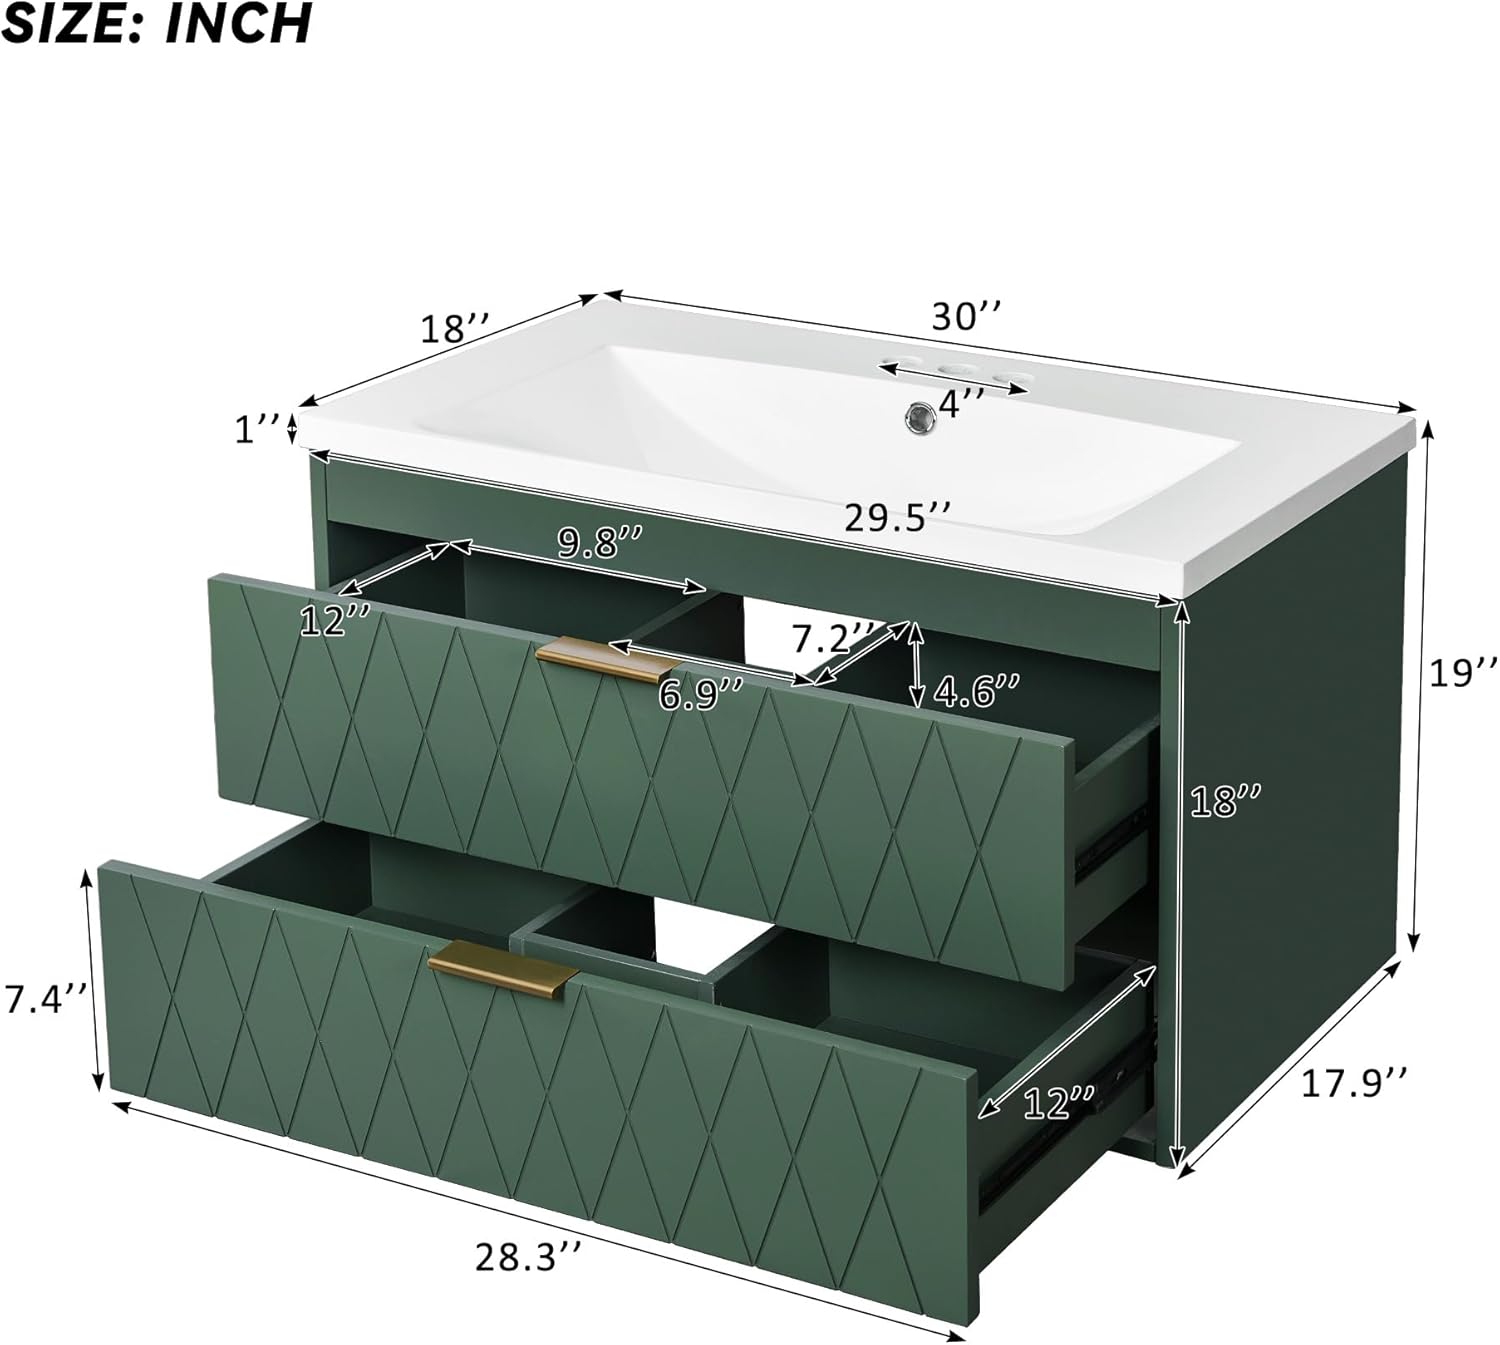
Image: Dimensional drawing of the vanity, indicating key measurements.
9. Warranty and Support
For warranty information or technical support, please refer to the contact details provided at the point of purchase or visit the official Zyerch website. Keep your purchase receipt as proof of purchase.
For further assistance, please contact Zyerch customer service.