
Falcon Electronics HDE-1051P
FalconEye Electronics Rogue Multi-Cam 1080P DVR System User Manual
Model: HDE-1051P
1. Introduction and System Overview
The FalconEye Rogue Multi-Cam 1080P System is a comprehensive vehicle surveillance solution designed to enhance safety and security for trucks, buses, trailers, and motorhomes. This system provides extensive coverage with up to four high-definition cameras, offering a complete view of your surroundings.
Key features include high-definition cameras, superior night vision capabilities, versatile viewing options on a 10-inch LCD monitor, and ample storage capacity for continuous recording.

Figure 1.1: Overview of the FalconEye Rogue Multi-Cam 1080P DVR System components, including the 10-inch LCD monitor and four cameras.
2. Product Components
The FalconEye Rogue Multi-Cam 1080P System typically includes the following components:
- 10-inch LCD Monitor: The central display unit for viewing camera feeds.
- 1080P Weatherproof Cameras: Four high-definition cameras designed for outdoor use, capturing clear video day and night.
- Cables: Various lengths of cables (e.g., 16ft, 9ft, 32ft) for connecting cameras to the DVR monitor.
- Mounting Hardware: Brackets and screws for securing the monitor and cameras.
- Power Adapter: For supplying power to the system.
- Optional SD Card: For video recording (supports up to 128GB, sold separately for this specific configuration).


Figure 2.1: A detailed view of one of the 1080P weatherproof cameras (left) and a diagram illustrating the dimensions of the aerodynamic side camera (right).
3. Setup and Installation
The FalconEye Rogue system features a plug-and-play design for simplified installation. Follow these general steps:
- Mount the Monitor: Securely mount the 10-inch LCD monitor in a suitable location within your vehicle, ensuring clear visibility and accessibility.
- Position Cameras: Strategically place the four cameras to achieve desired viewing angles (e.g., rear, side, front). Ensure they are securely mounted and have an unobstructed view.
- Connect Cameras: Connect each camera to the DVR monitor using the provided cables. Ensure connections are firm and secure.
- Power Connection: Connect the system to your vehicle's power supply according to the wiring diagram (refer to the full installation guide for detailed wiring instructions).
- Insert SD Card (Optional): If using an SD card for recording, insert it into the designated slot on the monitor.

Figure 3.1: Example of a side camera securely mounted on a vehicle for optimal viewing.
4. Operating Instructions
Once installed and powered on, the system will automatically display camera feeds. Use the buttons on the monitor or the remote control (if included) to navigate settings and display modes.
4.1 Display Modes
The 10-inch LCD monitor supports multiple viewing options:
- Single View: Displays one camera feed at a time. Useful for focusing on a specific area.
- Dual View: Displays two camera feeds simultaneously.
- Quad View: Displays all four camera feeds simultaneously, providing a comprehensive overview.
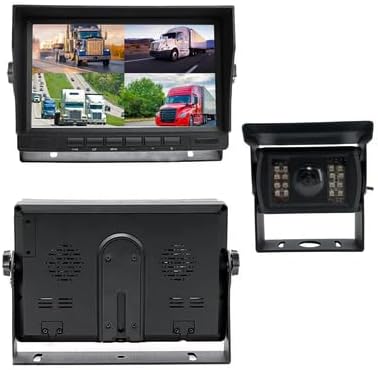
Figure 4.1: The 10-inch LCD monitor in quad-view mode, showing feeds from four cameras simultaneously.
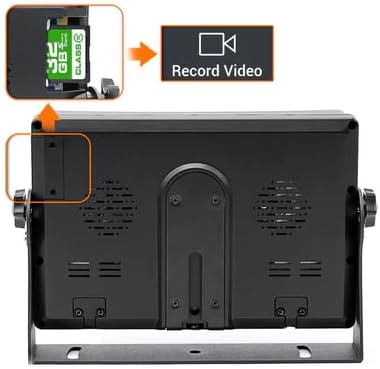
Figure 4.2: The 10-inch LCD monitor displaying a single camera feed, providing a focused view.
4.2 Video Recording
The system supports video recording to an SD card (up to 128GB). When an SD card is inserted, the system can continuously record footage. Older footage will be overwritten as the card fills up (loop recording).

Figure 4.3: Location of the SD card slot on the monitor for video recording.
4.3 Night Vision
The cameras are equipped with infrared (IR) lights, providing superior night vision capabilities. This ensures clear video capture even in low-light or completely dark conditions.
5. Maintenance
Regular maintenance ensures optimal performance and longevity of your FalconEye Rogue system:
- Clean Lenses: Periodically clean camera lenses with a soft, damp cloth to remove dirt, dust, or water spots that may obstruct the view.
- Check Connections: Regularly inspect all cable connections to ensure they are secure and free from corrosion or damage.
- Monitor Cleaning: Clean the LCD monitor screen with a screen-safe cleaner and a microfiber cloth.
- Software Updates: Check the manufacturer's website for any available firmware or software updates for your system.
6. Troubleshooting
If you encounter issues with your FalconEye Rogue system, consider the following troubleshooting steps:
- No Power to Monitor:
- Verify the power connection to the vehicle's power source.
- Check fuses in the power line if applicable.
- No Camera Display:
- Ensure all camera cables are securely connected to the monitor.
- Check if the camera is receiving power.
- Try switching display modes on the monitor to ensure the correct input is selected.
- Poor Image Quality:
- Clean camera lenses.
- Check for any physical damage to the camera or cables.
- Ensure the camera is properly focused (if adjustable).
- Recording Issues:
- Ensure an SD card is properly inserted.
- Check if the SD card is full; format it if necessary (note: formatting will erase all data).
- Verify the SD card is compatible (Class 10 or higher recommended).
For persistent issues, contact FalconEye Electronics customer support.
7. Specifications
| Feature | Detail |
|---|---|
| Model Number | HDE-1051P |
| Video Capture Resolution | 1080p |
| Monitor Size | 10 inches |
| Connectivity | Wired |
| Special Features | Night Vision |
| Max SD Card Capacity | 128GB |
| Product Dimensions | 13 x 11 x 9 inches |
| Manufacturer | FalconEye Electronics |
| UPC | 794000401430 |
8. Warranty and Support
For warranty information, technical support, or service inquiries, please contact FalconEye Electronics directly. Refer to the product packaging or the official FalconEye Electronics website for the most current contact details and warranty terms.
Manufacturer: FalconEye Electronics
Related documentsHDE-1051P

Ask a question about this manual
Ask about setup, troubleshooting, compatibility, parts, safety, or missing instructions. Manuals+ will review the question and use this page’s manual context to help answer it.