
1. Introduction
This manual provides instructions for the installation, operation, and maintenance of your GEARGO RV Tire Pressure Monitoring System (TPMS). This system is designed to monitor the pressure and temperature of your vehicle's tires in real-time, enhancing driving safety and tire longevity. It features a solar-powered display, four external sensors, and multiple alarm modes.
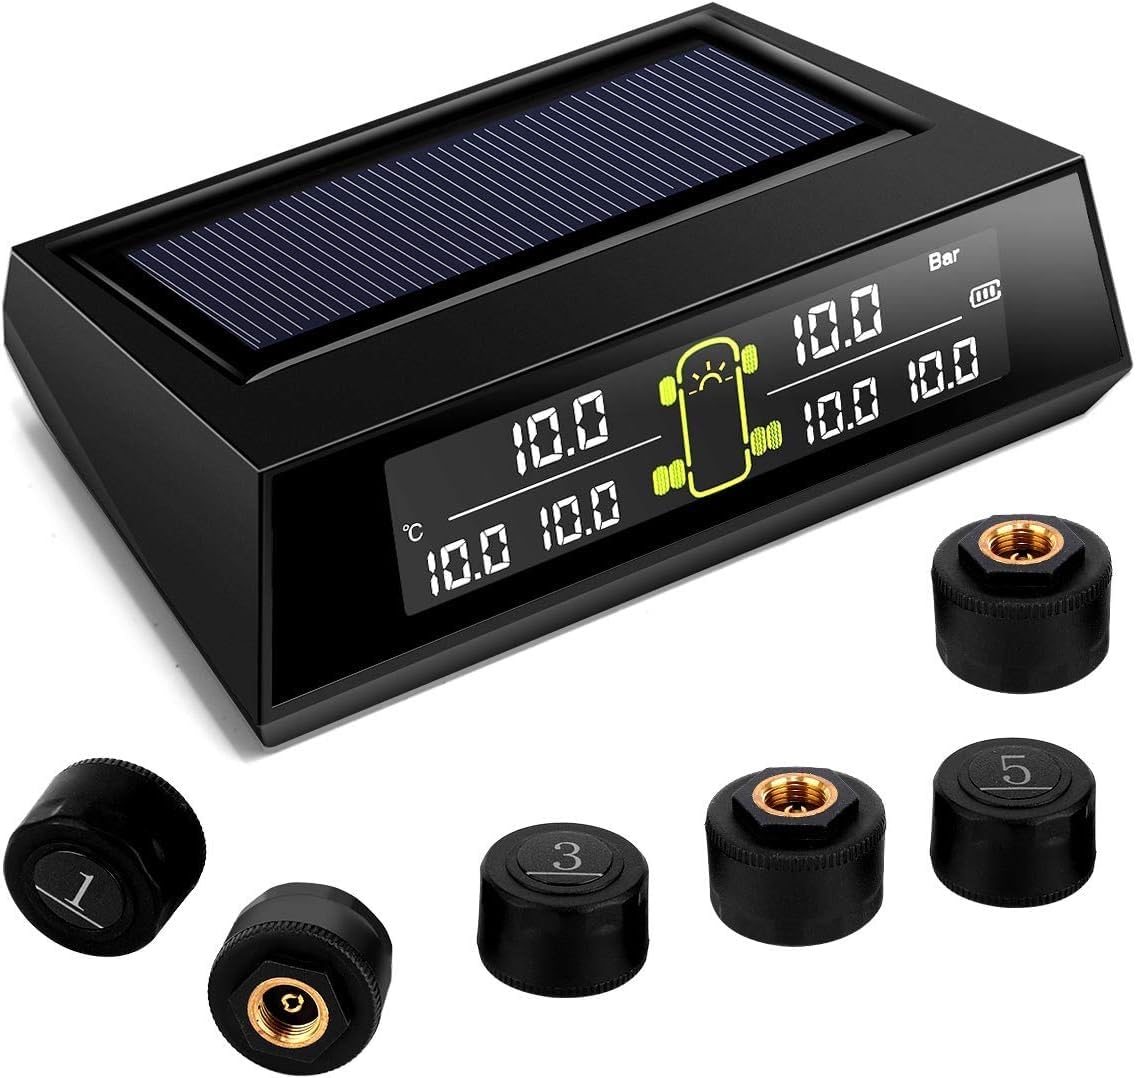
Image 1.1: Complete package contents of the GEARGO RV TPMS.
2. Package Contents
Verify that all components are present in your package:
- 1 x TPMS Display Unit (with integrated solar panel)
- 4 x External Tire Pressure Sensors
- 4 x Anti-theft Nuts
- 1 x Small Wrench
- 1 x USB Charging Cable
- 1 x Adhesive Mounting Pad
3. Setup and Installation
Follow these steps to install your GEARGO RV TPMS:
- Initial Charging: Before first use, fully charge the display unit using the provided USB cable. The unit also features a solar panel for continuous charging in sunlight.
- Sensor Installation:
- Screw an anti-theft nut onto the tire valve stem.
- Screw the corresponding sensor (labeled FL, FR, RL, RR for Front Left, Front Right, Rear Left, Rear Right) onto the valve stem until it is hand-tight.
- Use the small wrench to tighten the anti-theft nut against the sensor to secure it and prevent unauthorized removal. Ensure a tight seal to prevent air leaks.
- Display Unit Placement: Place the display unit on your dashboard using the adhesive mounting pad. Ensure it is in a position where it receives adequate sunlight for solar charging and does not obstruct your view of the road.

Image 3.1: Step-by-step guide for sensor installation.
4. Operating Instructions
The TPMS display unit is designed for ease of use and automatic operation.
- Automatic On/Off: The system automatically turns on when the vehicle starts and turns off when the vehicle is stationary for an extended period, conserving battery life.
- Real-time Monitoring: The LCD screen displays real-time tire pressure and temperature for all four tires simultaneously.
- Automatic Brightness Adjustment: The intelligent color LCD screen automatically adjusts its backlighting based on ambient light conditions, ensuring clear visibility day or night.
- Setting Alarm Thresholds: Upon initial pairing, the system uses the current tire pressure as a reference point. You can manually adjust high/low pressure and high-temperature alarm thresholds through the display unit's menu. Refer to the detailed instructions in the included quick start guide for specific button functions.
- Voice Prompts: The system is equipped with voice broadcasting to alert drivers to problems, allowing for quick understanding of the issue without needing to look at the display.

Image 4.1: The display unit automatically adjusts brightness for optimal visibility.
5. Alarm Modes
The GEARGO TPMS features 6 distinct alarm modes to alert you to potential tire issues:
- High Pressure Alarm: Alerts when tire pressure exceeds the set high threshold.
- Low Pressure Alarm: Alerts when tire pressure falls below the set low threshold.
- High Temperature Alarm: Alerts when tire temperature exceeds the set high threshold.
- Fast Leak Alarm: Detects and alerts rapidly decreasing tire pressure.
- Sensor Low Voltage Alarm: Indicates a low battery in one of the tire sensors.
- Disconnection Alarm: Alerts if communication with a sensor is lost.

Image 5.1: Overview of the 6 alarm modes.
6. Charging
The display unit supports two charging methods:
- Solar Charging: The integrated solar panel efficiently recharges the display unit's battery when exposed to sunlight. For optimal performance, ensure the unit is placed where it receives direct sunlight.
- USB Charging: For faster charging or in low-light conditions, connect the display unit to a USB power source using the provided USB cable.

Image 6.1: Solar and USB charging options for the display unit.
7. Maintenance
To ensure the longevity and optimal performance of your TPMS:
- Sensor Batteries: The external sensors use CR1632 batteries. When a sensor low voltage alarm occurs, replace the battery promptly.
- Cleaning: Wipe the display unit and sensors with a soft, dry cloth. Avoid using abrasive cleaners or solvents.
- Sensor Check: Periodically check that sensors are securely tightened to prevent air leaks.
8. Troubleshooting
If you encounter issues with your GEARGO TPMS, refer to the following common problems and solutions:
- No Display/Unit Not Turning On:
- Ensure the unit is fully charged via USB or has sufficient solar exposure.
- Verify the vehicle ignition is on, as the unit may have an auto on/off feature linked to vehicle movement.
- Sensor Not Reading/Displaying Data:
- Check if the sensor is correctly installed and tightened on the valve stem.
- Ensure the sensor battery is not depleted (check for 'Sensor Low Voltage Alarm'). Replace if necessary.
- If a sensor was recently installed, drive for a short period to activate it.
- Air Leaks After Sensor Installation:
- Ensure the sensor is screwed on tightly and the anti-theft nut is firmly secured against the sensor.
- Check the valve stem for any damage or debris that might prevent a proper seal.
- Inaccurate Readings:
- Compare readings with a reliable manual tire gauge.
- Ensure sensors are correctly assigned to their respective tire positions (FL, FR, RL, RR).
- Frequent Alarms:
- Review and adjust your alarm thresholds for high/low pressure and high temperature to suit your vehicle's recommended tire specifications.
9. Specifications
| Feature | Specification |
|---|---|
| Model Number | I900000413 |
| Pressure Detection Range | 0-99 PSI (0-6.8 Bar) |
| Pressure Measurement Accuracy | ±0.5 PSI |
| Power Supply | Solar / USB Charging |
| Display Type | Color LCD with Auto Brightness Adjustment |
| Sensor Type | External |
| Sensor Battery | CR1632 (replaceable) |
| Operating Temperature | Refer to product packaging for specific range |
| Sensing Distance | 32.8 Feet |
| Material | Plastic |
| Item Weight | 200 Grams |
| Item Dimensions (L x W x H) | 25 x 25 x 25 millimeters |

Image 9.1: Key features highlighting durability and functionality.
10. Warranty Information
The GEARGO RV Tire Pressure Monitoring System (Model I900000413) comes with a 3-year warranty from the date of purchase. This warranty covers manufacturing defects and malfunctions under normal use. Please retain your proof of purchase for warranty claims. The warranty does not cover damage caused by misuse, accidents, unauthorized modifications, or improper installation.
11. Customer Support
For technical assistance, warranty claims, or any questions regarding your GEARGO RV TPMS, please contact GEARGO customer support. Refer to the contact information provided on the product packaging or the official GEARGO website.