Introduction
Thank you for choosing the OQIMAX Wireless Refrigerator Thermometer. This device provides real-time temperature monitoring for your refrigerator and freezer compartments, helping you maintain optimal food storage conditions. It features a clear LCD display, adjustable alarms, and historical temperature recording. Please read this manual carefully before use to ensure proper operation and longevity of your device.
Package Contents
- 1 x Temperature Station (Main Unit)
- 1 x Freezer Sensor
- 1 x Refrigerator Sensor
- 1 x User Manual

The package includes the main display unit, two remote sensors (one for freezer, one for refrigerator), and the instruction manual.
Product Features
- HD LCD Screen: A 3.7-inch display clearly shows real-time temperatures, MAX/MIN values, and alarm indicators.
- Dual-Channel Monitoring: Simultaneously monitors temperatures for both freezer and refrigerator compartments.
- Adjustable Upper/Lower Limit Alarms: Set custom temperature ranges. Alarms activate with flashing icons and audible alerts if temperatures exceed or fall below the set limits. Features a 2-minute delay to prevent false alarms from temporary door openings.
- MAX/MIN Temperature Record: Records maximum and minimum temperature values for the last 24 hours or all-time, allowing you to track temperature fluctuations. These records can be cleared.
- Backlight Function: For easy viewing in low-light conditions. The backlight automatically turns off after 10 seconds to conserve battery life.
- °C/°F Switch: Easily switch between Celsius and Fahrenheit temperature units.
- Easy Installation: The main unit can be placed upright or hung. Sensors come with hooks for convenient placement inside compartments.
- IPX4 Splash-proof Sensors: Designed to withstand splashes from any direction.
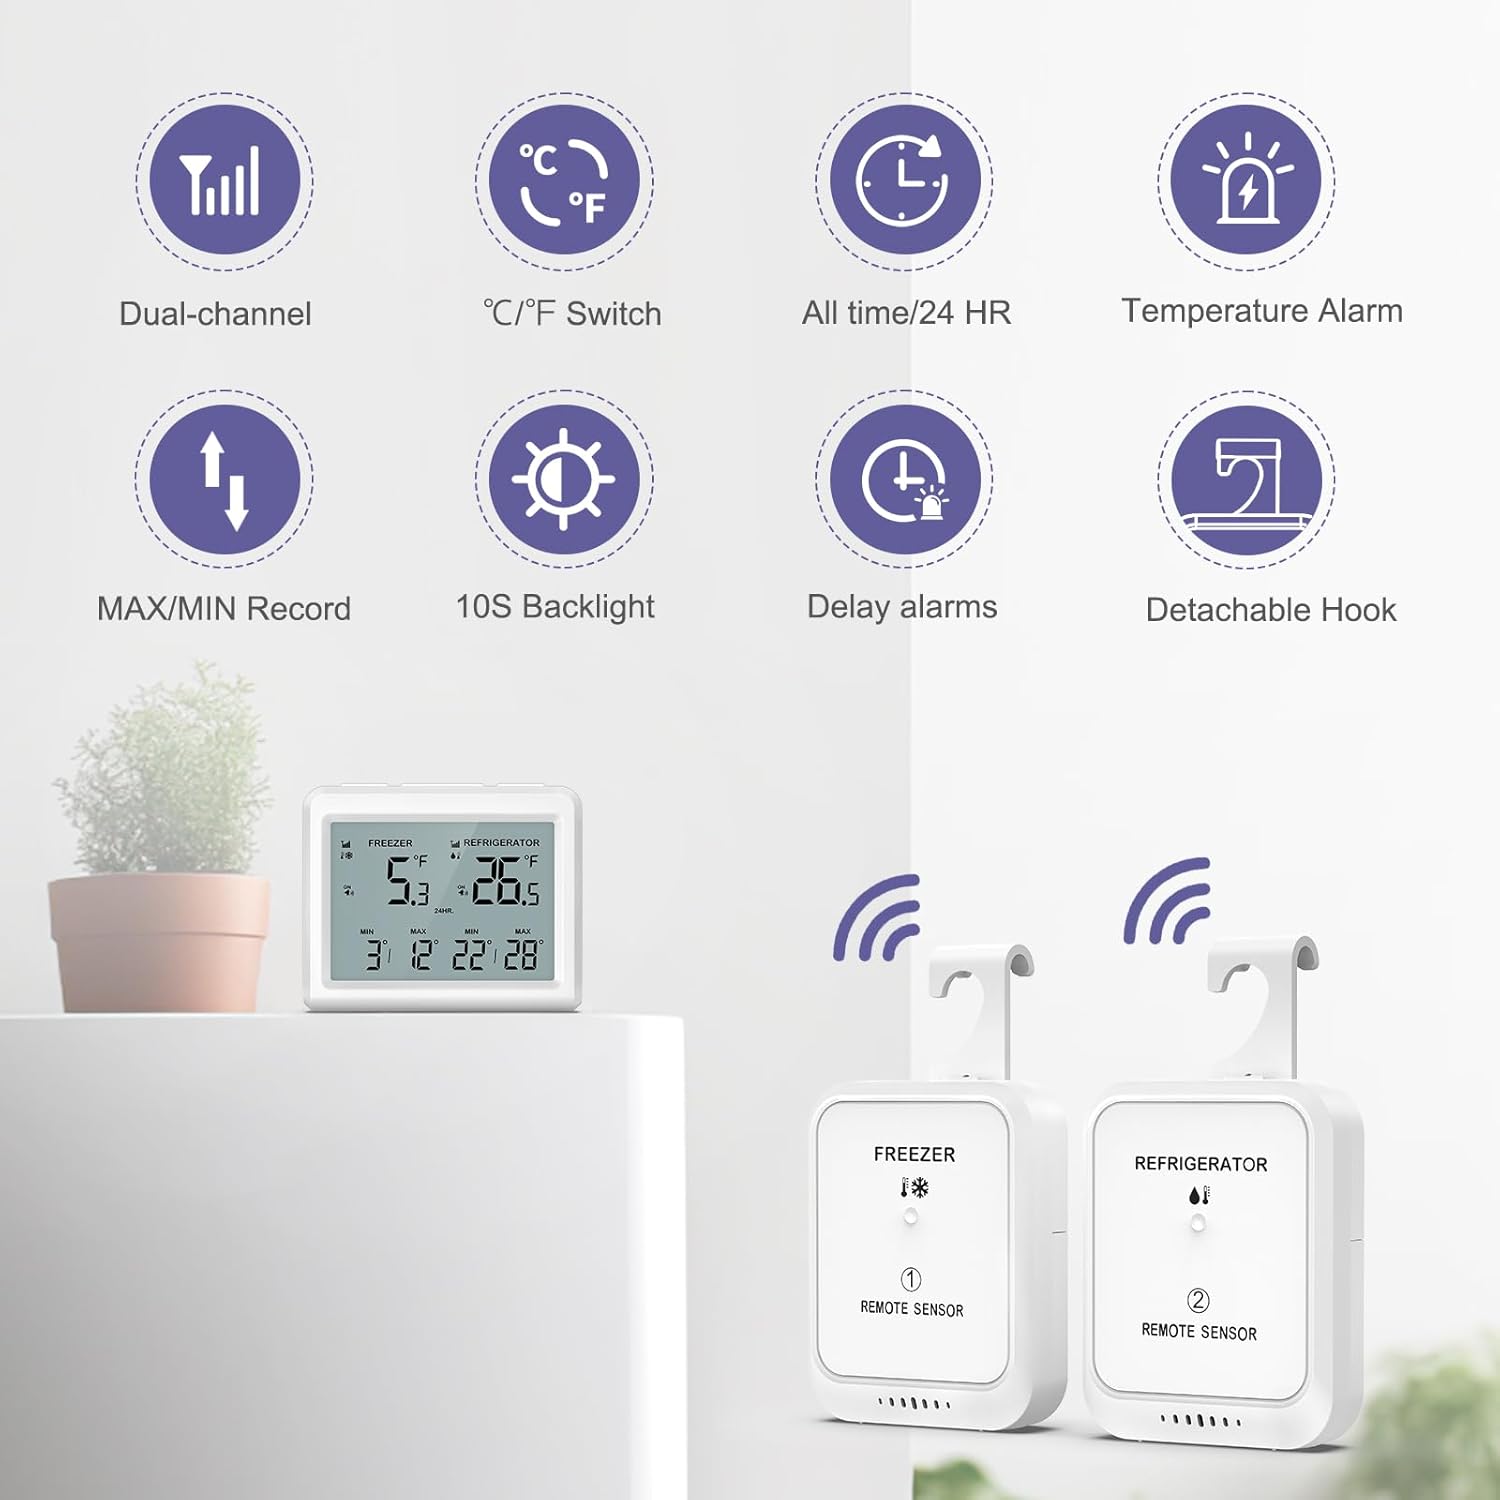
Overview of the main features including dual-channel monitoring, temperature unit switch, historical records, alarms, backlight, and detachable hooks for sensors.
Setup
1. Battery Installation
- Main Unit: Open the battery compartment on the back of the main unit. Insert 3 x AAA (LR03) 1.5V batteries, ensuring correct polarity. Close the compartment.
- Sensors: Open the battery compartment on each remote sensor. Insert 2 x AAA (LR03) 1.5V batteries into each sensor, ensuring correct polarity. Close the compartments.
2. Pairing the Sensors
- After installing batteries in the main unit, the freezer and refrigerator signal icons will flash, indicating it is ready to receive external signals.
- For each sensor, press the TX button (located inside the battery compartment or on the back) for immediate signal transmission. The main unit will display the temperature from the sensor once paired.
- If pairing does not occur immediately, wait for approximately 30 seconds for the detection cycle to complete. If still unsuccessful, long-press the RF/- button on the main unit to re-pair.
3. Sensor Placement
- Place the freezer sensor (labeled "FREEZER") inside your freezer compartment.
- Place the refrigerator sensor (labeled "REFRIGERATOR") inside your refrigerator compartment.
- Both sensors are equipped with hooks for easy hanging on shelves or racks, optimizing space.
- Position the main unit outside the refrigerator/freezer in a convenient location where you can easily read the display. It can stand upright or be hung.

Illustration of battery installation and placement options for the main unit and sensors.

Example of main unit placement on the refrigerator exterior and a sensor placed inside.
Operating Instructions
Display Overview

Understanding the information displayed on the main unit's LCD screen.
- The top left shows the current freezer temperature.
- The top right shows the current refrigerator temperature.
- Below each current temperature, the MIN and MAX recorded temperatures are displayed.
- Alarm icons (bell with ON/OFF) indicate alarm status for each compartment.
Button Functions
| Button | Short Press Function | Long Press Function |
|---|---|---|
| FREEZE SET | Toggle freezer alarm ON/OFF. | Set freezer alarm temperature. |
| CLE/+ | Select between 24-hour and All-time historical modes. | Clear historical MAX/MIN records. |
| RF/- | Display the set alarm value. | Re-pair sensors. |
| COOL SET | Toggle refrigerator alarm ON/OFF. | Set refrigerator alarm temperature. |
| °C/°F | Switch between Celsius (°C) and Fahrenheit (°F). | N/A |
Setting Alarms
- Freezer Alarm: Long press the FREEZE SET button. The freezer alarm temperature will start flashing. Use the CLE/+ and RF/- buttons to adjust the desired upper and lower limits. Short press FREEZE SET again to confirm and exit setting mode.
- Refrigerator Alarm: Long press the COOL SET button. The refrigerator alarm temperature will start flashing. Use the CLE/+ and RF/- buttons to adjust the desired upper and lower limits. Short press COOL SET again to confirm and exit setting mode.
- To activate/deactivate an alarm, short press the corresponding FREEZE SET or COOL SET button. An "ON" or "OFF" indicator will appear next to the alarm icon.
- Note: Alarms have a 2-minute delay to prevent false triggers from brief temperature changes (e.g., opening the door).
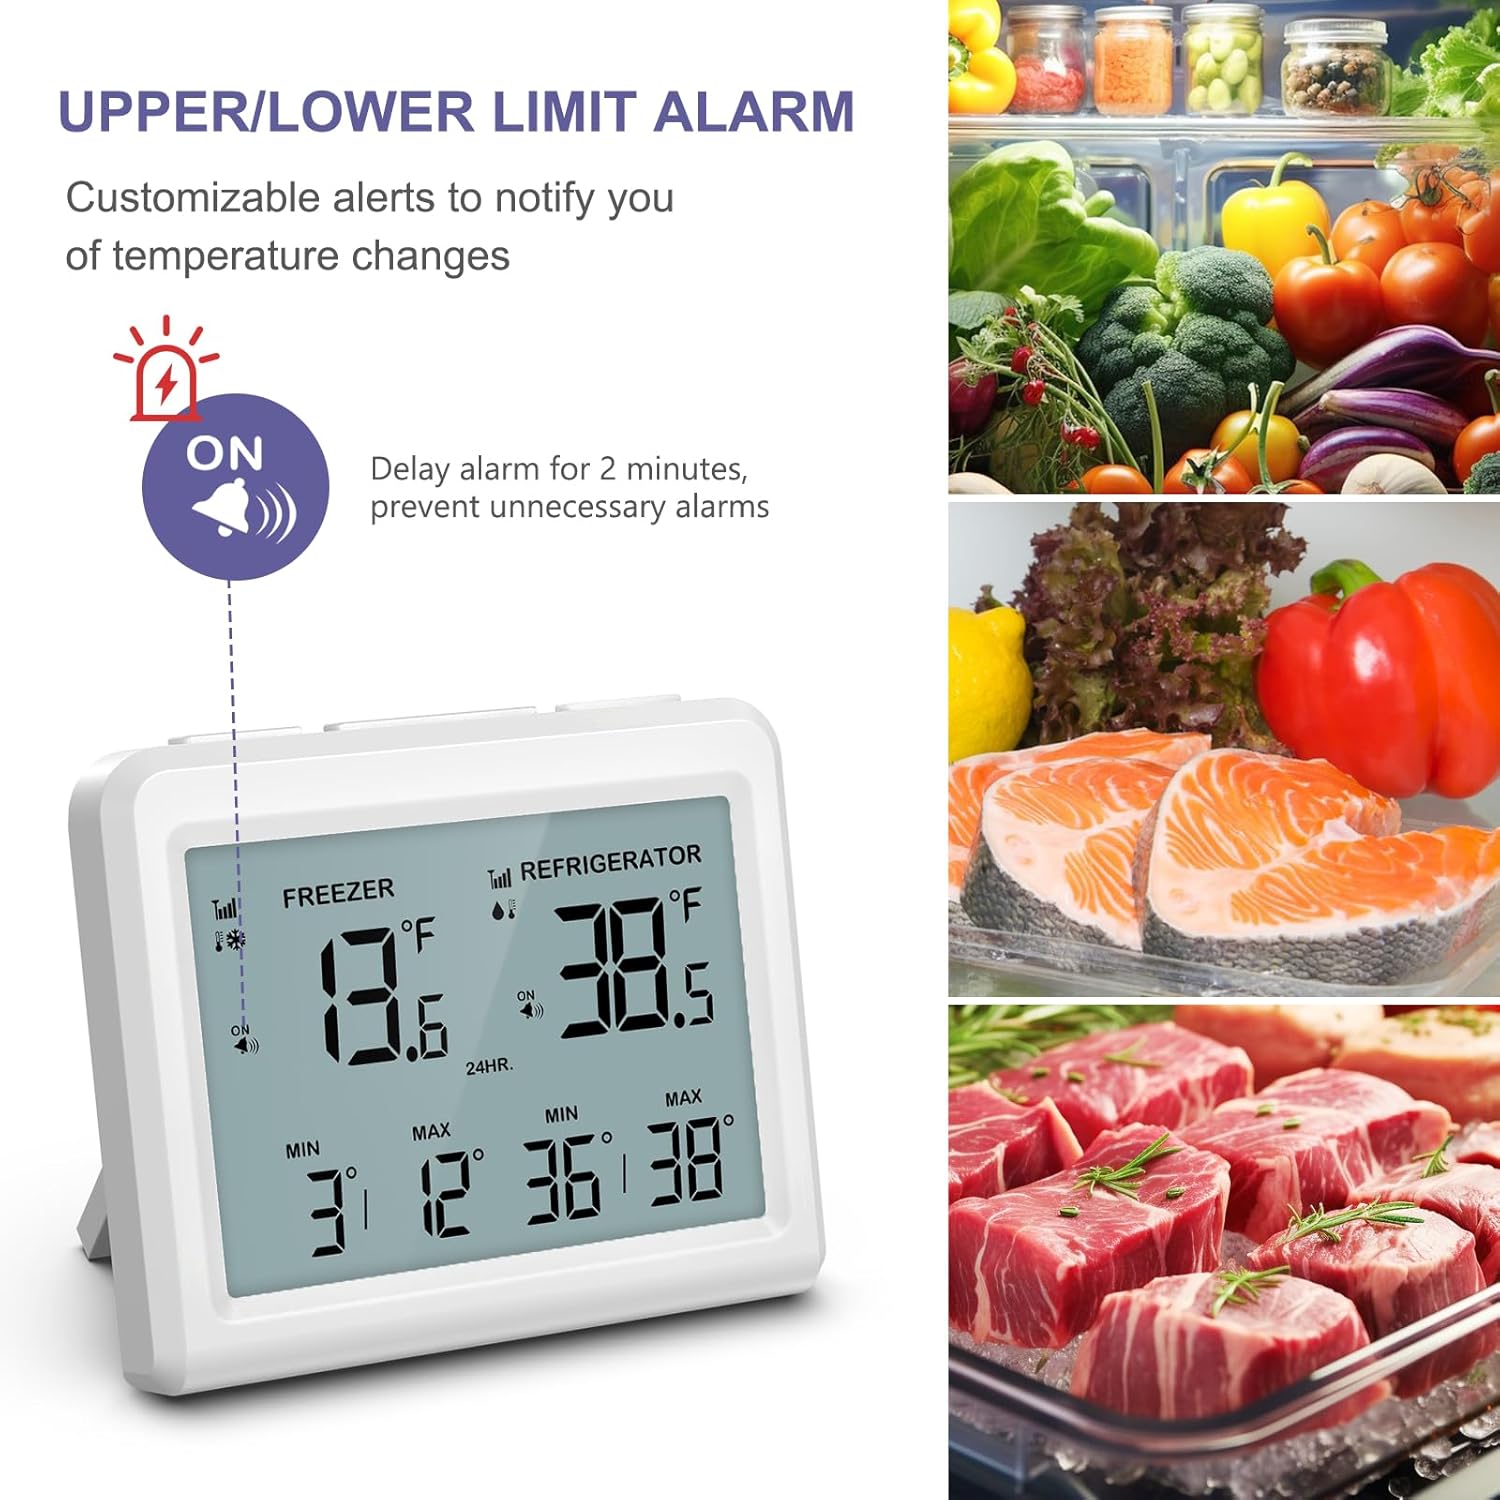
The display indicates when an alarm is active and the temperature is outside the set limits.
Viewing and Clearing MAX/MIN Records
- Short press the CLE/+ button to cycle between 24-hour and All-time MAX/MIN records.
- To clear the displayed historical records, long press the CLE/+ button.
Backlight
The backlight automatically activates when a button is pressed and turns off after 10 seconds of inactivity to save power.
Maintenance
Battery Replacement
When the battery indicator appears on the display, replace the batteries in the main unit or the respective sensor. Always use new AAA (LR03) 1.5V batteries and ensure correct polarity.
Cleaning
Wipe the main unit and sensors with a soft, damp cloth. Do not use abrasive cleaners or immerse the main unit in water. The sensors are IPX4 splash-proof but should not be submerged.
Storage
If storing the device for an extended period, remove all batteries to prevent leakage and damage.
Troubleshooting
| Problem | Possible Cause | Solution |
|---|---|---|
| No display on main unit. | Dead or incorrectly installed batteries. | Replace batteries (3xAAA) in the main unit, ensuring correct polarity. |
| Sensor temperature not displayed or shows "--". |
|
|
| Alarm sounds frequently. | Alarm limits set too close to operating temperature, or frequent door openings. | Adjust alarm limits to a wider range. Remember the 2-minute delay helps prevent false alarms. |
| Inaccurate temperature readings. | Sensor placed too close to cooling vents or heat sources. | Relocate the sensor to a more central area within the compartment, away from direct airflow or heat. |
Specifications
| Main Unit Dimensions | 9.5 x 8 x 2 cm (3.75 x 3.15 x 0.79 inches) |
| Main Unit Power | 3 x AAA (LR03) 1.5V batteries (not included) |
| Sensor Dimensions | 6 x 7.5 x 2 cm (2.36 x 2.95 x 0.79 inches) |
| Sensor Hook Length | 3 cm (1.2 inches) |
| Sensor Power | 2 x AAA (LR03) 1.5V batteries per sensor (not included) |
| Temperature Measurement Range | -40°C ~ 37.7°C (-40°F ~ 100°F) |
| Freezer Alarm Setting Range | -40°C ~ 0°C (-40°F ~ 32°F) |
| Refrigerator Alarm Setting Range | 0°C ~ 15°C (32°F ~ 59°F) |
| Temperature Accuracy | ± 1°C (± 1.8°F) |
| Resolution | 0.1°C (0.1°F) |
| Protection Grade | IPX4 (Splash-proof from all directions) |
| Transmission Frequency | 433 MHz |
| Wireless Range | Up to 80m / 26 ft (in open field) |
| Data Transmission Cycle | Every 30 seconds |
| Alarm Delay Time | 2 minutes |

Detailed dimensions of the main unit and remote sensors.
Warranty and Support
OQIMAX products are designed for reliability and performance. For any questions, technical support, or warranty inquiries, please contact your retailer or OQIMAX customer service through the contact information provided at the point of purchase. Please retain your proof of purchase for warranty claims.


