
1. Introduction
Thank you for purchasing the VIGORWORK 7-inch Car Stereo MP5 Player. This device is designed to enhance your in-car entertainment and connectivity with its high-definition touchscreen, Bluetooth capabilities, mirror link function, and various media playback options. Please read this manual thoroughly before installation and operation to ensure proper use and to maximize your enjoyment of the product.
2. Safety Information
To prevent injury or damage to the unit, please observe the following safety precautions:
- Professional Installation Recommended: Due to the complexity of car electrical systems, professional installation is highly recommended. Incorrect wiring can cause damage to the unit or the vehicle.
- Power Supply: Ensure the unit is connected to a 12V DC power supply with a negative ground.
- Avoid Water and Moisture: Do not expose the unit to water or excessive moisture.
- Temperature: Operate the unit within normal vehicle operating temperatures.
- Driving Safety: Do not operate the unit in a way that distracts you from driving. Always prioritize road safety.
- Ventilation: Ensure adequate ventilation around the unit to prevent overheating.
- Fuse Replacement: When replacing a fuse, ensure the new fuse has the correct amperage rating.
3. Package Contents
Please check the package for the following items:
- VIGORWORK 7-inch Car Stereo MP5 Player Unit
- Power Cable Harness
- Remote Control (Steering Wheel Controller)
- User Manual
- Mounting Brackets/Screws (if included)
4. Product Overview
The VIGORWORK Car Stereo MP5 Player features a 7-inch HD digital touchscreen with a 1024*600 resolution, supporting 1080P video playback. It offers a range of functionalities for an enhanced driving experience.
Key Features:
- HD Touchscreen: 7-inch display with 1024*600 resolution for clear visuals and 1080P video support.
- Bluetooth Connectivity: Hands-free calling, Bluetooth music streaming, and voice navigation support.
- Mirror Link: Two-way connection for Android phones and one-way projection for Apple phones.
- Steering Wheel Control: Compatible with included steering wheel controller for easy operation.
- Reverse Image Support: Automatically switches to rear view when reversing (requires optional camera).
- Multiple Media Playback: Supports USB, AUX, TF card, and various audio/video formats (APE, FLAC, WAV, DIS, MP3, AVI, MP4, etc.).
- FM Radio: High-performance digital tuning with 18 radio station presets.
- Sound Customization: Electronic volume, treble, bass, balance, and sound field adjustments with various EQ modes.
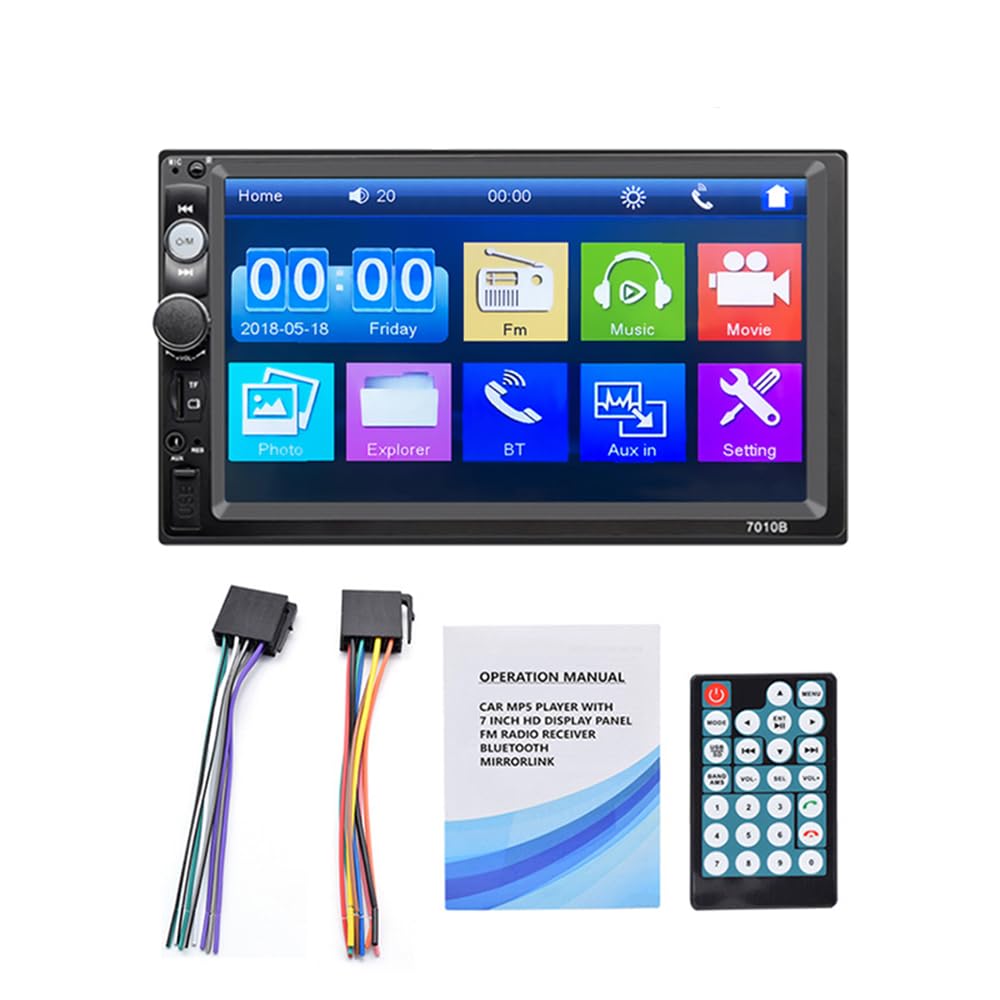
Figure 4.1: The 7-inch car stereo displaying video content, highlighting its 1024x600 resolution and multi-format playback capabilities.
5. Installation and Setup
This section provides general guidelines for installing your car stereo. Due to variations in vehicle models, specific wiring and mounting procedures may differ. If you are unsure, consult a professional installer.
5.1 Wiring Diagram (General)
Refer to the wiring diagram provided with your unit for specific connections. A typical setup includes:
- Yellow Wire: Constant 12V (Battery Positive)
- Red Wire: ACC (Accessory/Ignition Switch 12V)
- Black Wire: Ground (Chassis Ground)
- Orange/Brown Wire: Illumination (Connect to vehicle's illumination wire)
- Blue Wire: Power Antenna/Amplifier Remote Turn-On
- Speaker Wires: Connect to corresponding vehicle speakers (e.g., White/White-Black for Front Left, Gray/Gray-Black for Front Right, Green/Green-Black for Rear Left, Purple/Purple-Black for Rear Right).
- Reverse Gear Wire: Connect to the vehicle's reverse light circuit for automatic camera switching.
- Video Input: For rear view camera.
5.2 Mounting the Unit
- Remove the existing car stereo from your dashboard.
- Connect the wiring harness from the new unit to your vehicle's wiring. Ensure all connections are secure.
- Slide the new stereo into the dashboard opening. Secure it using the provided mounting brackets and screws.
- Reassemble the dashboard trim.
- Test all functions before finalizing the installation.
6. Operating Instructions
6.1 Basic Operation
- Power On/Off: Press the power button or turn the ignition key to ACC/ON.
- Volume Control: Use the rotary knob or steering wheel controls to adjust volume.
- Menu Navigation: Tap icons on the touchscreen to access different functions (Radio, Bluetooth, USB, AUX, Settings, etc.).
6.2 Bluetooth Connectivity
Connect your mobile phone via Bluetooth for hands-free calls and audio streaming.
- On the stereo, navigate to the Bluetooth menu.
- Enable Bluetooth on your mobile phone and search for available devices.
- Select "Car Radio" or a similar name from the list on your phone.
- Confirm the pairing code if prompted.
- Once connected, you can make/receive calls and play music through the car stereo.

Figure 6.1: The Bluetooth interface of the car stereo, demonstrating hands-free call functionality and music streaming.
6.3 Mirror Link Function
Mirror Link allows you to display your phone's screen on the car stereo. Use a USB data cable for connection.
- For Android Phones: Supports two-way connection (control from stereo or phone). Connect your phone via USB and follow on-screen prompts to enable USB debugging and allow screen mirroring.
- For Apple Phones: Supports one-way screen projection (view only, control from phone). Connect your iPhone via USB and allow screen mirroring when prompted.

Figure 6.2: Illustration of the Mirror Link feature, showing how mobile phones connect to the car stereo for screen mirroring.
6.4 FM Radio Operation
Access the FM radio function to listen to your favorite stations.
- Auto Scan: Press the "SCAN" button to automatically search and save available stations.
- Manual Tuning: Use the arrow buttons to fine-tune frequencies.
- Presets: Tap on a preset number (1-6) to recall a saved station. To save a station, tune to it and then press and hold a preset number.

Figure 6.3: The FM radio interface, displaying frequency tuning and station preset options.
6.5 Media Playback (USB, AUX, TF Card)
The unit supports various media inputs for audio and video playback.
- USB: Insert a USB flash drive into the USB port. The unit will automatically switch to USB mode or you can select it from the main menu.
- TF Card: Insert a TF (Micro SD) card into the designated slot. The unit will detect the card and allow playback.
- AUX: Connect an external audio device (e.g., MP3 player) to the AUX input using a 3.5mm audio cable. Select AUX mode from the main menu.

Figure 6.4: Visual representation of the four available playback modes: USB flash disk, AUX input, Bluetooth, and TF Card.
6.6 Steering Wheel Control
Use the provided steering wheel controller for convenient operation without taking your hands off the wheel.
- Answer/Hang Up: Manage phone calls.
- Skip Tracks: Navigate to the next or previous song.
- Volume Adjustment: Increase or decrease the audio volume.

Figure 6.5: An example of a steering wheel controller, illustrating its functions for managing calls, changing tracks, and adjusting volume.
6.7 Reverse Camera Function
If an optional rear view camera is connected and properly wired, the stereo will automatically display the reverse image when the vehicle is shifted into reverse gear.

Figure 6.6: The car stereo screen automatically switching to a reverse image with parking guidelines when the vehicle is in reverse gear.
7. Maintenance
- Cleaning the Screen: Use a soft, dry cloth to wipe the touchscreen. For stubborn smudges, slightly dampen the cloth with water or a screen cleaner designed for electronics. Avoid harsh chemicals.
- General Cleaning: Keep the unit free from dust and debris. Use a soft brush or compressed air to clean around buttons and ports.
- Avoid Extreme Temperatures: Prolonged exposure to extreme heat or cold can affect the unit's performance and lifespan.
8. Troubleshooting
| Problem | Possible Cause | Solution |
|---|---|---|
| No power | Incorrect wiring; Blown fuse; Loose connection. | Check power and ground connections. Inspect and replace fuses if necessary. Ensure all wires are securely connected. |
| No sound | Volume too low; Mute function active; Incorrect speaker wiring; Faulty speakers. | Increase volume. Check if mute is active. Verify speaker connections. Test with known good speakers. |
| Bluetooth not connecting | Bluetooth not enabled on phone/stereo; Device not discoverable; Incorrect pairing process. | Ensure Bluetooth is on for both devices. Make sure the stereo is in pairing mode. Delete previous pairings and try again. |
| Mirror Link not working | Incorrect USB cable; USB debugging not enabled (Android); Phone not compatible. | Use a high-quality USB data cable. Enable USB debugging in Android developer options. Ensure your phone model supports Mirror Link with the unit. |
| Rear view camera not displaying | Camera not connected; Reverse trigger wire not connected; Faulty camera. | Check camera video input and power connections. Ensure the reverse trigger wire is correctly connected to the vehicle's reverse light circuit. |
9. Specifications
| Feature | Detail |
|---|---|
| Screen Size | 7-inch HD Digital Touch Screen |
| Resolution | 1024*600 |
| Video Playback | Supports 1080P video |
| Bluetooth | Hands-free calls, music player, voice navigation |
| Mirror Link | Android (two-way), Apple (one-way) |
| Audio Formats | APE, FLAC, WAV, DIS, MP3, WMA, ACC, OGG, RA, AC3, MP2, AMR |
| Video Formats | AVI, MP4, FLV, PMP, RM, RMVB, MPG |
| Image Formats | JPEG |
| USB Port | High-speed USB 2.0, supports high current output for phone charging |
| TF Card Slot | Yes |
| AUX Input | Yes |
| FM Radio | Automatic scanning, 18 station storage |
| Power Supply | 12V DC (Negative Ground) |
| Dimensions (Approx.) | 180mm (W) x 104mm (H) x 63mm (D) |

Figure 9.1: Product dimensions of the VIGORWORK 7-inch Car Stereo, indicating width, height, and depth.
10. Warranty and Support
VIGORWORK products are designed and manufactured to the highest quality standards. For warranty information and technical support, please refer to the warranty card included with your product or contact your retailer. Keep your purchase receipt as proof of purchase.
For further assistance, please visit the VIGORWORK official website or contact customer service.