1. Introduction
The DigitPro VHS to Digital Converter (Model V102-A) is designed to help you digitize your old analog video tapes and other media into modern digital formats. This device allows you to record video and audio from various sources such as VCRs, VHS tapes, Hi8 camcorders, DVDs, TV boxes, and gaming systems directly to a Micro SD card or USB flash drive, without the need for a computer or additional software. It features a 5-inch OLED screen for real-time monitoring and playback.
2. Package Contents
Please verify that all items listed below are included in your package:
- 1 x DigitPro VHS to Digital Converter (Model V102-A)
- 1 x 5V Power Adapter
- 1 x HDMI Cable
- 1 x Type-C USB Cable
- 1 x AV Cable (3.5mm to RCA)
- 1 x User Manual
- 1 x Micro SD Card (pre-installed or included separately)

Image 2.1: DigitPro Converter and all included accessories, including the main unit, various cables, power adapter, user manual, and a Micro SD card.
3. Device Overview
3.1 Front Panel and Controls

Image 3.1: The front of the converter features a 5-inch OLED display and control buttons for Menu, Mode, Previous, OK, and Next functions.
- 5-inch OLED Screen: For previewing video during recording and playing back recorded files.
- Control Buttons: MENU, MODE, PREV, OK, NEXT buttons for navigating the interface and controlling operations.
3.2 Side and Top Panels

Image 3.2: The side of the converter shows various input/output ports and the Micro SD card slot.
- HDMI Input: Connect modern devices for recording.
- AV Input: Connect analog devices (VCR, camcorder) using the provided AV cable.
- HDMI Output: Connect to a TV or larger display for pass-through viewing.
- USB Port: For connecting a USB flash drive to save recordings or for power.
- Type-C Port: For power input.
- Micro SD Card Slot: Insert a Micro SD card (up to 128GB, FAT32 or exFAT format) for storing recordings.
- Built-in Speakers: Located on the back for audio monitoring.

Image 3.3: The device includes a built-in 1800mAh battery, providing approximately 1 hour of recording or 2 hours of playback on a full charge.
4. Setup
4.1 Powering the Device
- Connect the provided Type-C USB cable to the converter's Type-C port.
- Connect the other end of the USB cable to the 5V power adapter.
- Plug the power adapter into a wall outlet. The device can also be powered via a computer's USB port.
- The built-in 1800mAh battery allows for portable use. Ensure it is charged before use.
4.2 Inserting Storage Media
- Insert a Micro SD card (Class 10 or higher speed recommended, up to 128GB) into the Micro SD card slot on the side of the converter. Ensure the card is formatted to FAT32 or exFAT.
- Alternatively, connect a USB flash drive to the USB port.
4.3 Connecting Source Devices
The converter supports both HDMI and composite AV input.

Image 4.1: The converter can connect to a wide range of analog and digital video sources for recording.
- For Analog Sources (VCR, Camcorder, Hi8): Connect the provided AV cable (3.5mm jack) to the AV IN port on the converter. Connect the red, white, and yellow RCA plugs to the corresponding output ports on your analog source device.
- For Digital Sources (DVD Player, TV Box, Gaming System): Connect an HDMI cable (included) from the HDMI OUT port of your digital source device to the HDMI IN port on the converter.
4.4 Connecting to a Display (Optional)
To view your video on a larger screen during recording or playback, connect an HDMI cable from the HDMI OUT port on the converter to an HDMI IN port on your TV or monitor.
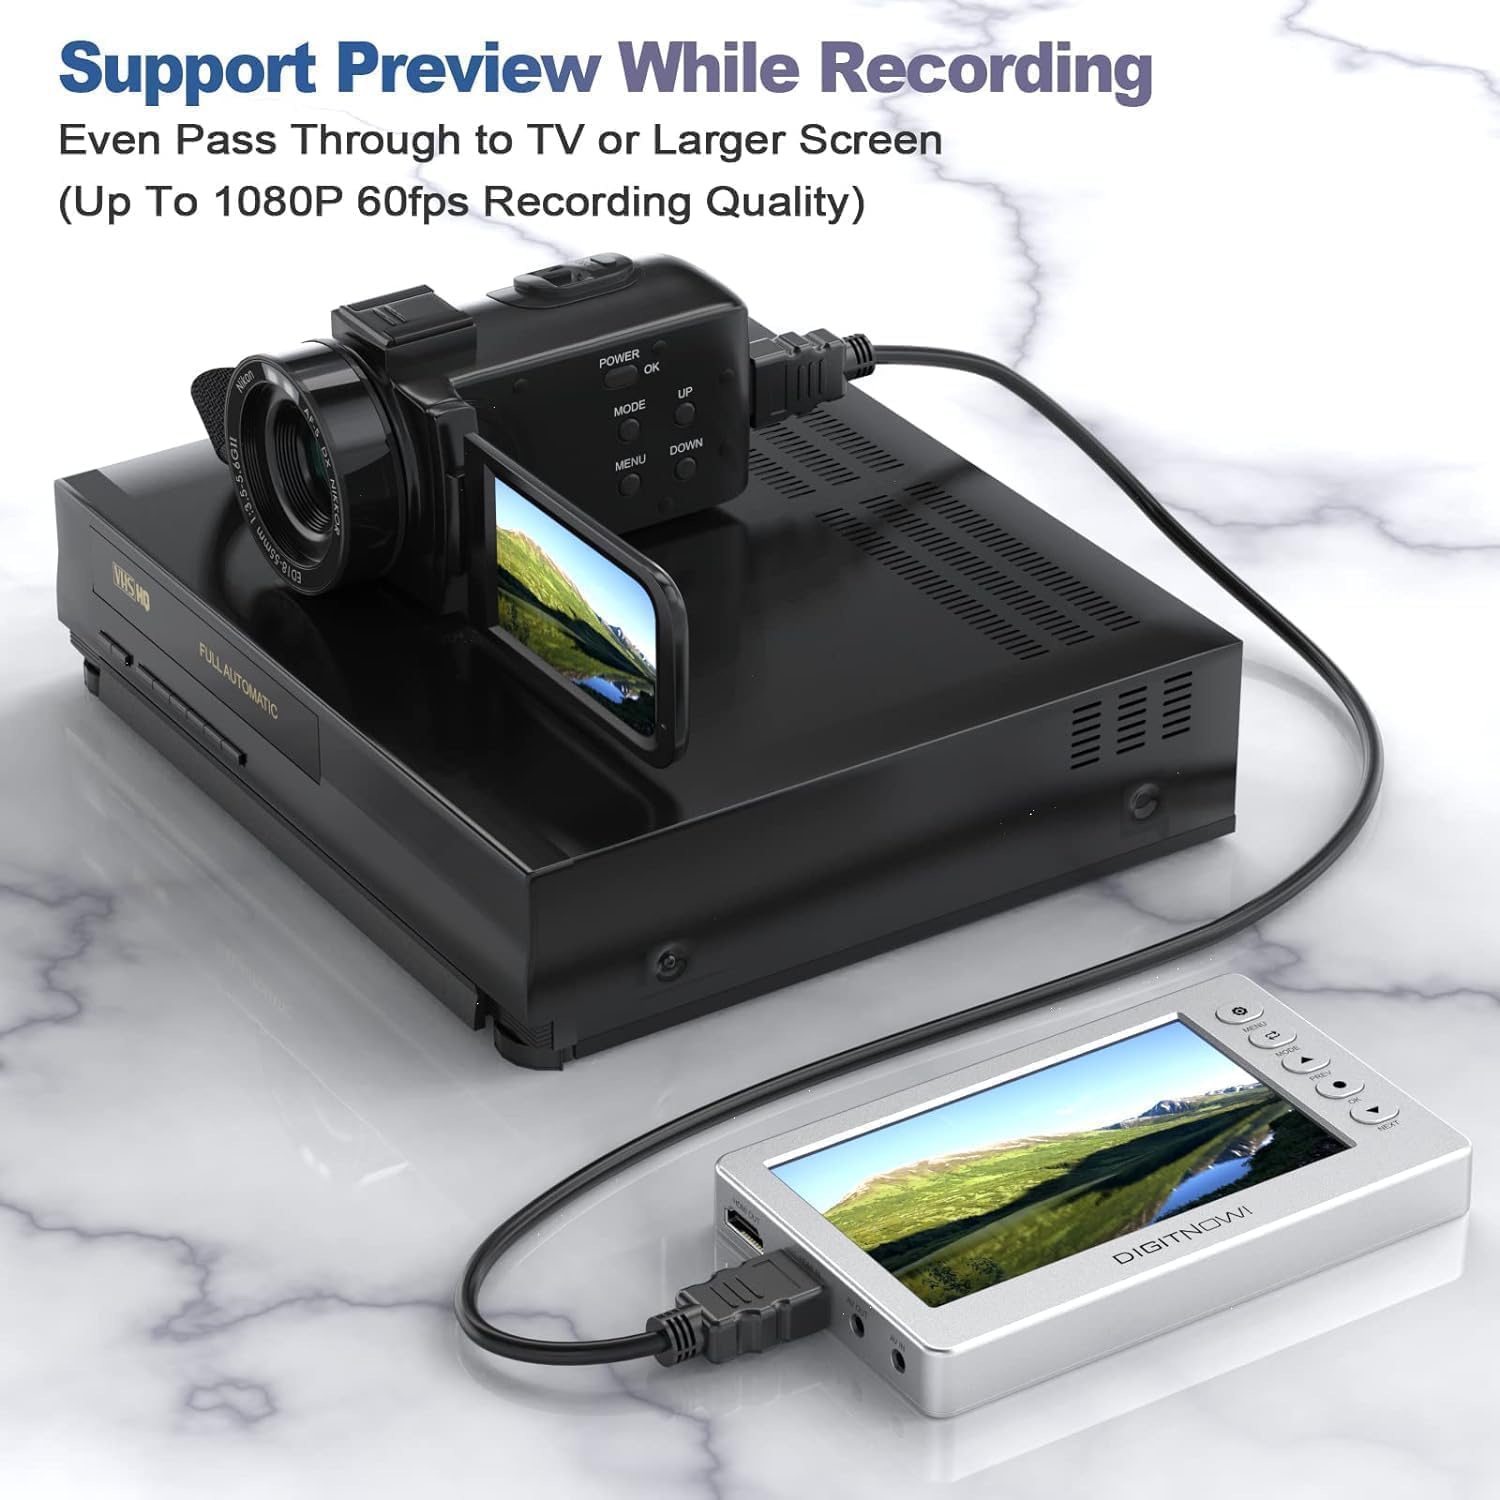
Image 4.2: The converter allows real-time preview of the video source on its screen while recording, or pass-through to an external display.

Image 4.3: The device supports Full HD 1080P 60FPS capture and can output to a larger display for enhanced viewing.
5. Operating Instructions
5.1 Power On/Off
Press and hold the Power button (usually located on the top or side) to turn the device on or off.
5.2 Navigating the Menu
Use the MENU button to access settings. Use the PREV/NEXT buttons to navigate through options and the OK button to confirm selections.
5.3 Selecting Input Source
Press the MODE button to switch between different input sources (HDMI, AV). Ensure the correct input is selected for your connected device.
5.4 Recording Video
- Ensure your source device is playing the video you wish to record.
- On the converter's screen, you should see the live video feed.
- Press the OK button to start recording. A recording indicator (e.g., 'REC') will appear on the screen.
- To stop recording, press the OK button again.
- Important Note: The device records video in approximately 30-minute segments. After 30 minutes, it will automatically save the current file and start a new recording file. If you require a single continuous video file for longer recordings, you will need to use video editing software on a computer to combine these segments.
5.5 Playing Back Recorded Files
- From the main screen, navigate to the playback mode using the MODE button or menu options.
- Use the PREV/NEXT buttons to browse through your recorded video files.
- Press the OK button to start playback of the selected file.
5.6 Transferring Files to a Computer
Recorded files are saved in MOV format on the Micro SD card or USB flash drive. To transfer them to a computer:
- Safely remove the Micro SD card from the converter and insert it into your computer's SD card reader (an adapter may be needed).
- Alternatively, connect the converter to your computer using the Type-C USB cable. The device should appear as an external storage device.
- Copy the MOV files from the storage device to your computer.
6. Maintenance
- Keep the device clean by wiping it with a soft, dry cloth. Avoid using liquid cleaners or solvents.
- Store the converter in a cool, dry place away from direct sunlight and extreme temperatures.
- Ensure all cables are disconnected when not in use to prevent damage.
- Regularly back up your recorded files to a computer or other storage solution.
7. Troubleshooting
| Problem | Possible Cause | Solution |
|---|---|---|
| No power | Power adapter not connected, battery drained. | Ensure power adapter is securely connected and plugged in. Charge the device if using battery power. |
| No video signal on screen | Incorrect input source selected, cables loose, source device not playing. | Press MODE to select correct input. Check all cable connections. Ensure source device is powered on and playing video. |
| Cannot record | No storage media, incompatible SD card format, insufficient space. | Insert Micro SD card or USB drive. Ensure card is FAT32/exFAT and has enough free space. Use a Class 10 or higher speed SD card. |
| Poor audio quality | Speakers obstructed, source audio issue. | Ensure the device's rear speakers are not obstructed. Check audio output from the source device. |
8. Specifications
| Feature | Detail |
|---|---|
| Model | V102-A |
| Display | 5-inch OLED Screen |
| Input Ports | HDMI, RCA (via 3.5mm AV cable) |
| Output Ports | HDMI |
| Recording Resolution | Up to 1080P 60FPS |
| Recording Format | MOV |
| Storage Media | Micro SD Card (up to 128GB, FAT32/exFAT), USB Flash Drive |
| Battery | 1800mAh Lithium Ion (approx. 1 hr recording, 2 hrs playback) |
| Power Input | 5V via Type-C USB |
| Dimensions | 7.17 x 4.84 x 3.23 inches (Package) |
| Item Weight | 1.23 pounds |
9. Warranty and Support
For customer service, technical support, or warranty inquiries, please contact DigitPro using the information below:
- Email: orderwarranty@gmail.com
- Telephone: +1 6264203743 (Monday - Friday, 9:00 AM - 5:00 PM PST)
- Address: 14th Ave, City of Industry, CA 91746
Please retain your purchase receipt for warranty purposes.


