
1. General Safety Instructions
Always read and understand all safety warnings, instructions, illustrations, and specifications provided with this power tool. Failure to follow all instructions listed below may result in electric shock, fire, and/or serious injury.
Work Area Safety
- Keep the work area clean and well-lit. Cluttered or dark areas invite accidents.
- Do not operate power tools in explosive atmospheres, such as in the presence of flammable liquids, gases, or dust. Power tools create sparks which may ignite the dust or fumes.
- Keep children and bystanders away while operating a power tool. Distractions can cause you to lose control.
Electrical Safety
- Power tool plugs must match the outlet. Never modify the plug in any way.
- Avoid body contact with earthed or grounded surfaces, such as pipes, radiators, ranges, and refrigerators. There is an increased risk of electric shock if your body is earthed or grounded.
- Do not expose power tools to rain or wet conditions. Water entering a power tool will increase the risk of electric shock.
Personal Safety
- Stay alert, watch what you are doing, and use common sense when operating a power tool. Do not use a power tool while you are tired or under the influence of drugs, alcohol, or medication.
- Use personal protective equipment. Always wear eye protection. Protective equipment such as dust masks, non-skid safety shoes, hard hats, or hearing protection used for appropriate conditions will reduce personal injuries.
- Prevent unintentional starting. Ensure the switch is in the off-position before connecting to a battery pack, picking up or carrying the tool.
Power Tool Use and Care
- Do not force the power tool. Use the correct power tool for your application.
- Disconnect the battery pack from the power tool before making any adjustments, changing accessories, or storing power tools.
- Store idle power tools out of the reach of children and do not allow persons unfamiliar with the power tool or these instructions to operate the power tool.
- Maintain power tools and accessories. Check for misalignment or binding of moving parts, breakage of parts, and any other condition that may affect the power tool’s operation.
Circular Saw Specific Safety
- Keep hands away from the cutting area and the blade. Keep your second hand on the auxiliary handle, or motor housing. If both hands are holding the saw, they cannot be cut by the blade.
- Do not reach underneath the workpiece. The guard cannot protect you from the blade below the workpiece.
- Adjust the cutting depth to the thickness of the workpiece. Less than a full tooth of the blade should be visible below the workpiece.
- Never hold the workpiece in your hands or across your leg while cutting. Secure the workpiece to a stable platform.
- Always use blades of the correct size and type for your saw.
2. Product Overview
The Truper MAX-20SCS is a 6-1/2 inch brushless 20V cordless circular saw designed for efficient cutting of various materials including wood, metal, and plastic. Its brushless motor ensures durability and requires minimal maintenance. The saw features ergonomic handles for comfortable use and a robust aluminum shoe and guard for protection.
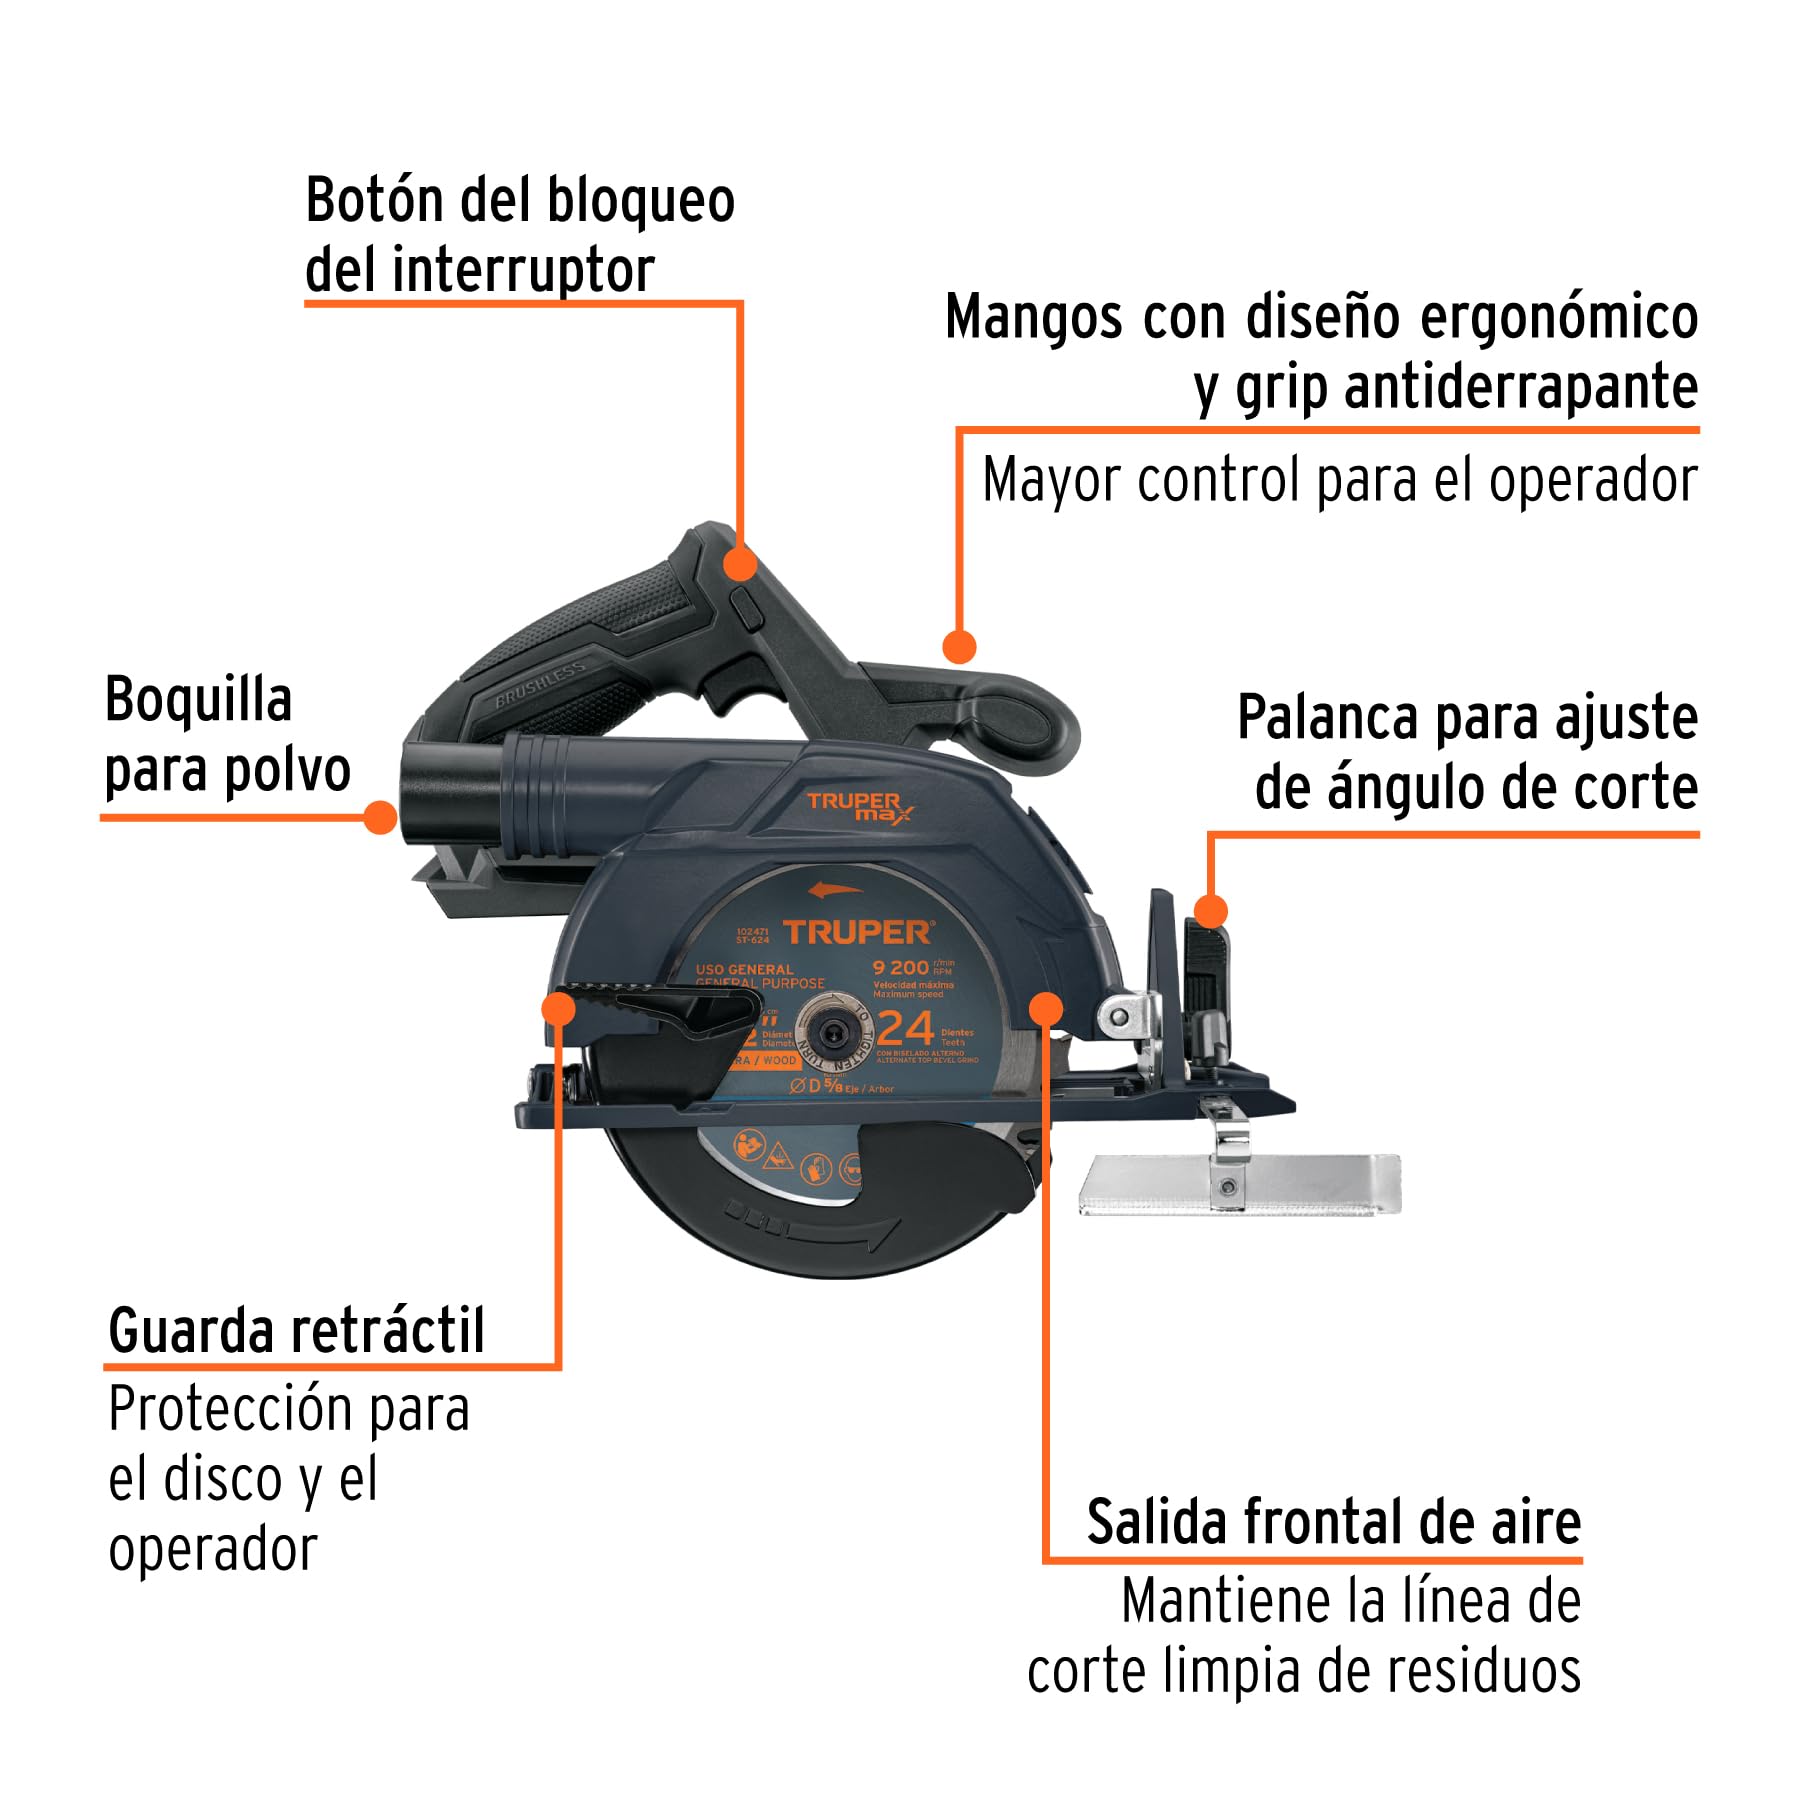
Figure 1: Truper MAX-20SCS Circular Saw Components
This image shows the main components of the Truper MAX-20SCS circular saw, including the switch lock button, ergonomic non-slip comfort grip handles, dust nozzle, bevel angle adjustment lever, retractable guard, and front air outlet.
Key Features
- Brushless Motor: Requires no maintenance and prevents premature wear, extending tool life.
- Ergonomic Comfort Grip Handles: Designed for enhanced control and reduced user fatigue.
- Bevel Capacity: Adjustable cutting angle from 0° to 45° for versatile applications.
- Aluminum Shoe and Guard: Provides durability and protection during operation.
- Accidental Start-up Protection: Enhances user safety by preventing unintended activation.
- Dust Nozzle and Front Air Outlet: Helps keep the cutting line clear of debris for improved visibility and cleaner cuts.
3. Included Components
The Truper MAX-20SCS circular saw comes with the following components:
- Truper MAX-20SCS 6-1/2" Brushless 20V Cordless Circular Saw (Tool Only)
- 24-tooth Tungsten Carbide Blade (6-1/2")
- Parallel Guide
- Allen Wrench
- Dust Nozzle
- Vacuum Adapter
Note: Battery and charger are sold separately.
4. Specifications
| Specification | Detail |
|---|---|
| Model Number | 103234 |
| Brand | Truper Max |
| Blade Diameter | 6-1/2 inches (16.5 cm) |
| Motor Type | Brushless |
| Voltage | 20V |
| Blade Material | Tungsten Carbide |
| Bevel Capacity | 0° - 45° |
| Recommended Surface | Wood, Metal, Plastic |
| Color | Gray |
| Country of Origin | Mexico |
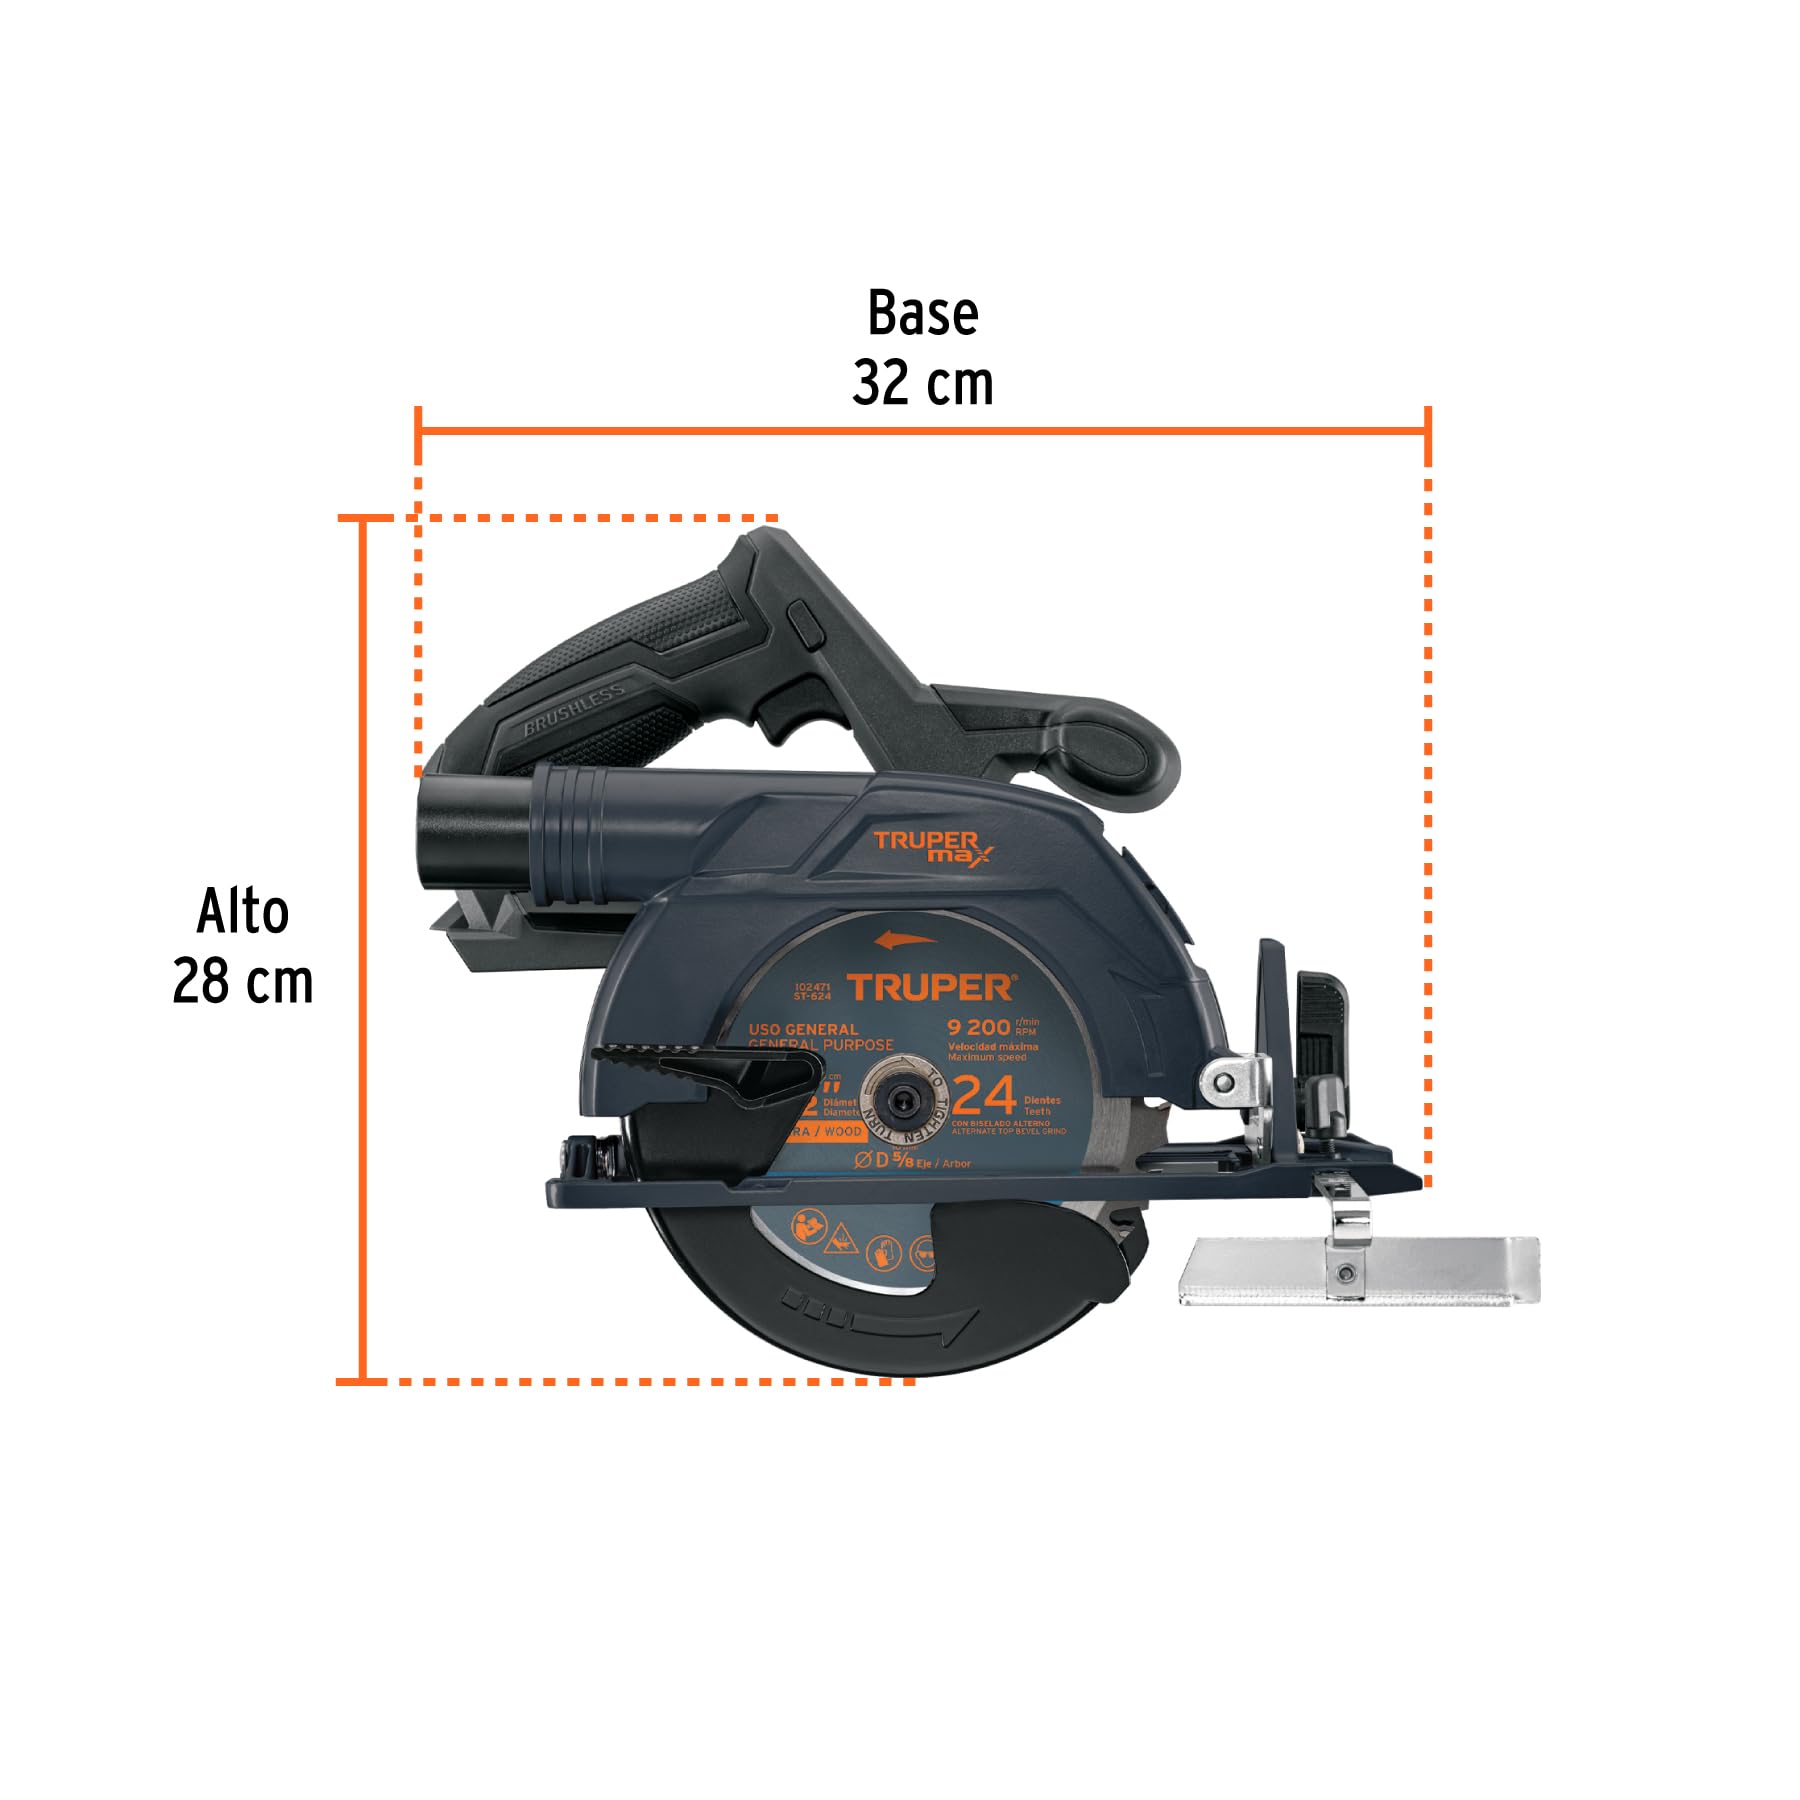
Figure 2: Truper MAX-20SCS Circular Saw Dimensions
This image illustrates the approximate dimensions of the circular saw: Base 32 cm (12.6 inches) and Height 28 cm (11 inches).
5. Setup
5.1 Battery Installation
- Ensure the saw is turned off and the switch lock button is engaged.
- Align the battery pack with the battery port on the saw.
- Slide the battery pack into the port until it clicks securely into place.
- To remove, press the battery release button and slide the battery out.
5.2 Blade Installation
Always disconnect the battery before changing blades.
- Place the saw on a flat, stable surface.
- Locate the blade arbor lock button (if present) and press it to prevent the blade from rotating.
- Using the provided Allen wrench, loosen the arbor nut by turning it counter-clockwise.
- Lift the retractable guard and carefully remove the old blade (if applicable).
- Ensure the new blade's teeth are pointing in the direction of rotation indicated by the arrow on the saw.
- Place the new blade onto the arbor, ensuring it sits flush against the inner flange.
- Replace the outer flange and arbor nut. Tighten the arbor nut securely with the Allen wrench while holding the arbor lock button. Do not overtighten.
- Release the arbor lock button and check that the blade spins freely.
5.3 Adjusting Cutting Depth
- Loosen the depth adjustment lever.
- Raise or lower the saw shoe to achieve the desired cutting depth. The blade should extend approximately 1/8 inch (3 mm) below the workpiece.
- Tighten the depth adjustment lever firmly.
5.4 Adjusting Bevel Angle
- Loosen the bevel angle adjustment lever (refer to Figure 1).
- Tilt the saw shoe to the desired angle between 0° and 45°. Use the angle scale for precision.
- Tighten the bevel angle adjustment lever securely.
5.5 Connecting Dust Extraction
For cleaner operation and improved visibility, connect a dust extraction system.
- Attach the dust nozzle to the saw's dust port.
- Connect a vacuum hose to the vacuum adapter, then attach the adapter to the dust nozzle.
6. Operating Instructions
6.1 Starting and Stopping the Saw
- To start the saw, press the accidental start-up protection switch lock button (refer to Figure 1) and then squeeze the trigger switch.
- To stop the saw, release the trigger switch. The blade will come to a stop.
6.2 Making a Cut
- Ensure the workpiece is securely clamped and stable.
- Position the saw with the front edge of the shoe resting on the workpiece, ensuring the blade is clear of the material.
- Start the saw and allow the blade to reach full speed before engaging the material.
- Slowly push the saw forward through the workpiece, maintaining a steady, even pressure. Do not force the saw.
- Keep both hands firmly on the ergonomic handles for control.
- Once the cut is complete, release the trigger and allow the blade to stop completely before lifting the saw from the workpiece.
6.3 Cutting Different Materials
- Wood: Use the included tungsten carbide blade. Adjust cutting depth appropriately.
- Metal: Use a specialized metal-cutting blade (sold separately). Apply a slower feed rate.
- Plastic: Use a fine-tooth blade (sold separately) to prevent melting or chipping. Adjust speed and feed rate as needed.
7. Maintenance
7.1 Cleaning
- Always disconnect the battery pack before performing any cleaning or maintenance.
- Use a soft brush or compressed air to clean dust and debris from the ventilation openings and around the blade area.
- Wipe the tool housing with a damp cloth. Do not use harsh chemicals or abrasive cleaners.
- Keep the retractable guard clean and ensure it moves freely.
7.2 Blade Care
- Regularly inspect the blade for sharpness, cracks, or missing teeth. Replace damaged blades immediately.
- Clean resin and pitch buildup from the blade using a suitable blade cleaner.
7.3 Brushless Motor
The Truper MAX-20SCS features a brushless motor, which requires no carbon brush replacement or routine motor maintenance. This design contributes to longer tool life and consistent performance.
7.4 Storage
- Store the saw in a dry, secure location out of reach of children.
- Remove the battery pack from the tool before storing for extended periods.
8. Troubleshooting
| Problem | Possible Cause | Solution |
|---|---|---|
| Saw does not start | Battery not inserted correctly Battery discharged Switch lock button not pressed | Ensure battery is fully seated Charge battery Press switch lock button before trigger |
| Poor cut quality / Blade binds | Dull or damaged blade Incorrect blade for material Improper cutting depth Forcing the saw | Replace blade Use appropriate blade Adjust cutting depth Reduce feed rate, let saw do the work |
| Excessive vibration | Loose blade Damaged blade Bent arbor | Tighten arbor nut Replace blade Contact service center |
| Dust accumulation | Dust nozzle blocked Dust extraction not connected | Clear dust nozzle Connect dust extraction system |
9. Warranty and Support
9.1 Warranty Information
The Truper MAX-20SCS circular saw comes with a 5-year unconditional warranty from the date of purchase. Please retain your proof of purchase for warranty claims. This warranty covers defects in materials and workmanship under normal use.
9.2 Customer Support
For technical assistance, warranty claims, or to order replacement parts, please contact Truper Max customer service. Refer to the contact information provided on the product packaging or the official Truper website.
When contacting support, please have your product model (MAX-20SCS) and serial number (if applicable) ready.


