1. Introduction
The OnRetul V119 OBD2 Scanner is a professional diagnostic tool designed for automotive enthusiasts and mechanics. It provides comprehensive diagnostic functions for OBD2/EOBD compliant vehicles manufactured since 1996. This manual will guide you through the setup, operation, maintenance, and troubleshooting of your V119 scanner.

The V119 OBD2 Scanner, an upgraded diagnostic tool, features full OBD2 modes, battery voltage test, smog check, DTC lookup (10000+ codes), I/M readiness, and check engine light diagnostics.
2. Key Features
- Compatibility: Works with all OBD2/EOBD compliant vehicles manufactured since 1996 (US, European, Asian).
- Diagnostic Functions: Reads and clears check engine light codes, displays live sensor data, provides code definitions.
- Voltage Testing: Built-in voltage meter monitors vehicle battery health and electrical system performance.
- User-Friendly Design: Large LCD screen with intuitive interface for easy navigation and clear display.
- Plug-and-Play: Simple connection to vehicle's OBD2 port; no additional software or batteries required.

This image illustrates the comprehensive OBDII modes available, including Read Codes, Clear Codes, Mode 6, Voltage Test, O2 Sensor Test, Freeze Frame, I/M Readiness, Vehicle Info, Live Data Graph, 10000+ DTC Library, and 13 Languages Support.
3. Setup
The V119 OBD2 Scanner is designed for simple plug-and-play operation. Follow these steps to set up your device:
- Locate the OBD2 Port: The OBD2 port is typically located under the dashboard on the driver's side of the vehicle. Refer to your vehicle's owner's manual if you cannot find it.
- Connect the Scanner: Plug the 16-pin OBDII connector from the V119 scanner into your vehicle's OBD2 port. Ensure a secure connection.
- Power On: The scanner will automatically power on once connected to the vehicle's OBD2 port. No external power source or batteries are required.
- Initial Link: The scanner will attempt to link to the vehicle's system. This process may take a few moments.

The V119 scanner features a handheld design, making it compact and powerful. Key features include a 1.77-inch Full Color LCD-TFT Screen, Bright Acrylic Screen Protective Cover, High Resilience Buttons, a 16-PIN Heavy-duty Lead Standard OBDII Plug, and an Upgraded CPU for High-speed Processing.
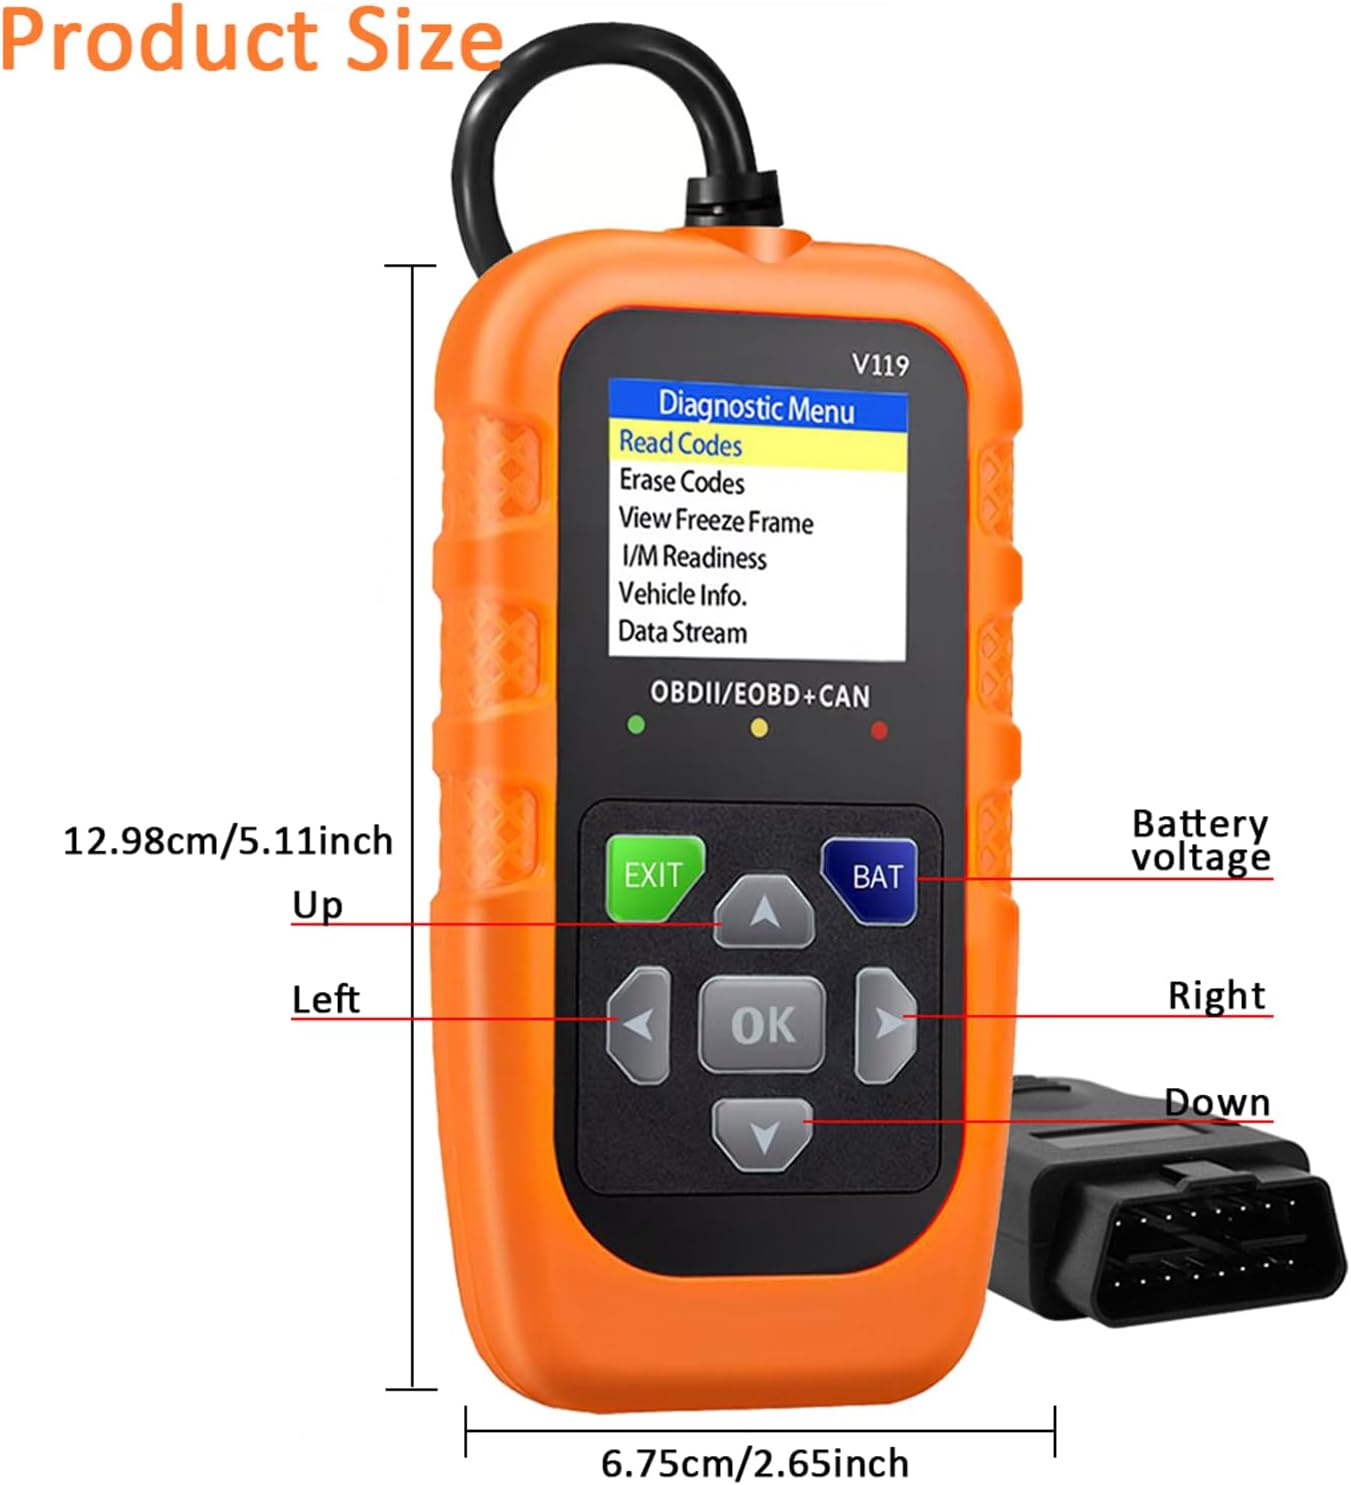
The scanner measures approximately 12.98 cm (5.11 inches) in length and 6.75 cm (2.65 inches) in width, indicating its compact size.
4. Operating Instructions
The V119 scanner features an intuitive interface with navigation buttons. Use the UP, DOWN, LEFT, RIGHT arrow buttons to navigate menus, and the OK button to confirm selections. The EXIT button returns to the previous screen or exits a function.
4.1. Reading and Clearing Codes
To read or clear diagnostic trouble codes (DTCs):
- From the main menu, select "Read Codes" or "Erase Codes".
- Follow the on-screen prompts to complete the operation.
- Ensure the ignition is in the ON position (engine off) when clearing codes.
4.2. Live Data Stream
To view real-time sensor data:
- Select "Data Stream" from the diagnostic menu.
- The scanner will display various live parameters from the vehicle's sensors.
4.3. Battery Test
To check your vehicle's battery health:
- Select the battery icon from the main menu or "Battery Test" from the diagnostic menu.
- Choose between "Battery Measurement" for current voltage or "Battery Monitoring" for a voltage curve over time.

The Battery Test function allows measurement of battery voltage, viewing the battery voltage curve, and assessing battery life. The screen shows options for Battery Measurement and Battery Monitoring, with a sample voltage reading of 11.9V and a graph indicating 'Poor', 'Medium', and 'Good' battery health.
4.4. DTC Lookup
To look up definitions for diagnostic trouble codes:
- Select "DTC Lookup" from the menu.
- Enter the DTC code using the arrow buttons and confirm with OK.
- The scanner will display the definition of the code.

The device offers a 10000+ DTC lookup feature, allowing users to search codes directly in the database. It displays diagnostic menu options, trouble codes (stored, pending, permanent), and system status including MIL status, codes found, and monitor readiness.
4.5. I/M Readiness
To check if your vehicle is ready for an emission test:
- Select "I/M Readiness" from the menu.
- The scanner will display the status of various emission-related monitors.

The I/M Readiness function provides a quick test to determine if the vehicle is ready for an emission test. It shows the status of various monitors (MIL, DTC, MIS, FUE, CCM, CAT, HCAT, EVAP, AIR, O2S, HRT, EGR) for both 'Since DTCs Cleared' and 'This Drive Cycle'.
4.6. Language Settings
To change the display language:
- Navigate to the settings menu (gear icon).
- Select "Language" and choose your preferred language from the list.
An official video demonstrating the V119 OBD2 Scanner in use, showing its interface and basic diagnostic functions, including language selection.

The user-friendly interface includes visual indicators: Green for good condition, Yellow for attention required, and Red for immediate action needed.

This diagnostic tool can Read Codes, Clear Codes, view Live Data, and access Vehicle Info. It helps identify issues such as an engine shut off solenoid, unpleasant pungent smell, or high intake air temperature.
5. Maintenance
To ensure the longevity and optimal performance of your V119 OBD2 Scanner:
- Cleaning: Wipe the device with a soft, dry cloth. Avoid using abrasive cleaners or solvents.
- Storage: Store the scanner in a cool, dry place away from direct sunlight and extreme temperatures.
- Cable Care: Do not bend or crimp the OBD2 cable excessively. Store it neatly to prevent damage.
- Avoid Drops: Protect the device from drops and impacts, which can damage internal components or the screen.
6. Troubleshooting
If you encounter issues with your V119 OBD2 Scanner, refer to the following common problems and solutions:
| Problem | Possible Cause | Solution |
|---|---|---|
| Scanner does not power on. | Loose connection, vehicle's OBD2 port issue, internal device fault. | Ensure the OBD2 connector is fully seated. Check vehicle's fuse for the OBD2 port. Try on another compatible vehicle if possible. |
| Cannot link to vehicle / Communication error. | Incorrect protocol, vehicle not OBD2 compliant, ignition off, faulty cable. | Verify vehicle is OBD2 compliant (1996 or newer). Ensure ignition is ON. Check cable for damage. |
| Screen navigation skips pages or is unresponsive. | Button sensitivity, rapid button presses. | Press buttons firmly and deliberately. Avoid rapid, repeated presses. |
| Incorrect code definitions or data. | Outdated firmware (unlikely for this model), vehicle specific codes. | Consult a professional mechanic for complex or manufacturer-specific codes. |
7. Specifications
| Specification | Detail |
|---|---|
| Manufacturer | OnRetul |
| Model | V119 (Car Scanner) |
| Item Weight | 6.4 ounces |
| Product Dimensions | 2.65 x 1 x 5.11 inches |
| Automotive Fit Type | Universal Fit |
| Display | 1.77-inch Full Color LCD-TFT Screen |
| Connectivity | 16-PIN Heavy-duty Lead Standard OBDII Plug |
| Power Source | Vehicle's OBD2 port (no batteries required) |
8. Warranty and Support
For warranty information and technical support, please refer to the documentation included with your product or contact OnRetul customer service through their official website or the retailer where the product was purchased. Keep your purchase receipt as proof of purchase.


