
LoopTone TR-18CDBB
LoopTone 10-in-1 Vinyl Record Player
User Manual
Introduction
This manual provides detailed instructions for the setup, operation, and maintenance of your LoopTone 10-in-1 Vinyl Record Player. Please read this manual thoroughly before using the product to ensure proper function and longevity.

Image: The LoopTone 10-in-1 Vinyl Record Player, showcasing its multi-functional design with a record on the turntable, cassette deck, and CD tray visible.

Image: An infographic highlighting the 10-in-1 features of the record player, including 3-speed LP, CD Player, Bluetooth, Cassette, Radio, USB Player, SD Player, Headphone, RCA Line Out, and AUX In.
Setup
- Unpacking: Carefully remove the unit from its packaging. Retain the packaging materials for future transport or storage.
- Placement: Place the record player on a stable, level surface away from direct sunlight, heat sources, and excessive dust or moisture. Ensure adequate ventilation around the unit.
- Power Connection: Connect the power cord to the AC inlet on the back of the unit, then plug it into a standard wall outlet.
- Stylus Protection: Before first use, gently remove the clear plastic protective cap from the stylus (needle) on the tonearm. Failure to do so will prevent proper playback and may damage the stylus.
Operating Instructions
General Controls
- Power On/Off & Volume: Rotate the VOLUME knob clockwise to turn the unit on and increase volume. Rotate counter-clockwise to decrease volume and turn off.
- Mode Selection: Use the MODE button to switch between functions: PHONO (Vinyl), CD, TAPE (Cassette), USB/SD, BLUETOOTH, and RADIO (AM/FM).
- Remote Control: The included remote control allows for convenient operation of mute, play/pause, mode switching, and other functions from a distance.
Turntable Operation (PHONO Mode)
- Select Speed: Set the speed selector switch (located near the turntable) to the appropriate speed for your record: 33-1/3 RPM for LPs, 45 RPM for singles (use the included 45 RPM adapter if needed), or 78 RPM for older shellac records.
- Place Record: Place a vinyl record on the turntable platter.
- Start Playback: Gently lift the tonearm using the cue lever and position the stylus over the desired track on the record. Lower the tonearm slowly onto the record. The turntable will begin to spin automatically.
- Automatic Stop: The turntable features an auto-stop function that will stop spinning when the record reaches its end.
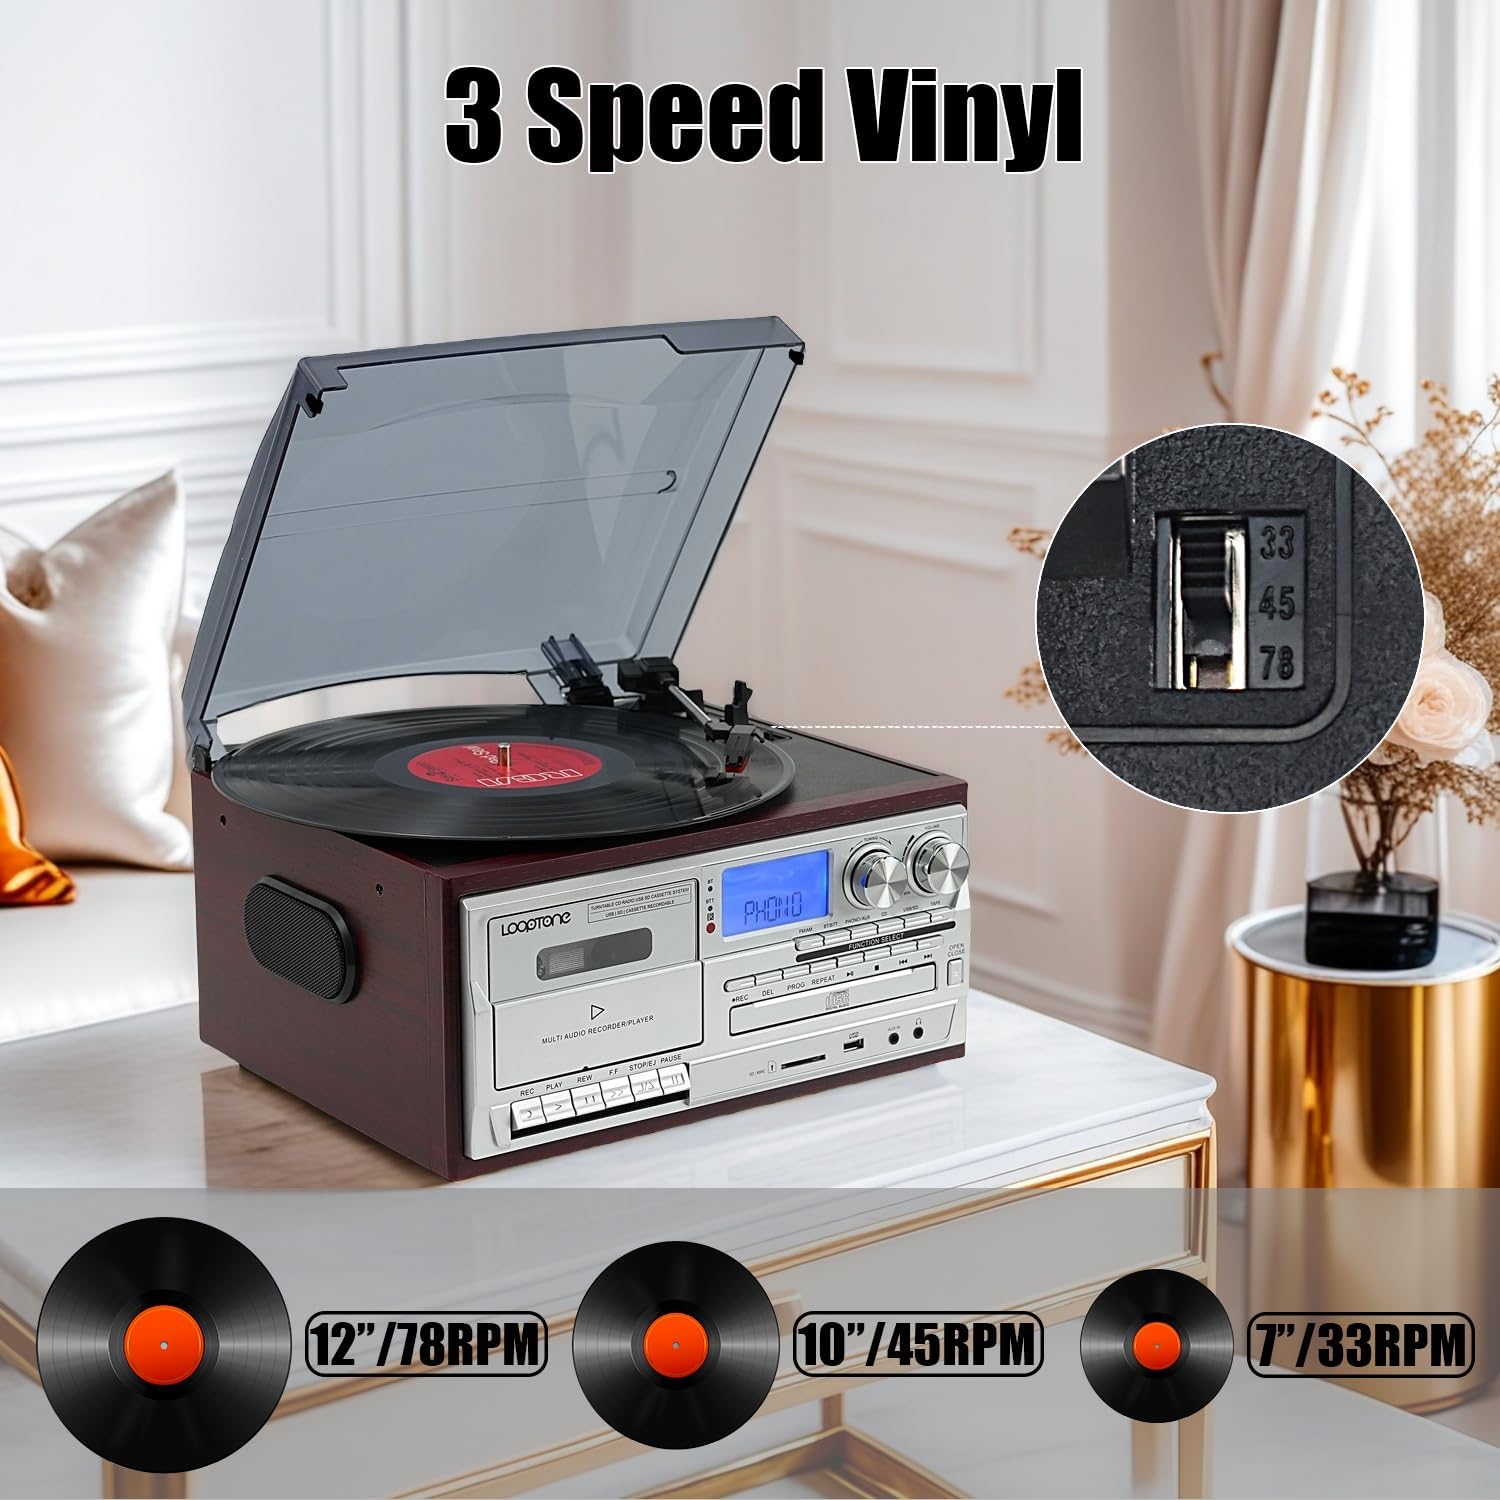
Image: A close-up of the turntable showing the 3-speed selector switch (33, 45, 78 RPM) and examples of 7", 10", and 12" vinyl records.
Image: A diagram illustrating the turntable's capabilities: 3 size vinyl (12"/10"/7"), 3 speed select (33 1/3 / 45 / 77 RPM), and automatic start and stop.
Bluetooth Operation
- Bluetooth Input: Select BLUETOOTH mode. The unit will enter pairing mode. On your mobile device, search for "LoopTone" and connect. You can now stream audio from your device to the record player's speakers.
- Bluetooth Output: The unit can also transmit audio to Bluetooth headphones or speakers. Ensure your external Bluetooth device is in pairing mode, then activate Bluetooth output on the record player (refer to the specific button/menu option for Bluetooth output).

Image: An illustration demonstrating the two-way wireless Bluetooth pairing, showing the record player connecting to both Bluetooth headphones (output) and a smartphone (input).

Image: A person holding a smartphone, with blue wireless signals indicating a Bluetooth connection to the record player, demonstrating audio streaming from the phone.

Image: A person wearing headphones, with blue wireless signals indicating a Bluetooth connection from the record player to the headphones, demonstrating private listening.
CD Player Operation
- Insert CD: Select CD mode. Insert a CD into the CD slot. The unit supports CDA, MP3, and WMA formats.
- Playback: Use the Play/Pause, Skip, and Repeat buttons for control.
- Playback Modes: Supports various playback modes including Repeat One, Repeat Folder, Repeat All, and Random playback.
- Program Mode: Customize track playback order using the program function.

Image: The record player with a cassette tape inserted into the cassette deck and a CD partially ejected from the CD tray, highlighting both playback options.

Image: A diagram illustrating the CD player's capabilities: CDA/MP3/WMA compatibility, 4 playback modes (Repeat One, Repeat Folder, Repeat All, Random), and Program Mode for customized track order.
Cassette Player Operation
- Insert Cassette: Select TAPE mode. Insert a cassette tape into the cassette deck.
- Playback: Use the Play, Fast-Forward, and Rewind buttons for control. The unit supports Type I, II, III, and IV tapes.

Image: A diagram illustrating the cassette player's capabilities: Supports Type I, II, III, IV tapes, complete buttons for fast-forward and rewind, and recording functionality.
AM/FM Radio Operation
- Select Radio Mode: Select RADIO mode. The digital LCD display will show the frequency.
- Tuning: Use the tuning knob or auto-scan function to find desired stations. The unit supports 30 FM and 10 AM preset stations.

Image: The record player displaying an FM radio frequency on its digital screen, with text indicating FM/AM Radio features and USB/SD Player capabilities.

Image: A diagram illustrating the radio's capabilities: FM/AM radio, auto-scan or manual radio tuning, and support for 30 FM and 10 AM preset stations.
USB/SD Player Operation
- Insert USB/SD: Select USB/SD mode. Insert a USB drive or SD card into the respective slot. The unit supports MP3 and WMA formats.
- Playback: Use the Play/Pause, Skip, and Folder navigation buttons for control.

Image: A diagram illustrating the USB and SD digital audio input capabilities: Supports MP3/WMA formats and recording functionality.
Aux-in and RCA Line-out
- Aux-in: Connect non-Bluetooth devices (e.g., MP3 player, PC, laptop, tablet) to the AUX IN port using a 3.5mm audio cable. Select AUX mode to play audio through the record player's speakers.
- RCA Line-out: Connect the RCA LINE OUT ports (Red for Right, White for Left) to an external amplifier or home audio system for enhanced sound output.

Image: A close-up view of the front panel showing the 3.5mm AUX IN port and the headphone jack.

Image: A close-up view of the rear panel showing the red (R) and white (L) RCA LINE OUT ports.
Recording Functionality
The LoopTone 10-in-1 Record Player offers versatile recording options:
- Vinyl to MP3/Cassette: Record your vinyl records directly to a USB drive, SD card (MP3 format), or a cassette tape.
- CD to MP3/Cassette: Convert your CDs to MP3 files on USB/SD or record them onto a cassette tape.
- Radio to MP3/Cassette: Record your favorite radio broadcasts to MP3 on USB/SD or onto a cassette tape.
- Aux-in to MP3/Cassette: Record audio from devices connected via Aux-in to MP3 on USB/SD or onto a cassette tape.
Refer to the specific recording section in the full manual for detailed steps on initiating and completing recordings for each source.
Maintenance
- Cleaning the Unit: Wipe the exterior of the unit with a soft, dry cloth. Do not use abrasive cleaners, waxes, or solvents.
- Stylus Care: The stylus is delicate. Clean it periodically with a soft brush, brushing gently from back to front. Avoid touching the stylus with your fingers.
- Dust Cover: Keep the dust cover closed when the unit is not in use to protect the turntable and stylus from dust and debris.
- Cassette Deck Maintenance: Periodically clean the tape heads and pinch rollers with a cotton swab lightly dampened with isopropyl alcohol.
Troubleshooting
| Problem | Possible Cause | Solution |
|---|---|---|
| Unit does not power on. | Power cord not securely connected; Power outlet not active. | Ensure power cord is firmly plugged into the unit and a working wall outlet. Check the power switch/volume knob is turned to the ON position. |
| No sound from speakers. | Volume too low; Incorrect mode selected; Stylus cap not removed (for vinyl); External speakers not connected properly (if applicable). | Increase volume. Select the correct input mode (e.g., PHONO, CD, BLUETOOTH). Ensure the stylus protective cap is removed. If using external speakers, check RCA connections. |
| Turntable not spinning or no audio from vinyl. | Stylus cap still on; Incorrect speed selected; Tonearm not lowered onto record; PHONO mode not selected. | Remove the stylus protective cap. Verify the speed selector matches the record. Gently lower the tonearm onto the record. Ensure PHONO mode is selected. |
| Bluetooth connection issues. | Unit not in pairing mode; Device too far; Interference. | Ensure the unit is in BLUETOOTH pairing mode. Move your device closer to the unit. Avoid placing the unit near other wireless devices that may cause interference. |
| CD/Cassette not playing. | Disc/tape inserted incorrectly; Disc/tape damaged; Incorrect mode selected. | Ensure the disc/tape is inserted correctly. Try a different disc/tape. Select the correct mode (CD or TAPE). |
Specifications
| Feature | Detail |
|---|---|
| Model Number | TR-18CDBB |
| Product Dimensions | 12.6 x 11.81 x 7.87 inches |
| Item Weight | 9.9 pounds |
| Connectivity Technology | Bluetooth, USB |
| Maximum Rotational Speed | 78 RPM |
| Included Components | Record Player, built-in speaker x 2, 45 rpm adapter, remote control, manual |
| Special Features | Adjustable Speed, Built-In Speaker, AUX Input, Dust Cover, Recording Functionality |
| Material | Engineered Wood, Wood, Plastic, Metal |
| Color | Silver |
| Manufacturer | MEIFAN-US |
Warranty and Support
For warranty information and technical support, please refer to the contact details provided in the product packaging or visit the official LoopTone website. Keep your purchase receipt as proof of purchase for any warranty claims.
Ask a question about this manual
Ask about setup, troubleshooting, compatibility, parts, safety, or missing instructions. Manuals+ will review the question and use this page’s manual context to help answer it.