1. Introduction
This manual provides detailed instructions for the installation, operation, and maintenance of your podofo 8 CORE 4G+64G Car Radio Stereo. Please read this manual thoroughly before using the product to ensure proper function and safety. This unit is designed for specific compatibility with Toyota Yaris and Vios models manufactured between 2007 and 2012.

Image: The podofo 8 CORE 4G+64G Car Radio Stereo unit, featuring a 9-inch IPS touch screen displaying various application icons. The unit is presented with its custom fitting frame for Toyota Yaris/Vios.
2. Safety Information
- Always ensure the vehicle is parked safely before operating the stereo's advanced functions or making adjustments.
- Do not attempt to install or repair the unit if you are not qualified. Consult a professional for installation to prevent damage to the unit or your vehicle.
- Keep the volume at a level that allows you to hear outside traffic sounds. Excessive volume can be dangerous.
- Avoid exposing the unit to extreme temperatures, direct sunlight for prolonged periods, or moisture.
- Use only the specified power supply and wiring harnesses provided with the unit.
3. Package Contents
Verify that all items listed below are included in your package:
- Android Car Stereo Unit
- GPS Antenna
- External Microphone
- HD Backup Camera
- Power Cable
- RCA Input/Output Cables
- Reversing Camera Input Cable
- USB Cables (Dual)
- Radio Antenna
- Installation Tool (Plastic pry tool)
- User Manual (This document)

Image: A visual representation of the complete package contents, including the main head unit, various connection cables, GPS antenna, external microphone, and HD backup camera.
4. Setup and Installation
This unit is designed for direct fitment in Toyota Yaris and Vios models from 2007 to 2012. Professional installation is recommended.
4.1 General Installation Steps
- Preparation: Disconnect the vehicle's negative battery terminal before starting any electrical work.
- Remove Old Unit: Carefully remove the factory radio and trim panels using appropriate tools.
- Connect Wiring: Connect the provided power harness, RCA cables, USB cables, GPS antenna, and radio antenna to the new head unit. Ensure all connections are secure.
- Backup Camera Wiring: Refer to section 4.2 for specific backup camera wiring instructions.
- Test Functionality: Before fully reassembling, temporarily connect the battery and test basic functions (power, audio, touch screen, camera).
- Secure Unit: Mount the new head unit into the dashboard opening and secure it with screws.
- Reassemble: Reinstall all trim panels and reconnect the battery.

Image: A visual comparison showing the vehicle's dashboard before and after the installation of the podofo car stereo, demonstrating the integrated fit.
4.2 Backup Camera Wiring
Proper connection of the backup camera is essential for its functionality.
- Connect the video RCA cable from the camera to the 'Reversing Camera Input' on the head unit.
- Locate the reverse trigger cable (often labeled 'back' or 'reverse') from the head unit's wiring harness. Connect this cable to the vehicle's reverse light positive (+) wire. If this cable is integrated with the power harness, no separate connection may be needed.
- Connect the camera's black cable (D) to the vehicle's ground ('GND').
- Connect the camera's red cable (E) to the backup light's positive (+) wire.

Image: A detailed wiring diagram showing how to connect the backup camera to the car stereo unit and the vehicle's reverse light circuit.
5. Operating Instructions
5.1 Basic Operation
- Power On/Off: Press and hold the power button (usually on the front panel) to turn the unit on or off. A short press typically mutes or unmutes audio.
- Volume Control: Use the physical knobs or on-screen controls to adjust the volume.
- Touch Screen: The 9-inch IPS touch screen responds to finger gestures for navigation and control.
5.2 Wireless CarPlay / Android Auto
The unit supports both wired and wireless CarPlay and Android Auto, allowing seamless integration with your smartphone.
- Connection: Connect your iPhone via Bluetooth for Wireless CarPlay or an Android phone via Bluetooth for Wireless Android Auto. For wired connection, use a USB cable.
- Access: Once connected, the CarPlay or Android Auto interface will appear on the screen, providing access to navigation, music, calls, and messaging apps.
- Voice Control: Utilize Siri (for CarPlay) or Google Assistant (for Android Auto) for hands-free operation.
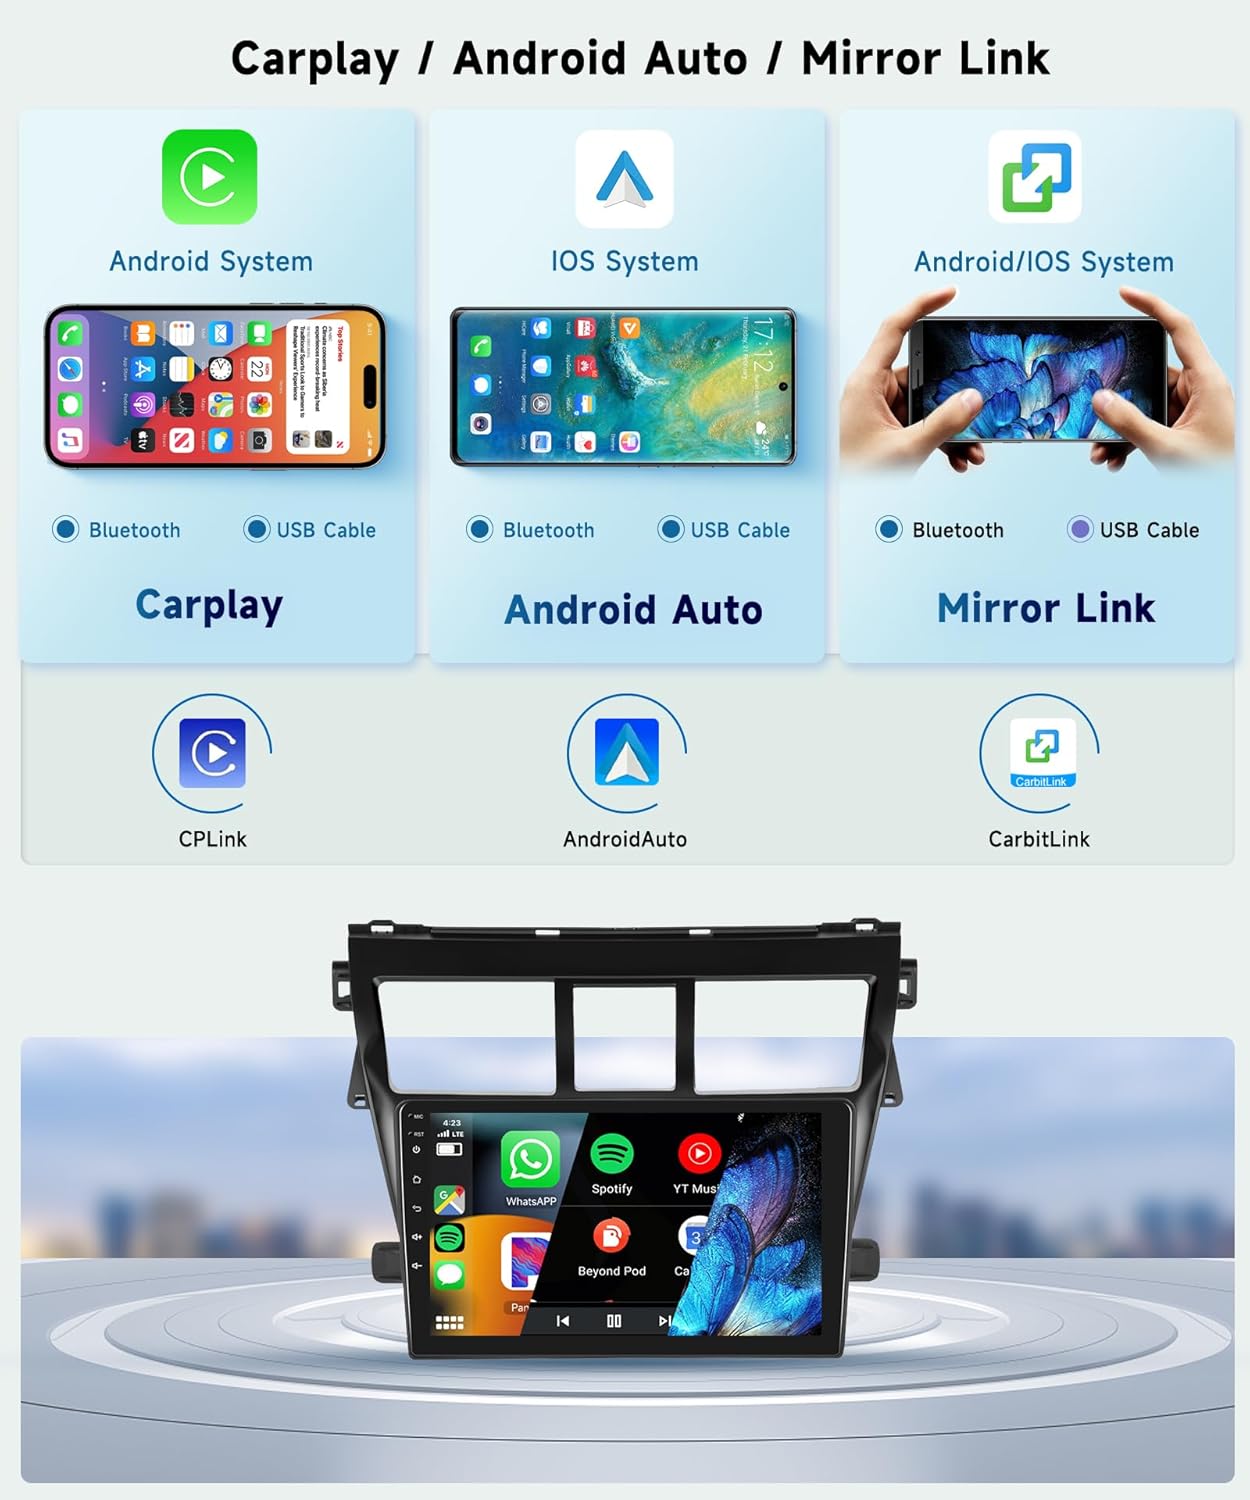
Image: An illustration detailing the connection methods (Bluetooth or USB) for CarPlay, Android Auto, and Mirror Link, compatible with both Android and iOS devices.

Image: A split view demonstrating the user interfaces for both wired/wireless CarPlay and Android Auto on the car stereo, highlighting navigation and media playback.
5.3 GPS Navigation & WiFi
The unit features built-in GPS and WiFi connectivity for navigation and online services.
- Offline Maps: A pre-installed offline map application allows you to download worldwide map data for navigation without an internet connection.
- Online Maps: Connect to a WiFi hotspot (e.g., from your smartphone) to use online navigation apps like Google Maps, Waze, etc.
- App Installation: Use the WiFi connection to access the Application Store and install or update Android apps.

Image: A graphic illustrating the GPS navigation capabilities, showing both offline and online map usage, and the WiFi connection feature for downloading applications.
5.4 Bluetooth Functionality
Bluetooth 5.0 enables hands-free calling and wireless audio streaming.
- Pairing: Enable Bluetooth on your smartphone and search for the car stereo unit. Select the unit to pair.
- Hands-Free Calls: Make and receive calls directly from the stereo screen, with audio routed through the car speakers and the external microphone.
- Music Streaming: Play audio from your phone wirelessly through the car's sound system.

Image: A dual display showing the Bluetooth interface for hands-free calling and music streaming, alongside the FM/RDS radio interface with frequency tuning.
5.5 FM/RDS Radio
Access local radio stations with FM and RDS (Radio Data System) support.
- Tuning: Use the touch screen to scan for stations or manually tune to a specific frequency.
- Presets: Save your favorite stations for quick access.
- RDS: Display station information, song titles, and traffic announcements where available.
5.6 DSP Audio (32-Band Equalizer)
Customize your audio experience with the integrated Digital Signal Processor (DSP).
- Equalizer: Adjust the 32-band graphic equalizer to fine-tune bass, treble, and mid-range frequencies.
- Sound Effects: Access various preset sound modes or create custom profiles.
- Time Alignment: Optimize sound delivery to different seating positions for an immersive experience.

Image: The 32-band DSP audio adjustment interface, displaying detailed equalizer settings and a graphical representation of sound staging within the vehicle.
5.7 Steering Wheel Control
Integrate with your vehicle's existing steering wheel controls for convenient operation.
- Setup: Access the 'Steering Wheel Control' settings in the unit's menu. Follow the on-screen prompts to map your vehicle's steering wheel buttons to specific stereo functions (e.g., volume up/down, track skip, mode change).
- Functionality: Control essential stereo functions without taking your hands off the steering wheel.

Image: A visual guide to setting up steering wheel controls, showing the on-screen learning interface and a driver interacting with the controls.
5.8 Backup Camera Display
When properly installed, the backup camera automatically displays the rear view when the vehicle is shifted into reverse.
- Automatic Activation: The screen will switch to the camera view when reverse gear is engaged.
- HD 1080P: The included camera provides a high-definition view for improved visibility.
- Parking Lines: Dynamic or static parking guidelines may be displayed to assist with parking maneuvers.

Image: A multi-panel display showcasing various features including Bluetooth, FM/RDS radio, DVR recording, and the AHD 1080P reverse camera view with parking lines.
5.9 Voice Control
The unit supports voice commands for hands-free operation of various functions.
- Activation: Say "Hey Podofo" or tap the voice control icon to activate the voice assistant.
- Commands: Use commands such as "Play [Artist/Song]", "Call [Contact]", "Open Google Maps", "Close Play Store", or "Tune to 97.9 FM".

Image: A graphic demonstrating the voice control capabilities, showing the activation phrase "Hey Podofo" and various example commands for music, calls, and app control.
5.10 Split Screen Functionality
The large 9-inch screen supports split-screen mode, allowing two applications to run simultaneously.
- Activation: Long-press an app icon or use the split-screen button (if available) to activate.
- Usage: Run navigation on one side and music playback on the other, or any two compatible applications.

Image: A visual example of the screen partitioning feature, displaying a navigation map on one side and media playback controls on the other, along with a selection of commonly used apps.
6. Maintenance
- Screen Cleaning: Use a soft, lint-free cloth to gently wipe the touch screen. Avoid abrasive cleaners or harsh chemicals.
- Software Updates: Periodically check for available software updates via the unit's settings menu to ensure optimal performance and access to new features. Connect to WiFi for updates.
- General Care: Keep the unit free from dust and debris. Ensure proper ventilation around the unit to prevent overheating.
7. Troubleshooting
| Problem | Possible Cause | Solution |
|---|---|---|
| Unit does not power on | Incorrect wiring; Blown fuse; Vehicle battery issue | Check power connections and fuses. Ensure vehicle battery is charged. Consult installation professional. |
| No sound | Volume muted; Speaker wiring issue; Incorrect audio settings | Check volume and mute status. Verify speaker connections. Adjust audio output settings. |
| GPS not working or inaccurate | GPS antenna not connected or poorly positioned; No satellite signal | Ensure GPS antenna is securely connected and placed in an unobstructed location (e.g., dashboard). Move to an open area for better signal. |
| Bluetooth connection issues | Device not in pairing mode; Interference; Incorrect pairing process | Ensure both devices are in pairing mode. Delete previous pairings and try again. Restart both devices. |
| Touch screen unresponsive | Software glitch; Physical damage | Restart the unit. If issue persists, contact technical support. |
| Backup camera not displaying | Incorrect wiring; Camera malfunction | Verify all camera wiring connections (power, ground, video, trigger). Test camera if possible. |
8. Specifications
- Applicable Car Models: Toyota Yaris Vios 2007-2012
- Operating System: Android 13.0
- Processor: 8-Core CPU
- Memory: 4GB RAM, 64GB ROM
- Screen Size: 9 Inch
- Display Type: IPS Touch Screen
- Resolution: 1280 * 720P
- Connectivity: Wireless CarPlay/Android Auto, GPS, WiFi, Bluetooth 5.0, Dual USB ports
- Audio Features: 32-Band DSP, Subwoofer output
- Radio: FM RDS Radio
- Camera Support: HD Backup Camera (included), DVR Function (optional camera required)
- Control Method: Touch, Steering Wheel Control, Voice Control
- Visible Screen Diagonal: 9" / 23 cm
- Item Weight: Approximately 1 Kilogram (2.2 pounds)

Image: A visual breakdown of the IPS HD screen's attributes, including its wide viewing angle, high resolution, 2.5D curved glass, touch functionality, and split-screen feature.

Image: A graphic illustrating the superior performance of the 8-CORE processor with 4GB RAM and 64GB ROM compared to a standard 4-CORE system with less memory.
9. Warranty and Support
Your podofo Car Radio Stereo comes with a 2-year warranty, ensuring peace of mind regarding product quality and performance. podofo also provides 24/7 expert customer support.
9.1 Technical Support
For technical assistance or inquiries, please follow these steps:
- Navigate to the product page on Amazon.
- Locate the 'Sold by Podofo US' link and click on it.
- On the seller's page, click 'Ask a question' to contact support directly.

Image: A step-by-step guide on how to access 24/7 technical support through the Amazon platform.

Image: An overview of podofo's commitment to customer satisfaction, featuring a 2-year warranty and round-the-clock expert customer support.


