
Product Overview
The Lafocuse Digital LED Alarm Clock (Model ZH0154A) features a large 6.7-inch LED display for clear visibility. It offers multiple functions including time, date, and temperature display, adjustable brightness, and a customizable snooze function. The clock can be powered via USB cable or AAA batteries, providing flexibility for placement.

Image: Front view of the Lafocuse Digital LED Alarm Clock displaying the time.
Package Contents
- Lafocuse Digital LED Alarm Clock (Model ZH0154A)
- USB Power Cable
- User Manual
Note: 3 AAA batteries and a USB power adapter are not included and must be purchased separately.
Component Identification
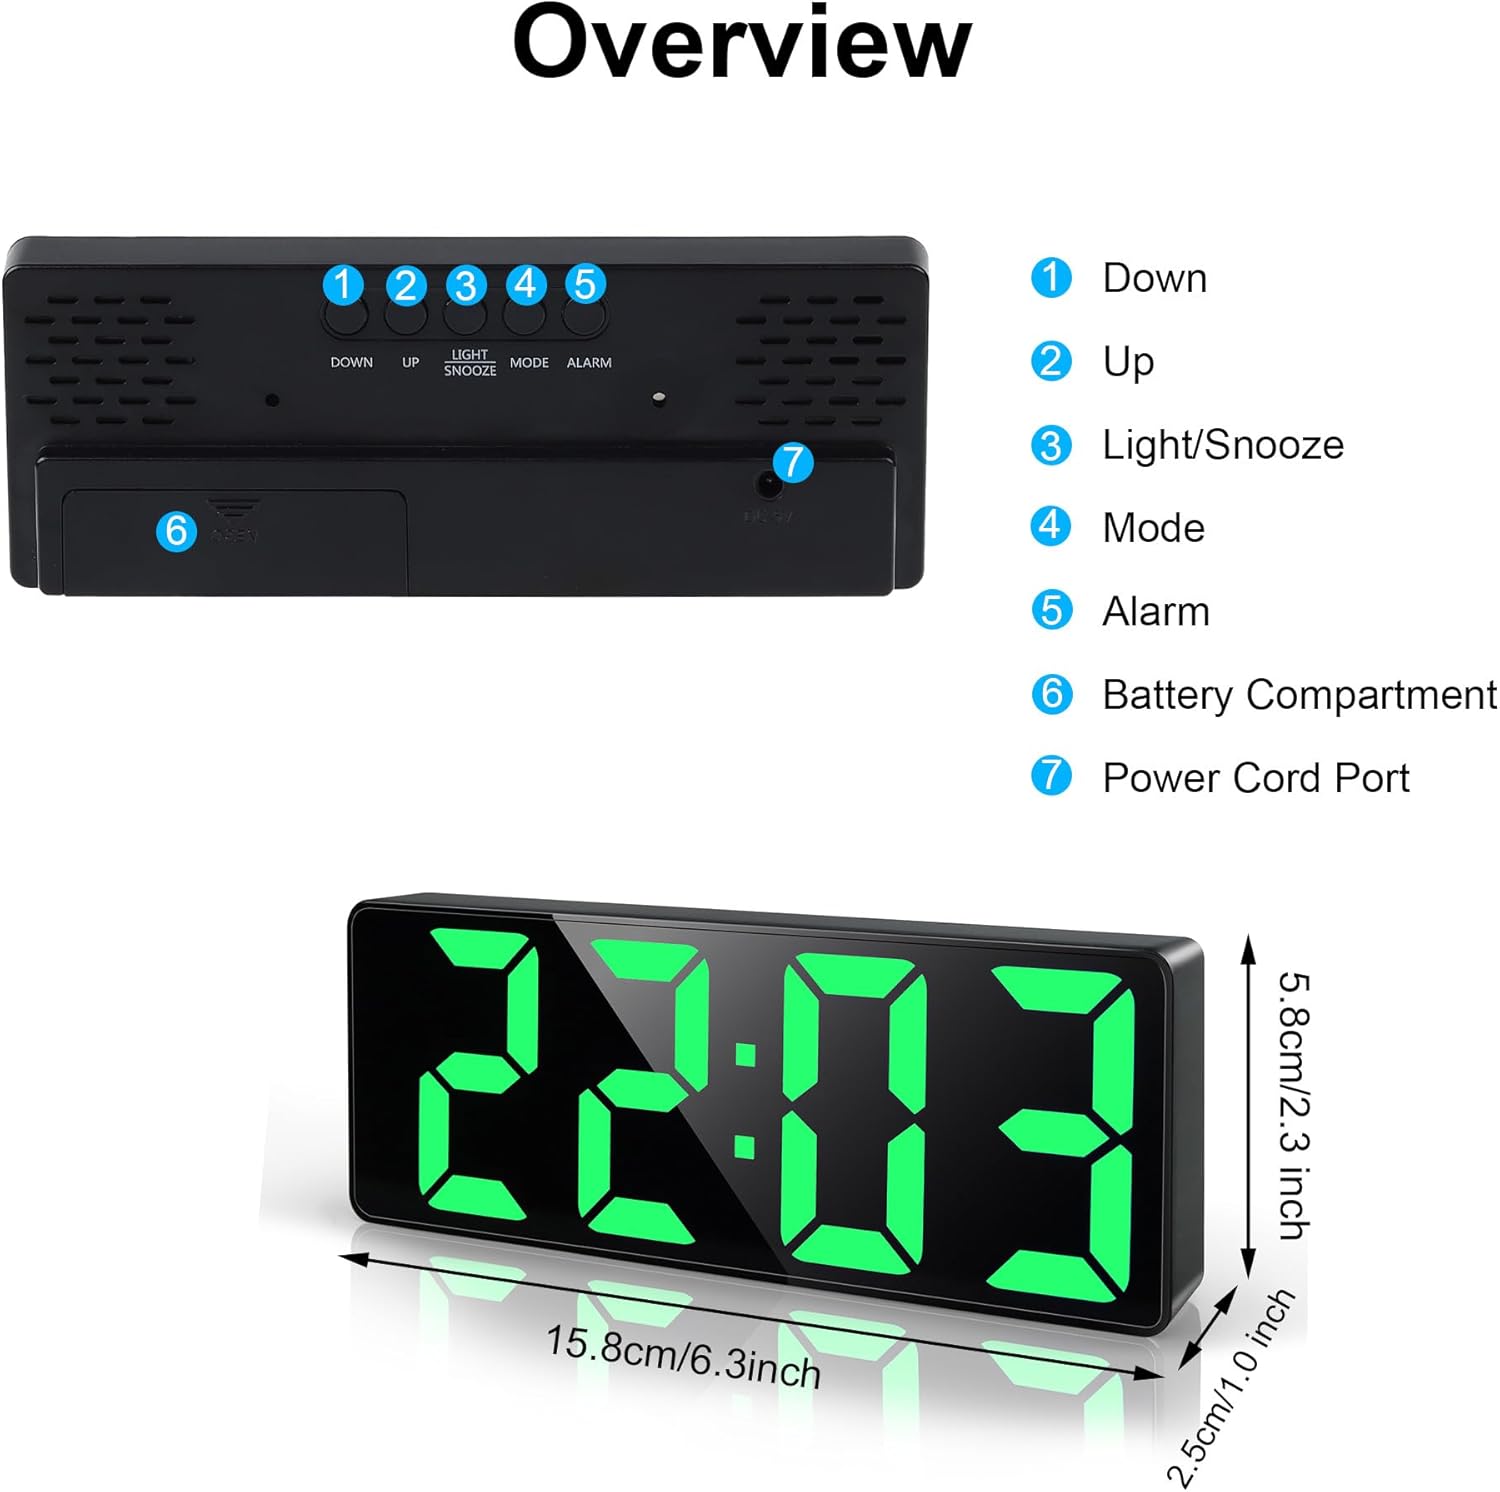
Image: Top and rear view of the alarm clock, highlighting control buttons and ports.
- DOWN Button: Used to decrease values or navigate menus.
- UP Button: Used to increase values or navigate menus.
- LIGHT/SNOOZE Button: Adjusts display brightness, activates snooze, or turns off the screen.
- MODE Button: Switches between time, date, and temperature display modes, and enters setting modes.
- ALARM Button: Enters alarm setting mode.
- Battery Compartment: Holds 3 AAA batteries (not included).
- Power Cord Port: USB input for continuous power.
Setup
Powering the Clock
The clock offers two power options:
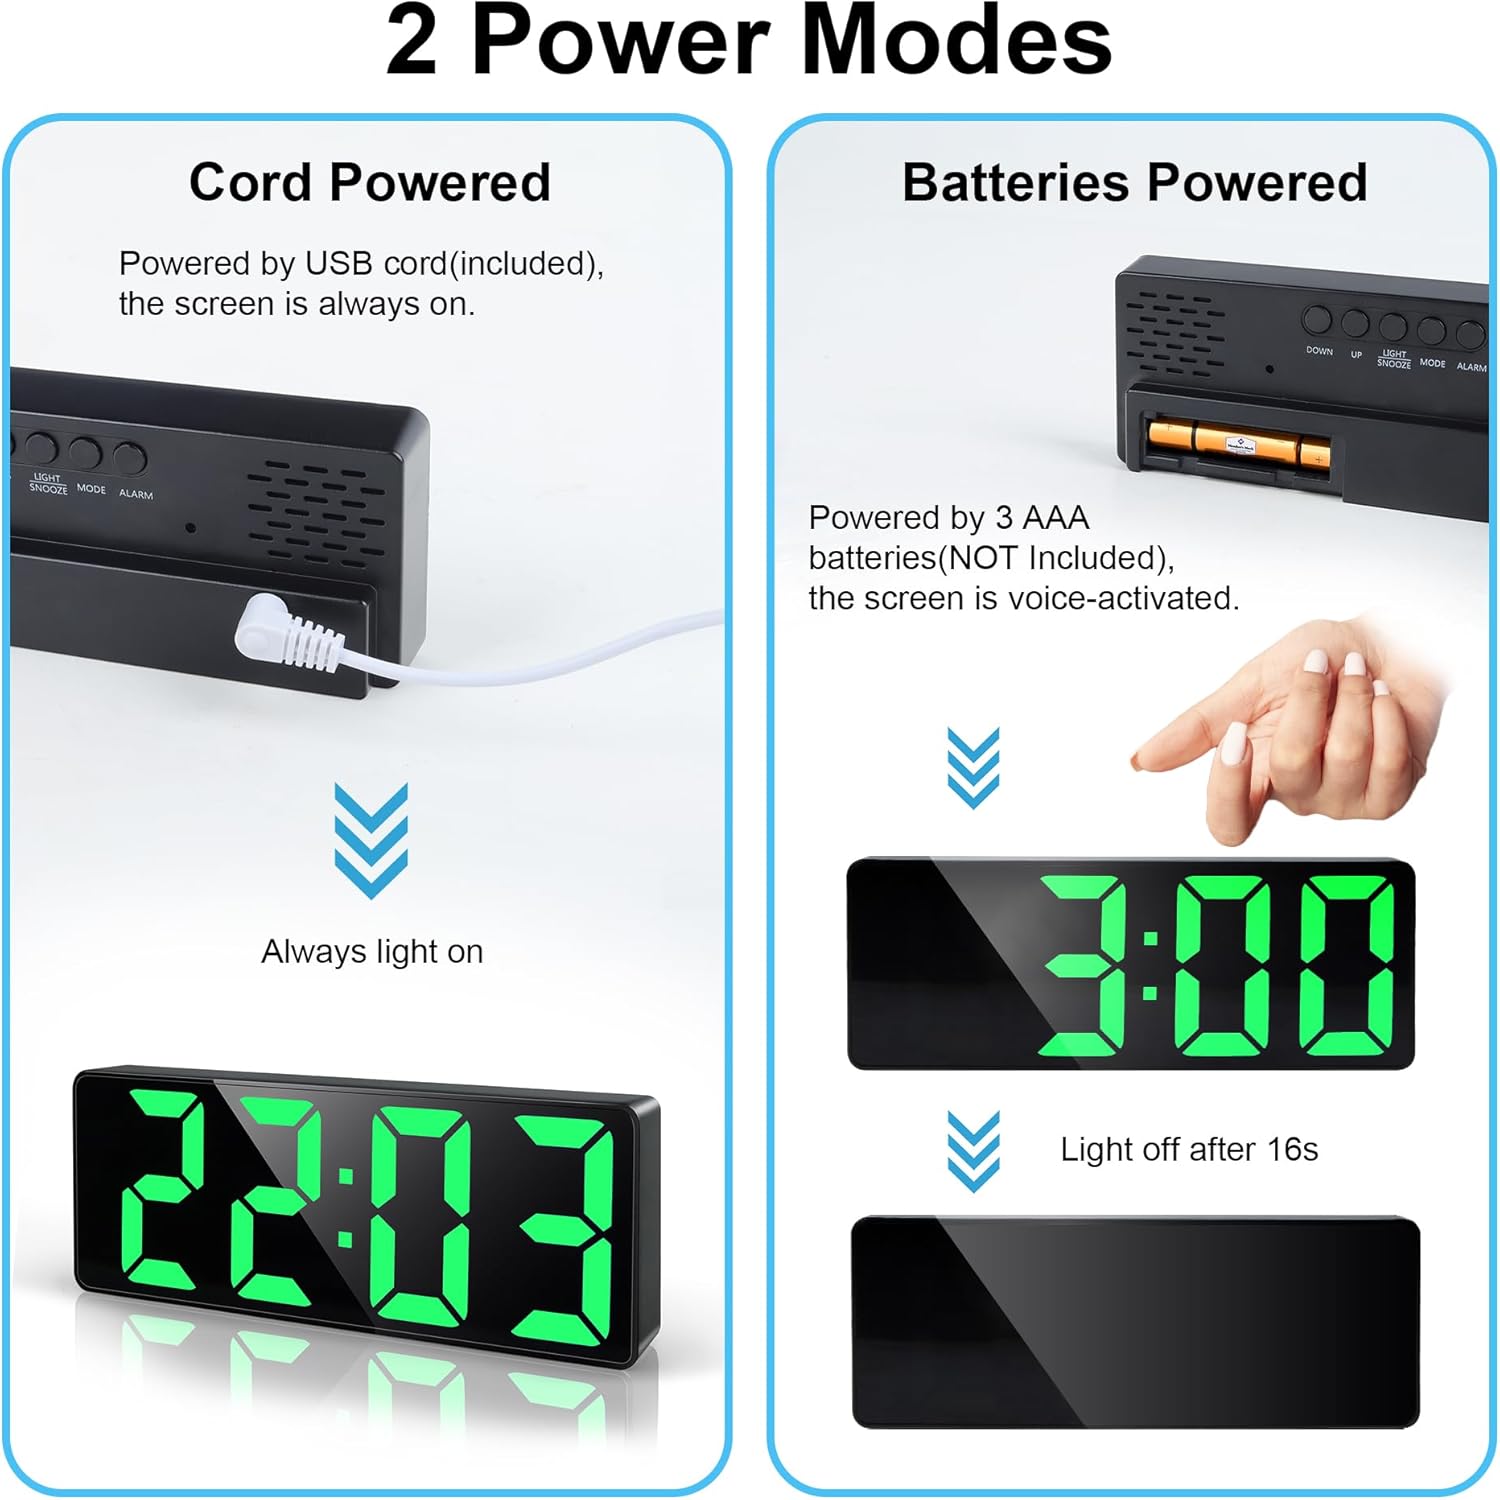
Image: Illustration of the two power modes: USB cable connection for continuous display and battery compartment for voice-activated display.
- USB Cable Power (Recommended for continuous display):
- Connect the provided USB cable to the Power Cord Port (7) on the back of the clock.
- Plug the other end of the USB cable into a USB power adapter (not included) or a powered USB port.
- The LED display will remain continuously lit.
- Battery Power (For power saving, display activates on sound/touch):
- Open the Battery Compartment (6) on the back of the clock.
- Insert 3 new AAA batteries (not included), ensuring correct polarity (+/-).
- Close the battery compartment.
- When powered by batteries, the LED display will turn off after approximately 16 seconds to conserve energy. To activate the display, gently tap the clock or make a sound.
Operating Instructions
Setting Time and Date
- Press the MODE button (4) to cycle through Time, Date, and Temperature display.
- To set the time, press and hold the MODE button (4) until the hour digits flash.
- Use the UP (2) and DOWN (1) buttons to adjust the hour.
- Press MODE (4) again to confirm the hour and move to minutes.
- Use the UP (2) and DOWN (1) buttons to adjust the minutes.
- Press MODE (4) again to confirm minutes and move to the 12/24-hour format setting.
- Use the UP (2) and DOWN (1) buttons to select either 12H or 24H format.
- Press MODE (4) again to confirm the time format and move to year setting.
- Continue using UP (2) and DOWN (1) to adjust the Year, Month, and Day, pressing MODE (4) after each setting to confirm and advance.
- After setting the day, press MODE (4) one last time to exit the setting mode.

Image: The clock cycling through temperature, time, and date display modes.
Setting the Alarm
The clock supports three alarm modes: Monday-Friday (1-5), Monday-Saturday (1-6), and Monday-Sunday (1-7).
- Press the ALARM button (5) to enter alarm setting mode. The alarm time will flash.
- Use the UP (2) and DOWN (1) buttons to adjust the alarm hour.
- Press ALARM (5) again to confirm the hour and move to minutes.
- Use the UP (2) and DOWN (1) buttons to adjust the alarm minutes.
- Press ALARM (5) again to confirm minutes and move to alarm mode selection.
- Use the UP (2) and DOWN (1) buttons to select the desired alarm mode (1-5, 1-6, or 1-7).
- Press ALARM (5) again to confirm the alarm mode and exit setting.
- To activate or deactivate the alarm, short press the ALARM button (5) outside of setting mode. An alarm icon will appear/disappear on the display.

Image: The clock displaying the snooze function and options for 3 alarm modes.
Snooze Function
When the alarm sounds, press the LIGHT/SNOOZE button (3) to activate the snooze function. The alarm will pause and sound again after the set snooze duration.
- Adjusting Snooze Time:
- While in normal time display mode, press and hold the LIGHT/SNOOZE button (3) until the snooze time flashes.
- Use the UP (2) and DOWN (1) buttons to adjust the snooze duration from 1 to 60 minutes.
- Press LIGHT/SNOOZE (3) again to confirm and exit.
- To turn off the alarm completely when it sounds, press any button other than LIGHT/SNOOZE (3).

Image: A user activating the snooze function on the alarm clock.
Adjusting Display Brightness
The clock has 3 levels of brightness and an option to turn off the display.
- To cycle through brightness levels: Short press the LIGHT/SNOOZE button (3). The display will cycle through Bright, Medium, Low.
- To turn off the display: Press and hold the LIGHT/SNOOZE button (3) for approximately 3 seconds. The display will turn off completely. This is useful for undisturbed sleep.
- To reactivate the display from off: Press any button.
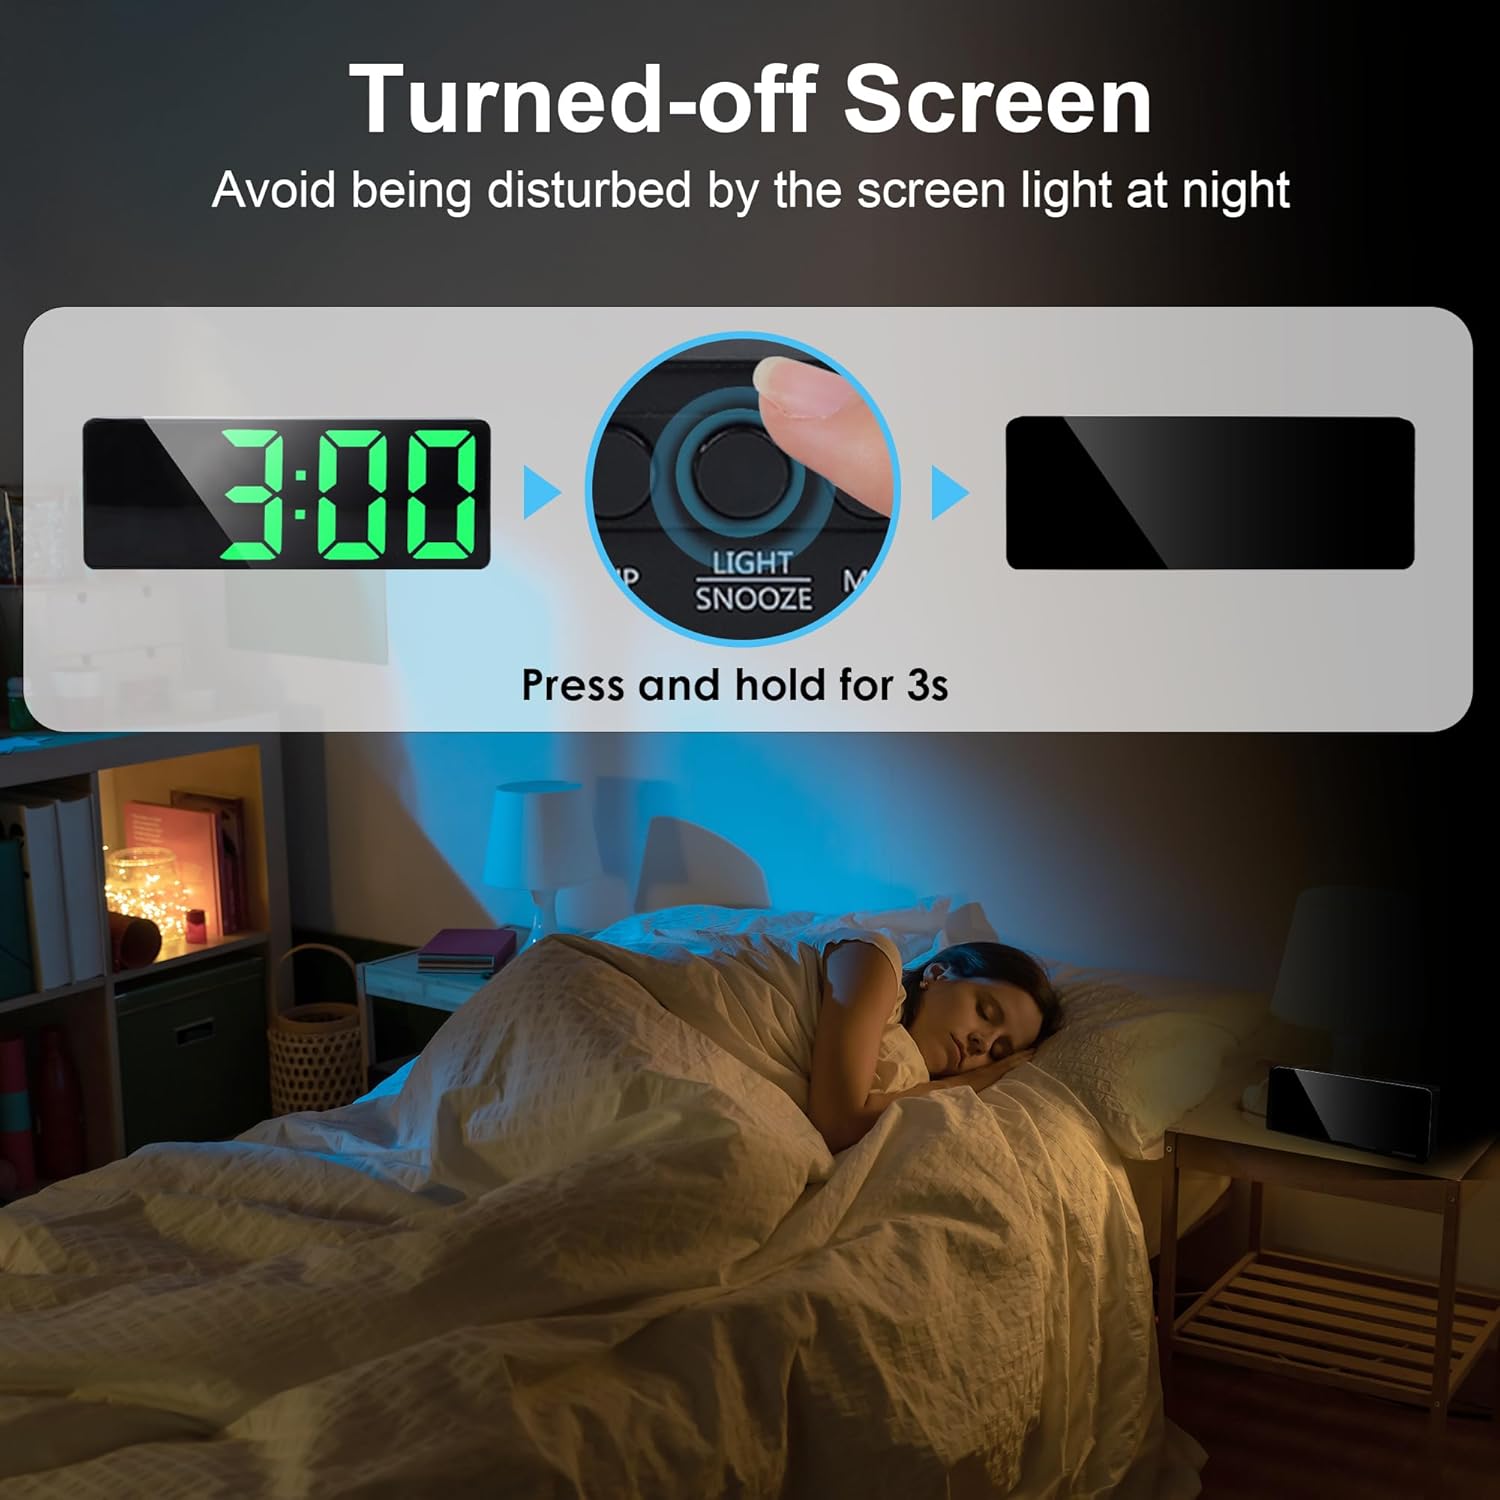
Image: Instructions on how to turn off the screen to avoid light disturbance at night.
Maintenance
- Clean the clock with a soft, dry cloth. Do not use abrasive cleaners or solvents.
- Avoid exposing the clock to extreme temperatures, direct sunlight, or high humidity.
- If using battery power, replace all three AAA batteries simultaneously when they are depleted. Do not mix old and new batteries or different types of batteries.
- Remove batteries if the clock will not be used for an extended period to prevent leakage.
Troubleshooting
| Problem | Possible Cause | Solution |
|---|---|---|
| Display is off (battery mode). | Power-saving mode activated. | Tap the clock or make a sound to activate the display. |
| Display is off (USB mode). | No power or cable issue. | Check USB cable connection and power source. Ensure the adapter is working. |
| Alarm does not sound. | Alarm is not activated or set incorrectly. | Ensure the alarm icon is visible on the display. Re-check alarm time and mode settings. |
| Time/Date is incorrect. | Not set correctly or power interruption. | Re-set the time and date following the operating instructions. |
| Display too bright/dim. | Brightness level needs adjustment. | Short press the LIGHT/SNOOZE button (3) to cycle through brightness levels. |
Specifications
| Brand | Lafocuse |
| Model Number | ZH0154A |
| Display Type | Digital LED |
| Screen Size | 6.7 inches (17 cm) |
| Dimensions (L x W x H) | 15.8 x 3.81 x 5.8 cm (6.2 x 1.5 x 2.3 inches) |
| Weight | 150 g (5.3 oz) |
| Material | Plastic |
| Power Source | USB cable (DC 5V) or 3 x AAA batteries (not included) |
| Special Features | Adjustable Brightness (3 levels + off), Adjustable Snooze (1-60 min), 3 Alarm Modes (Mon-Fri, Mon-Sat, Mon-Sun), Time/Date/Temperature Display, Sound/Tap Activated Display (battery mode) |
Warranty and Support
For warranty information or technical support, please refer to the documentation included with your purchase or contact Lafocuse customer service through the retailer where the product was purchased.