1. Introduction
This manual provides detailed instructions for the operation and maintenance of your WISCENT Vintage Micro HiFi Stereo System. This all-in-one multimedia player combines classic design with modern functionality, offering Bluetooth audio streaming, a top-loading CD player, FM radio, USB playback, Aux-in, and an earphone port. Please read this manual thoroughly before using the product to ensure proper and safe operation.

Image: Front view of the WISCENT Vintage Micro HiFi Stereo System, highlighting its multi-functional capabilities including CD playback, Bluetooth connectivity, USB port, earphone jack, and FM radio.
2. Safety Information
To ensure safe operation and prevent damage, please observe the following precautions:
- Do not expose the unit to rain or moisture.
- Do not block any ventilation openings.
- Place the unit on a stable, flat surface.
- Unplug the unit during lightning storms or when unused for long periods.
- Do not open the casing; refer all servicing to qualified personnel.
3. Package Contents
Please check that all items are included in the package:
- 1 x WISCENT CD Micro System Player
- 1 x Remote Control (Batteries not included)
- 1 x AC Power Cable
- 1 x AUX Cable
- 1 x User Manual

Image: The WISCENT Micro HiFi Stereo System along with its included accessories: remote control, AC power cable, AUX cable, and user manual.
4. Product Overview
The WISCENT Micro HiFi Stereo System features a classic wooden enclosure and a user-friendly interface. Key components include:
- Top-Loading CD Tray: For playing CDs, CD-R/RW, MP3 CDs, and audiobook CDs.
- Control Panel: Centralized buttons and a rotary knob for volume, mode selection, playback control, and equalizer settings.
- Display Screen: Shows current mode, track information, and radio frequency.
- Speakers: Integrated 2x 3" full-range units providing 15W RMS (30W Peak) per speaker.
- USB Port: For playing MP3/WMA files from a USB drive.
- AUX-IN Port: For connecting external audio devices via a 3.5mm cable.
- Earphone Output: For private listening with headphones.
- FM Antenna: For radio reception.
- AC Power Input: For connecting the power cable.

Image: A detailed diagram illustrating the various controls and ports on the front and rear of the stereo system for easy identification.
5. Setup
5.1 Power Connection
- Connect the supplied AC power cable to the AC IN port on the rear of the unit.
- Plug the other end of the AC power cable into a standard wall outlet (110V~240V).
- Ensure the power switch on the back of the unit is in the 'ON' position.
5.2 FM Antenna
The unit includes a soft FM antenna (approximately 90cm long) attached to the rear. For optimal FM radio reception, extend the antenna fully and position it at a higher location, away from other electronic devices that may cause interference.
5.3 Remote Control Batteries
Insert two AAA batteries (not included) into the remote control, ensuring correct polarity.
6. Operating Instructions
6.1 Power On/Off
Press the Power button on the front panel or the remote control to turn the unit on or off.
6.2 Mode Selection
Press the EQ/FUN button on the front panel or the MODE button on the remote control to cycle through available modes: CD, USB, AUX, Bluetooth (BT), and FM Radio.
6.3 CD Player Operation
- Gently press the 'OPEN/CLOSE' area on the top cover to open the CD tray.
- Place a CD (CD, CD-R/RW, MP3 CD, audiobook CD) onto the spindle with the label side facing up.
- Close the CD tray cover. The unit will automatically detect and begin playing the CD.
- Use the Play/Pause, Skip Forward/Backward buttons on the unit or remote for playback control.
- Press the REP button to select repeat modes (one, all, random).
- Press the EQ/FUN button repeatedly to cycle through 5 EQ modes: Flat, Classic, Rock, Pop, Jazz.
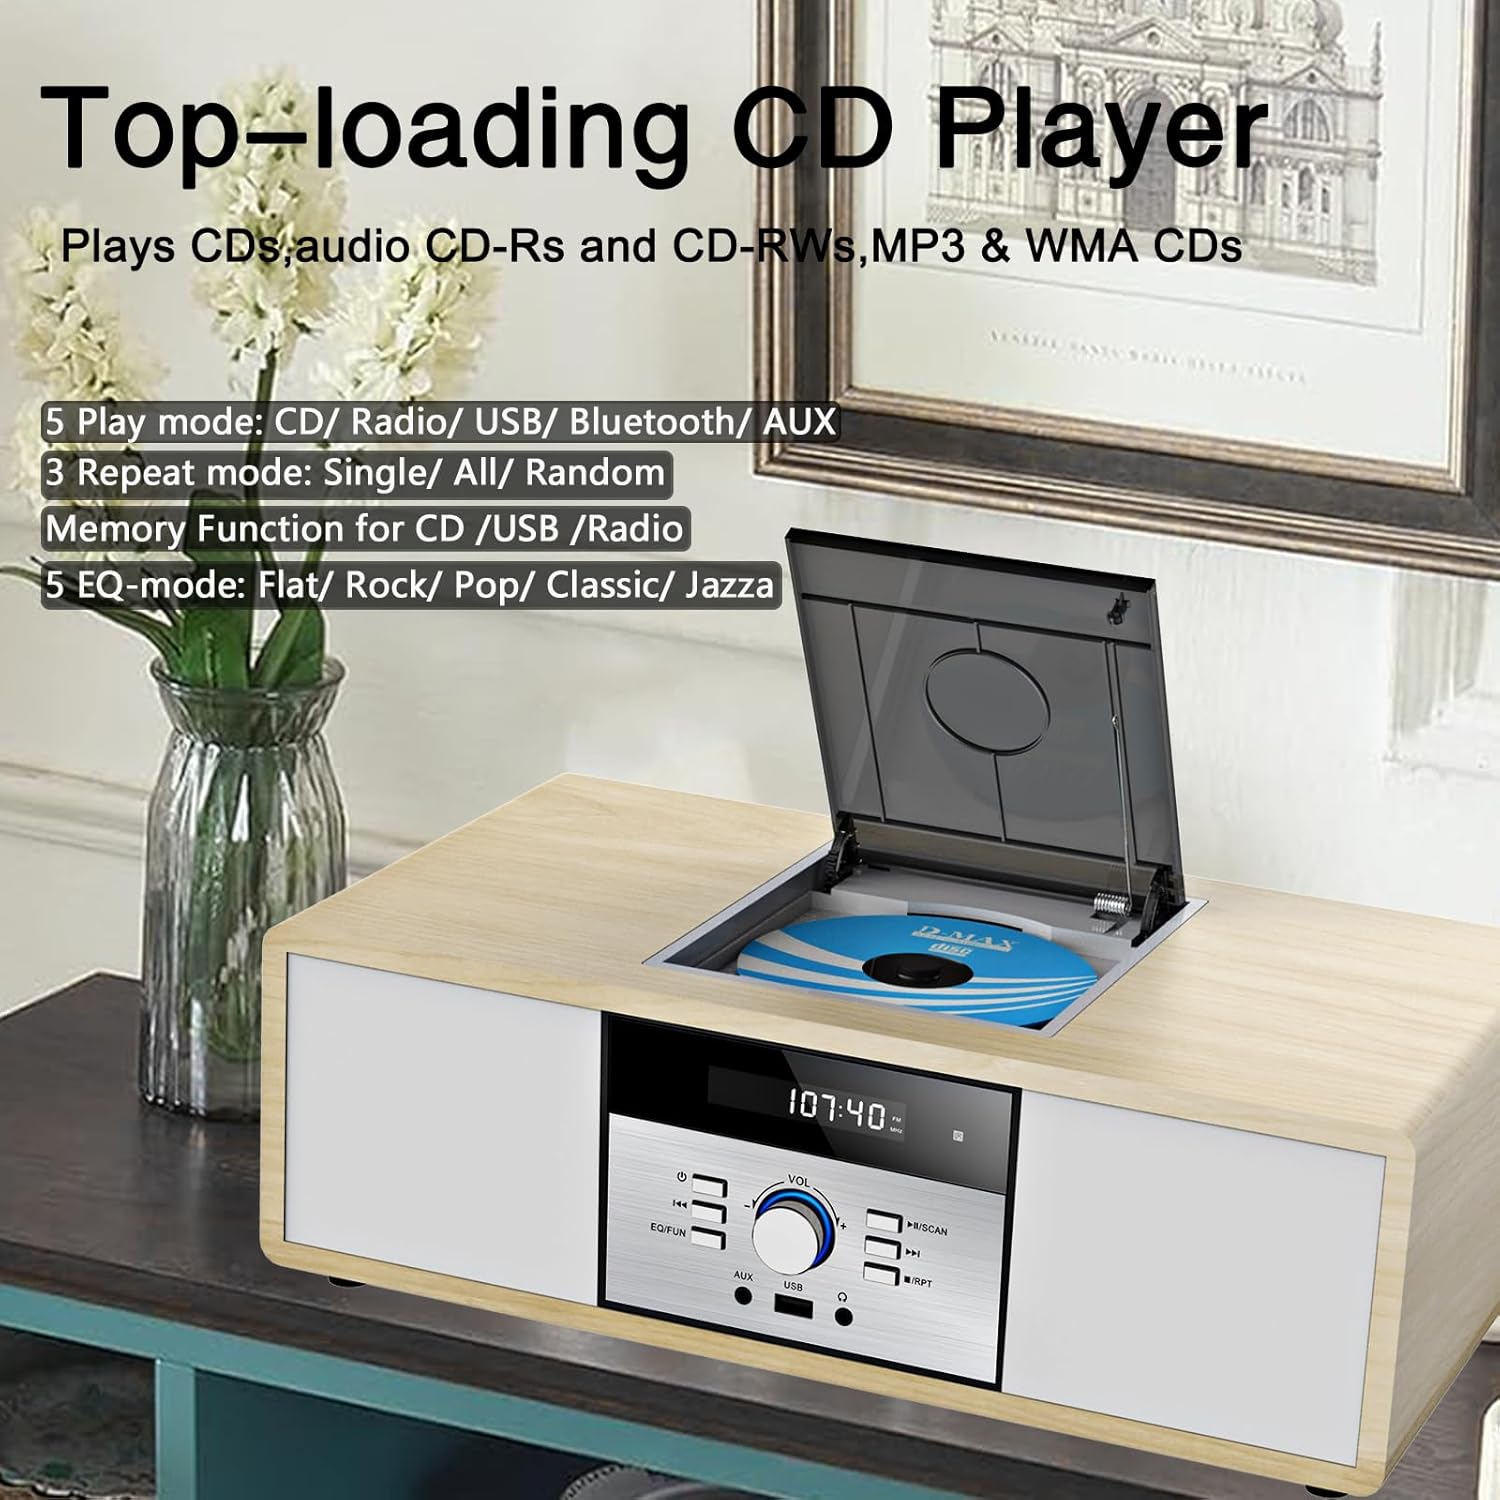
Image: The top-loading CD player mechanism, illustrating how to insert a compact disc.
6.4 Bluetooth Audio Streaming
- Switch the unit to Bluetooth (BT) mode. The display will show 'BT' and flash, indicating it's ready for pairing.
- Enable Bluetooth on your mobile device (smartphone, tablet, etc.) and search for 'WISCENT'.
- Select 'WISCENT' from the list of available devices to pair. Once connected, the 'BT' indicator will stop flashing.
- You can now stream audio from your device to the stereo system.

Image: A smartphone wirelessly connected to the stereo system via Bluetooth, demonstrating audio streaming functionality.
6.5 FM Radio Operation
- Switch the unit to FM Radio mode.
- Press the SCAN button on the remote control to auto-scan and preset up to 30 stations.
- Alternatively, use the Previous/Next Tune buttons to manually tune to a desired frequency.
- Use the CH+/CH- buttons on the remote to navigate through preset stations.

Image: The stereo system in FM radio mode, showing the frequency display and an antenna symbol for radio reception.
6.6 USB Playback
- Insert a USB flash drive containing MP3/WMA files into the USB port on the front panel.
- Switch the unit to USB mode. The unit will automatically detect and begin playing the audio files.
- Use the playback control buttons (Play/Pause, Skip) on the unit or remote.
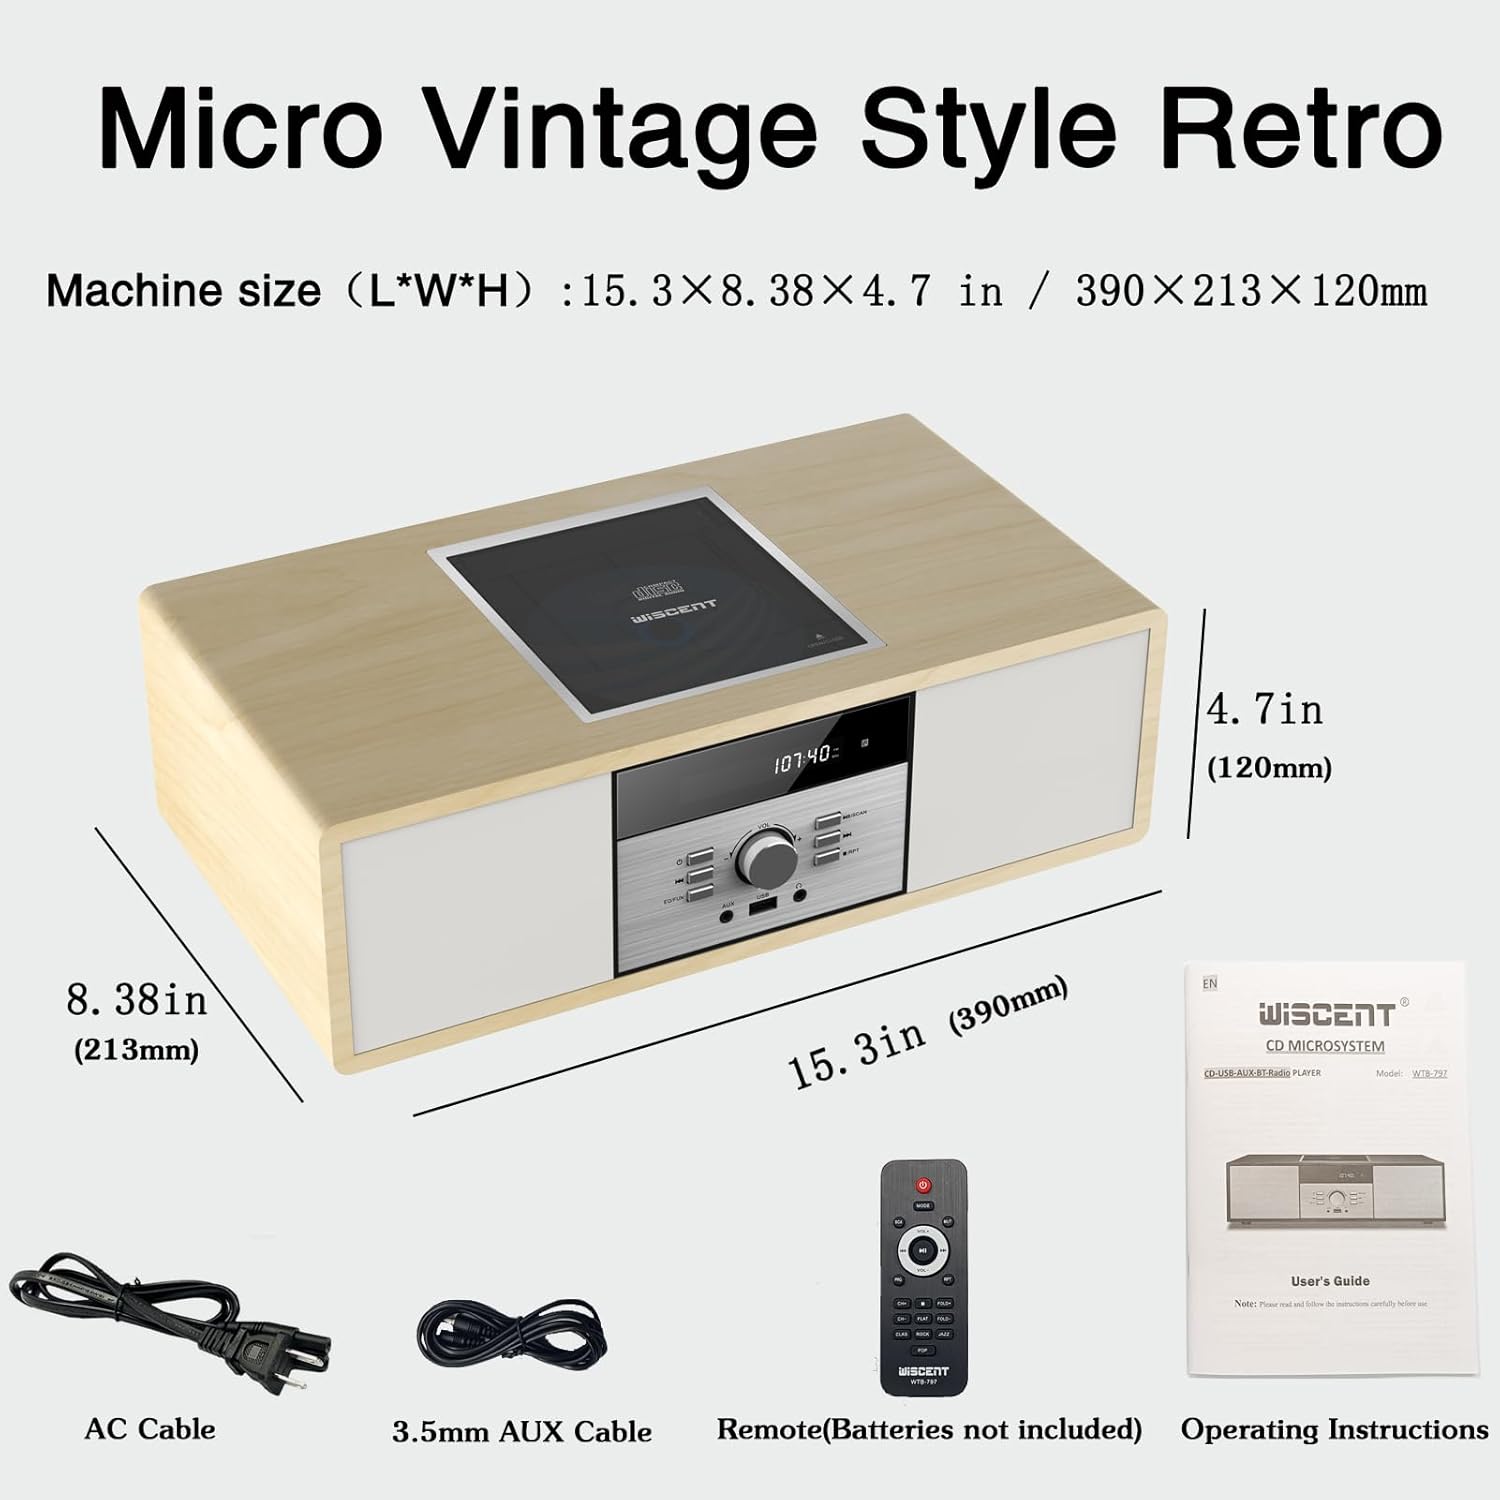
Image: A USB flash drive connected to the stereo system's USB port, ready for playing digital audio files.
6.7 Aux-in Connection
Connect an external audio device (e.g., smartphone, MP3 player) to the AUX-IN port on the front panel using the supplied 3.5mm AUX cable. Switch the unit to AUX mode to play audio from the connected device.
6.8 Earphone Port
Connect headphones to the earphone port on the front panel for private listening. The main speakers will mute automatically.
6.9 Volume Control
Rotate the VOL knob on the front panel or use the VOL+/VOL- buttons on the remote control to adjust the volume level.
7. Maintenance
7.1 Cleaning
Wipe the unit with a soft, dry cloth. Do not use abrasive cleaners or solvents. For the CD lens, use a specialized CD lens cleaner if necessary.
7.2 CD Player Care
Handle CDs by their edges to avoid fingerprints and scratches. Always close the CD tray cover when not in use to prevent dust accumulation.
7.3 General Handling
Avoid placing the unit in direct sunlight, near heat sources, or in areas with high humidity or dust. Ensure adequate ventilation around the unit.
8. Troubleshooting
| Problem | Possible Cause | Solution |
|---|---|---|
| No power | Power cable not connected; Power switch off | Ensure power cable is securely connected; Turn power switch to 'ON' |
| No sound | Volume too low; Incorrect mode selected; Headphones connected | Increase volume; Select correct mode; Disconnect headphones |
| CD not playing | CD dirty or scratched; CD inserted incorrectly; Unsupported disc format | Clean or replace CD; Insert CD with label side up; Use supported disc types |
| Bluetooth not connecting | Unit not in BT mode; Device not in pairing mode; Device too far | Switch to BT mode; Ensure device Bluetooth is on and discoverable; Move device closer |
| Poor FM reception | Antenna not extended or positioned poorly | Extend and reposition FM antenna for better signal |
9. Specifications
- Product Dimensions: 9.9 x 5.9 x 15 inches
- Item Weight: 7.78 pounds
- Brand: WISCENT
- Model: B0DS23QT46
- Connectivity Technology: Auxiliary, Bluetooth, USB
- Color: Wood
- Speaker Type: Stereo
- Output Power: 2x 15W RMS (30W Peak)
- FM Radio Frequency: 87.5 - 108 MHz (No AM)
- Supported CD Formats: CD, CD-R/RW, MP3 CD, Audiobook CD
- Supported USB Formats: MP3, WMA
10. Warranty & Support
This WISCENT product is covered by an 18-month warranty from the date of purchase. For warranty claims or technical support, please refer to the contact information provided in your product packaging or visit the official WISCENT website. Please retain your proof of purchase for warranty service.


