
Falcon Electronics HDE-1015
Falcon Electronics Platinum 4K IP69K Waterproof Sports Cam
Model: HDE-1015
1. Introduction
Welcome to your new Falcon Electronics Platinum 4K IP69K Waterproof Sports Cam. This manual provides essential information for setting up, operating, and maintaining your device. Please read these instructions carefully before use to ensure optimal performance and longevity of your camera.
2. What's in the Box
Verify that all items are present in your package:
- Platinum 4K Sports Cam
- IP69K Waterproof Case with Mount
- 11 Different Mounts
- User Guide
- Yellow Interchangeable Face Plate
- 32GB Micro SD Card (as shown in accessories image)

Figure 2.1: All included accessories, including various mounts, cables, and the yellow interchangeable face plate.
3. Product Overview
The Falcon Electronics Platinum 4K Sports Cam is designed for capturing high-quality video and photos in various environments. Key features include:
- 4K Video Quality: Record stunning videos with incredible clarity and brightness.
- 170-Degree Wide Angle Lens: Capture a broad field of view, ensuring you don't miss any action.
- Wi-Fi Connectivity: Easily view and transfer videos to your smartphone or tablet wirelessly.
- 2-inch TFT LCD Screen: Conveniently watch back recorded footage and adjust camera settings directly on the device.
- IP69K Waterproof: Utilize the included waterproof case for submersion up to 30 meters, suitable for various aquatic activities.
- Long Battery Life: Enjoy up to 6 hours of continuous recording.

Figure 3.1: Camera in waterproof case.

Figure 3.2: Camera without waterproof case.
4. Setup
4.1 Battery Installation
- Locate the battery compartment on the camera.
- Open the compartment cover.
- Insert the included Lithium Ion battery, ensuring correct polarity.
- Close the battery compartment cover securely.
4.2 Micro SD Card Insertion
A Micro SD card (up to 256GB) is required for recording. A 32GB card is included.
- Locate the Micro SD card slot on the side of the camera.
- Insert the Micro SD card with the gold contacts facing the back of the camera until it clicks into place.
- To remove, gently push the card until it springs out.
4.3 Attaching the Waterproof Case
The IP69K waterproof case protects your camera during underwater activities or in harsh environments.
- Ensure the camera is clean and dry before placing it inside the case.
- Open the latch on the waterproof case.
- Carefully insert the camera into the case.
- Close the latch firmly to create a watertight seal.
- Before first use in water, perform a leak test with the case empty.

Figure 4.1: Camera secured within its IP69K waterproof case.
4.4 Mounting Options
Your camera comes with 11 different mounts, compatible with standard Go-Pro mounts, allowing for versatile attachment to various surfaces and gear.
- Refer to the assembly diagram for common mounting configurations.
- Ensure all mounts are securely fastened before use to prevent loss or damage to the camera.

Figure 4.2: Assembly diagram illustrating how to combine different mounts for various applications.
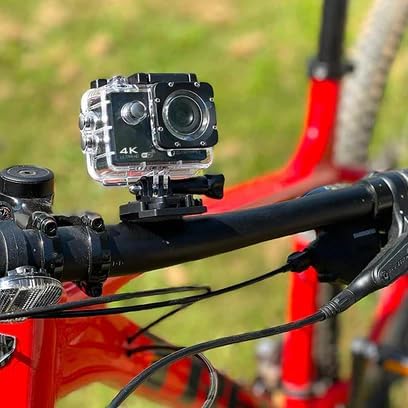
Figure 4.3: Example of the camera mounted on a bicycle handlebar.
5. Operating Instructions
5.1 Power On/Off
- To Power On: Press and hold the Power/Mode button (usually on the front or top) for a few seconds until the screen illuminates.
- To Power Off: Press and hold the Power/Mode button again until the screen turns off.
5.2 Recording Video
- Ensure the camera is in video recording mode. If not, press the Mode button repeatedly to cycle through modes until the video icon is displayed.
- Press the Shutter/OK button (usually on the top) to start recording. A red indicator light will typically flash, and a timer will appear on the screen.
- Press the Shutter/OK button again to stop recording. The indicator light will stop flashing.
5.3 Capturing Photos
- Press the Mode button repeatedly to select photo capture mode (camera icon).
- Frame your shot using the LCD screen.
- Press the Shutter/OK button to take a photo.
5.4 Using the 2-inch TFT LCD Screen
The integrated LCD screen allows for real-time viewing, playback, and menu navigation.
- Use the Mode button to switch between video, photo, and playback modes.
- In playback mode, use the navigation buttons (if available) to scroll through your recordings and photos.
- Access the settings menu by pressing and holding the Mode button or navigating to the settings icon.

Figure 5.1: The 2-inch TFT LCD screen displaying live view or playback.
5.5 Wi-Fi Connectivity
Connect your camera to a smartphone or tablet via Wi-Fi for remote control, live preview, and file transfer.
- Turn on the camera's Wi-Fi function (refer to the camera's on-screen menu for specific steps).
- On your smartphone/tablet, go to Wi-Fi settings and connect to the camera's Wi-Fi network (SSID and password usually found in the camera settings or manual).
- Download and install the recommended companion app (check the user guide for app name).
- Open the app to control the camera, view live footage, and download files.
6. Maintenance
6.1 Cleaning the Camera and Case
- Use a soft, lint-free cloth to clean the camera body and lens. Avoid abrasive materials.
- For the waterproof case, rinse with fresh water after each use in saltwater or chlorinated water. Ensure no debris is trapped in the seals.
- Allow all components to dry completely before storage.
6.2 Battery Care
- Charge the battery fully before first use.
- Avoid exposing the battery to extreme temperatures.
- If storing the camera for extended periods, remove the battery.
6.3 Storage
- Store the camera and accessories in a cool, dry place away from direct sunlight.
- Keep the camera in its protective case when not in use to prevent scratches or damage.
7. Troubleshooting
If you encounter issues with your camera, refer to the following common solutions:
| Problem | Possible Solution |
|---|---|
| Camera does not power on | Ensure the battery is fully charged and correctly inserted. Try charging the camera for at least 2 hours. |
| Cannot record video/take photos | Check if a Micro SD card is inserted and has sufficient free space. Ensure the card is formatted correctly (FAT32). |
| Poor video/photo quality | Ensure the lens is clean. Check camera settings for resolution and exposure. Record in well-lit conditions. |
| Wi-Fi connection issues | Ensure Wi-Fi is enabled on the camera and your mobile device. Restart both devices. Check the companion app for updates. |
| Waterproof case leaks | Inspect the rubber seal for dirt, hair, or damage. Ensure the latch is fully closed. Do not exceed the maximum depth rating. |
8. Specifications
Detailed technical specifications for the Falcon Electronics Platinum 4K Sports Cam (Model HDE-1015):
- Model Number: HDE-1015
- Video Capture Resolution: Up to 4K (actual 1080p listed in specs, but product title/features state 4K. User should verify in camera settings.)
- Photo Sensor Technology: Other
- Maximum Focal Length: 170 degrees (Wide Angle)
- Maximum Aperture: 2.8 Millimeters
- Flash Memory Type: SD (Micro TF card compatible)
- Video Capture Format: MOV
- Supported Audio Format: AAC, PCM
- Screen Size: 2 Inches TFT LCD
- Connectivity Technology: Wi-Fi
- Waterproof Rating: IP69K (up to 30M with case)
- Battery: 1 Lithium Ion battery (included)
- Battery Life: Up to 6 hours
- Item Weight: 1.08 pounds
- Package Dimensions: 10.4 x 6.3 x 2.4 inches
9. Warranty Information
Falcon Electronics products are covered by a limited warranty against defects in materials and workmanship. The specific terms and duration of your warranty may vary based on your region and purchase date. Please retain your proof of purchase for warranty claims.
For detailed warranty information and to register your product, please visit the official Falcon Electronics website or contact customer support.
10. Customer Support
If you require further assistance, have questions not covered in this manual, or need technical support, please contact Falcon Electronics customer service.
- Online Support: Visit the Falcon Electronics Store on Amazon for product information and resources.
- Email/Phone: Refer to the packaging or official website for current contact details.
Related documentsHDE-1015

Ask a question about this manual
Ask about setup, troubleshooting, compatibility, parts, safety, or missing instructions. Manuals+ will review the question and use this page’s manual context to help answer it.