Introduction
Thank you for choosing the NineLeaf Bike Tail Light with Alarm and Remote. This versatile device combines a powerful tail light, a smart brake sensor, an anti-theft alarm, and a bike bell into one compact unit, enhancing your cycling safety and security. This manual provides detailed instructions for installation, operation, and maintenance to ensure optimal performance and longevity of your product.
Product Overview and Features
The NineLeaf Bike Tail Light is designed with advanced features for a safer and more convenient cycling experience.
- 4-in-1 Functionality: Integrates a remote control, tail light, brake light, anti-theft alarm, and bike bell.
- Smart Brake Light: Automatically illuminates brightly for 2 seconds upon braking or slowing down to alert others.
- Auto On/Off (Smart Mode): In slow flash or breathing modes, the light automatically turns on/off based on ambient light and motion. It powers off after 30 seconds of inactivity in the dark and reactivates upon motion.
- Anti-theft Alarm: Features a 3D displacement sensor and special algorithm to accurately detect theft attempts and emit a loud alarm up to 113dB.
- USB Rechargeable: Built-in 4.2V 700mAh battery with Type-C port, offering 1 to 3 months of daily use.
- IP65 Waterproof: Constructed with PC+UV resistant material, providing effective protection against rain, sun, and snow.
- Wireless Remote Control: Operates within a 20-meter range, allowing for arming, disarming, sensitivity adjustment, bell sound change, and vehicle search.
- Multiple Light Modes: Offers 4 light modes including Slow Flashing (Auto ON/OFF), Breathing (Auto ON/OFF), Blinking, and Steady Light.
- SOS Function: The device includes an SOS function for emergency situations.
- Battery Low Indication: Alerts when the battery is low.
Specifications
| Tail Light Battery: | 3.7V 700mAh rechargeable battery |
| Remote Control Battery: | 12V/27A alkaline battery |
| Wireless Range: | 20 meters (65 feet) |
| Alarm Loudness: | Up to 113dB |
| Waterproof Rating: | IP65 |
| Operating Temperature: | -20°C to 60°C (-4°F to 140°F) |
| Storage Temperature: | -30°C to 70°C (-22°F to 158°F) |
| Humidity: | <80% |
| Model Number: | NL-AMA01-KS-SF33R-1PK+BKT-XL-32R-1PK |
Package Contents
Please check the package to ensure all items are present:
- NineLeaf Bike Tail Light with Alarm
- Remote Control
- USB Type-C Charging Cable
- Bike Light Pole Bracket (for 0.98 - 1.38 inch seat post)
- Bike Wind-Breaking Bracket (for seat tube)
- Mounting Accessories (screws, double-sided tape, strap, padding)
Setup and Installation
The NineLeaf Bike Tail Light offers multiple installation methods to suit various bike types and preferences.
Initial Power On
- Press and hold the Arm key on the remote control until the alarm emits a short "Bi" sound.
- Gently shake the alarm. You will hear three short "Bi" sounds, indicating that the alarm is powered on and ready for use.
Mounting the Tail Light
The tail light can be installed using the provided brackets or other accessories.

Image showing the NineLeaf Bike Tail Light, its remote control, USB charging cable, and the two types of mounting brackets included in the package. This provides a clear visual of all main components.

Diagram illustrating three primary installation methods for the tail light: using zip ties, the bracket, or double-sided tape. The image also shows the light mounted on a bike seat post, indicating compatibility with 0.98-1.38 inch seat posts.

Image displaying the dimensions of the bike wind-breaking bracket, showing its overall length of 60mm (2.4 inches) and a width of 34mm (1.3 inches). This bracket is designed for ergonomic fit on aerodynamic seat tubes.

A four-step visual guide demonstrating the installation process for the bike tail light using the bracket: 1. Inserting the padding, 2. Positioning the bracket, 3. Tightening the screws, and 4. Checking stability and installing the alarm.
Using the Bike Light Pole Bracket:
This bracket is suitable for seat posts with a diameter of 0.98 to 1.38 inches.
- Select the appropriate padding for your seat post diameter and insert it into the bracket.
- Position the bracket securely on the seat post.
- Tighten the screws to firmly secure the bracket.
- Slide the tail light onto the bracket until it clicks into place. Ensure it is stable.
Using the Bike Wind-Breaking Bracket:
This bracket is ergonomically designed for aerodynamic seat tubes.
- Attach the wind-breaking bracket to the seat tube using the provided hardware.
- Ensure the bracket is tightly secured and does not wobble.
- Mount the tail light onto the bracket.
The included pad helps prevent slipping caused by vibrations during riding.

Close-up view of the bike seat post bracket, highlighting the anti-slip pad designed to prevent movement and vibrations during cycling. The image shows the bracket both disassembled and installed on a seat post.

Various views of the bike tail light securely mounted on a bicycle seat post, demonstrating its compact fit and how it appears from different angles when installed on the bike.
Pairing the Remote Control
The alarm can pair with a maximum of 8 remote controls.
- Remove the battery from the tail light alarm unit.
- Wait for 30 seconds, then re-install the battery into the alarm unit.
- Immediately long press the Ringtone key on the remote control.
- After the alarm sounds a single "Bi", press the Arm key on the remote control.
- The alarm will sound "Bi...Bi" to confirm successful pairing.
Operating Instructions
Remote Control Functions
- Arm Key: Activates the anti-theft alarm.
- Disarm Key: Deactivates the anti-theft alarm.
- Bell Key: Activates the bike bell sound to search for your vehicle.
- Light Mode Key: Cycles through the different light modes.
Adjusting Touch Sensitivity (7 Levels)
The alarm's vibration sensitivity can be adjusted to 7 levels.
- Long press the Disarm key on the remote control until the LED light on the remote stays lit.
- While the remote's LED is lit, press the Arm key. Each press will cycle the sensitivity level from high to low.
- There are 7 distinct tones (Do, Re, Mi, Fa, Sol, La, Si) corresponding to the 7 sensitivity levels. "Do" represents the highest sensitivity.
Light Modes
The tail light features 4 distinct light modes for various riding conditions.
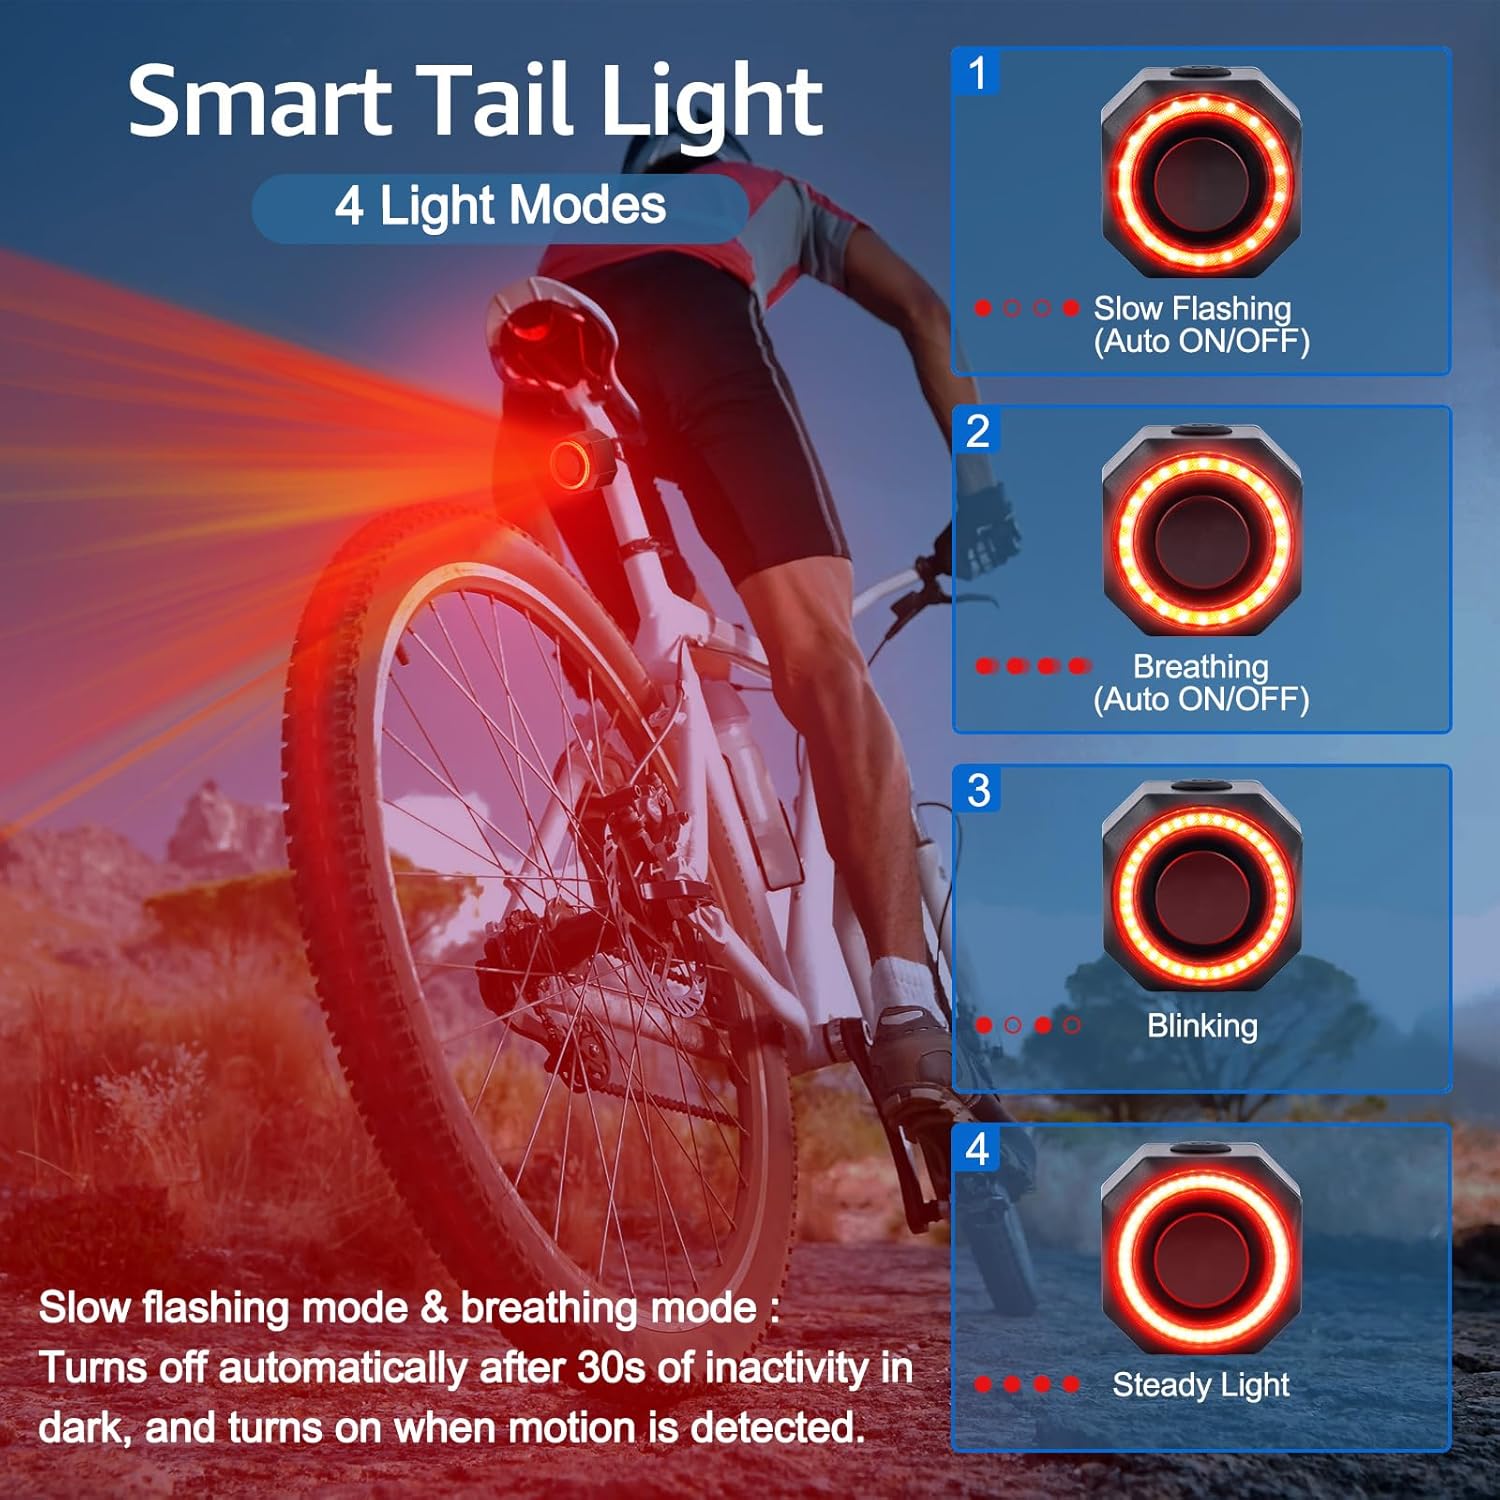
Visual representation of the four light modes: 1. Slow Flashing (Auto ON/OFF), 2. Breathing (Auto ON/OFF), 3. Blinking, and 4. Steady Light. The image also explains that slow flashing and breathing modes automatically turn off after 30 seconds of inactivity in the dark and turn on when motion is detected.
- Slow Flashing (Auto ON/OFF): Ideal for energy saving. Turns off automatically after 30 seconds of inactivity in the dark, and turns on when motion is detected.
- Breathing (Auto ON/OFF): Provides a gentle pulsating light. Also features auto on/off functionality similar to slow flashing mode.
- Blinking: A standard flashing mode for visibility.
- Steady Light: Constant illumination for continuous visibility.
Smart Brake Sensing
The integrated smart brake sensor enhances safety by automatically activating a bright brake light.

An image depicting the brake sensing tail light in action, showing it brightly illuminated on a bicycle during what appears to be a rainy condition, emphasizing its IP65 waterproof rating. Text indicates that the brake light goes on high for 2 seconds upon braking or slowing down.
When you brake or slow down, the tail light will immediately and automatically illuminate at its highest brightness for 2 seconds to clearly alert following traffic.
SOS Function
The device includes an SOS function for emergency situations. Refer to the product packaging or manufacturer's website for specific activation instructions, as this feature's operation may vary.
Maintenance
Charging the Tail Light
- Connect the provided USB Type-C cable to the charging port on the tail light.
- Connect the other end of the cable to a USB power source (e.g., computer, wall adapter).
- The charging indicator light will show the charging status. A full charge typically takes a few hours.
- A full charge provides 1 to 3 months of daily use, depending on usage patterns and light mode.
Replacing Remote Control Battery
The remote control uses a 12V/27A alkaline battery, which typically lasts 1-2 years with average use.
- Locate the battery compartment on the back of the remote control.
- Open the compartment using a small screwdriver or coin.
- Remove the old battery and insert a new 12V/27A alkaline battery, ensuring correct polarity.
- Close the battery compartment securely.
Cleaning and Storage
- Wipe the device with a soft, damp cloth to remove dirt and dust. Do not use harsh chemicals or abrasive cleaners.
- Ensure the charging port cover is securely closed to maintain IP65 waterproofing.
- Store the device in a cool, dry place when not in use, away from direct sunlight and extreme temperatures.
Troubleshooting
| Problem | Solution |
|---|---|
| Tail light does not turn on. |
|
| Remote control not working. |
|
| Alarm is too sensitive or not sensitive enough. |
|
| Brake light not activating. |
|
| Auto On/Off feature not working. |
|
Warranty and Support
NineLeaf products are manufactured with high-quality standards. For warranty information, technical support, or any inquiries regarding your product, please refer to the contact information provided on the product packaging or visit the official NineLeaf website. Please retain your proof of purchase for warranty claims.
For further assistance, you may visit the NineLeaf Store on Amazon.


