
1. Introduction and Overview
This TRIUMPHKEY Vanity is a versatile furniture piece designed for bedrooms, functioning as both a makeup vanity with an integrated LED mirror and a storage cabinet. Its minimalist design and ample storage make it a practical addition to any space. This manual provides detailed instructions for assembly, operation, and maintenance to ensure optimal performance and longevity of your vanity.

Image 1.1: Fully assembled TRIUMPHKEY Vanity with LED light mirror and open drawers.
2. Product Features
- Integrated LED Lighted Mirror: The vanity features an integrated LED lighted makeup mirror with three adjustable brightness levels (low, medium, high). This design ensures optimal lighting for various tasks and is safer than traditional bulb setups.
- Sliding Mirror with Hidden Storage: A unique sliding mirror design conceals three layers of storage shelves, providing discreet and organized space for cosmetics and personal items. This feature helps maintain a tidy desktop appearance while offering convenient access.
- Ample Storage Capacity: Beyond the hidden shelves, the vanity includes five drawers of varying sizes and eight open shelves, offering extensive storage for skincare products, perfumes, and other essentials. One drawer includes a locking mechanism for securing valuable items.
- Multifunctional Design: With dimensions of 80 cm (width) x 38 cm (depth) x 130 cm (height), this vanity can also serve as a functional desk or laptop workstation. The space under the table, measuring 47.5 cm in length, provides comfortable seating.

Image 2.1: Close-up of the LED mirror illustrating three adjustable brightness levels.

Image 2.2: The sliding mirror mechanism revealing hidden storage compartments.

Image 2.3: Detailed view of the vanity's storage options, including drawers and open shelves.
3. Assembly Instructions
The TRIUMPHKEY Vanity requires assembly. Please follow these guidelines for a smooth and successful process:
- Unpacking and Inspection: Upon receiving your package, carefully unpack all components. Verify that all accessories and parts are present and undamaged by cross-referencing them with the included parts list in the assembly manual.
- Preparation: Clear a spacious area for assembly. It is recommended to have a second person assist with assembly, especially for larger components.
- Follow Instructions: Refer to the detailed installation instructions provided in the package. Each step is illustrated to guide you through the process.
- Component Identification: While parts are not individually numbered, identify them by shape, size, and pre-drilled holes as shown in the manual diagrams.
- Secure Fasteners: Ensure all screws, dowels, and connectors are securely tightened but do not overtighten to avoid damaging the wood.
- LED Mirror Connection: During assembly, ensure the LED mirror's power connection is properly seated. If the mirror does not light up after assembly, check the connection points.
- Assistance: If you encounter any difficulties during assembly or if any parts are missing, please contact customer service for support. Solutions will be provided within 24 hours.
4. Operating Instructions
- LED Mirror Operation: The integrated LED mirror features touch controls for illumination. Tap the designated area on the mirror surface to cycle through three brightness levels: low, medium, and high. Tap again to turn off the light.
- Sliding Mirror Access: To access the hidden storage shelves, gently slide the mirror panel horizontally along its track. Slide it back to conceal the shelves.
- Drawer Usage: Utilize the five drawers for organized storage. The top left drawer includes a lock for securing valuable items. Insert the key and turn to lock or unlock.
5. Maintenance
- Cleaning: Wipe surfaces with a soft, damp cloth. Avoid abrasive cleaners or harsh chemicals that may damage the finish. For the mirror, use a glass cleaner and a lint-free cloth.
- Dusting: Regularly dust all surfaces to prevent buildup.
- LED Lights: The LED lights are integrated and designed for long-term use. If an issue arises, contact customer support; do not attempt to replace individual LEDs.
- Drawer Slides: Periodically check drawer slides for smooth operation. If they become stiff, a small amount of silicone lubricant can be applied.
- Structural Integrity: Periodically check all screws and fasteners to ensure they remain tight. Retighten if necessary to maintain stability.
6. Troubleshooting
- Mirror LED Lights Not Working:
- Ensure the vanity is properly assembled and the LED mirror's power connection is securely plugged in.
- Verify that the power source (if external) is active.
- If only part of the mirror lights up, check for any loose connections or contact customer service.
- Difficulty Assembling:
- Review the assembly instructions carefully, paying close attention to diagrams.
- Ensure all parts are correctly identified before attempting to connect them.
- If parts seem to be missing or do not fit, double-check the packaging and contact customer service with specific details.
- Drawers Not Sliding Smoothly:
- Check for any obstructions in the drawer slides.
- Ensure drawers are correctly aligned on their tracks.
- Apply a small amount of silicone lubricant to the slides if friction persists.
- Vanity Wobbles:
- Ensure all assembly screws and fasteners are fully tightened.
- Verify the vanity is placed on a flat, level surface.
7. Specifications
| Feature | Specification |
|---|---|
| Model Number | H6 |
| Product Dimensions (W x D x H) | 80 cm x 38 cm x 130 cm |
| Item Weight | 23 kg |
| Material | Wood |
| Color | White-1 |
| Number of Drawers | 5 |
| Assembly Required | Yes |
| Manufacturer | TRIUMPHKEY |
| UPC | 763433642338 |
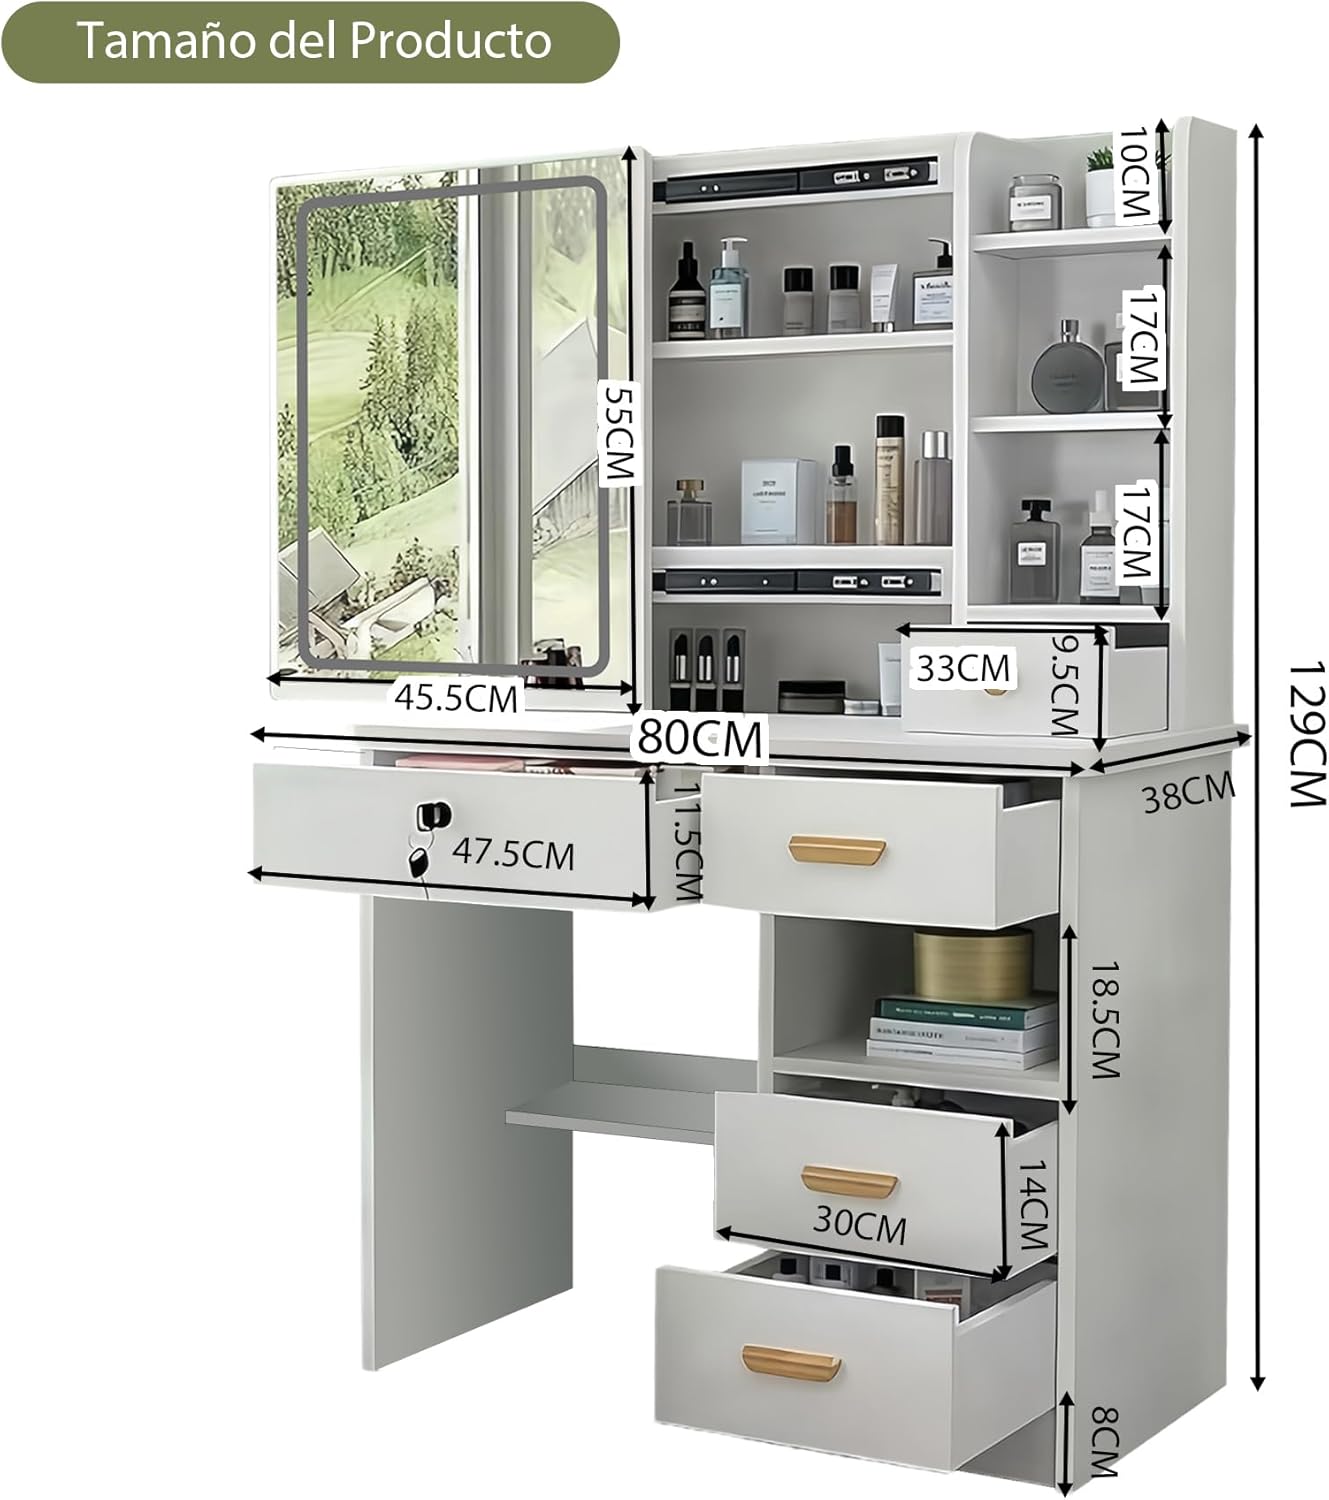
Image 7.1: Diagram illustrating the product dimensions.
8. Warranty and Support
- Customer Support: For any questions, missing parts, or assembly assistance, please contact TRIUMPHKEY customer service. We aim to provide a solution within 24 hours.
- Warranty Information: Please refer to the warranty card included with your product for specific details regarding coverage and terms. Keep your proof of purchase for warranty claims.