
1. Introduction and Overview
The Generic JDY-16 is a Bluetooth 4.2 module designed for low-power, high-speed wireless data transfer applications. It offers compatibility with the CC2541, making it a versatile solution for various embedded systems and IoT projects requiring reliable Bluetooth Low Energy (BLE) communication. This module facilitates seamless integration into existing hardware designs, providing robust and efficient wireless connectivity.

Image 1.1: Top view of the JDY-16 Bluetooth 4.2 module. This image displays the module's blue printed circuit board (PCB) with its integrated antenna, main chip, crystal oscillator, and various surface-mount components, providing a clear view of its compact design.
2. Key Features
- Bluetooth 4.2 Standard: Supports the latest Bluetooth Low Energy (BLE) specification for efficient and secure wireless communication.
- Low Power Consumption: Optimized for battery-powered applications, ensuring extended operational life.
- High-Speed Data Transfer: Capable of fast and reliable data exchange, suitable for various data-intensive tasks.
- CC2541 Compatibility: Designed to be compatible with systems and applications utilizing the CC2541 chipset.
- Compact Design: Small form factor for easy integration into space-constrained projects.
- UART Interface: Standard serial communication interface for easy connection with microcontrollers.
3. Specifications
| Specification | Value |
|---|---|
| Model | JDY-16 |
| Bluetooth Version | 4.2 BLE |
| Operating Voltage | Not explicitly specified (typically 1.8V-3.6V for BLE modules, refer to datasheet for exact range) |
| Communication Interface | UART |
| Dimensions (L x W) | 19.6 mm x 14.9 mm (approx.) |
| Manufacturer | Generic |
| Part Number | DQSSL_SKS_16061 |
| ASIN | B0DRJGV7RS |
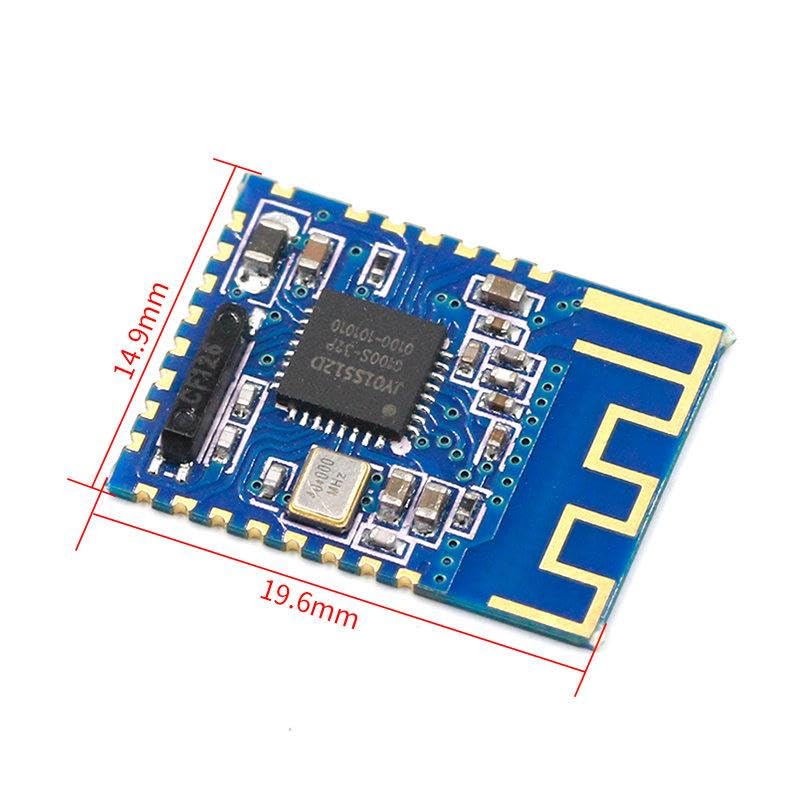
Image 3.1: JDY-16 module with dimensions. This image clearly indicates the module's length as 19.6mm and width as 14.9mm, providing essential physical specifications for integration.
4. Setup Instructions
Proper setup is crucial for the reliable operation of the JDY-16 module. Follow these general steps for initial integration:
- Power Supply Connection: Connect the VCC pin of the JDY-16 module to a stable power source (e.g., 3.3V or 5V, depending on the specific module variant and datasheet recommendations). Connect the GND pin to the system's ground.
- UART Connection: Connect the TXD pin of the JDY-16 to the RXD pin of your microcontroller or host device, and the RXD pin of the JDY-16 to the TXD pin of your microcontroller or host device. Ensure proper voltage level shifting if your microcontroller operates at a different voltage than the module.
- State Pin (Optional): If available, connect the STATE pin to an input pin on your microcontroller to monitor the module's connection status.
- AT Command Mode: The JDY-16 module typically supports configuration via AT commands. Connect a serial terminal (e.g., PuTTY, Arduino Serial Monitor) to your microcontroller's serial port (or directly to the module via a USB-to-UART converter) to send AT commands for configuration.
- Initial Configuration: Use AT commands to set parameters such as the module's name, baud rate, master/slave role, and pairing password if required. Refer to the specific JDY-16 AT command set documentation for detailed commands.
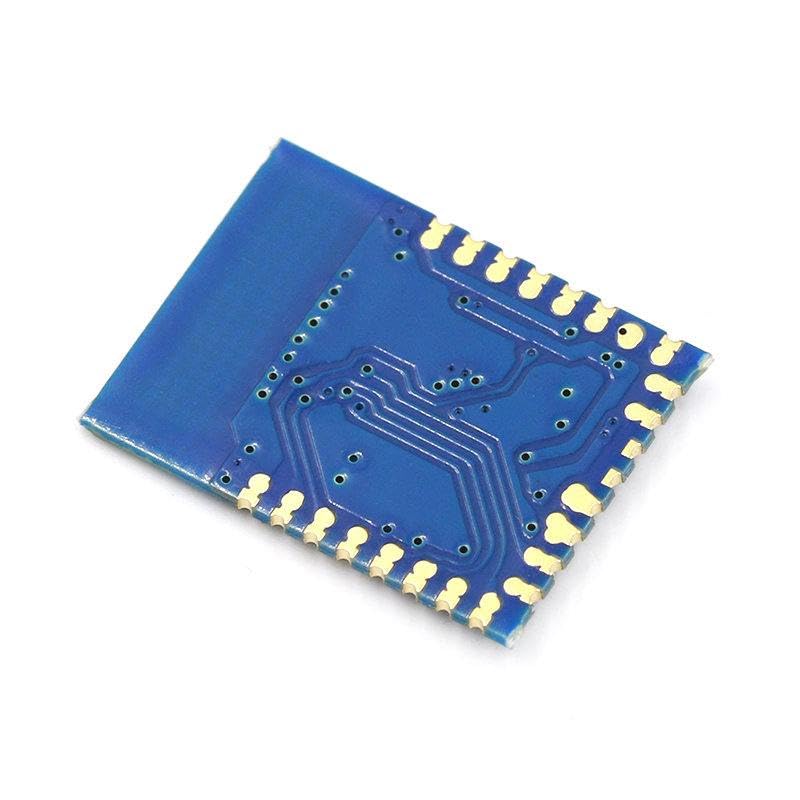
Image 4.1: Bottom view of the JDY-16 module. This image shows the underside of the PCB, revealing the solder pads for pin connections and the intricate circuit traces, which are essential for understanding the module's physical interface.
5. Operating Instructions
Once the JDY-16 module is set up, you can proceed with its operation for wireless communication:
- Power On: Apply power to the module. The status LED (if present) should indicate its operational state (e.g., blinking for discoverable, solid for connected).
- Discovery and Pairing:
- As a Peripheral (Slave): The module will broadcast its presence. Use a central device (e.g., smartphone, computer, or another Bluetooth module configured as master) to scan for and connect to the JDY-16.
- As a Central (Master): Configure the JDY-16 as a master using AT commands. It will then scan for and connect to a specified peripheral device.
- Data Transmission: After a successful connection, data can be sent and received via the UART interface. Any data sent to the module's TXD pin (from your microcontroller) will be transmitted wirelessly, and any data received wirelessly will be output through the module's RXD pin (to your microcontroller).
- Baud Rate: Ensure that the baud rate of your microcontroller's serial port matches the baud rate configured on the JDY-16 module (default is often 9600 or 115200, but can be changed via AT commands).
- Disconnection: The connection can be terminated by either device or by powering off the module.
6. Maintenance
The JDY-16 Bluetooth module is a robust electronic component designed for long-term operation with minimal maintenance. Adhering to the following guidelines will help ensure its longevity and reliable performance:
- Environmental Conditions: Operate the module within its specified temperature and humidity ranges. Avoid exposure to extreme temperatures, direct sunlight, or high moisture environments.
- Physical Handling: Handle the module with care to prevent physical damage to the PCB, components, or antenna. Avoid bending or applying excessive force.
- Cleanliness: Keep the module free from dust, dirt, and corrosive substances. If cleaning is necessary, use a soft, dry brush or a lint-free cloth. Do not use liquid cleaners unless specifically recommended by the manufacturer.
- Power Supply Stability: Ensure a stable and clean power supply. Fluctuations or incorrect voltage levels can damage the module.
- Firmware Updates: Periodically check the manufacturer's website or relevant community forums for any available firmware updates. Firmware updates can improve performance, add features, or fix bugs.
7. Troubleshooting
If you encounter issues with your JDY-16 module, consider the following troubleshooting steps:
- Module Not Powering On:
- Verify that the power supply voltage is correct and stable.
- Check all power connections (VCC, GND) for proper contact and polarity.
- Module Not Discoverable/Connectable:
- Ensure the module is powered on and its status LED (if present) indicates a discoverable state.
- Check if the module is configured as a peripheral (slave) if you expect it to be discoverable.
- Confirm that the scanning device is within range and has Bluetooth enabled.
- Reset the module and the scanning device.
- Data Transfer Issues:
- Verify that the UART TXD and RXD connections are correctly wired (TX to RX, RX to TX).
- Ensure the baud rate of your microcontroller's serial port matches the module's configured baud rate.
- Check for any voltage level mismatches between the module and your microcontroller.
- Confirm that the module is successfully connected to the target device.
- AT Command Issues:
- Ensure your serial terminal settings (baud rate, data bits, parity, stop bits, newline characters) match the module's requirements.
- Verify that the module is in AT command mode (if applicable, some modules require a specific pin state or command to enter this mode).
- Double-check the syntax of your AT commands.
8. Warranty and Support
This Generic JDY-16 Bluetooth 4.2 Module is typically covered by the standard warranty provided by the retailer or distributor at the time of purchase. Please retain your proof of purchase for any warranty claims.
For technical support, detailed datasheets, or specific AT command documentation, please refer to the manufacturer's official resources or contact the seller directly. Community forums and online resources dedicated to Bluetooth modules and embedded electronics can also be valuable sources of information and assistance.


