
1. Introduction
The Ortis Automatic Vacuum Switch ETC-088 is designed to enhance efficiency and safety in workshops by automating dust collection for power tools. This device features multiple tool outlets, configurable actuation thresholds, and adjustable shut-off delays to prevent circuit overload and ensure a cleaner working environment.

Figure 1: Ortis Automatic Vacuum Switch ETC-088. This image shows the main unit with its power cord and multiple outlets.
2. Safety Information
WARNING: Read all safety warnings and instructions before using this product. Failure to follow the warnings and instructions may result in electric shock, fire, and/or serious injury.
- Ensure the total power consumption of connected tools and vacuum does not exceed 120V/15A (1875W).
- Use only with UL-certified American Standard 14AWG power cords or equivalent.
- The device incorporates a 1-second delay to turn on the vacuum when a tool starts, helping to prevent circuit overload.
- The unit is constructed with PC+ABS V0 grade flame retardant material for enhanced safety.
- Always disconnect power before performing any maintenance or making adjustments.
3. Package Contents
Upon opening the package, verify that all items are present and undamaged:
- Ortis Automatic Vacuum Switch ETC-088 Unit
- Remote Control (requires 23A battery, not included)
- User Manual (this document)
4. Product Overview
The Ortis Automatic Vacuum Switch features a user-friendly design with clear LED indicators and multiple outlets for efficient dust control.

Figure 2: Overview of the Automatic Vacuum Switch showing its three tool outlets, configurable actuation threshold (30W/60W), configurable shut-off delay (3s/7s/10s), and three vacuum run modes (Auto, Off, On).
Key Components:
- Vacuum Power Outlet: Connect your dust collector or shop vacuum here.
- Tool Outlets (x3): Connect up to three power tools.
- Mode Switch (M): Toggles between AUTO, OFF, and ON vacuum modes.
- Overrun Delay (OD) Button: Adjusts the vacuum shut-off delay (3s, 7s, 10s).
- Actuation Threshold (AT) Button: Sets the power threshold for vacuum activation (30W, 60W).
- LED Indicators: Display current mode, delay time, and actuation threshold settings.

Figure 3: Highlighting the superior quality of the Ortis Automatic Vacuum Switch, featuring V0-rated flame-retardant materials, UL-certified American Standard 14AWG power cords, and UL-certified American Standard outlets.

Figure 4: A comparison image showing the Ortis Automatic Vacuum Switch with its three tool outlets, contrasting it with other models that may only offer one tool outlet, emphasizing its enhanced connectivity.

Figure 5: Physical dimensions of the Ortis Automatic Vacuum Switch, showing its compact size for easy mounting.
5. Setup
Follow these steps to set up your Ortis Automatic Vacuum Switch:
- Mounting: The unit can be mounted to a wall or workbench using the integrated mounting holes. Ensure it is in a stable location, away from excessive dust or moisture.
- Connect Vacuum: Plug your dust collector or shop vacuum into the "VACUUM POWER" outlet on the switch.
- Connect Tools: Plug your power tools (e.g., miter saw, table saw, sander, router, planer) into the "TOOL" outlets. The switch supports up to three tools.
- Power On: Plug the main power cord of the Ortis Automatic Vacuum Switch into a standard 120V/15A wall outlet.
- Remote Control Battery: Insert a 23A battery into the remote control (battery not included).
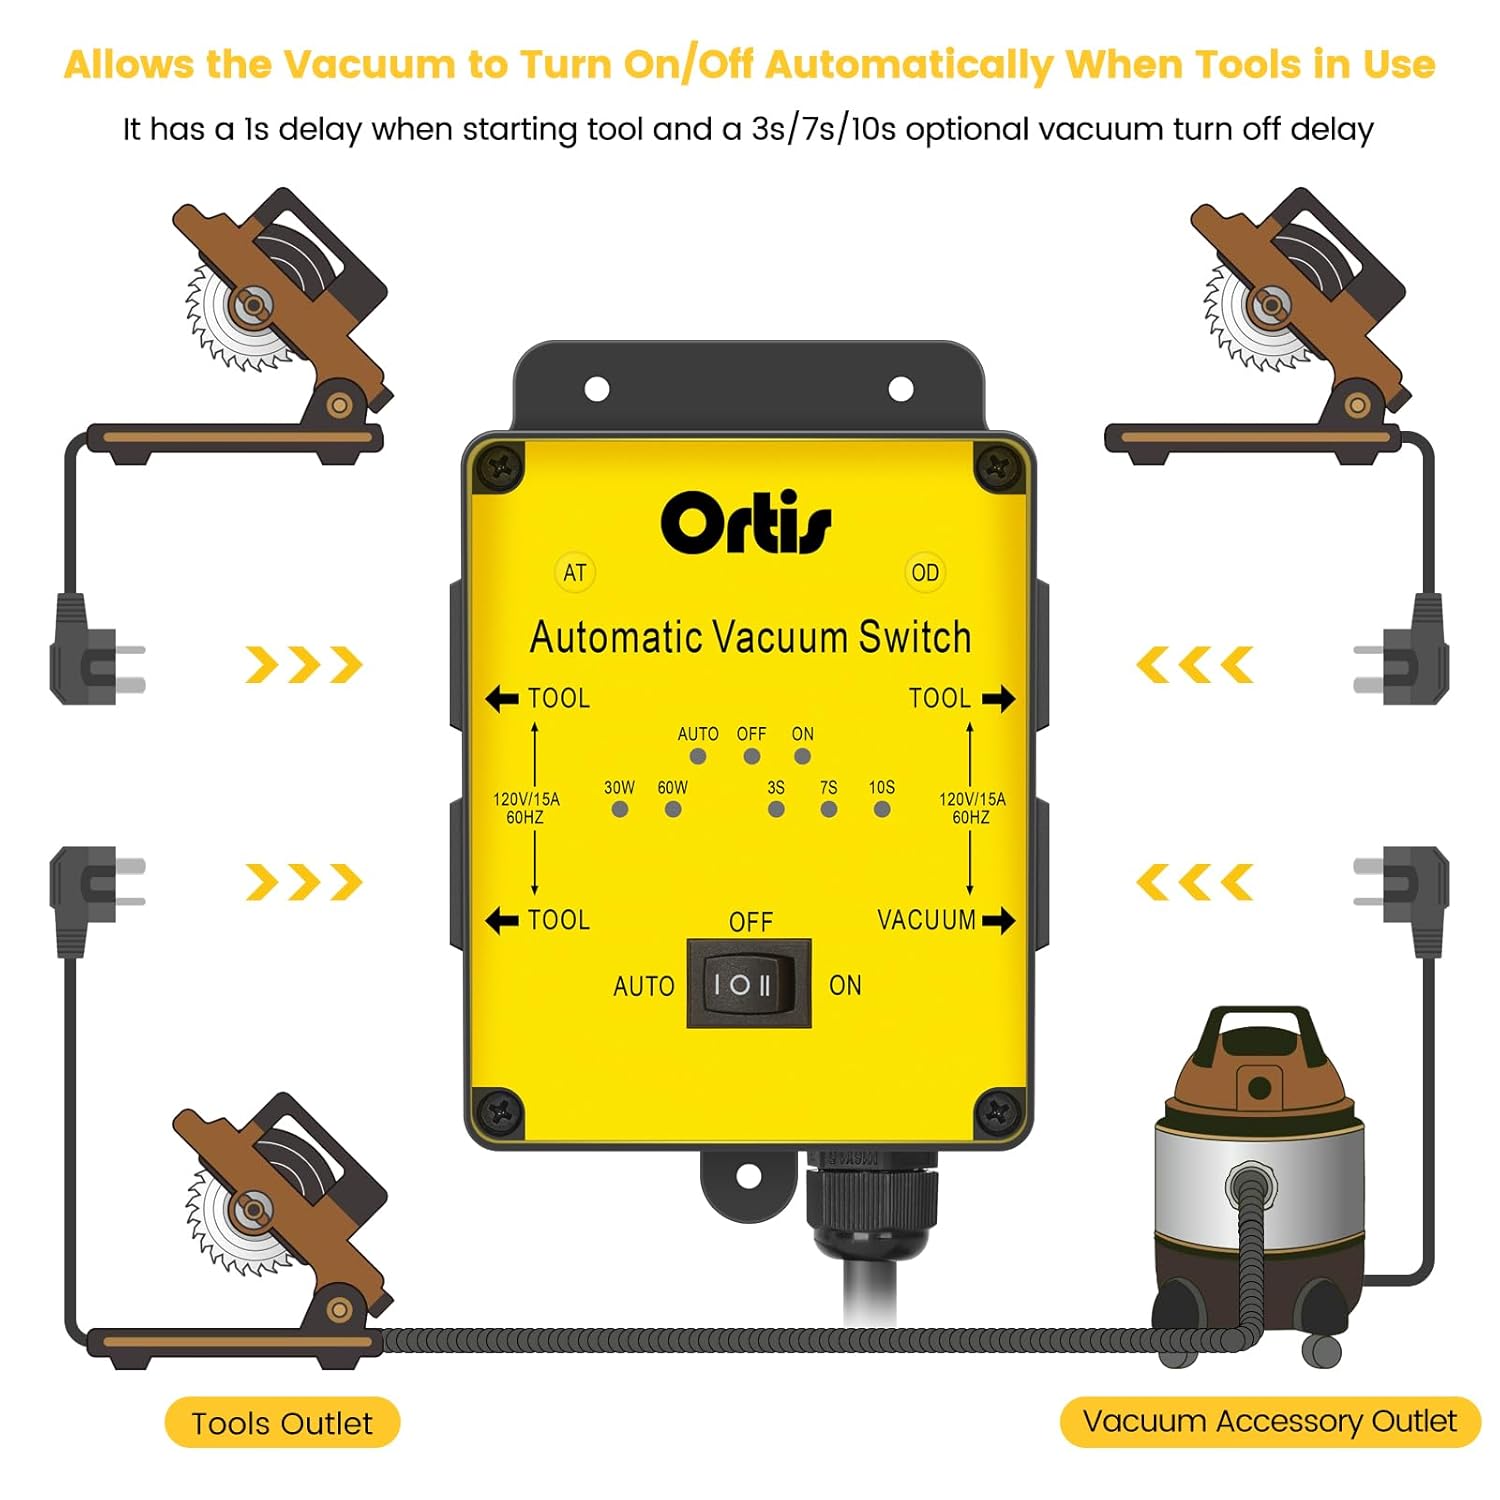
Figure 6: Diagram illustrating how to connect power tools to the tool outlets and the vacuum to the vacuum accessory outlet for automatic operation.
6. Operating Instructions
The Ortis Automatic Vacuum Switch offers three operating modes and adjustable settings for optimal dust control.
6.1. Operating Modes
Use the 'M' (Mode) button on the unit or remote to cycle through the modes:
- AUTO Mode: The vacuum automatically turns on when a connected power tool is activated and turns off after a set delay once the tool stops.
- OFF Mode: The vacuum remains off, regardless of tool operation.
- ON Mode: The vacuum remains continuously on.
6.2. Adjusting Shut-off Delay (Overrun Delay - OD)
The vacuum can continue running for a short period after the tool is turned off to clear remaining debris. Use the 'OD' button on the unit or remote to select the desired delay:
- 3 seconds (3S)
- 7 seconds (7S)
- 10 seconds (10S)
6.3. Adjusting Actuation Threshold (AT)
This setting determines the minimum power draw from a tool that will trigger the vacuum to turn on. Use the 'AT' button on the unit or remote to select:
- 30W: Suitable for lower-power tools or when a more sensitive trigger is desired.
- 60W: Suitable for higher-power tools or to prevent accidental vacuum activation from minor power fluctuations.
Video 1: Demonstration of an automatic vacuum switch in operation, showing how it activates with a power tool and delays shut-off. This video is provided by HTXSTORE.
Video 2: An animated explanation of how an automatic vacuum switch works, including delayed start and delayed shut-off features. This video is provided by SENCTRL.
Video 3: A practical demonstration of an automatic vacuum switch being used with a miter saw, highlighting the automatic dust collection. This video is provided by Merchant Video.
Video 4: A demonstration of an automatic vacuum switch used with a router table, showing how the dust collection activates and deactivates with the tool. This video is provided by O'SKOOL.
7. Compatibility
The Ortis Automatic Vacuum Switch is compatible with a wide range of power tools, including but not limited to:
- Miter Saws
- Table Saws
- Power Sanders
- Routers
- Joiners
- Planers
Maximum motor rating for connected tools should not exceed 120V/15A 50/60Hz, 1875W.

Figure 7: A worker using the Ortis Automatic Vacuum Switch with a miter saw, demonstrating its application in a workshop setting for improved efficiency and dust control.
8. Maintenance
To ensure optimal performance and longevity of your Ortis Automatic Vacuum Switch, follow these maintenance guidelines:
- Cleaning: Regularly wipe the unit with a dry, soft cloth to remove dust and debris. Do not use liquid cleaners or immerse the unit in water.
- Cord Inspection: Periodically inspect the power cords for any signs of damage, fraying, or wear. Replace damaged cords immediately.
- Storage: When not in use for extended periods, store the unit in a clean, dry place.
9. Troubleshooting
If you encounter issues with your Ortis Automatic Vacuum Switch, refer to the following common problems and solutions:
| Problem | Possible Cause | Solution |
|---|---|---|
| Vacuum does not turn on in AUTO mode. |
|
|
| Vacuum turns off too quickly or too slowly. | Incorrect shut-off delay setting. | Adjust Overrun Delay (OD) to 3s, 7s, or 10s as needed. |
| Circuit breaker trips when tool starts. | Overload on the circuit. | Ensure total wattage does not exceed 1875W. Use on a dedicated circuit if possible. The unit has a 1s delay to help prevent this. |
| Remote control not working. |
|
|
10. Specifications
| Feature | Detail |
|---|---|
| Model Number | ETC-088 |
| Brand | Ortis |
| Operating Voltage | 120 Volts (AC) |
| Current Rating | 15 Amps |
| Max Power Rating | 1875 Watts |
| Operation Modes | Auto, Off, On |
| Actuation Thresholds | 30W, 60W |
| Shut-off Delay Times | 3s, 7s, 10s |
| Turn-on Delay | 1 second |
| Material | Copper (internal), PC+ABS V0 grade flame retardant (housing) |
| Power Cord | UL-certified American Standard 14AWG |
| Parcel Dimensions | 18.39 x 11 x 8.2 cm |
| Weight | 499 g |
11. Warranty and Support
Specific warranty details are not provided in this manual. For warranty information, technical support, or service inquiries, please refer to the product packaging or contact Ortis customer service directly.