
1. Introduction
This manual provides detailed instructions for the safe and efficient operation of your Yoidesu LA50 Handheld Inkjet Printer. Please read this manual thoroughly before using the device to ensure proper functionality and to prevent damage.
The Yoidesu LA50 is a portable inkjet printer designed for versatile marking applications. It features a 4.3-inch HD LED touchscreen for intuitive control, an intelligent 4-core CPU for smooth performance, and supports printing various content types on a wide range of materials.

Figure 1.1: Yoidesu LA50 Handheld Inkjet Printer Overview
2. Package Contents and Setup
2.1. Unpacking
Carefully unpack all items from the box. Ensure all components are present and undamaged. If any items are missing or damaged, contact customer support immediately.
Package List:
- 1 x Yoidesu LA50 Printer
- 1 x USB Cable
- 1 x Printing Fixing Plate
- 1 x Touch Pen
Note: The ink cartridge is not included and must be purchased separately.

Figure 2.1: Package Contents
2.2. Charging the Printer
The printer is equipped with a 1500mAh Li-ion battery. Before initial use, fully charge the printer using the provided USB cable and a compatible power adapter (not included). Connect the USB cable to the Type-C interface on the printer.
2.3. Ink Cartridge Installation
- Locate the cartridge clip design on the printer (refer to Figure 2.2).
- Open the cartridge compartment.
- Carefully insert the compatible ink cartridge into the slot until it clicks into place. Ensure it is securely seated.
- Close the cartridge compartment.

Figure 2.2: Printer Components and Cartridge Clip Design
2.4. Powering On/Off
Press and hold the power button (usually located near the screen or handle) for a few seconds to turn the printer on. Repeat the action to power off the device.
3. Operating Instructions
3.1. Touchscreen Interface
The printer features a 4.3-inch HD LED touchscreen. Navigate through menus and settings by tapping icons and using the touch pen or your finger. The user interface is designed for ease of use, similar to a smartphone.

Figure 3.1: Touchscreen Interaction
3.2. Creating Print Content
The printer supports various content types:
- Text: Input Chinese and English characters using the on-screen keyboard, handwriting, or predictive text.
- Numbers & Symbols: Easily add numerical sequences and special characters.
- QR Codes & Barcodes: Generate dynamic QR codes and standard barcodes directly on the device.
- Images & Graphics: Upload images via USB interface.
- Date & Time: Automatically insert production dates, expiration dates, and current time.
- Serial Numbers & Batch Numbers: Implement sequential numbering for tracking.
The printer supports USB input methods for transferring data and is compatible with Android and iOS systems for enhanced functionality.
3.3. Adjusting Print Settings
- Inkjet Height: Adjustable from approximately 2mm to 12.7mm (0.08-0.5 inches). Adjust this setting based on the size of your desired print and the surface.
- Inkjet Accuracy: Adjustable between 300-600dpi. Higher DPI provides sharper print quality.
3.4. Printing Process
- Prepare your desired content on the touchscreen.
- Adjust the inkjet height and accuracy as needed.
- Position the printer over the target surface. The ergonomic design ensures a secure grip.
- Press the metal print key to initiate printing.
- Move the printer smoothly across the surface to apply the print. The quick-drying ink ensures immediate results.
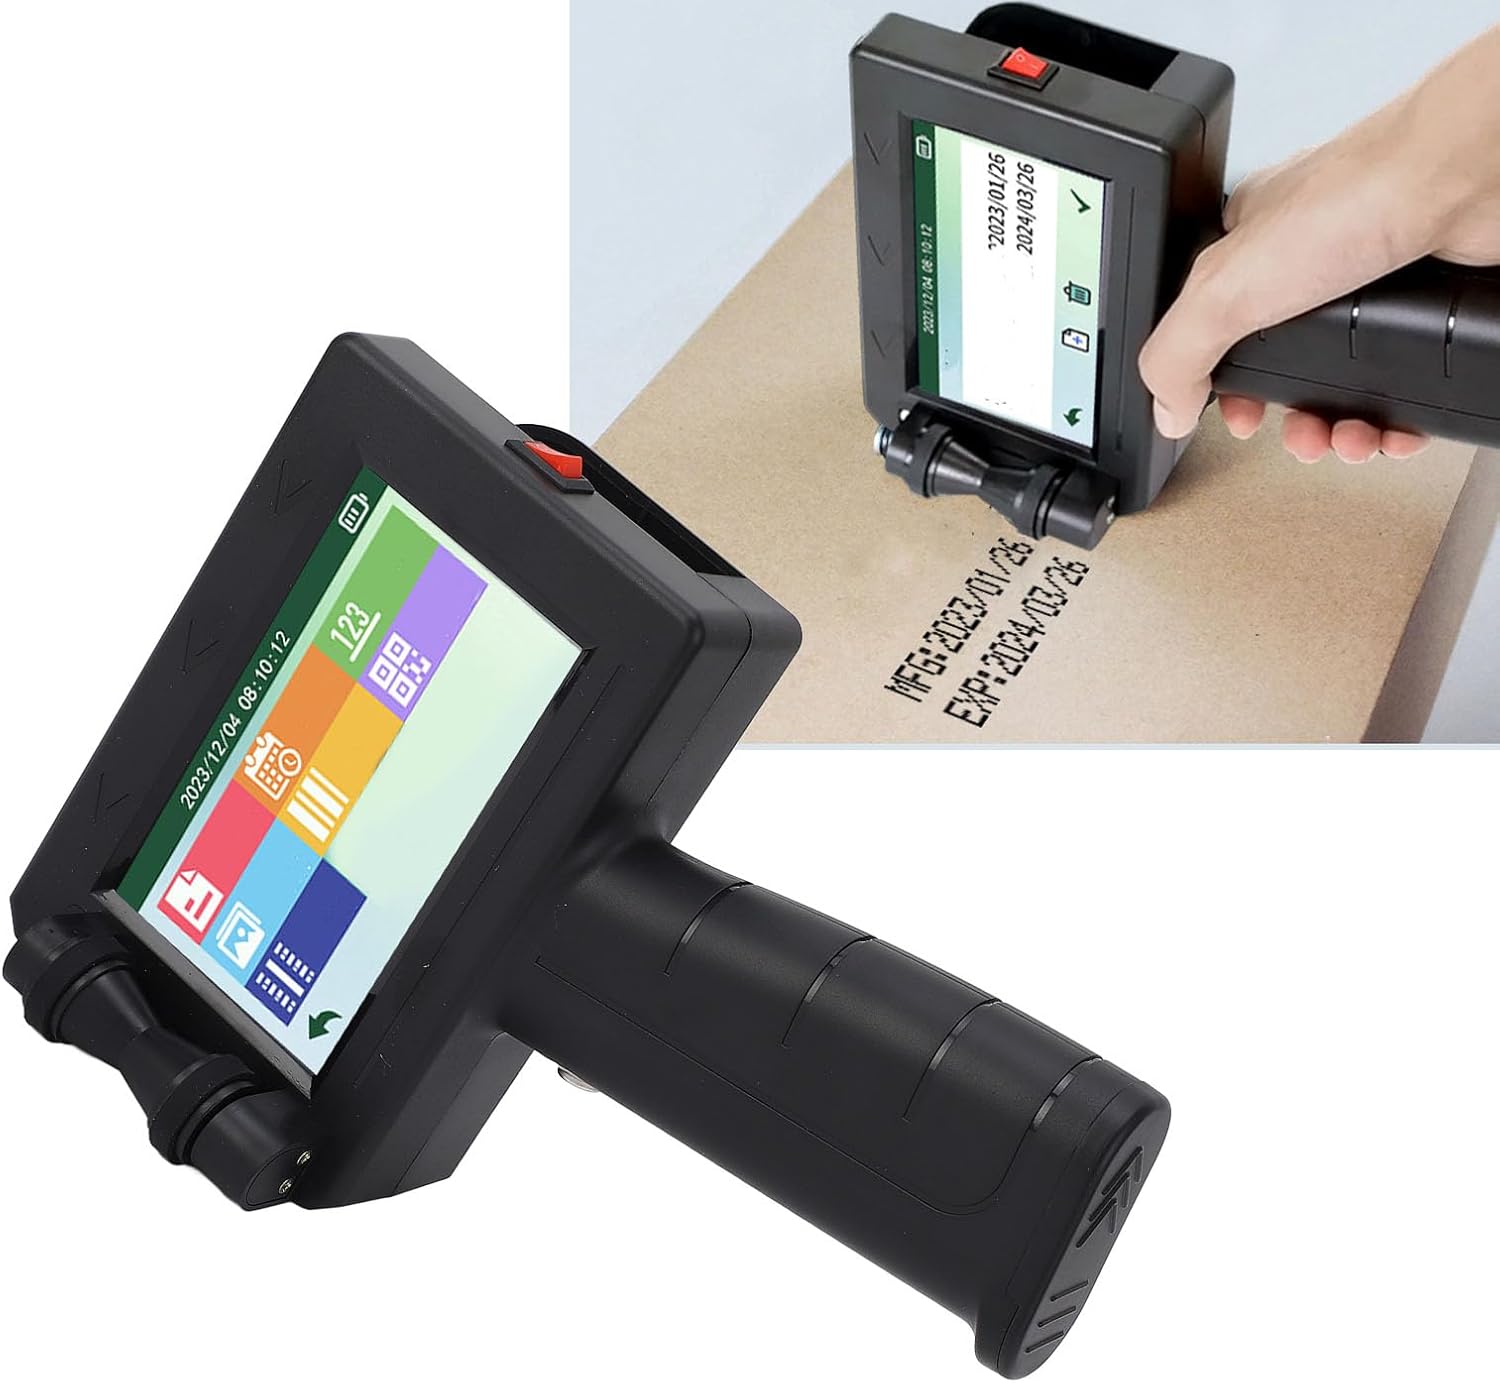
Figure 3.2: Printer in Use
3.5. Supported Materials
The Yoidesu LA50 is designed to print on a wide variety of materials, including but not limited to:
- Carton / Cardboard
- Plastic
- Wood
- Pipes / Cables
- Stone
- Industrial Packaging
- Medical and Food Packaging
- Acrylic
- Fabric
- Paper
- Labels
- Leather
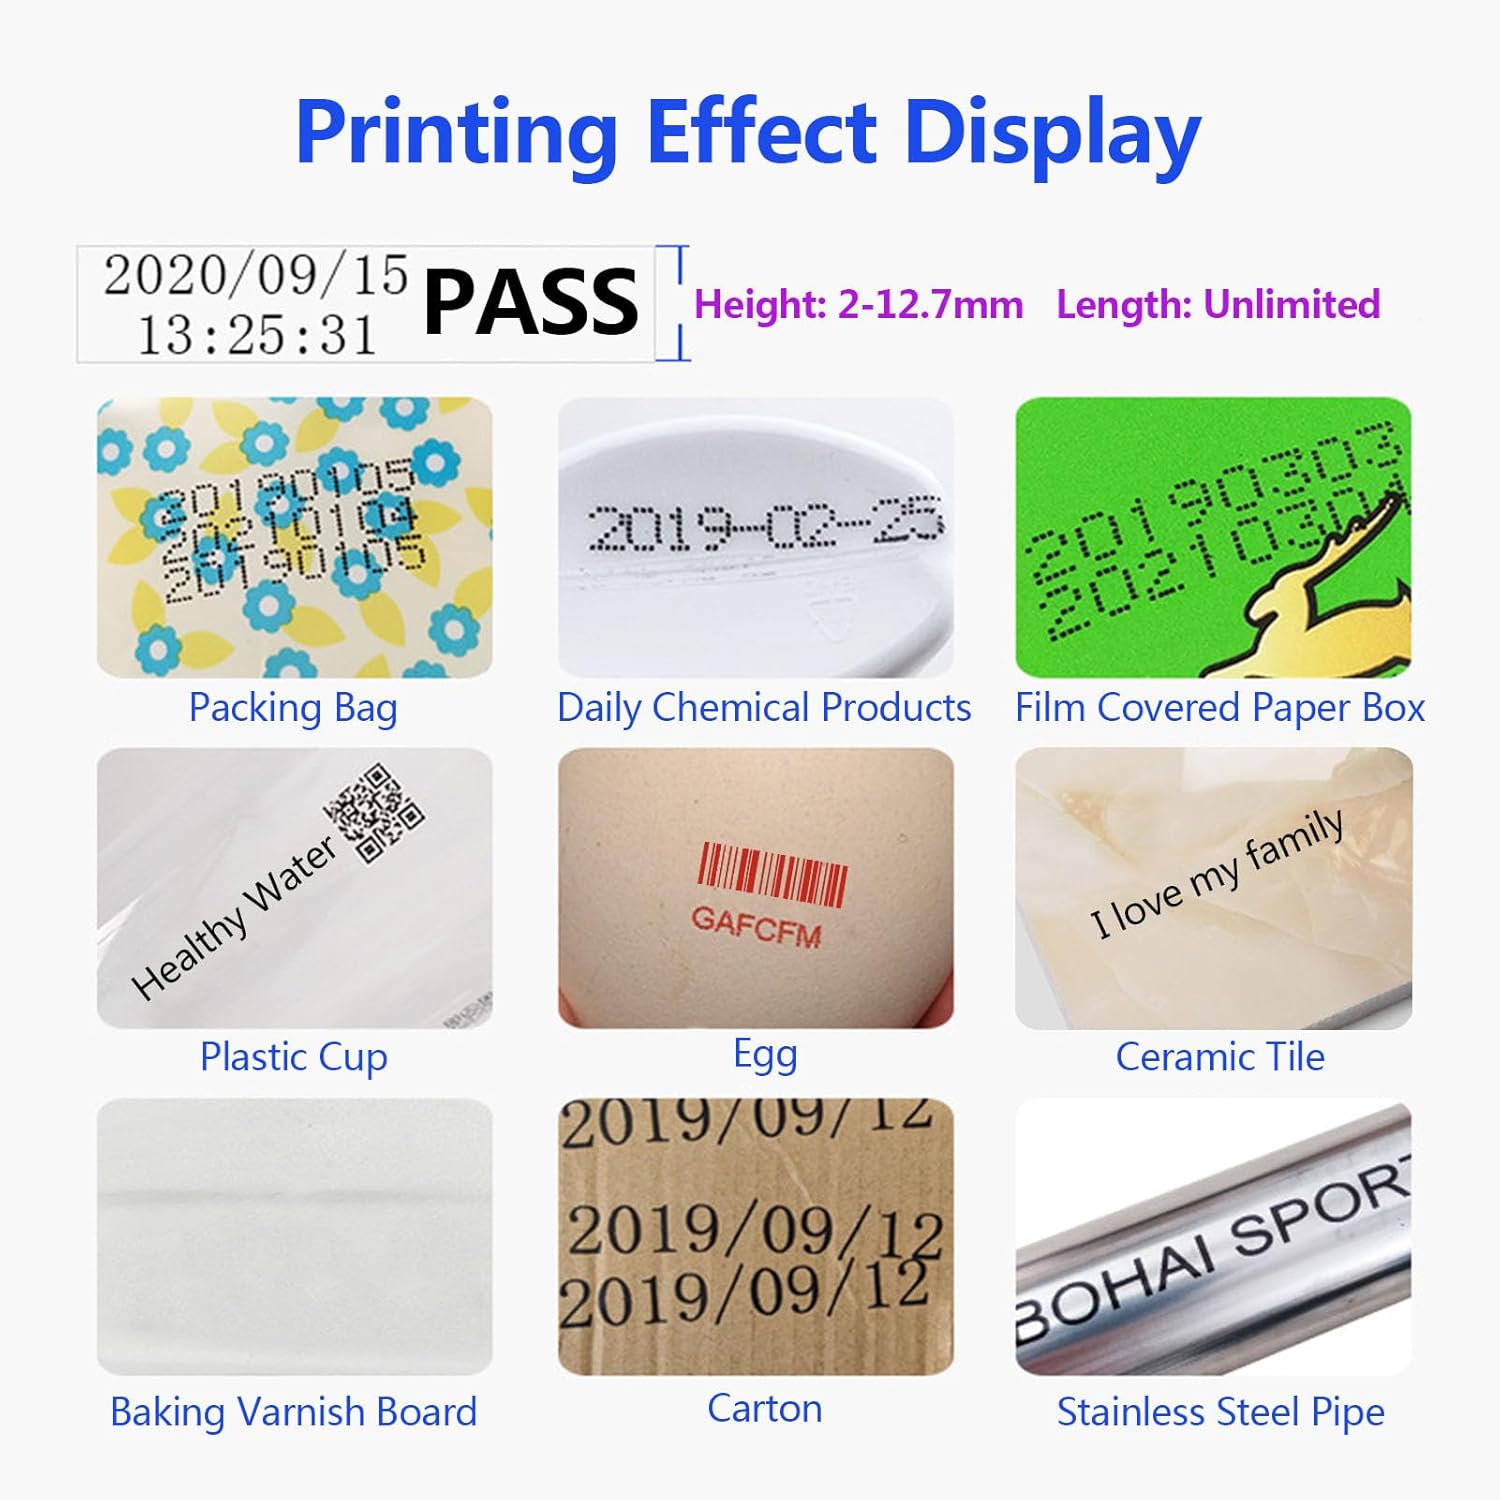
Figure 3.3: Printing Effect Display on Various Materials
4. Maintenance
4.1. Ink Cartridge Care
- When not in use, store the ink cartridge in its protective cap or original packaging to prevent drying.
- Avoid touching the print head directly.
- Replace cartridges promptly when ink runs low to maintain print quality.
4.2. Cleaning the Printer
- Screen: Use a soft, lint-free cloth to gently wipe the touchscreen. Do not use harsh chemicals or abrasive materials.
- Print Head: If print quality degrades, gently wipe the print head with a lint-free cloth slightly dampened with isopropyl alcohol. Refer to the printer's internal cleaning function if available.
- Exterior: Keep the printer body clean and free of dust and debris.
4.3. Storage
Store the printer in a cool, dry place away from direct sunlight and extreme temperatures. Ensure the ink cartridge is properly sealed or removed and stored separately if the printer will not be used for an extended period.
5. Troubleshooting
This section addresses common issues you might encounter with your Yoidesu LA50 printer.
5.1. Printer Not Powering On
- Ensure the battery is sufficiently charged. Connect the printer to a power source using the USB cable and allow it to charge for at least 30 minutes.
- Verify that the power button is being pressed and held correctly.
5.2. Poor Print Quality
- Check the ink cartridge level. Replace if empty or low.
- Clean the print head as described in Section 4.2.
- Ensure the inkjet accuracy setting is appropriate (e.g., 600dpi for finer prints).
- Verify that the printer is moved smoothly and consistently across the surface during printing.
- Ensure the surface material is suitable for inkjet printing.
5.3. Touchscreen Unresponsive
- Restart the printer.
- Ensure the screen is clean and free of moisture or debris.
- Use the provided touch pen for more precise interaction.
5.4. Connectivity Issues (USB)
- Ensure the USB cable is securely connected to both the printer and the host device.
- Try a different USB port or cable.
- Verify that the host device's operating system recognizes the printer.
If you encounter issues not covered here, or if the problem persists, please contact Yoidesu customer support for assistance.
6. Specifications
| Feature | Specification |
|---|---|
| Model | LA50 |
| Item Model Number | Yoidesui9g184nsy7 |
| Screen | HD 4.3 Inch LED Touch Screen |
| CPU | Intelligent 4 Cores CPU |
| Battery | 1500mAh Li Battery Group |
| Inkjet Height | Approx. 2-12.7mm / 0.08-0.5in Adjustable |
| Inkjet Accuracy | 300-600dpi Adjustable |
| Language | Bilingual (Chinese and English) |
| External Interfaces | Type-C Interface, Photoelectric Interface, USB, 3.5mm Interface |
| Operating System | Built-in RTOS Operating System |
| Product Dimensions | 10.63 x 7.09 x 4.33 inches (27 x 18 x 11 cm) |
| Item Weight | 1.5 pounds (0.68 kg) |
| Printer Output | Monochrome |
| Max Print Speed (Monochrome) | 100 ppm |
7. Warranty and Support
For warranty information, technical support, or service inquiries, please refer to the warranty card included with your product or contact Yoidesu customer support directly. Keep your purchase receipt as proof of purchase.