Introduction
The LEKATO AMP STUDIO EP-01 is a versatile digital guitar preamp pedal designed to provide a wide range of classic amplifier tones. This compact and robust pedal features 9 distinct preamp models, allowing guitarists to explore various soundscapes from clean to high-gain distortion. With intuitive controls and flexible power options, the EP-01 is an essential tool for practice, recording, and live performance.
Product Overview

Figure 1: The LEKATO AMP STUDIO EP-01 Digital Guitar Preamp Pedal. This image displays the top view of the pedal, showcasing its compact black metal enclosure, white control knobs for Gain, Level, Bass, Mid, Treble, and a rotary switch for selecting preamp models. The footswitch and input/output jacks are also visible.

Figure 2: Contents of the LEKATO AMP STUDIO EP-01 package. This image shows the EP-01 pedal alongside its user manual, indicating that a power supply adapter is not included. The dimensions of the pedal are also highlighted.
Key Features:
- 9 Classic Preamp Models: Offers a diverse selection of amplifier emulations suitable for various musical genres.
- Rich Adjustable Parameters: Independent controls for Gain, Level, Bass, Mid, and Treble allow for precise tone shaping.
- True Bypass: Minimizes tone loss and maintains a clean signal path when the effect is disengaged.
- Dual Power Options: Can be powered by a standard DC 9V adapter (center negative) or via USB Type-C for convenience.
- Sturdy & Compact Design: Built with a durable aluminum alloy shell, making it lightweight and portable for easy transport.
Preamp Models:
The EP-01 features 9 distinct preamp models, each inspired by classic amplifiers. Refer to the table below for details:
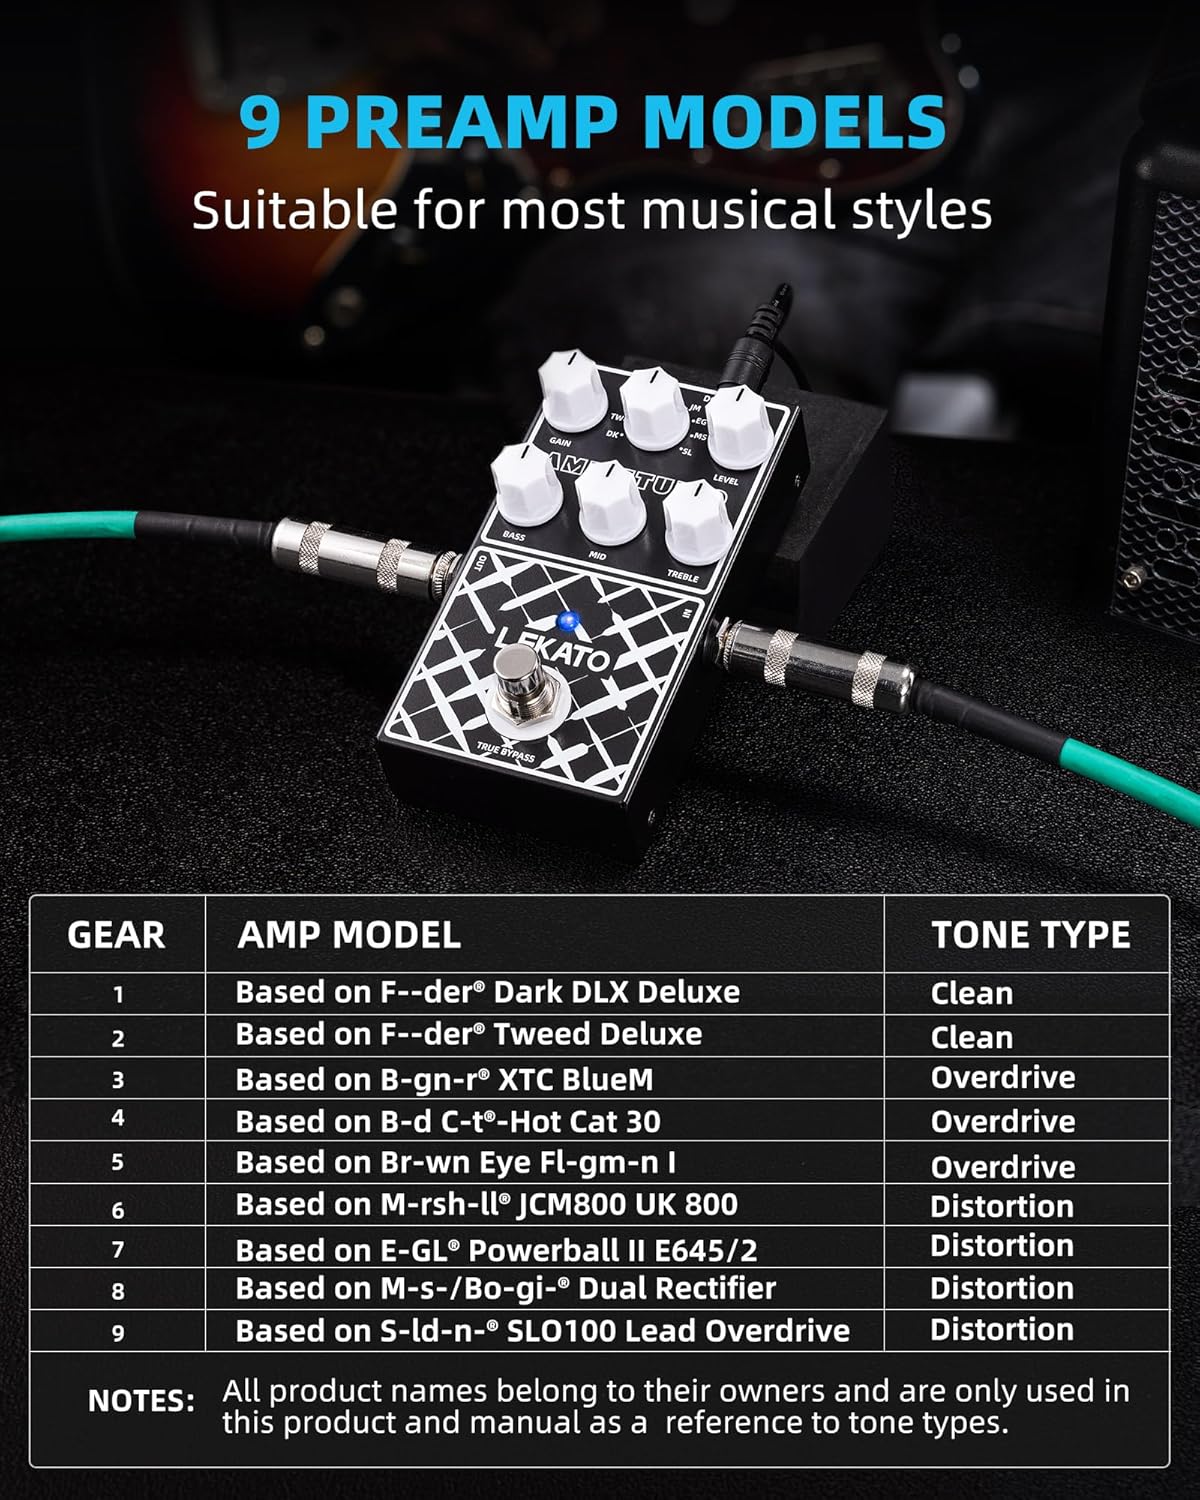
Figure 3: Table detailing the 9 preamp models available on the LEKATO AMP STUDIO EP-01 pedal, along with their corresponding tone types (Clean, Overdrive, Distortion). The table lists the gear and amp model each simulation is based on.
| Gear | Amp Model (Based On) | Tone Type |
|---|---|---|
| 1 | Fender® Dark DLX Deluxe | Clean |
| 2 | Fender® Tweed Deluxe | Clean |
| 3 | Bogner® XTC BlueM | Overdrive |
| 4 | Bad Cat® Hot Cat 30 | Overdrive |
| 5 | Friedman® Brown Eye FL-gm-n I | Overdrive |
| 6 | Marshall® JCM800 UK 800 | Distortion |
| 7 | ENGL® Powerball II E645/2 | Distortion |
| 8 | Mesa-Boogie® Dual Rectifier | Distortion |
| 9 | Soldano® SLO100 Lead Overdrive | Distortion |
Note: All product names belong to their owners and are only used in this product and manual as a reference to tone types.
Setup
Powering the Pedal:
The LEKATO AMP STUDIO EP-01 offers two power options:
- DC 9V Adapter: Use a standard 9V DC power adapter with a center-negative polarity. Ensure the current output is greater than 300mA for optimal performance. Insufficient current may affect sound quality.
- USB Type-C: The pedal can also be powered via a USB Type-C 5V connection, offering flexibility, especially when using power banks for mobile setups.
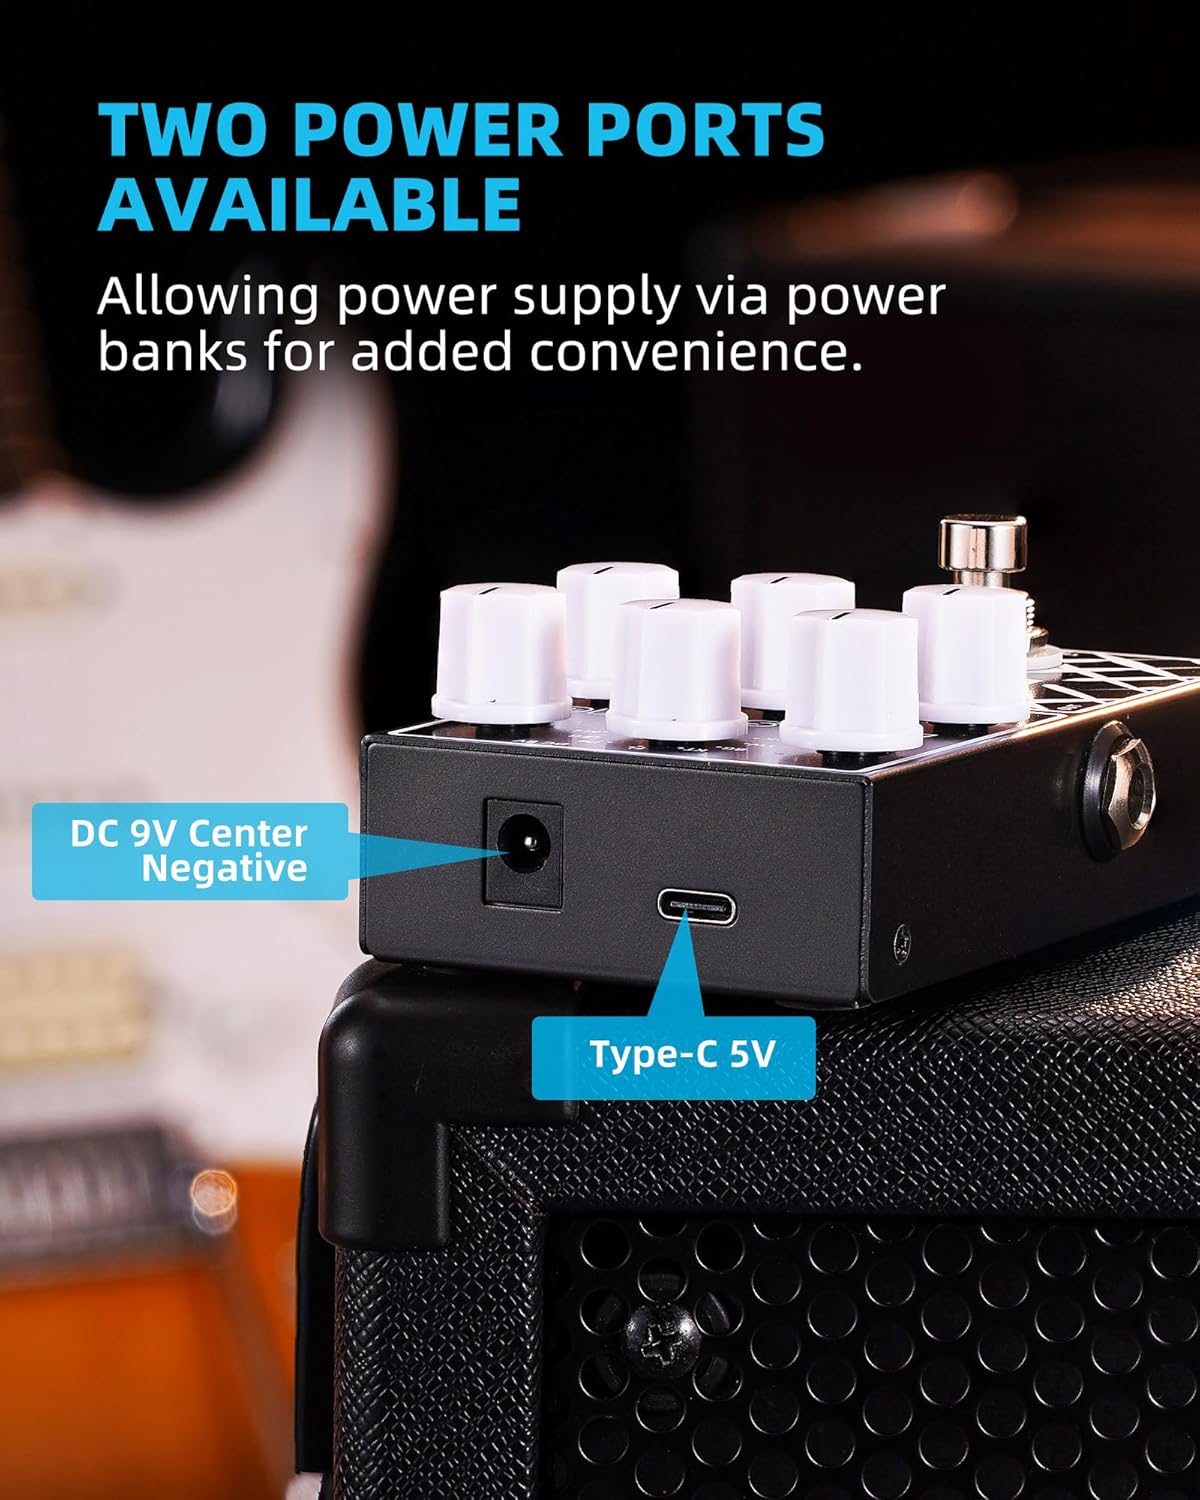
Figure 4: The two available power ports on the LEKATO AMP STUDIO EP-01 pedal: a standard DC 9V center-negative input and a USB Type-C 5V input.
Connection Instructions:
Proper connection is crucial for achieving the best sound. The EP-01 is designed to function as a preamp, replacing or augmenting your amplifier's preamp section.

Figure 5: Diagrams illustrating recommended connection methods for the LEKATO AMP STUDIO EP-01. This includes connecting to an amplifier's FX LOOP RETURN and connecting to an audio interface/headphones/monitor/mixer with a CAB SIM effector.
- Connecting to an Amplifier (FX LOOP RETURN):
Connect the output of the EP-01 pedal to the FX LOOP RETURN jack of your guitar amplifier. This method bypasses your amp's internal preamp, allowing the EP-01 to maximize its tone shaping ability. Your amplifier's power section will then amplify the signal from the EP-01.
- Connecting to Audio Interface/Headphones/Monitor/Mixer:
When connecting to devices like an audio interface, headphones, studio monitors, or a mixer, it is essential to use a "CAB SIM" (Cabinet Simulator) effector. The CAB SIM should be connected after the EP-01 pedal (e.g., between the EP-01's output and the input of your audio device) to achieve a full and natural timbre, as the EP-01 itself does not include cabinet simulation.
Important Tip: It is not recommended to connect the EP-01 to the standard INPUT connector of a guitar amplifier. Doing so may result in undesirable effects due to overlapping with the amplifier's built-in preamp.
Operating Instructions
Controls Overview:
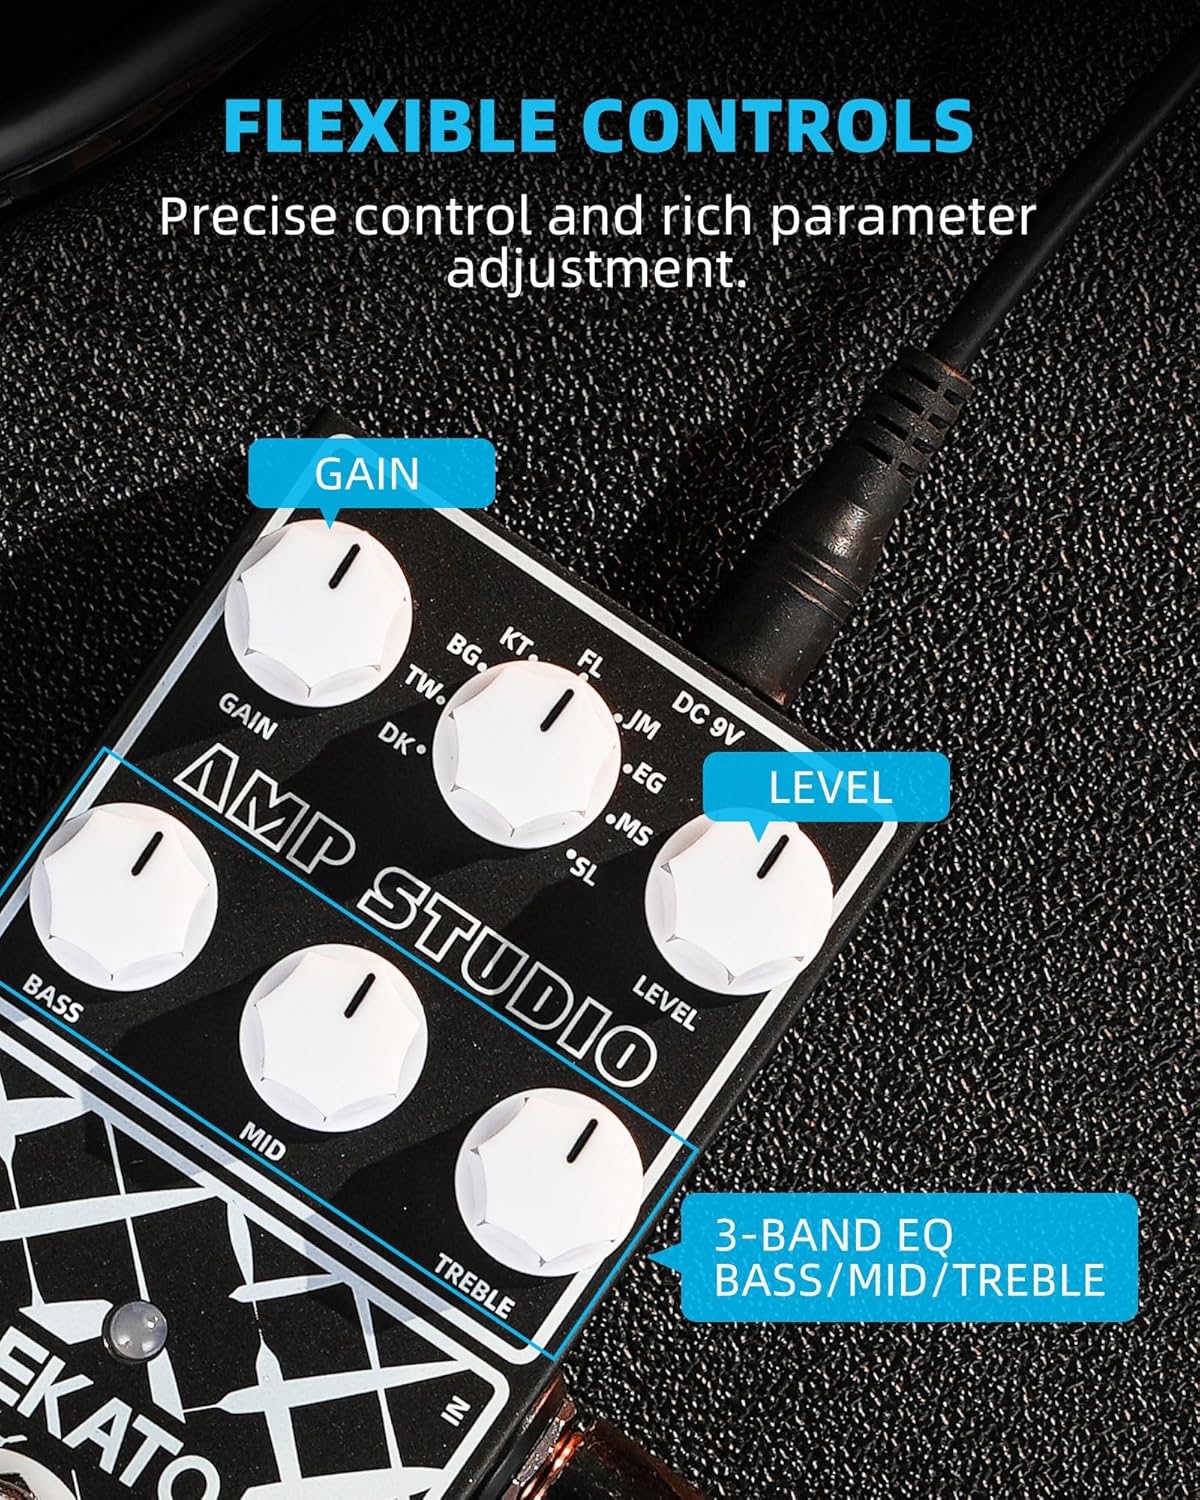
Figure 6: Close-up view of the LEKATO AMP STUDIO EP-01's control knobs, highlighting the Gain, Level, and 3-band EQ (Bass, Mid, Treble) for flexible tone adjustment.
- GAIN Knob: Adjusts the amount of overdrive or distortion. Turn clockwise for more gain, counter-clockwise for less.
- LEVEL Knob: Controls the overall output volume of the pedal.
- BASS Knob: Adjusts the low-frequency response of the tone.
- MID Knob: Adjusts the mid-range frequency response. This is crucial for shaping the guitar's presence and cut.
- TREBLE Knob: Adjusts the high-frequency response, controlling the brightness of the tone.
- Preamp Model Selector Knob: A rotary switch used to select one of the 9 available preamp models. Rotate to the desired model indicated by the markings (FL, TW, BG, KT, JM, EG, MS, SL, DK).
- Footswitch: Engages or disengages the effect. When engaged, the LED indicator will light up.
True Bypass Function:

Figure 7: The True Bypass footswitch on the LEKATO AMP STUDIO EP-01, designed to minimize signal degradation when the effect is off.
The EP-01 features true bypass circuitry. This means that when the pedal is disengaged (effect off), your guitar signal passes directly through the pedal without any electronic interference or tone coloration from the pedal's internal components. This preserves the integrity of your original guitar tone.
Maintenance
- Cleaning: Use a soft, dry cloth to clean the pedal's surface. Avoid using abrasive cleaners or solvents, as they may damage the finish or internal components.
- Storage: Store the pedal in a dry environment, away from extreme temperatures, humidity, and direct sunlight.
- Handling: Handle the pedal with care. Avoid dropping it or subjecting it to strong impacts, which could damage the circuitry or controls.
- Power Supply: Always disconnect the power supply when the pedal is not in use for extended periods.
Troubleshooting
| Problem | Possible Cause | Solution |
|---|---|---|
| No sound or weak sound | Incorrect power supply; Cables not connected properly; Pedal not engaged; Volume/Level knobs too low. | Ensure power supply is 9V DC (center negative) and provides at least 300mA. Check all cable connections. Press the footswitch to engage the effect (LED should light up). Increase LEVEL knob. |
| Unwanted noise/hum | Ground loop; Interference from other electronics; High gain settings. | Use a high-quality isolated power supply. Keep the pedal away from power transformers or other noisy electronic devices. Reduce GAIN setting if noise is excessive. Consider a noise gate pedal if necessary. |
| Tone is thin or unnatural (when connected to audio interface/mixer) | Missing cabinet simulation. | Ensure a "CAB SIM" (Cabinet Simulator) effector is used after the EP-01 when connecting to devices that do not have a guitar speaker cabinet (e.g., audio interface, headphones, mixer). |
| Distorted or muddy sound (when connected to amp input) | Connecting to amplifier's front input. | Connect the EP-01 to your amplifier's FX LOOP RETURN jack instead of the main input. The EP-01 is a preamp pedal and is designed to bypass your amp's preamp section. |
Specifications
| Feature | Detail |
|---|---|
| Model Number | EP-01 |
| Dimensions (L x W x H) | 12.5 x 7.3 x 4.5 cm (approx. 4.9 x 2.9 x 1.8 inches) |
| Weight | 265 grams (approx. 0.58 lbs) |
| Color | Black |
| Power Requirements | DC 9V (center negative, >300mA) or USB Type-C 5V |
| Signal Format | Digital |
| Interface | 1/4" Input, 1/4" Output, DC 9V Power Input, USB Type-C Power Input |
| Effects Output Audio | Preamp |
Warranty and Support
For warranty information and technical support, please refer to the official LEKATO website or contact your authorized dealer. Keep your purchase receipt as proof of purchase for any warranty claims.
For further assistance, you may also contact LEKATO customer service directly through their official channels.