
1. Introduction
This manual provides detailed instructions for the installation, operation, and maintenance of your HGLRC Zeus 800mW Smart Mounting Video Transmitter (VTX). Designed for FPV racing drones, this VTX offers reliable video transmission with adjustable power output and flexible mounting options. Please read this manual thoroughly before use to ensure proper setup and optimal performance.
2. Product Overview
The HGLRC Zeus 800mW VTX is a high-performance video transmitter featuring a built-in microphone and multiple power output levels. Its compact design supports both 20x20mm and 30x30mm mounting patterns, making it versatile for various FPV drone builds.
Key Features:
- Adjustable power output: PIT/25/100/200/400/800mW
- Wide input voltage range: DC 6-26V
- Built-in microphone for audio transmission
- 5.8GHz frequency with 5 bands and 40 channels
- MMCX antenna interface
- Dual mounting holes: 20x20mm and 30x30mm (M3)
Package Contents:
Verify that all items are present in your package:
- 1 x HGLRC Zeus VTX 800mW
- 1 x 80mm 5.8G MMCX Linear Brass Antenna
- 1 x SH1.0 6Pin 100mm Cable
- 1 x MMCX to SMA-KY Adapter Cable
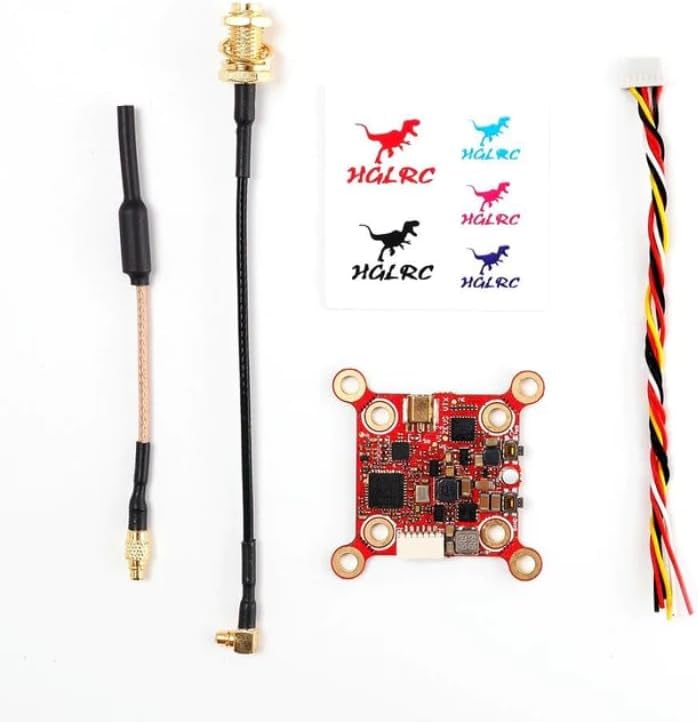
Figure 2.1: Contents of the HGLRC Zeus VTX 800mW package. This image displays the Zeus VTX module, an 80mm 5.8G MMCX linear brass antenna, a SH1.0 6-pin 100mm cable, and an MMCX to SMA-KY adapter cable, laid out on a white background.
3. Specifications
| Parameter | Value |
|---|---|
| Model | Zeus VTX 800mW |
| Input Voltage | DC 6-26V |
| Output Voltage | 5V/2A |
| Antenna Interface | MMCX |
| Output Power | PIT/25/100/200/400/800mW |
| Frequency | 5.8GHz (5 bands, 40 channels) |
| Current Consumption (approx.) | PIT@94mA, 25mW@169mA, 100mW@199mA, 200mW@216mA, 400mW@279mA, 800mW@387mA |
| Mounting Hole | 20x20mm / 30x30mm (M3) |
| Dimensions | 37mm x 37mm x 5mm |
| Weight | 4.8g |
| Built-in | Microphone |
4. Setup and Installation
Careful installation is crucial for optimal performance and to prevent damage to your VTX and drone components.
4.1 Wiring Diagram
Connect the VTX to your flight controller or power distribution board according to the following pinout. Ensure correct polarity to avoid damage.

Figure 4.1: Top view of the HGLRC Zeus VTX 800mW module. This image highlights the input/output pads labeled IN, GND, RX, 5V, GND, VID, and the band/channel selection indicators on the left side of the board.
- IN: Connect to your main battery voltage (DC 6-26V).
- GND: Connect to ground.
- RX: Connect to a UART TX pad on your flight controller for SmartAudio control.
- 5V: 5V output for powering a camera (max 2A).
- GND: Ground for 5V output.
- VID: Connect to the video output of your FPV camera.
Use the provided SH1.0 6Pin 100mm Cable for connecting to your flight controller. The cable typically has color-coded wires corresponding to these functions.
4.2 Mounting
The Zeus VTX supports two common mounting patterns:
- 20x20mm: For smaller builds.
- 30x30mm: For standard-sized builds.
Secure the VTX using M3 screws. Ensure there is adequate airflow around the VTX to prevent overheating, especially when operating at higher power levels.

Figure 4.2: Angled view of the HGLRC Zeus VTX 800mW, illustrating the four mounting holes located at each corner of the square board, compatible with 20x20mm and 30x30mm patterns.
4.3 Antenna Connection
Connect the provided 80mm 5.8G MMCX Linear Brass Antenna to the MMCX connector on the VTX. Ensure the connection is firm. If using an SMA antenna, attach the MMCX to SMA-KY Adapter Cable first, then connect your SMA antenna.
Warning: Never power on the VTX without an antenna connected. Doing so can permanently damage the VTX module.
5. Operating Instructions
The HGLRC Zeus VTX can be configured via SmartAudio (through your flight controller OSD) or manually using the onboard buttons.
5.1 SmartAudio Control
For convenient configuration, connect the VTX's RX pad to a UART TX pad on your flight controller and enable SmartAudio in your flight controller's firmware (e.g., Betaflight, Emuflight). This allows you to change VTX settings (power, band, channel) directly from your OSD menu using your FPV goggles or a remote control.
5.2 Manual Control (Onboard Buttons)
The VTX features two buttons for manual configuration:

Figure 5.1: Bottom view of the HGLRC Zeus VTX 800mW. This image shows the two small tactile buttons labeled "BAND" and "PWR" located near the bottom edge of the board, used for manual configuration.
- Band Button: Short press to cycle through bands (A, B, E, F, R).
- Power Button: Short press to cycle through channels (1-8) within the selected band. Long press (approx. 3 seconds) to cycle through power levels (PIT, 25mW, 100mW, 200mW, 400mW, 800mW).
LED indicators on the VTX will show the currently selected band, channel, and power level. Refer to the VTX's specific LED pattern chart (if available, not provided in data) for detailed interpretation.
5.3 Pit Mode
Pit Mode (PIT) transmits at a very low power level, typically 0.01mW, to allow for safe testing and setup without interfering with other pilots. Always activate Pit Mode when powering on your drone at an FPV event until you are ready to fly.
6. Maintenance
- Keep the VTX clean and free from dust and debris.
- Ensure proper airflow around the VTX to prevent overheating, especially during high-power operation.
- Regularly check antenna connections for tightness. A loose antenna can lead to poor video quality or VTX damage.
- Avoid exposing the VTX to moisture or extreme temperatures.
7. Troubleshooting
- No Video Signal:
- Check all wiring connections, especially video in/out and power.
- Ensure the VTX is powered on and receiving sufficient voltage.
- Verify that your FPV goggles/receiver are on the correct band and channel.
- Confirm the antenna is securely attached to the VTX.
- Poor Video Quality (Static/Flickering):
- Check for interference from other electronic components on the drone.
- Ensure the VTX antenna is not obstructed and is positioned optimally.
- Increase VTX power output (if legally permitted in your region).
- Check for damaged VTX or receiver antennas.
- VTX Overheating:
- Ensure adequate airflow around the VTX.
- Consider reducing the power output if not needed.
- Verify input voltage is within the specified range.
- SmartAudio Not Working:
- Verify the RX wire is connected to the correct UART TX pad on the flight controller.
- Ensure SmartAudio is enabled and configured correctly in your flight controller's firmware (e.g., Betaflight VTX tab).
- Check for firmware compatibility issues.
8. Warranty and Support
This HGLRC Zeus VTX 800mW comes with a standard manufacturer's warranty against defects in materials and workmanship. Please refer to the retailer's or manufacturer's website for specific warranty terms and conditions. For technical support or further assistance, please contact your point of purchase or the HGLRC customer service team.
Keep your purchase receipt as proof of purchase for warranty claims.


