
1. Introduction
This manual provides detailed instructions for the installation, operation, and maintenance of your Renogy PUH 1000W Pure Sine Wave Inverter. This device converts 12V DC power from batteries into 120V AC power, suitable for various applications including RVs, trucks, camping, and off-grid living. It features a built-in transfer switch for seamless power transitions and Bluetooth connectivity for remote monitoring.
2. Safety Information
Please read and understand all safety instructions before installing or operating the inverter. Failure to follow these instructions may result in electrical shock, fire, or serious injury.
- Electrical Safety: Ensure all wiring is correctly sized and connections are secure. Incorrect wiring can cause severe damage or injury.
- Ventilation: Install the inverter in a well-ventilated area to prevent overheating. Do not block cooling vents.
- Environment: Avoid exposure to moisture, direct sunlight, heat sources, and flammable materials.
- Grounding: The inverter must be properly grounded. Refer to local electrical codes for specific requirements.
- Certifications: This inverter is designed to meet UL 458 & CSA C22.2 No. 107.1 certifications, ensuring safety and quality.
- Protection Features: The unit includes LED indicators for overload, over temperature, low temperature, overvoltage, short circuit, and undervoltage protection, along with a Ground Fault Circuit Interrupter (GFCI).
3. Package Contents
Verify that all items are included in your package:
- Renogy PUH 1000W Pure Sine Wave Inverter
- Remote Control with 16.4FT Cable
- Battery Cables (Red and Black, AWG 3ft x2)
- User Manual


4. Product Features
- Pure Sine Wave Output: Provides high-quality AC power, similar to grid power, protecting sensitive electronics and appliances.
- Built-in Transfer Switch: Automatically switches to grid power within 20ms, ensuring uninterrupted power during outages.
- Bluetooth Connectivity: Monitor inverter status and settings remotely via the Renogy APP.
- High Efficiency: Conversion efficiency greater than 92%, minimizing power loss.
- Multiple Safety Protections: Includes overload, over temperature, low temperature, overvoltage, short circuit, undervoltage, and GFCI protection.
- Low Noise Operation: Fan noise is less than 51dB when on, and less than 20dB when off, ensuring quiet operation.
- Versatile Compatibility: Compatible with various battery types including Lithium (LI), Sealed Lead Acid (SLD), Absorbed Glass Mat (AGM), Gel, and Flooded (FLD).


5. Setup and Installation
Proper installation is critical for the safe and efficient operation of your inverter. Consult a qualified electrician if you are unsure about any steps.
5.1 Mounting the Inverter
- Choose a dry, cool, and well-ventilated location.
- Ensure adequate clearance around the inverter for airflow, especially around the cooling fans.
- Mount the inverter securely using appropriate hardware.
5.2 Wiring Connections
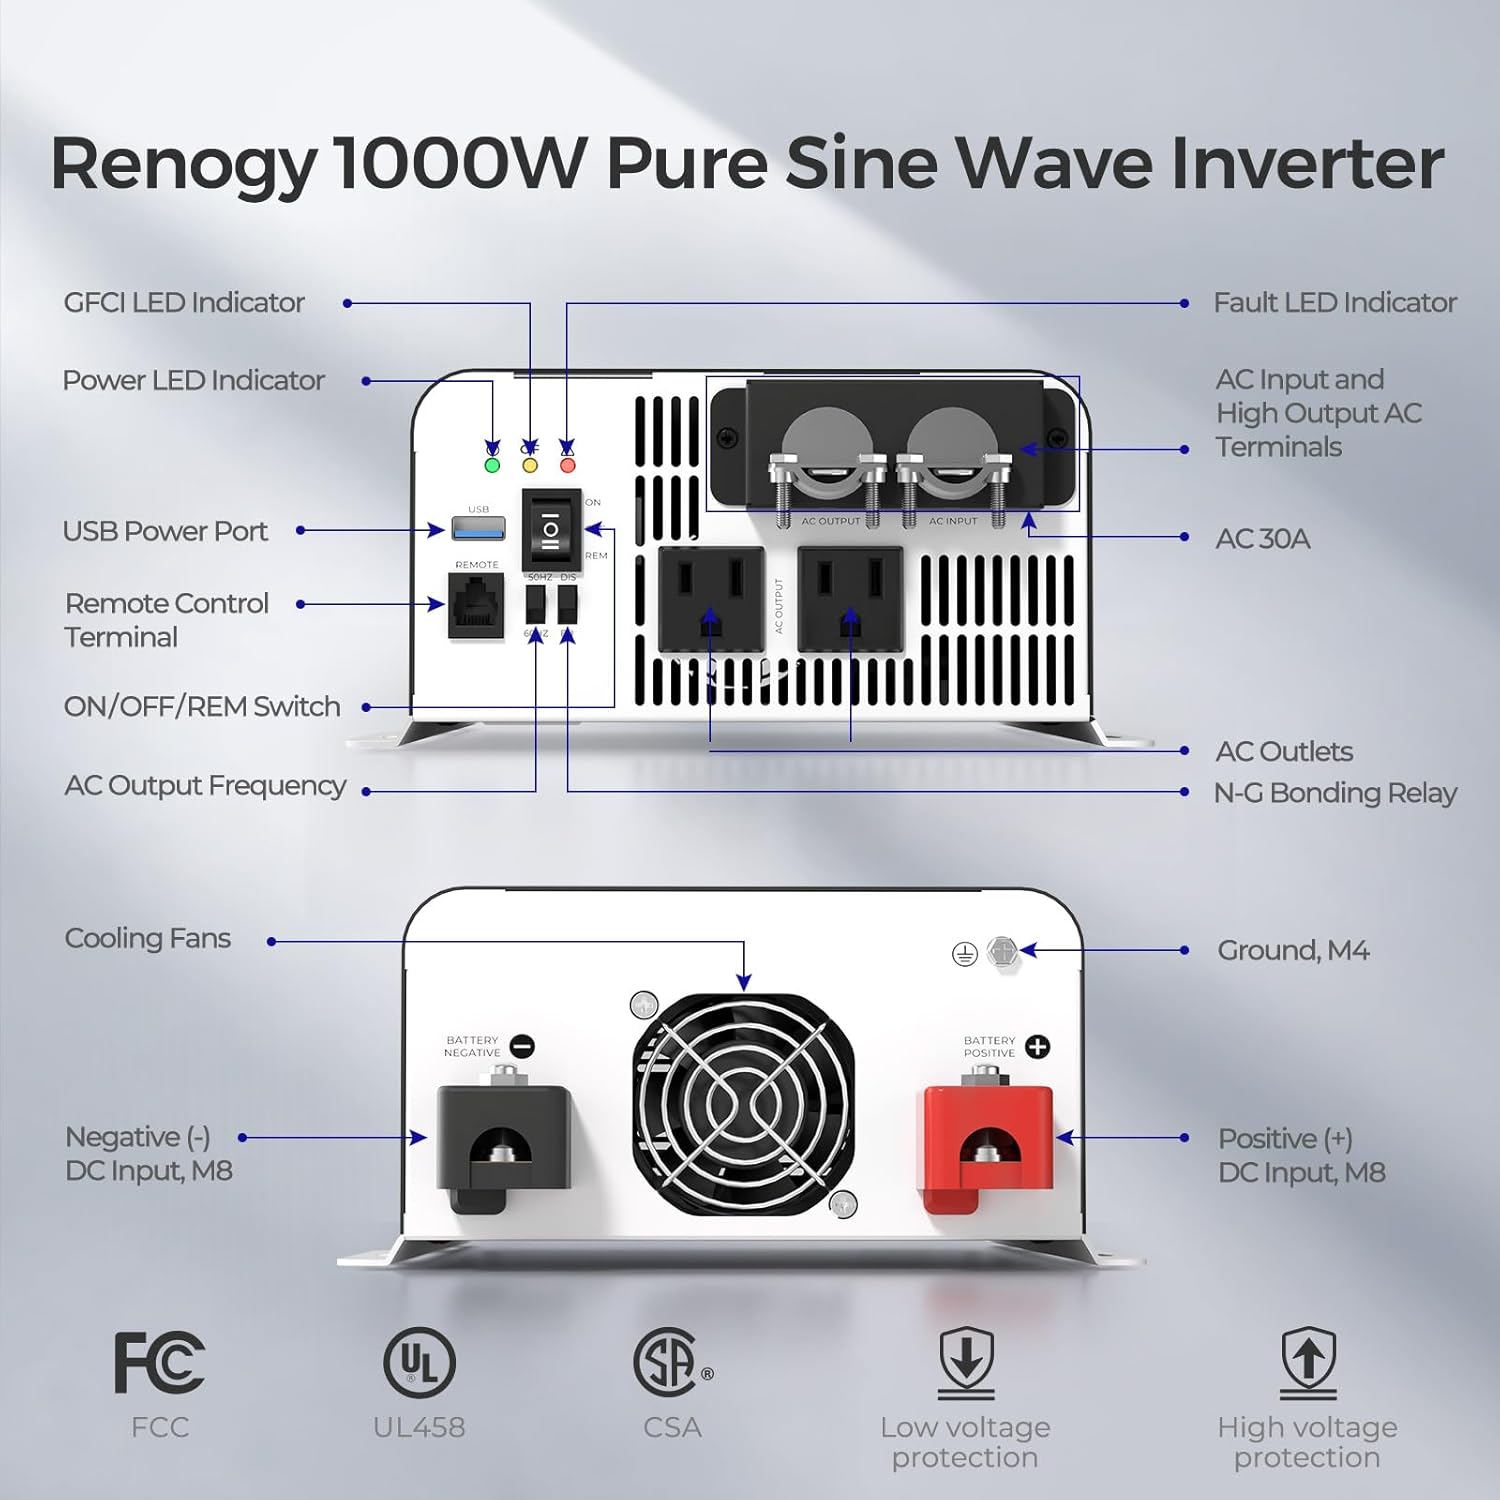
- DC Input (Battery Connection): Connect the included red cable to the positive (+) terminal of your 12V battery bank and the positive (+) M8 terminal on the inverter. Connect the black cable to the negative (-) terminal of your battery bank and the negative (-) M8 terminal on the inverter. Ensure connections are tight.
- AC Input (Shore Power/Grid): If using the transfer switch feature, connect your AC input source (e.g., shore power) to the AC Input terminals.
- AC Output: Connect your AC loads (appliances) to the AC Output terminals or directly to the AC outlets on the inverter.
- Grounding: Connect the inverter's ground terminal (M4) to a reliable earth ground.
- Remote Control: Plug the remote control cable into the dedicated remote control terminal.


6. Operating Instructions
6.1 Powering On/Off
- Ensure all connections are secure before powering on.
- Use the ON/OFF/REM switch on the inverter or the remote control to power the unit on or off.
- The Power LED indicator will illuminate when the inverter is active.
6.2 Using the Built-in Transfer Switch
The inverter's built-in transfer switch allows for automatic switching between inverter power and an external AC source (e.g., shore power). When an external AC source is detected, the inverter will automatically bypass battery power and supply AC directly from the external source. If the external AC source is lost, the inverter will seamlessly switch back to providing AC power from the battery bank.
Note: The transfer switch functionality requires the inverter to be powered on (12V supply) to allow AC pass-through, even when not actively inverting. If the inverter is completely off, AC power will not pass through.

6.3 Bluetooth Monitoring
Download the Renogy APP on your smartphone or tablet to monitor the inverter's performance. The app provides real-time data on output voltage, current, frequency, battery voltage, and temperature. It also allows for remote control and configuration.


7. Maintenance
Regular maintenance ensures the longevity and optimal performance of your Renogy inverter.
- Cleaning: Periodically clean the exterior of the inverter and ensure cooling vents are free from dust and debris. Use a dry cloth.
- Connections: Regularly check all electrical connections (DC input, AC input/output, ground) for tightness and corrosion. Tighten as necessary.
- Battery Health: Monitor your battery bank's health and charge levels, as poor battery performance can affect inverter operation.
- Environment: Ensure the installation environment remains within specified temperature and humidity ranges.

8. Troubleshooting
This section addresses common issues you might encounter with your inverter.
| Problem | Possible Cause | Solution |
|---|---|---|
| Inverter does not turn on | Low battery voltage; Loose DC connections; Blown fuse | Check battery voltage and charge if necessary; Inspect and tighten DC cables; Check and replace fuses if needed. |
| No AC output | Overload; Over-temperature; Short circuit; GFCI tripped | Reduce load; Allow inverter to cool; Check for short circuits in wiring/appliances; Reset GFCI. |
| AC pass-through not working when inverter is off | Inverter requires 12V power to operate the transfer switch. | Ensure the inverter is powered on (even if not actively inverting) for the transfer switch to function and allow AC pass-through. |
| Inverter randomly starts at 50Hz instead of 60Hz | Internal frequency setting issue (rare) | Contact Renogy customer support for assistance. Using incorrect frequency can damage appliances. |
| Bluetooth connection issues | Inverter not powered on; Bluetooth disabled on device; App issues | Ensure inverter is on; Enable Bluetooth on your device; Restart the Renogy APP or reinstall it. |
9. Specifications
| Feature | Specification |
|---|---|
| Model Name | RIV1210PU-126 |
| Continuous Power | 1000W |
| Surge Power | 2000W |
| Input Voltage | 12 Volts DC |
| Output Voltage | 120 Volts AC |
| Waveform | Pure Sine Wave |
| Conversion Efficiency | >92% |
| Product Dimensions | 15.3 x 8.1 x 3.8 inches (388.5 x 205.5 x 95.3 mm) |
| Item Weight | 10.52 pounds |
| Idle Power Consumption | <12W |
| Noise Level (Fan On) | <51dB |
| Noise Level (Fan Off) | <20dB |

10. Warranty and Support
Renogy products are designed for reliability and performance. For warranty information, please refer to the warranty card included with your product or visit the official Renogy website. For technical assistance, troubleshooting, or customer service, please contact Renogy support directly.
Renogy Customer Support:
- Visit the Renogy website for FAQs and support resources.
- Contact Renogy via their official support channels for professional technical guidance.