1. Overview
The AODELAN ZC-4 is a versatile wireless and wired remote controller designed for Sony camcorders. It provides comprehensive control over various camera functions including zoom, focus, iris, and ND filter adjustments, enhancing operational flexibility for professional video production. This manual provides detailed instructions for setup, operation, and maintenance of your ZC-4 remote controller.
Compatible Camcorders:
- Sony ILME-FX6, FDR-AX700
- Sony PXW-FX9, Z190V, Z190T, Z280V, Z280T, Z90V, Z90T, Z150
- Sony PXW-FS5, FS5M2, FS7, FS7M2, X180, X160
- Sony HXR-NX200, NX80, NX5R, NX100, NX3, NX1, NX5, MC2500
- Sony HVR-Z7, Z5, S270
- Sony DSR-PD150P, PD177P, PD198P
- Sony NEX-FS700/R, FS100, EA50
- Compatible with MCX-500 for multi-camera setups.
Note: Certain ZC-4 features may not function with all camcorder models. Refer to the compatibility table in the Specifications section for detailed information.
2. Package Contents
Verify that all items listed below are included in your package:
- ZC-4 TX Lanc Zoom Controller (Transmitter) x1
- ZC-4 RX Receiver x1
- 2.5mm Remote Cable (3.3 ft) x1
- 2.5mm Remote Cable (33 ft) x1
- USB Type-C Cable x1
- Attachment Plate x1
- Portable Bag x1
- User Manual x1
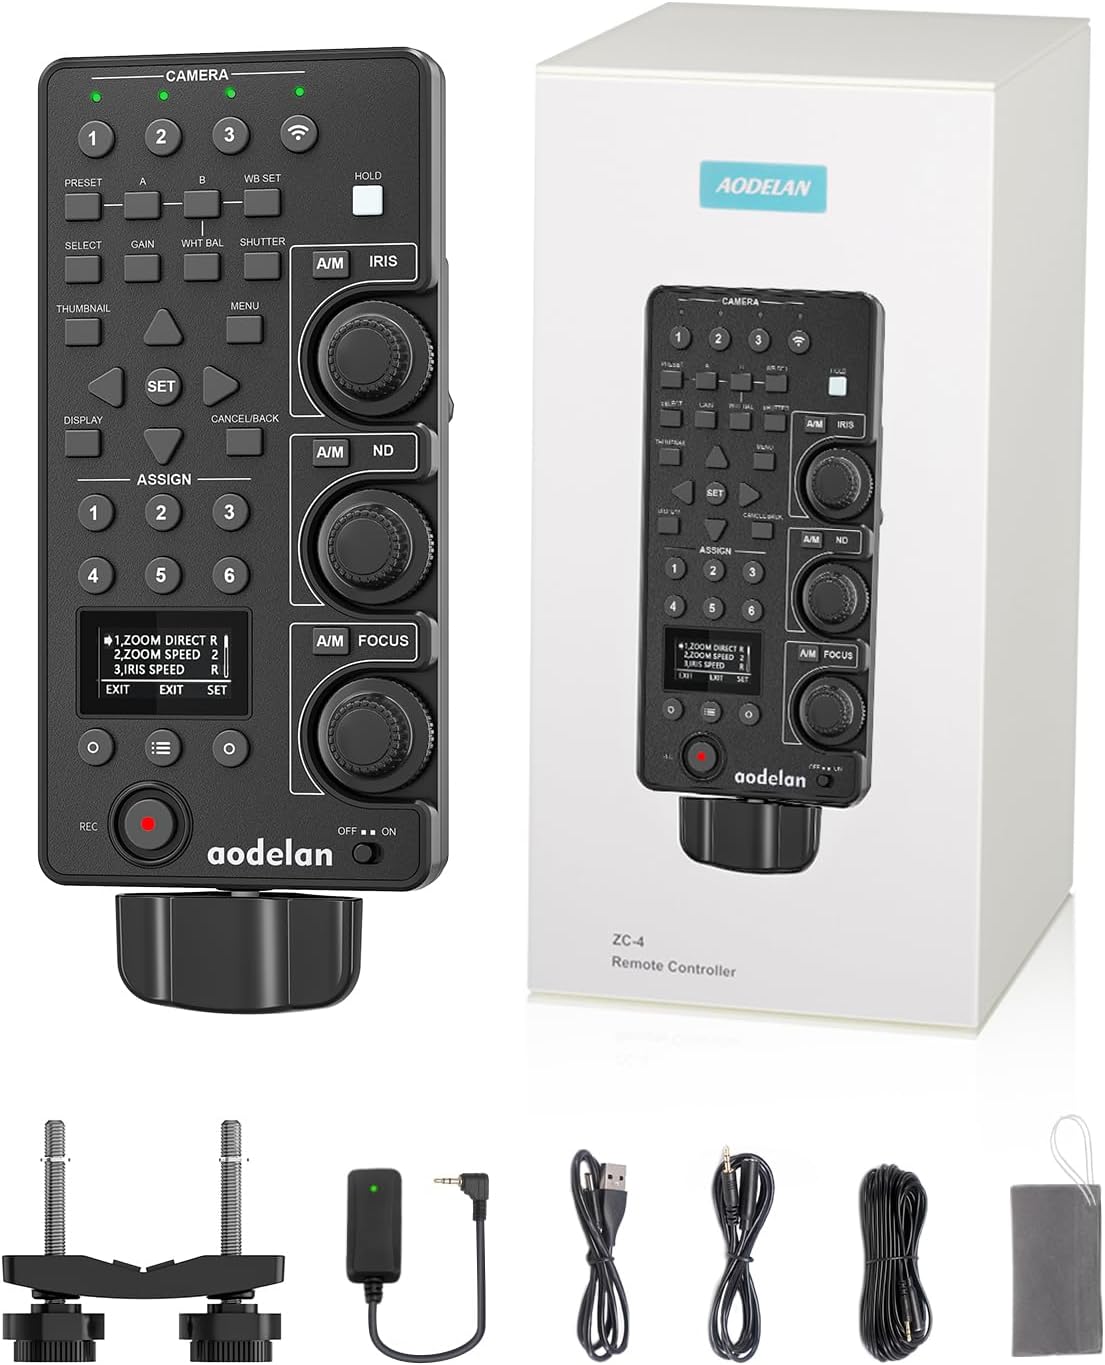
Image: The AODELAN ZC-4 Remote Controller shown with its retail packaging.

Image: A visual representation of all items included in the AODELAN ZC-4 package, such as the controller, receiver, cables, attachment plate, portable bag, and manual.
3. Product Features and Controls
The ZC-4 remote controller is designed with intuitive controls for precise camera adjustments.

Image: A detailed diagram illustrating the layout and functions of the AODELAN ZC-4 remote controller's buttons, knobs, and display.
Key Controls:
- Zoom Lever: Adjusts zoom speed and direction (Normal/Reverse, Speed 1-5).
- IRIS Adjustment Knob: Controls aperture. Features Normal/Reverse direction and speed settings (1-3). Pressing the center of the knob temporarily activates auto iris adjustment.
- ND Adjustment Knob: Adjusts Neutral Density filter density. Offers mode switching (ND/Dial) and direction adjustment. Pressing the center of the knob temporarily activates auto ND adjustment.
- FOCUS Adjustment Knob: Controls manual focus. Features Normal/Reverse direction and speed settings (1-5). Pressing the center of the knob temporarily activates auto focus adjustment.
- REC START/STOP Button: Initiates and stops video recording.
- White Balance & Gain & Shutter Buttons: Access and adjust White Balance (PRESET, A, B, WB SET), Gain (SELECT, GAIN), and Shutter (WHT BAL, SHUTTER) settings.
- Thumbnail & Menu & Display Buttons: Navigate camcorder menus, display thumbnails, and toggle on-screen display (OSD) screens.
- Six Assignable Keys (1-6): Recall functions assigned to the ASSIGN buttons on compatible camcorders.
- OLED Screen: Displays current settings and allows for more function settings adjustments.
Connector Panel:

Image: An illustration detailing the various ports on the AODELAN ZC-4 remote controller, including USB Type-C, OPTION, REMOTE, and CAMERA 1-3 connectors.
- USB Type-C Connector: For external power supply.
- OPTION Connector (Ø3.5 stereo mini jack): For additional accessories or functions.
- REMOTE Connector (Ø2.5 stereo mini jack): For wired connection to a camcorder.
- CAMERA 1, 2, 3 Connectors (Ø2.5 stereo mini plug): For connecting multiple camcorders in a daisy-chain setup.
4. Setup
4.1 Power Supply Modes
The ZC-4 controller supports three power supply methods:
- 2 AA Batteries: Insert two AA batteries (not included) into the battery compartment on the back of the controller.
- Wired Connection to Camcorder: The controller can draw power directly from the connected camcorder via the remote cable.
- USB Type-C: Connect a USB Type-C cable to an external power source for continuous operation.

Image: Visual guide showing how to insert AA batteries, connect via camcorder cable, and use a USB Type-C cable for power.
4.2 Connecting to Camcorder
The ZC-4 offers both wireless and wired connectivity options.
Wireless Connection:
- Ensure the ZC-4 RX receiver is connected to your camcorder's remote port.
- Power on both the camcorder and the ZC-4 TX controller.
- The controller and receiver will automatically pair. The wireless connection indicator on the controller will illuminate when connected.
- Wireless range is approximately 164 feet (50 meters).
Wired Connection:
- Connect one end of the 2.5mm remote cable to the REMOTE port on the ZC-4 TX controller.
- Connect the other end of the cable to your camcorder's LANC or remote port.
- The controller can be powered directly by the camcorder in wired mode.
- Wired cable lengths are 3.3 ft (1m) and 33 ft (10m).

Image: Illustrations demonstrating how to connect the ZC-4 controller to a camcorder using both wireless (via receiver) and wired (via cable) methods.
4.3 Multi-Camera Connectivity (Daisy-Chain)
The ZC-4 controller supports controlling up to four camcorders simultaneously, either wirelessly or through a daisy-chain wired connection.
- For Wireless Multi-Camera: Connect a ZC-4 RX receiver to each camcorder. The ZC-4 TX controller can connect to up to four receivers wirelessly.
- For Wired Daisy-Chain:
- Connect the first Remote Controller (ZC-4 TX) to the primary camcorder (via wired or wireless connection).
- Connect one of the CAMERA1 to CAMERA3 connectors on a second Remote Controller to the REMOTE connector on the first Remote Controller.
- Repeat for additional controllers/camcorders, up to a maximum of four camcorders.

Image: A visual guide demonstrating how to connect and control up to four camcorders using the ZC-4 controller, including a daisy-chain setup.
Note: If a camcorder lacks daisy-chaining functionality, this feature cannot be used. Only two Remote Controllers can be daisy-chained for wired multi-camera control.
5. Operating Instructions
5.1 Zoom Control
Use the zoom lever to adjust the camcorder's zoom. The lever is pressure-sensitive, allowing for variable zoom speeds. You can also set the zoom direction (Normal/Reverse) and speed (1-5) via the OLED screen menu.

Image: Visual examples of zooming in and out using the ZC-4 controller, showing the effect on the camera's field of view.
5.2 Focus Adjustment
The FOCUS adjustment knob allows for precise manual focus control. Pressing the center of the knob temporarily activates auto-focus adjustment. Release to end it. You can customize the focus direction (Normal/Reverse) and speed (1-5) through the controller's menu.

Image: Visual representation of adjusting focus from blurred to sharp using the ZC-4 controller's focus knob.
5.3 IRIS Adjustment
The IRIS adjustment knob controls the camcorder's aperture, affecting the depth of field and exposure. Pressing the center of the knob temporarily activates auto-iris adjustment. You can set the IRIS direction (Normal/Reverse) and speed (1-3) via the menu.

Image: A series of images showing the effect of different iris settings (f/1.4 to f/8.0) on depth of field and exposure, controlled by the ZC-4's iris knob.
5.4 ND Filter Adjustment and Recording
Use the ND adjustment knob to control the Neutral Density filter density. Press the A/M (Auto/Manual) key to toggle auto adjustment on/off. Pressing the center of the knob temporarily activates auto-ND adjustment. You can also set the ND mode (Dial/ND) and direction (Normal/Reverse) via the menu. The REC button initiates and stops recording.

Image: Visual examples of adjusting ND filter settings (2, 4, 6 stops) and initiating video recording using the ZC-4 controller.
5.5 White Balance, Gain, and Shutter Control
The controller provides dedicated buttons for White Balance, Gain, and Shutter settings.

Image: A diagram detailing the functions of the PRESET, A, B, WB SET, SELECT, GAIN, WHT BAL, and SHUTTER buttons for advanced camera control.
- PRESET Key: Recalls preset settings.
- A/B Keys: Recall settings stored in WB SET A or WB SET B memory.
- WB SET Key: Stores the current White Balance setting to A or B.
- SELECT Key: Changes the mode of the gain recalled using the GAIN key.
- GAIN Key: Recalls the gain setting configured on the camcorder.
- WHT BAL Key: Sets manual white balance and recalls the setting on the camcorder. Press again for auto adjustment.
- SHUTTER Key: Turns off auto adjustment and recalls the shutter or shutter speed settings. Use arrow keys to change shutter mode.
5.6 Thumbnail, Menu, and Display Navigation
Navigate your camcorder's interface directly from the ZC-4 controller.

Image: A diagram illustrating the functions of the THUMBNAIL, MENU, DISPLAY, SET, and arrow keys for navigating camcorder settings.
- DISPLAY Key: Toggles between on-screen display (OSD) screens.
- SET & Arrow Keys: Use arrow keys to move the cursor on the camcorder's menu screen or change values. Press SET to apply selections or execute functions.
- MENU Key: Displays the camcorder menu. Press again to dismiss.
- CANCEL/BACK Key: Cancels a setting before it's applied or moves one level up in the menu hierarchy.
- THUMBNAIL Key: Displays the thumbnail screen. Press again to dismiss.
5.7 Assignable Keys
The ZC-4 features six assignable keys (1-6) that can recall functions assigned to the ASSIGN buttons on compatible camcorders.

Image: An illustration highlighting the six assignable keys on the ZC-4 controller and their correlation with assignable buttons on a camcorder.
5.8 OLED Screen Settings
The OLED screen provides access to various function settings for the remote controller itself.
Image: A table displaying the menu items and options available on the ZC-4's OLED screen, including settings for zoom, iris, focus, ND, sleep mode, pair mode, and factory reset.
- Remote Controller Menu Navigation: Use the O key (NEXT) to navigate through menu items. Press the O key (SET) to confirm settings.
- Menu Items include: ZOOM DIRECT (Normal/Reverse), ZOOM SPEED (1/2/3), IRIS DIRECT (Normal/Reverse), IRIS SPEED (1/2/3), FOCUS DIRECT (Normal/Reverse), FOCUS SPEED (1/2/3/4/5), ND DIRECT (Normal/Reverse), ND MODE (Dial/ND), SLEEP (10M/1H/4H/OFF), PAIR MODE (Y/N), RESET ALL (Y/N), VERSION VX.XX.
6. Maintenance
To ensure the longevity and optimal performance of your AODELAN ZC-4 remote controller, follow these maintenance guidelines:
- Cleaning: Use a soft, dry cloth to clean the surface of the controller. Avoid using liquid cleaners or solvents, which may damage the device.
- Storage: Store the controller in a cool, dry place away from direct sunlight and extreme temperatures. If storing for extended periods, remove the AA batteries to prevent leakage.
- Handling: Handle the controller with care to prevent drops or impacts, which could damage internal components.
- Cable Care: Avoid bending or crimping the remote cables excessively. Store them neatly to prevent tangles and damage.
7. Troubleshooting
If you encounter issues with your AODELAN ZC-4 remote controller, refer to the following common troubleshooting steps:
- Controller Not Responding:
- Check battery levels or ensure the USB Type-C cable is providing power.
- Verify that the controller is switched ON.
- For wireless connection, ensure the receiver is properly connected to the camcorder and both devices are powered on and paired.
- For wired connection, ensure the 2.5mm remote cable is securely connected to both the controller and the camcorder.
- Specific Functions Not Working:
- Refer to the compatibility table in the Specifications section to confirm if the function is supported by your specific camcorder model.
- Check camcorder settings to ensure external control is enabled for the desired function.
- Intermittent Connection:
- For wireless, ensure there are no obstructions between the controller and receiver, and that you are within the 164-foot range. Avoid areas with strong electromagnetic interference.
- For wired, check the cable for any damage or loose connections. Try using a different cable if available.
- OLED Screen Not Displaying:
- Ensure the controller has power.
- If the screen is blank, it might be in sleep mode. Press any button to wake it up.
- Factory Reset: If issues persist, consider performing a factory reset via the OLED screen menu (refer to section 5.8). This will revert all controller settings to their default values.
8. Specifications
- Model Number: ZC-4
- Brand: AODELAN
- Color: Black
- Item Weight: 1.43 pounds
- Package Dimensions: 10.43 x 5.12 x 4.72 inches
- Max Number of Supported Devices: 4 (camcorders)
- Special Feature: Digital Display (OLED Screen)
- Connectivity: Wireless (up to 164ft), Wired (LANC/Remote ports)
- Power Supply: 2 AA Batteries (not included), Wired via camcorder, USB Type-C
8.1 Camcorder Compatibility Table
The following tables detail the compatibility of ZC-4 features with various Sony camcorder models. A ✓ indicates full support, a ✗ indicates no support, and a — indicates partial or limited support.

Image: Compatibility table for ZC-4 features with Sony PXW-FX9, ILME-FX6, HXR-NX200, and PXW-Z280V/Z280T camcorders.

Image: Compatibility table for ZC-4 features with Sony HXR-NX3R, PXW-FS5, PXW-FS5M2, PXW-FS7, and PXW-FS7M2 camcorders.

Image: Compatibility table for ZC-4 features with Sony HXR-NX1, HXR-NX5, HXR-NX70, HXR-MC2500, HXR-MC2000, HXR-MC1500, and NEX-FS700/R camcorders.
Image: Compatibility table for ZC-4 features with Sony NEX-EA50, NEX-FS100, HVR-Z7, HVR-Z5, HVR-S270, HXR-NX80, and PXW-Z90V/Z90T camcorders.
Image: Compatibility table for ZC-4 features with Sony PXW-Z100, FDR-AX1, HVR-HD1000, HVR-A1, HVR-V1, HVR-Z1, and DSR-PD150P/PD177P/PD198P camcorders.
Image: Compatibility table for ZC-4 features with Sony PXW-Z190V/Z190T, FDR-AX700, PXW-Z150, PXW-X180/X160, HXR-NX3, and HXR-NX100 camcorders.
9. Warranty and Support
AODELAN products are manufactured to high-quality standards. For warranty information and customer support, please refer to the official AODELAN website or contact your local distributor. Keep your purchase receipt as proof of purchase for warranty claims.
Contact Information:
For technical assistance or product inquiries, please visit the AODELAN official website or contact their customer service department. Details can typically be found on the product packaging or the official brand store.


