1. Introduction
The JONSBO C6 MAX is a compact and versatile Micro ATX PC case designed for users seeking a small footprint without compromising on component compatibility and thermal performance. Its innovative design features tool-free access and an all-mesh construction for optimal airflow, making it an ideal choice for various desktop computer builds.

Figure 1.1: JONSBO C6 MAX PC Case, showcasing its compact design and mesh panels.
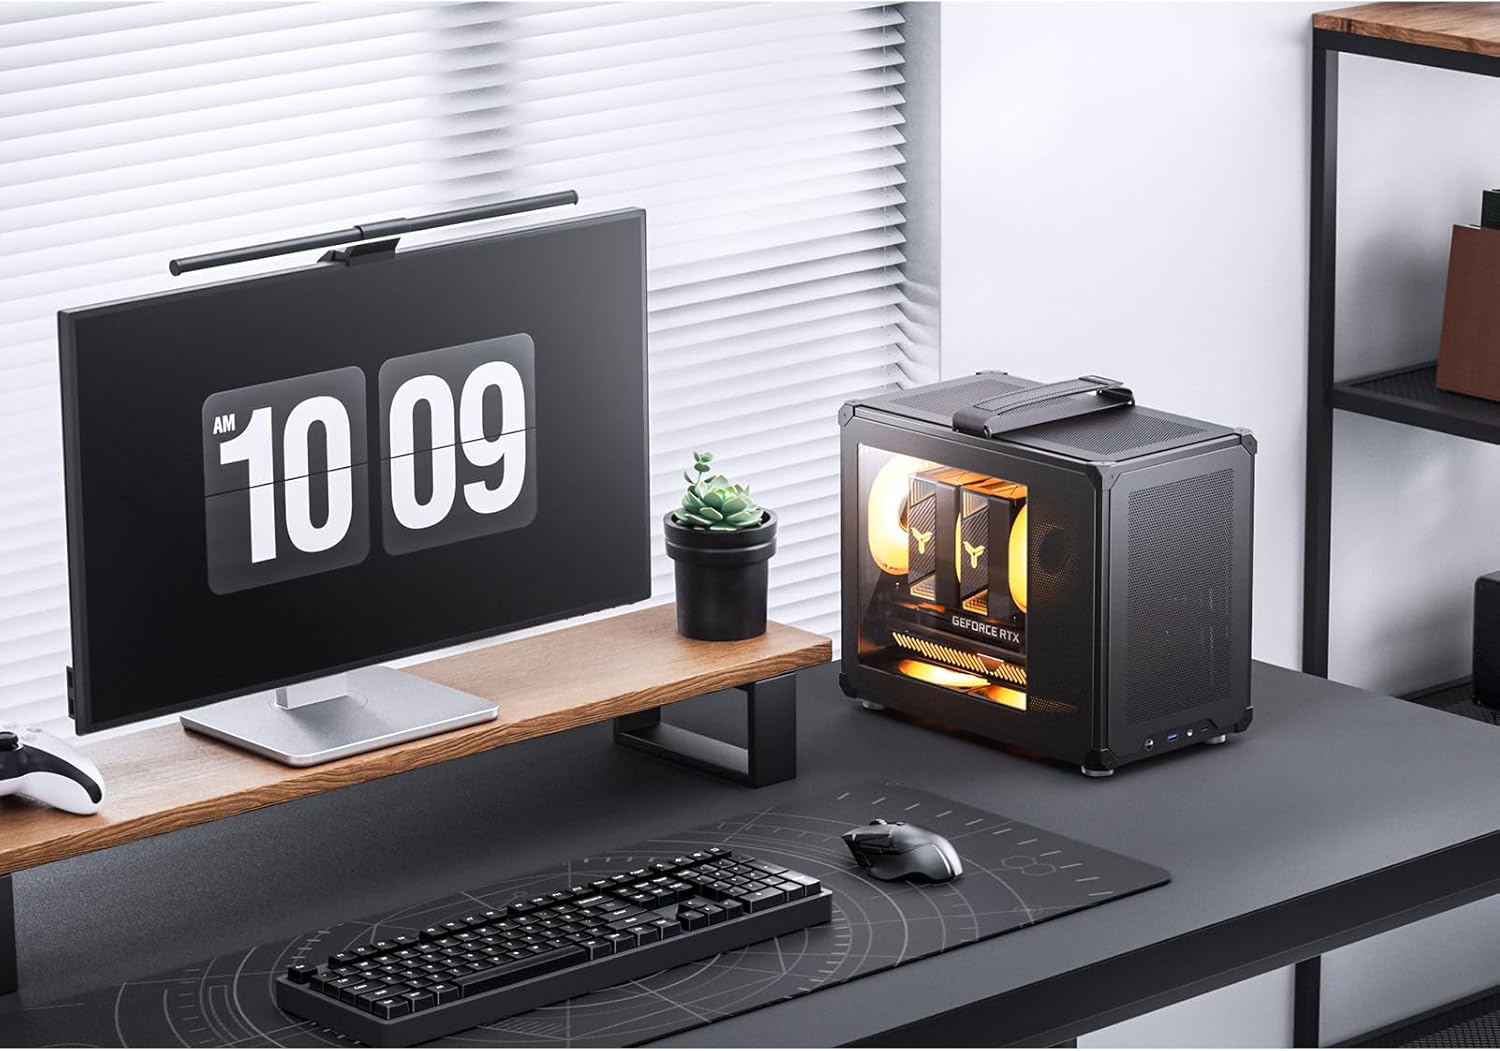
Figure 1.2: The C6 MAX integrated into a typical desktop environment, highlighting its small size.
2. Key Features
The JONSBO C6 MAX offers several features designed for ease of use, optimal performance, and portability:
- Tool-Free Quick Disassembly: Panels can be easily removed without tools for convenient installation and maintenance.
- All-Mesh Chassis: Ensures excellent airflow and heat dissipation from all sides.
- Adjustable Magic Hook Handle: Provides portability and ease of transport.
- Embedded Glass Side View: A combination of glass and mesh holes on the side panel offers a view of internal components while maintaining airflow.
- Broad Component Compatibility: Supports Micro-ATX/ITX motherboards, ATX power supplies, and various GPU/CPU cooler sizes.
- Versatile Fan Positions: Multiple fan mounting options for customized cooling solutions.
2.1 Tool-Free Quick Disassembly
The C6 MAX features a user-friendly design that allows for quick and easy removal of the front, upper cover, and side panels without the need for tools. Simply press the rear window buckle, open the top cover, and push open the front/side panel from the inside.

Figure 2.1: Illustration of the tool-free disassembly mechanism, highlighting the ease of access to internal components.
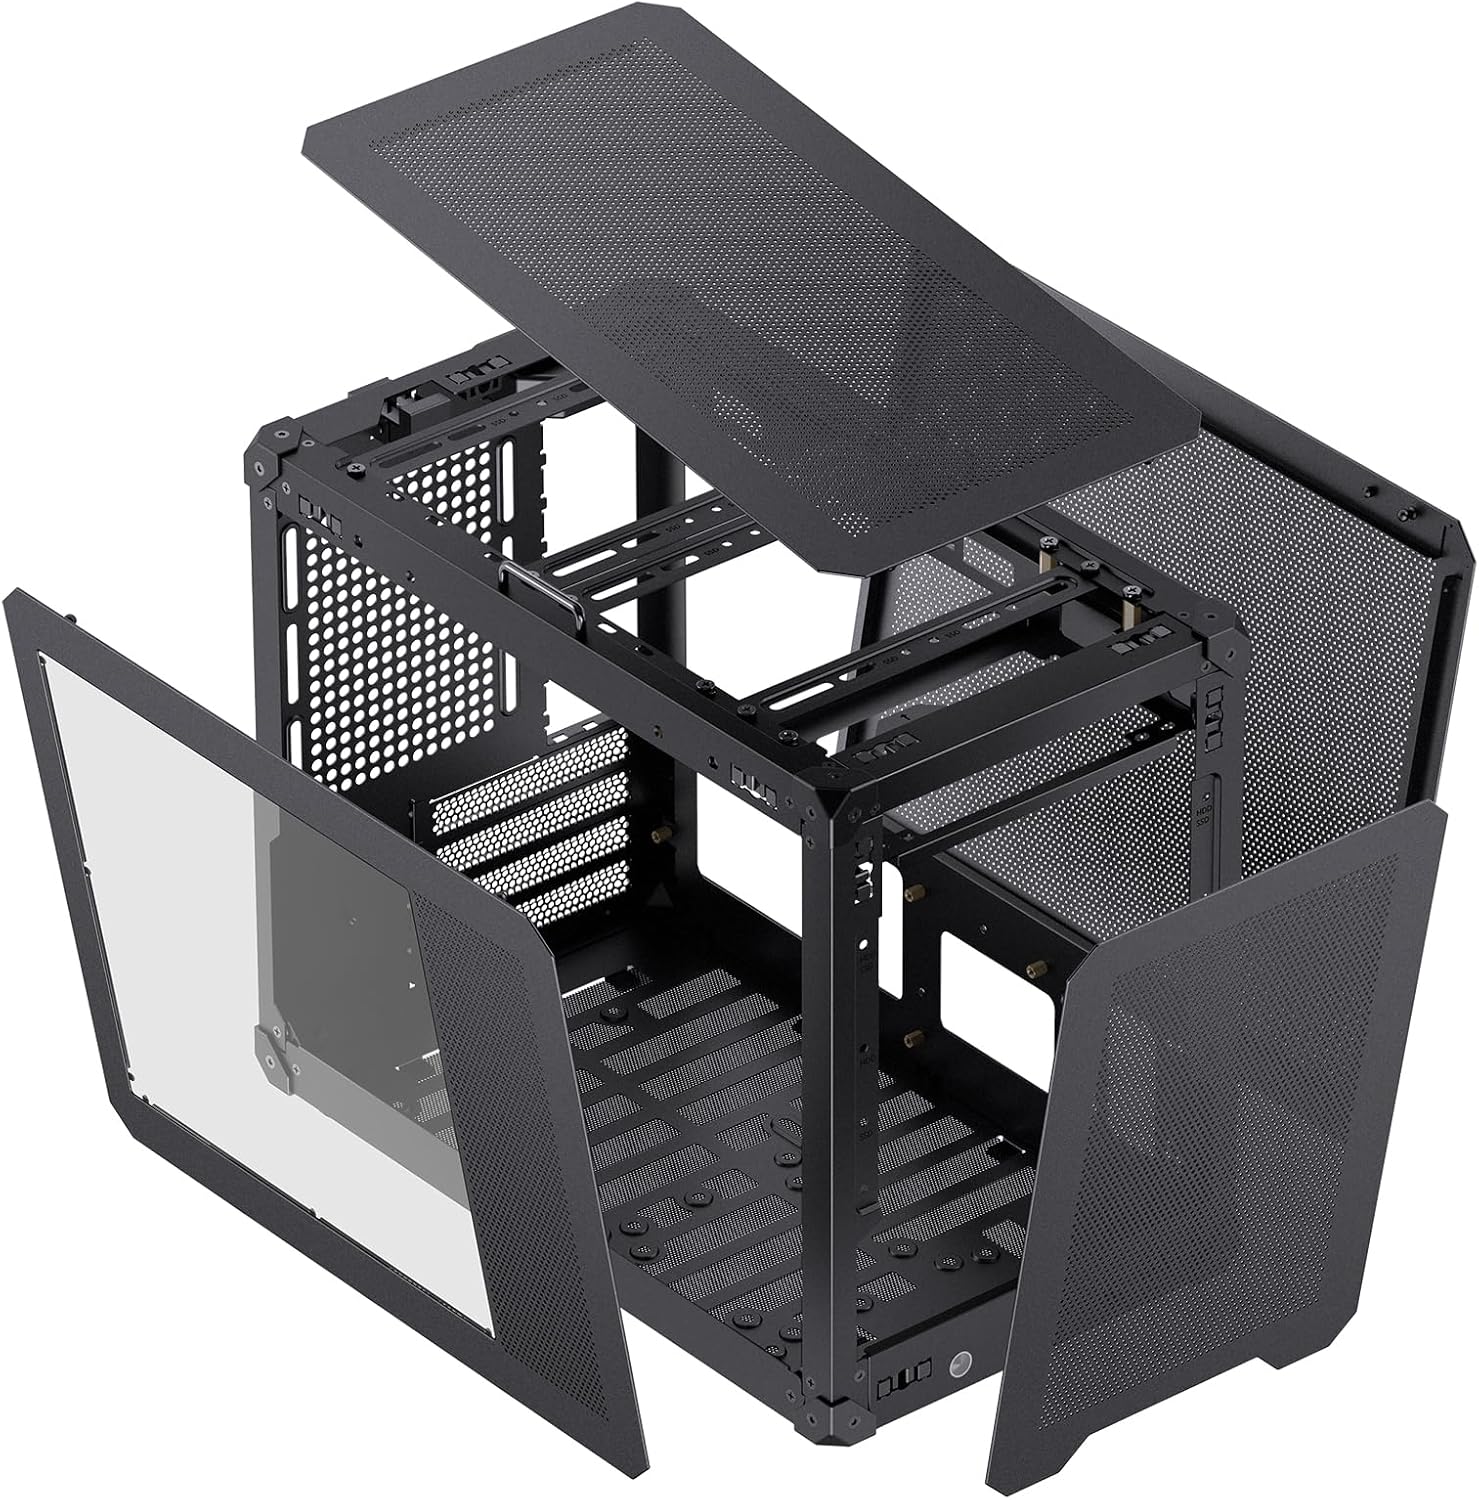
Figure 2.2: The C6 MAX with its panels detached, demonstrating the open frame for component installation.
2.2 Adjustable Magic Hook Handle
Equipped with an adjustable magic adhesive buckle handle, the C6 MAX is designed for easy portability, allowing users to transport their system conveniently.

Figure 2.3: The adjustable handle on the top of the case, designed for easy carrying.

Figure 2.4: A closer look at the handle, illustrating its design and attachment point.
2.3 Embedded Glass Side View
The side panel integrates both glass and mesh sections, providing a clear view of your internal components while ensuring adequate air intake and maintaining the case's overall thermal performance.

Figure 2.5: Diagram showing the combination of glass and mesh on the side panel for aesthetics and airflow.

Figure 2.6: The case with its glass side panel, offering a clear view of the installed hardware.
3. Setup and Installation
Follow these instructions for proper assembly and installation of your PC components within the JONSBO C6 MAX case.
3.1 Component Clearances and Compatibility
Ensure your components fit within the specified dimensions:
- Motherboard: Supports Micro-ATX and ITX motherboards.
- CPU Cooler Height: Maximum 170mm.
- GPU Length: 300-335mm (depending on motherboard slot and PSU length).
- PSU Support: ATX (140mm-220mm).

Figure 3.1: Detailed hardware support diagram, indicating compatible component sizes and fan locations.

Figure 3.2: Visual representation of maximum air cooler height and GPU length supported.
3.2 Power Supply Unit (PSU) Installation
The case supports ATX power supplies. The maximum PSU length varies based on the graphics card installation slot:
- If the graphics card is installed in the first slot of the motherboard: PSU length ≤ 140mm.
- If the graphics card is installed in the second slot of the motherboard: PSU length ≤ 160mm.

Figure 3.3: Comparison of SFX and ATX PSU configurations and their impact on fan placement.
3.3 Graphics Card (GPU) Installation
The maximum supported GPU length depends on the motherboard slot used and its thickness:
- If installed in the first slot: GPU length ≤ 335mm (thickness within 65mm).
- If installed in the second slot: GPU length ≤ 300mm (thickness within 60mm).
Select the appropriate bottom fan/hard drive size based on the graphics card thickness and installation position.

Figure 3.4: Important tips regarding GPU and PSU compatibility based on installation slot and dimensions.
3.4 Fan Installation
The case supports various fan configurations for optimal cooling:
- Top: 1 x 120mm or 1 x 140mm (Optional)
- Rear: 1 x 120mm
- Bottom: 2 x 120mm or 1 x HDD (The hard drive shares one fan slot)
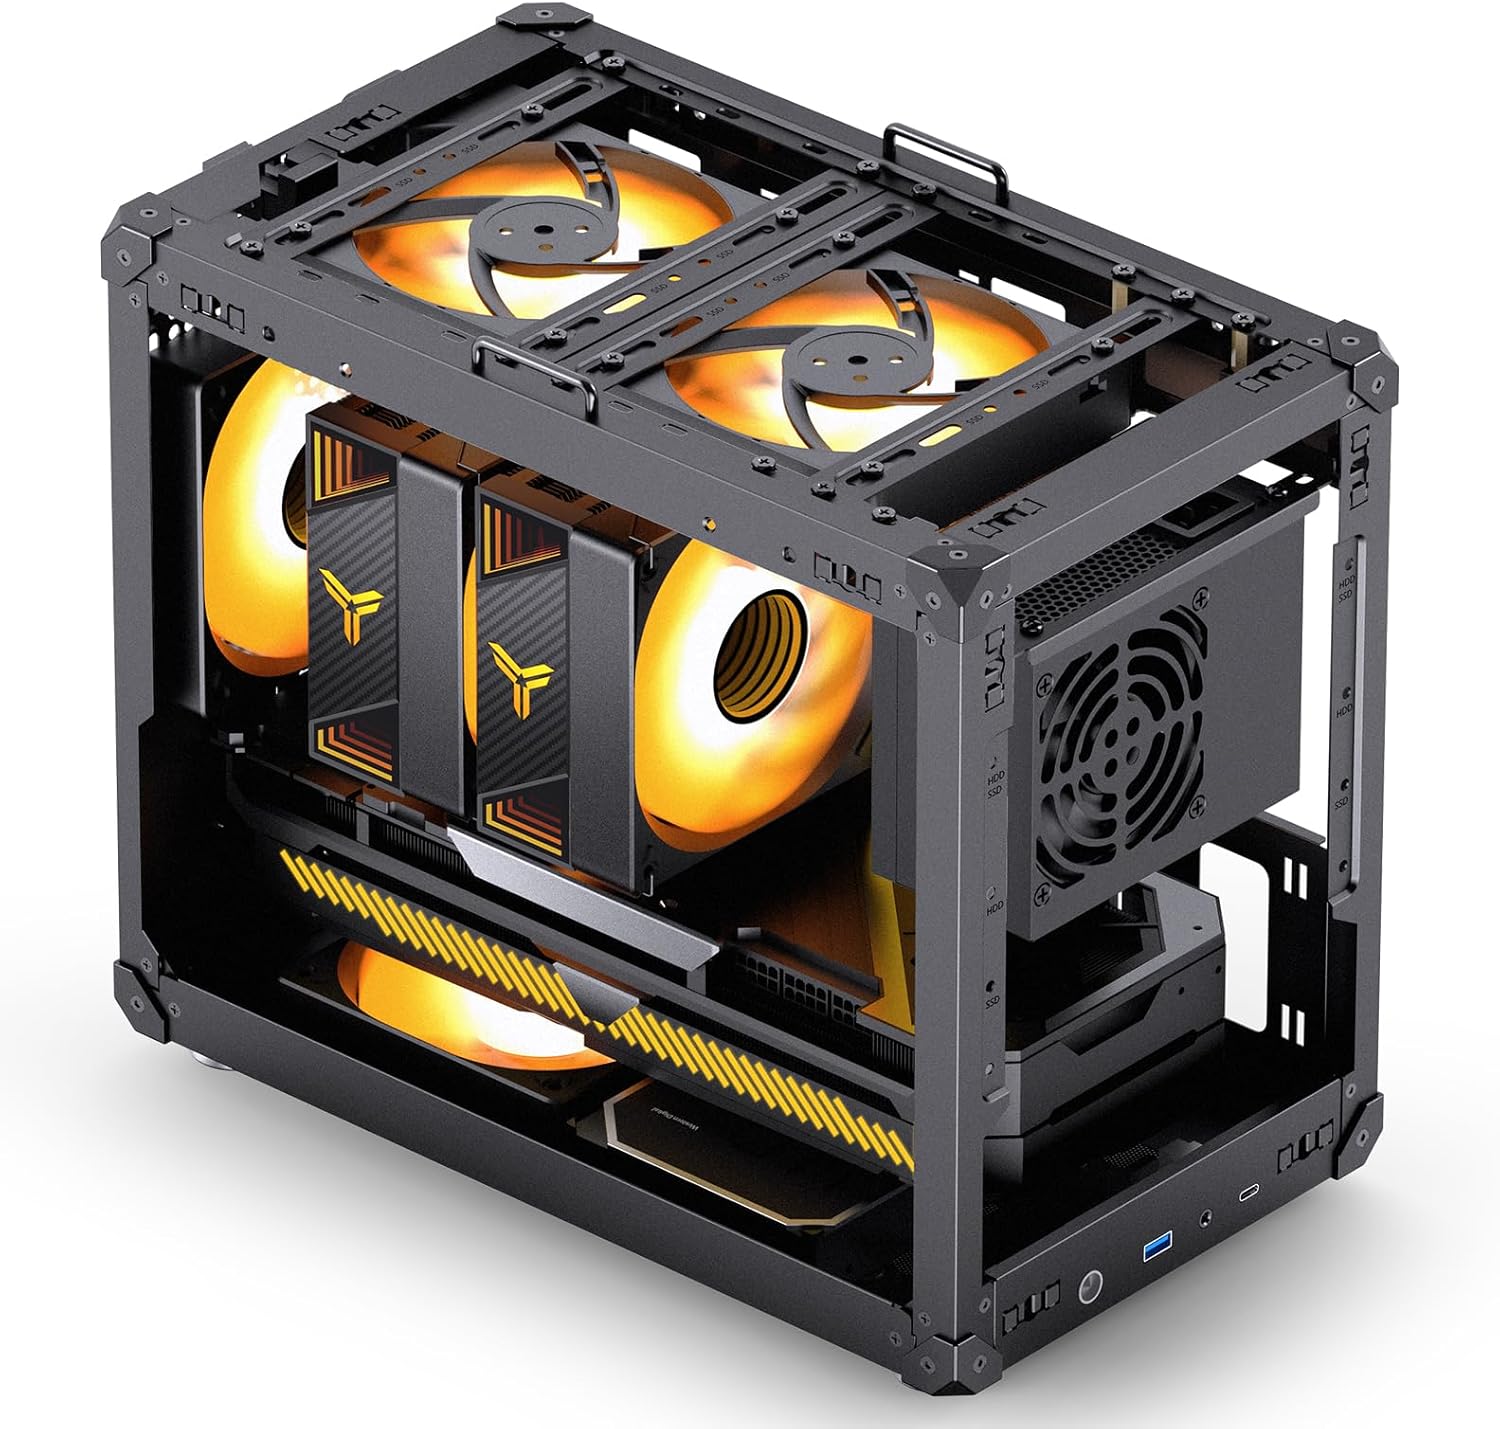
Figure 3.5: Internal view highlighting potential fan mounting positions for enhanced airflow.
3.5 Drive Bay Installation
The C6 MAX provides flexible storage options:
- 1 x 3.5" HDD
- 1 x 2.5" SSD

Figure 3.6: Illustration of the drive bay locations for 3.5" HDD and 2.5" SSD.
3.6 Front Panel Connections
The front I/O panel provides convenient access to essential ports:
- 1 x Type-C (20PIN)
- 1 x USB 3.0
- 1 x AUDIO + 1 x MIC (2-in-1 combo jack)

Figure 3.7: Detailed view of the front I/O panel and its various ports.
4. Operating Considerations
Once assembled, the JONSBO C6 MAX operates as a standard PC enclosure. Its all-mesh design is engineered to provide continuous airflow, which is crucial for maintaining optimal temperatures for your components. Ensure all fans are correctly installed and oriented for proper intake and exhaust to maximize cooling efficiency.
5. Maintenance
Regular maintenance will help prolong the life of your components and maintain optimal performance:
- Dust Cleaning: Due to the mesh design, dust accumulation can occur. Periodically use compressed air to clean dust from the mesh panels and internal components.
- Panel Cleaning: Wipe down the exterior panels with a soft, damp cloth. Avoid abrasive cleaners.
- Fan Inspection: Check fans regularly for dust buildup and ensure they are spinning freely.
6. Troubleshooting
If you encounter issues, consider the following common troubleshooting steps:
- Component Not Fitting: Double-check the specifications in Section 3.1 and 3.2 to ensure your components (GPU, PSU, CPU cooler) are within the supported dimensions.
- Poor Airflow/Overheating: Verify that all fans are installed correctly and are spinning. Ensure cables are managed to not obstruct airflow. Clean any dust buildup.
- Front Panel Ports Not Working: Ensure all front panel cables (USB, Audio, Type-C) are securely connected to the correct headers on your motherboard.
- Panels Difficult to Remove/Attach: Ensure the tool-free buckles are fully disengaged/engaged as described in Section 2.1.
7. Specifications
Detailed specifications for the JONSBO C6 MAX PC Case:
| Feature | Specification |
|---|---|
| Model No. | C6 MAX |
| Color | Black |
| Dimensions (W x D x H) | 202mm x 349mm x 295mm (Includes footpads) |
| Material | 0.7mm Steel Plate |
| Compatible Motherboard | Micro-ATX / ITX |
| Drive Bays | 1 x 2.5" SSD or 1 x 3.5" HDD |
| Front Interface | Type-C (20PIN), USB 3.0 x 1, AUDIO + MIC (2-in-1) |
| Support Power Supply | ATX ≤ 140mm-220mm |
| Support CPU Cooler Height | ≤ 170mm |
| Support GPU Length | ≤ 300mm-335mm |
| Fan Support (Top) | 1 x 120mm or 1 x 140mm (Optional) |
| Fan Support (Rear) | 1 x 120mm |
| Fan Support (Bottom) | 2 x 120mm or 1 x HDD |
| Net Weight | 3.45kg (Approx. 7.6 lbs) |

Figure 7.1: Various external views of the JONSBO C6 MAX PC case.

Figure 7.2: Summary of key product specifications.
8. Warranty and Support
For warranty information and technical support, please refer to the documentation provided with your purchase or contact Jonsbo customer service directly. You may also visit the official Jonsbo store on Amazon for additional resources and contact details: Jonsbo Store.


