
1. Introduction
This manual provides comprehensive instructions for the assembly, operation, and maintenance of your saunalife EuroSauna KIT1 2-Person Outdoor Barrel Sauna. Please read all instructions carefully before installation and use to ensure safe and efficient operation. Retain this manual for future reference.
2. Safety Information
WARNING: Failure to follow these safety instructions may result in serious injury or death.
- Electrical Installation: A qualified electrician is required for the proper hookup of the 6kW Harvia sauna heater. Do not attempt electrical installation yourself unless you are a certified professional.
- Wood Treatment: To preserve the exterior wood of your sauna and protect it from moisture and UV damage, apply a high-quality wood stain or paint specifically designed for saunas. This should be done periodically as part of maintenance.
- Hydration: Drink plenty of water before, during, and after sauna use to prevent dehydration.
- Health Conditions: Consult a physician before using the sauna if you have any health conditions, are pregnant, or are taking medication.
- Children and Pets: Keep children and pets away from the sauna, especially when in operation. The sauna can reach high temperatures.
- Alcohol and Drugs: Do not use the sauna under the influence of alcohol, drugs, or medications that may impair judgment or cause drowsiness.
- Maximum Session Time: Limit sauna sessions to 15-20 minutes to avoid overheating. Exit immediately if you feel dizzy, nauseous, or uncomfortable.
- Ventilation: Ensure proper ventilation as described in the assembly section to allow for air circulation.
3. Package Contents
Verify that all components are present before beginning assembly:
- Full-length premium Spruce barrel staves (1.65" thick)
- Spruce front and back walls (1.1" thick)
- Tempered safety glass door (0.31" thick)
- High-quality Alder wood sauna benches
- Spruce structural elements (fascia boards, cradles, etc.)
- 6kW Harvia KIP60B Finnish sauna heater with stones
- Full shingle kit for roof protection
- Corrosion-resistant stainless steel barrel bands
- Assembly kit (screws, fasteners, detailed instructions)
4. Setup and Assembly
Assembly of the EuroSauna KIT1 requires at least two people and basic carpentry skills. Follow the detailed instructions provided in the included assembly kit. The following provides a general overview and key considerations.
4.1 Site Preparation
Choose a level, stable surface for your sauna. Ensure adequate clearance around the sauna for maintenance and safety. The area should be well-drained.
4.2 Base and Cradles
Assemble the wooden cradles and place them on your prepared site. These form the stable base for the barrel structure.
4.3 Barrel Assembly
Begin by assembling the front and back walls. Carefully fit the Spruce staves into the grooves of the end walls, forming the barrel shape. Secure with the provided stainless steel barrel bands. Ensure a tight fit for optimal insulation.
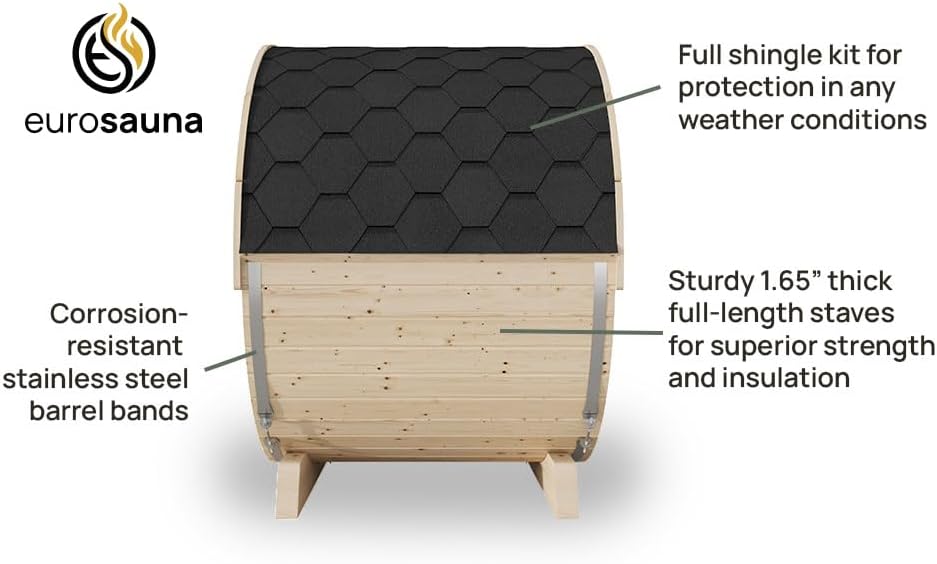
Figure 1: Exterior construction highlighting thick staves and barrel bands.
4.4 Door and Benches Installation
Install the tempered safety glass door into the front wall. Position and secure the Alder wood benches inside the sauna. These benches are designed for comfort and heat resistance.

Figure 2: Interior layout with heater and benches.
4.5 Shingle Roof Installation
Apply the full shingle kit to the top portion of the barrel. This provides essential weather protection for your outdoor sauna.

Figure 3: Shingle roof detail on the barrel sauna.
4.6 Heater Installation and Electrical Hookup
Mount the 6kW Harvia KIP60B sauna heater according to its specific instructions. A certified electrician must perform the electrical hookup for the heater. Ensure all wiring meets local electrical codes.

Figure 4: Harvia 6kW sauna heater and sauna exterior.
5. Operating Instructions
5.1 Initial Use
Before the first use, wipe down the interior with a damp cloth. Run the sauna at a moderate temperature for an hour to burn off any manufacturing residues and allow the wood to acclimate.
5.2 Heating the Sauna
- Ensure the sauna door is closed.
- Turn on the Harvia heater using its controls. Refer to the separate Harvia heater manual for specific operating instructions.
- Allow 30-60 minutes for the sauna to reach your desired temperature (typically 160-190°F or 70-90°C).
5.3 During Use
You may pour small amounts of water over the hot sauna stones to create steam (löyly). Do not over-pour, as this can damage the heater. Always use clean water.
6. Maintenance
6.1 Cleaning
- Wipe down benches and interior surfaces with a damp cloth after each use.
- For deeper cleaning, use a mild soap solution and rinse thoroughly. Avoid harsh chemicals.
- Periodically vacuum or sweep the floor to remove debris.
6.2 Wood Treatment
Regularly inspect the exterior wood for signs of wear or weather damage. Apply a high-quality wood stain or paint specifically designed for saunas to protect the wood from moisture and UV radiation. This will extend the lifespan and maintain the aesthetic appeal of your sauna.
6.3 Heater Maintenance
Refer to the Harvia heater manual for specific maintenance instructions. Periodically check the sauna stones and replace any that are cracked or crumbling.
7. Troubleshooting
- Sauna not heating: Check the electrical connection and the heater's circuit breaker. Ensure the heater's timer and thermostat settings are correct. Consult the Harvia heater manual for specific troubleshooting steps.
- Excessive steam/humidity: Ensure proper ventilation is maintained. Avoid pouring too much water on the stones at once.
- Wood discoloration/warping: This can be a natural process due to heat and moisture. Regular wood treatment (staining/painting) can help mitigate this for the exterior. Ensure proper ventilation to prevent excessive moisture buildup inside.
8. Specifications
| Feature | Detail |
|---|---|
| Model Number | KIT1 |
| Product Dimensions (L x W x H) | 81 x 59.06 x 84.65 inches |
| Heater Type | 6kW Harvia KIP60B Finnish Sauna Heater with Stones |
| Barrel Stave Thickness | 1.65 inches (Spruce) |
| Front & Back Wall Thickness | 1.1 inches (Spruce) |
| Door Material | 0.31 inch Tempered Safety Glass |
| Bench Material | Alder Wood |
9. Warranty and Support
For warranty information and customer support, please refer to the documentation included with your purchase or contact saunalife customer service directly. Ensure you have your model number (KIT1) and proof of purchase available when contacting support.


