
Introduction
This manual provides detailed instructions for the safe installation, operation, and maintenance of your ALIYIQI Modern Nickel Glass Bubble Chandelier. Please read this manual thoroughly before installation and retain it for future reference.
The chandelier features a unique design with swirled clear glass globe shades and a sleek nickel finish, offering both elegance and a playful aesthetic. It is designed to be a focal point in various interior spaces.
Important Safety Information
- Always turn off the main power supply at the circuit breaker before beginning any electrical work.
- Installation should be performed by a qualified electrician or a competent person.
- Ensure all wiring connections are secure and comply with local electrical codes.
- Do not exceed the maximum wattage specified for the bulbs.
- Handle glass components with care to prevent breakage.
- Keep children away from the installation area.
What's in the Box
Verify that all components are present and undamaged before proceeding with installation.
- Mounting Hardware
- Glass Bubble Shades (12 large at 5.9" diameter, 6 small at 4.7" diameter)
- Chandelier Frame with 12 E12 bulb sockets
- Adjustable Hanging Cord (up to 86")
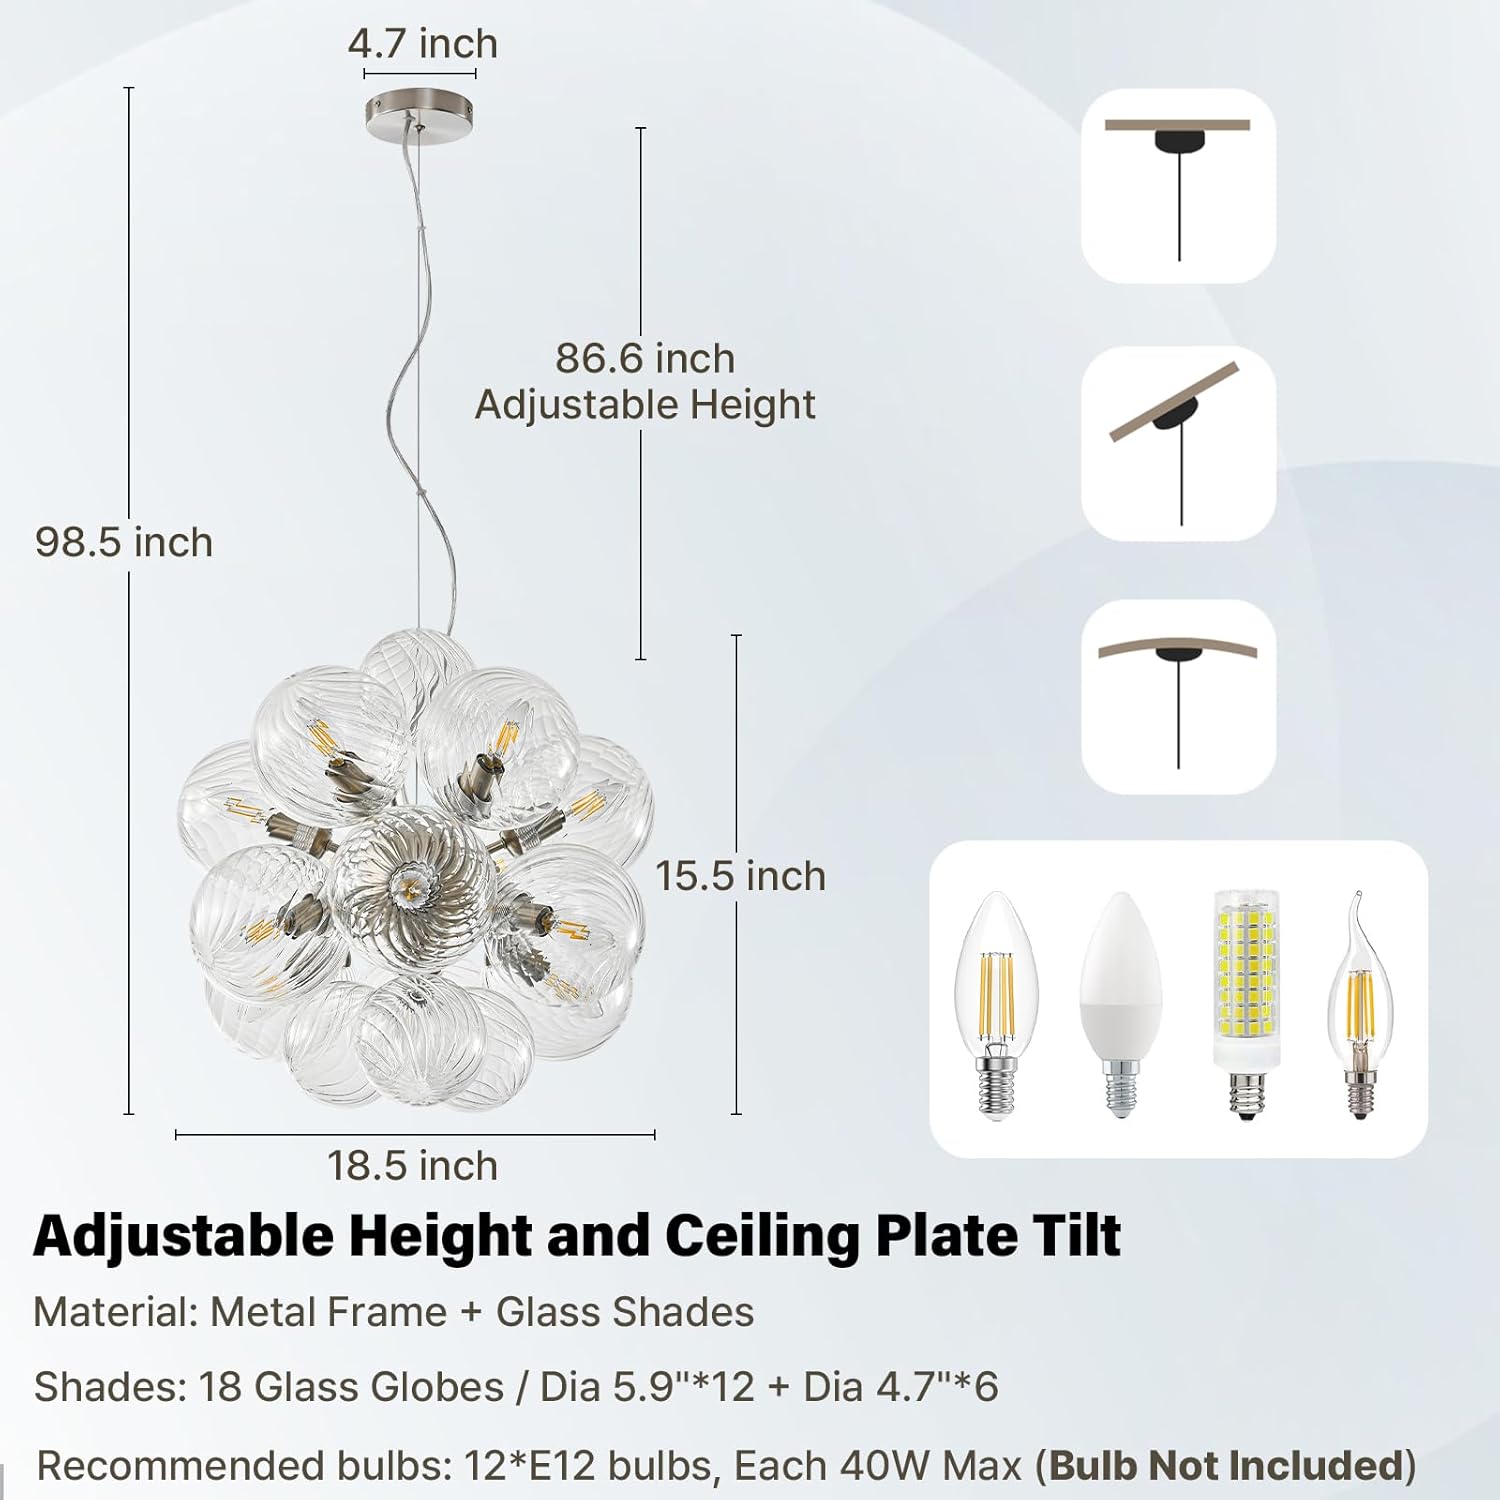
Figure 1: Chandelier dimensions and components. Note the adjustable height feature and recommended E12 bulb types.
Installation Instructions
Follow these steps carefully for proper installation. It is recommended to have assistance during the installation process.
- Prepare for Installation: Turn off power at the circuit breaker. Clear the installation area.
- Assemble the Chandelier Frame: Connect the main body of the chandelier to the hanging rod and canopy, ensuring all wires are properly threaded.
- Mount the Canopy: Secure the mounting bracket to your ceiling junction box using the provided hardware. Connect the chandelier's electrical wires to your household wiring (live to live, neutral to neutral, ground to ground) using wire nuts. Carefully tuck the wires into the junction box and secure the canopy to the mounting bracket.
- Adjust Height: The hanging cord is adjustable up to 86 inches. Adjust the length to your desired height before securing the final connections.
- Install Bulbs: Screw 12 E12 base bulbs (not included) into the sockets. Ensure bulbs are compatible with dimmers if you plan to use a dimming switch.
- Attach Glass Globes: Carefully attach each of the 18 swirled clear glass globes to the fixture frame using the provided hooks. There are 12 larger globes (5.9" diameter) and 6 smaller ones (4.7" diameter).

Figure 2: Detailed view of the chandelier's components, including the swirled glass shades and brushed nickel frame.
Operating Instructions
Once installed, restore power at the circuit breaker. The chandelier is compatible with dimmable E12 bulbs (not included), allowing you to adjust the brightness to suit your preference. If using a dimmer switch, ensure both the switch and bulbs are dimmable compatible.

Figure 3: Visual comparison of the chandelier in its off and illuminated states, highlighting its aesthetic appeal.
Care and Maintenance
- Cleaning: To clean the glass globes and metal frame, ensure the power is off. Use a soft, dry cloth to gently wipe away dust. For stubborn marks, a slightly damp cloth with mild soap can be used, followed by drying with a clean, soft cloth. Avoid abrasive cleaners or solvents.
- Bulb Replacement: Always turn off power before replacing bulbs. Allow bulbs to cool completely before handling. Replace with E12 base bulbs of the specified wattage.
- Inspection: Periodically check all connections and components for any signs of wear or damage.
Troubleshooting
| Problem | Possible Cause | Solution |
|---|---|---|
| Light does not turn on. | No power, loose wiring, faulty bulb. | Check circuit breaker. Verify all wiring connections. Replace bulbs. |
| Bulbs flicker or buzz with dimmer. | Incompatible dimmer switch or bulbs. | Ensure both dimmer switch and E12 bulbs are specifically rated as dimmable compatible. |
| Missing parts or damaged components upon arrival. | Shipping damage or packaging error. | Contact customer service immediately for assistance and replacement parts. |
Specifications
| Feature | Detail |
|---|---|
| Brand | ALIYIQI |
| Model Name | Modern Bubble Chandelier |
| Color | Nickel Chandelier 18.5 |
| Material | Glass, Metal |
| Style | Modern |
| Light Fixture Form | Chandelier |
| Product Dimensions | 18.5"L x 18.5"W x 16.5"H |
| Adjustable Height | Yes, up to 86" hanging cord |
| Indoor/Outdoor Usage | Indoor |
| Power Source | Corded Electric |
| Special Feature | Adjustable Height, Dimmable, Glass Ball Bubble Chandelier, Nordic Swirled Clear Ribbed Glass Ball Chandelier |
| Shade Material | Glass |
| Number of Light Sources | 12 |
| Voltage | 110 Volts |
| Light Color | Dimmable (with compatible bulbs) |
| Wattage | 48 watts (total) |
| Bulb Base | E12 |
| Assembly Required | Yes |
| Item Weight | 13.6 pounds |
Customer Support
For any inquiries regarding installation, quality concerns, or general assistance with your ALIYIQI Modern Nickel Glass Bubble Chandelier, please contact our dedicated customer service team. We are committed to providing prompt solutions.
Please refer to your purchase documentation for specific contact details or visit the ALIYIQI store on Amazon: ALIYIQI Store.