1. Introduction
This manual provides detailed instructions for the assembly, operation, and maintenance of your NZXT H9 Flow RGB+ (2025) PC case. The H9 Flow RGB+ is a large dual-chamber ATX mid-tower case designed for high-performance builds, emphasizing optimal airflow and aesthetics. It features a dual-chamber design for improved cooling and cable management, perforated panels, angled fans, and extensive support for fans and radiators.

Figure 1: Front-left view of the NZXT H9 Flow RGB+ (2025) PC Case, showcasing its illuminated RGB fans and panoramic glass panels.
2. Key Features
- Dual-Chamber Design: Separates main components from the PSU and drives for improved thermal performance and cable management.
- Optimized Airflow: Perforated steel panels and angled front-right fans ensure efficient cooling for high-performance builds.
- RGB Ready: Includes two F420 RGB Core single-frame fans, one F120 RGB Core (CV) fan in the rear, and an NZXT Control Hub. CV = Case Version (3-pin DC).
- Ten-Fan Capacity: Supports up to nine 140mm fans across the top, front-right, and bottom, plus one 120mm fan in the rear.
- Panoramic View: Showcase every detail of your build with seamless, wraparound tempered glass paneling.
- Large Radiators & GPUs: Fits up to a 420mm radiator on the top and front-right, with plenty of clearance for high-end graphics cards (up to 435mm GPU length).
- Easy Cable Management: Extra-wide channels, built-in Velcro straps, and tie-down points make cable routing effortless.
- Back-Connect Ready: Compatible with rear-connecting motherboards like ASUS BTF and MSI Project Zero for a cable-free look.
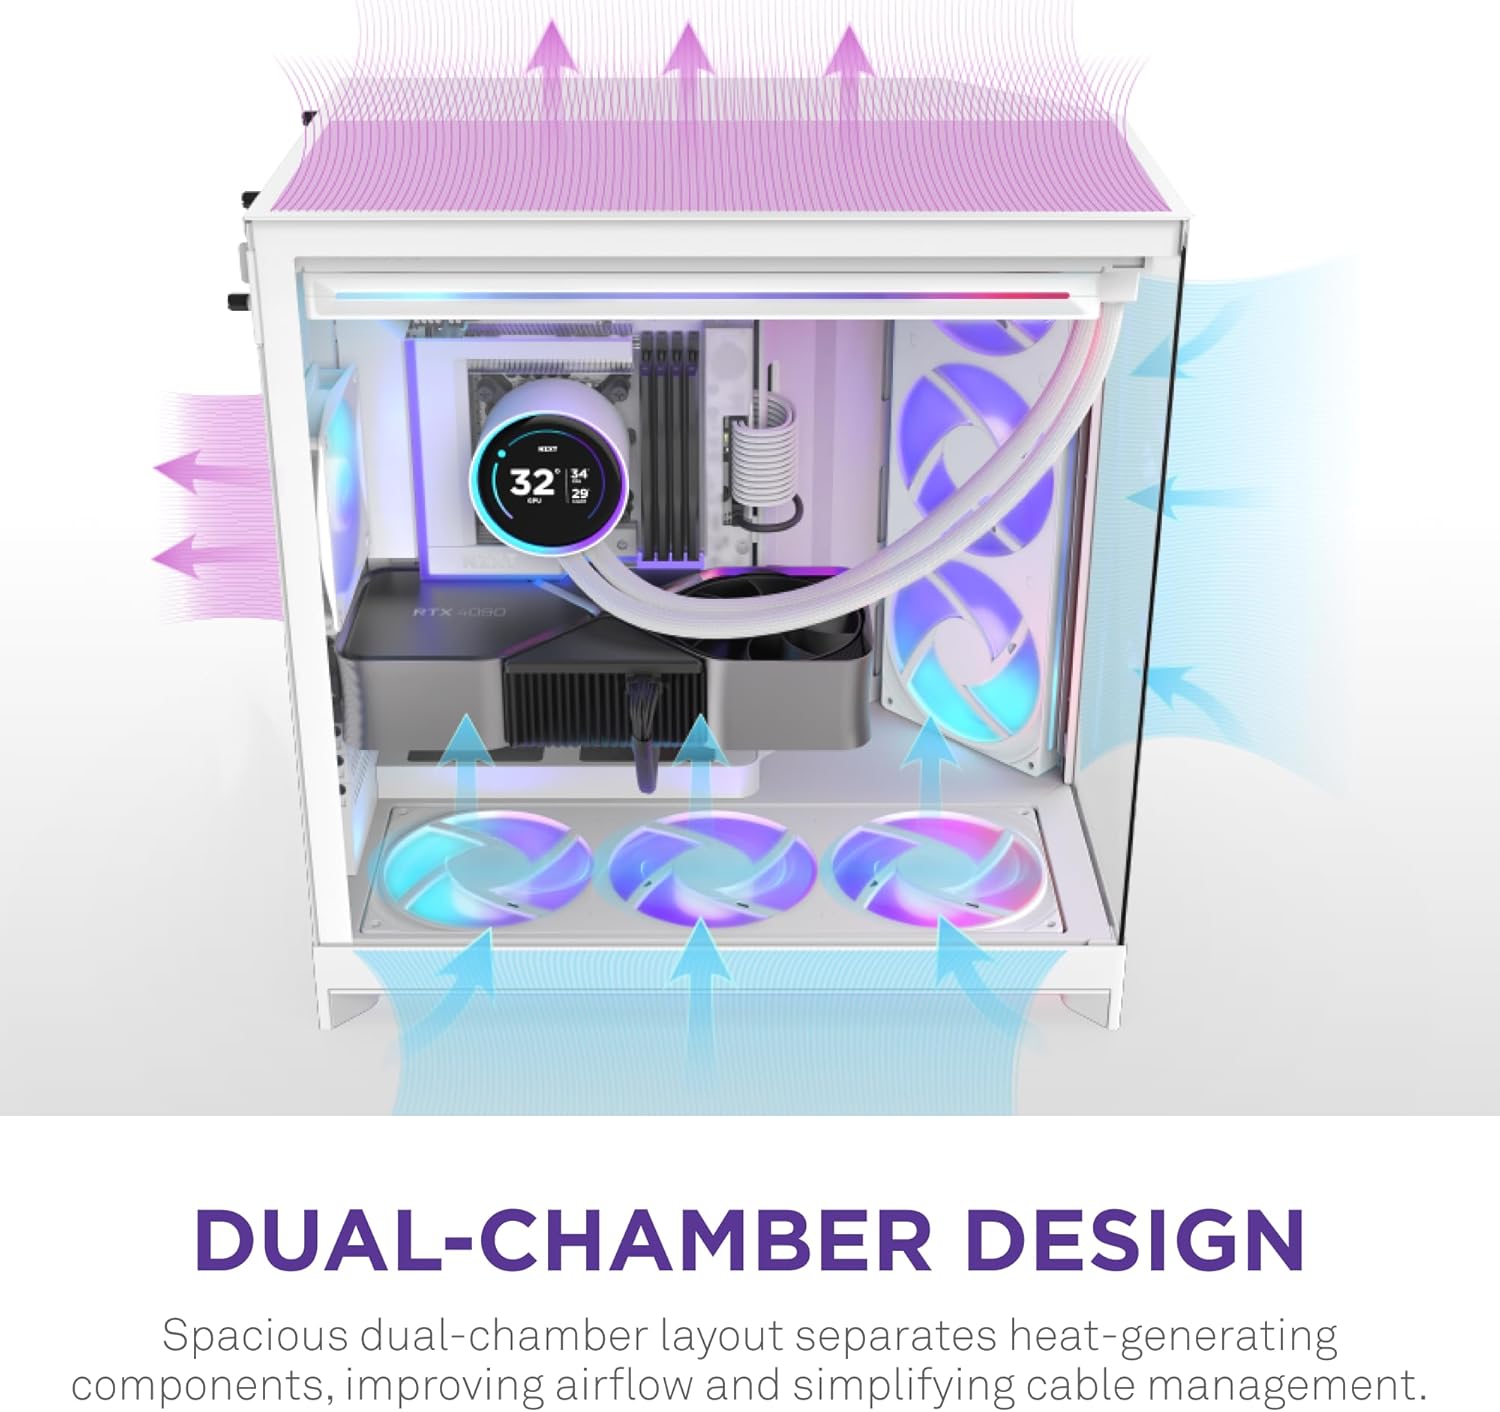
Figure 2: Visual representation of the dual-chamber design, highlighting the separation of heat-generating components and optimized airflow.

Figure 3: The panoramic tempered glass paneling offers an unobstructed view of the internal components.
3. Setup and Installation
Follow these steps for proper installation of your PC components within the NZXT H9 Flow RGB+ case.
3.1. Preparing the Case
- Carefully remove the tempered glass panels by unscrewing the thumb screws and gently sliding them off.
- Identify the various mounting points for fans, radiators, and storage drives.
3.2. Fan and Radiator Installation
The case supports extensive cooling configurations. Refer to the diagram below for fan and radiator placement options.

Figure 4: Expansive cooling options with support for up to ten fans and 420mm radiators.
- Install fans and radiators in desired locations (top, front-right, bottom, rear) using the provided screws.
- The case includes two F420 RGB Core single-frame fans and one F120 RGB Core (CV) fan. Connect them to the NZXT Control Hub.
3.3. Motherboard and GPU Installation
- Install your ATX motherboard onto the standoffs. The case is compatible with back-connect motherboards for a cleaner aesthetic.
- Install your graphics card. The case offers ample clearance for large GPUs (up to 435mm).

Figure 5: The case supports large graphics cards up to 435mm in length.
3.4. Cable Management
Utilize the extra-wide channels, built-in Velcro straps, and tie-down points in the dual-chamber design for effortless cable routing.

Figure 6: Dedicated cable management features simplify the building process and improve airflow.
3.5. Video Guides
Watch these videos for visual guidance on building with the NZXT H9 Flow RGB+ case.
Video 1: NZXT H9 Flow RGB+ Review - A detailed overview of the case and its features.
Video 2: Clean aesthetic and first time build friendly! - A user's perspective on building in the H9 Flow RGB+.
Video 3: Awesome case! - Another user's build experience with the H9 Flow RGB+.
4. Operating Instructions
Once all components are installed and connected, you can power on your system.
4.1. Power On/Off
- Press the power button located on the front I/O panel to turn on your PC.
- To power off, use the operating system's shutdown function or press and hold the power button for several seconds.
4.2. RGB Lighting and Fan Control
The included NZXT Control Hub manages the RGB lighting and fan speeds. For advanced customization, download and install the NZXT CAM software.
Video 4: NZXT Single Frame Fan Overview - Demonstrates the features of NZXT's single-frame fans, similar to those included.
5. Maintenance
Regular maintenance ensures optimal performance and longevity of your PC components.
5.1. Dust Filter Cleaning
- The case features removable dust filters (e.g., at the bottom). Regularly check and clean these filters to prevent dust buildup and maintain airflow.
- Gently slide out the filters, clean them with compressed air or water (ensure they are completely dry before reinstallation), and reinsert.
5.2. General Cleaning
- Use a soft, lint-free cloth to clean the tempered glass panels and exterior surfaces. Avoid abrasive cleaners.
- For internal components, use compressed air to remove dust buildup periodically. Ensure the PC is powered off and unplugged before cleaning.
6. Troubleshooting
If you encounter issues, refer to these common troubleshooting tips.
- No Power: Ensure all power cables (PSU, motherboard, GPU) are securely connected. Check the power outlet and PSU switch.
- Fans Not Spinning/RGB Not Lighting: Verify fan and RGB cables are correctly connected to the NZXT Control Hub and the hub is powered. Check NZXT CAM software settings.
- Overheating: Ensure all fans are spinning correctly and in the proper orientation for airflow. Clean dust filters. Verify CPU cooler and GPU are properly seated.
- Display Issues: Confirm the display cable is securely connected to the graphics card and monitor.
- For further assistance, consult your motherboard manual or the NZXT support website.
7. Specifications
Detailed technical specifications for the NZXT H9 Flow RGB+ (2025) PC Case.
| Feature | Detail |
|---|---|
| Brand | NZXT |
| Series | NZXT H9 |
| Model Number | CM-H92FW-P1 |
| Case Type | Mid Tower |
| Color | White |
| Material | Stainless Steel, Tempered Glass |
| Item Weight | 29.5 pounds (13.4 kg) |
| Product Dimensions (LxWxH) | 20.08 x 19.29 x 12.6 inches (510 x 490 x 320 mm) |
| Motherboard Compatibility | ATX, Micro-ATX, Mini-ITX (Back-Connect Ready: ASUS BTF, MSI Project Zero) |
| Cooling Method | Air |
| Power Supply Mounting Type | Rear Mount |
| Included Fans | 2 x F420 RGB Core (140mm), 1 x F120 RGB Core (CV) (120mm) |
| Max Radiator Support | 420mm (Top, Front-Right) |
| Max GPU Clearance | 435mm |

Figure 7: Case dimensions for planning your build space.
8. Warranty and Support
For warranty information, technical support, or to register your product, please visit the official NZXT website or contact their customer service directly. Keep your proof of purchase for warranty claims.
Official NZXT Website: www.nzxt.com


