
1. Introduction
Thank you for choosing the Generic Gas Grill L & R Burner Kit. This manual provides essential information for the safe and proper installation, operation, and maintenance of your new replacement burners. This kit is designed for specific Ducane gas grill models, including the 1202, 1204, 1205, 2002, 2004, and 4002 Series.
Please read this manual thoroughly before attempting any installation or use. Keep this manual for future reference.
2. Safety Information
WARNING: Failure to follow these safety instructions could result in fire, explosion, or serious injury.
- Always ensure the gas supply to the grill is turned off and disconnected before beginning any installation or maintenance.
- Allow the grill to cool completely before handling any components.
- Wear appropriate safety gear, such as gloves and eye protection, during installation.
- Perform a leak test after installation to check for gas leaks. Apply a soapy water solution to all gas connections. Bubbles indicate a leak.
- Do not operate the grill if a gas leak is detected.
- Ensure proper ventilation when operating the grill.
- If you are unsure about any part of the installation process, consult a qualified professional.
3. Package Contents
Verify that all components are present and undamaged before proceeding with installation.
- 1 x Left Hand P-Shaped Burner (Stainless Steel)
- 1 x Right Hand P-Shaped Burner (Stainless Steel)
- 2 x Ignitors with Wires (Pre-attached to burners)
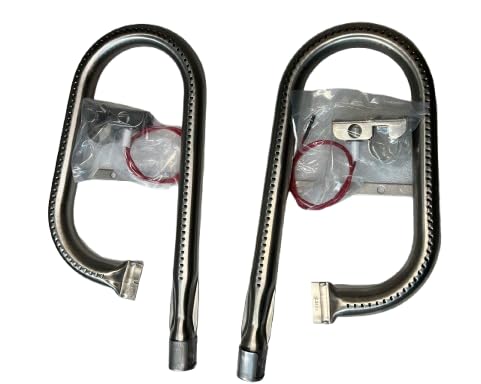
Figure 1: Included Left and Right P-shaped stainless steel burners with ignitors.
4. Setup and Installation
This section outlines the steps for replacing your old grill burners with the new Generic L & R Burner Kit. Refer to your original grill manual for specific disassembly instructions if needed.
4.1 Pre-Installation Steps
- Turn off Gas Supply: Ensure the gas supply to your grill is completely shut off and the gas tank is disconnected (for propane grills) or the main gas valve is closed (for natural gas grills).
- Cool Down: Allow the grill to cool down completely before touching any components.
- Remove Grates and Heat Plates: Carefully remove the cooking grates and heat distribution plates (flame tamers) from your grill.
- Disconnect Old Burners: Disconnect the ignitor wires from the old burners. Carefully remove the old burners from their mounting points and gas valve orifices. Note their orientation (left/right) for proper replacement.
- Clean Grill Interior: Clean any debris, grease, or rust from the grill's firebox before installing new burners.
4.2 Burner Installation
- Position New Burners: Carefully insert the new P-shaped burners into the grill firebox, ensuring the gas inlet end of each burner aligns with the gas valve orifice. The ignitor probe should face the front of the grill.
- Secure Burners: Ensure the burners are properly seated over the gas valve orifices and secured in their mounting brackets. The burners are designed to fit snugly.
- Connect Ignitor Wires: Connect the ignitor wires from the new burners to the corresponding terminals on the grill's ignitor module. Ensure a secure connection.
- Replace Heat Plates and Grates: Once burners are securely installed and ignitor wires connected, replace the heat distribution plates and cooking grates.
4.3 Leak Test
After installation, it is crucial to perform a leak test before operating the grill.
- Prepare Solution: Mix a solution of equal parts liquid dish soap and water in a spray bottle.
- Apply Solution: Turn on the gas supply to the grill. Spray the soapy solution generously over all gas connections, including where the burners connect to the gas valves and any other gas lines.
- Check for Bubbles: Observe for bubbles forming at any connection points. Bubbles indicate a gas leak.
- Resolve Leaks: If a leak is detected, immediately turn off the gas supply. Tighten the connection or replace the faulty part. Repeat the leak test until no bubbles appear.
- Do Not Operate: Never operate the grill if a gas leak is present.
5. Operating Instructions
Once the burners are installed and a leak test has been successfully performed, you can operate your grill. Refer to your specific Ducane grill's original instruction manual for detailed operating procedures, including lighting instructions and temperature control.
To test the new burners:
- Ensure the grill lid is open.
- Turn on the gas supply.
- Turn one burner control knob to the "HIGH" position.
- Press and hold the ignitor button (if applicable) or use a long lighter to ignite the burner.
- Observe the flame. It should be primarily blue with yellow tips, indicating proper gas flow and combustion.
- Repeat for all burners.
6. Maintenance
Regular maintenance will extend the life of your burners and ensure optimal grill performance.
- Burner Cleaning: Periodically remove the burners and clean any food debris or blockages from the burner ports using a wire brush or a stiff wire. Ensure the ignitor probe is clean and free of residue.
- Grease Management: Regularly clean the grill's firebox and grease tray to prevent flare-ups and maintain hygiene.
- Inspection: Before each grilling season, inspect the burners for signs of corrosion, cracks, or excessive wear. Replace burners if they are significantly damaged or if flame distribution becomes uneven.
- Ignitor Wires: Check ignitor wires for fraying or damage. Ensure connections are secure.
7. Troubleshooting
If you encounter issues with your new burners, refer to the following common problems and solutions:
| Problem | Possible Cause | Solution |
|---|---|---|
| Burner does not light |
|
|
| Uneven or weak flame |
|
|
| Yellow or orange flame |
|
|
8. Specifications
- Product Type: Gas Grill L & R Burner Kit
- Compatibility: Ducane 1202, 1204, 1205, 2002, 2004, 4002 Series Gas Grills
- Material: Stainless Steel
- Burner Dimensions (Each): Approximately 13 5/8 inches (L) x 6 5/8 inches (W)
- Includes: Left Hand P-Shaped Burner, Right Hand P-Shaped Burner, Ignitors with Wires
- Model Numbers: 13011, 13021 (Burners)
9. Warranty Information
For specific warranty details regarding this Generic Gas Grill L & R Burner Kit, please refer to the product listing or contact the seller directly. Warranty terms may vary.
10. Support
If you require further assistance or have questions not covered in this manual, please contact the seller through the platform where the purchase was made. Provide your order number and a detailed description of your inquiry for prompt support.


