
1. Introduction
Thank you for choosing the FORGING MOUNT HY9281 Corner TV Wall Mount. This product is designed to securely hold flat or curved LED LCD TVs ranging from 26 to 65 inches, offering full motion capabilities including 90-degree rotation, swivel, and tilt. Its long extension arm and articulated design make it ideal for corner installations and flexible viewing angles. Please read this manual thoroughly before installation and use to ensure safe and correct operation.
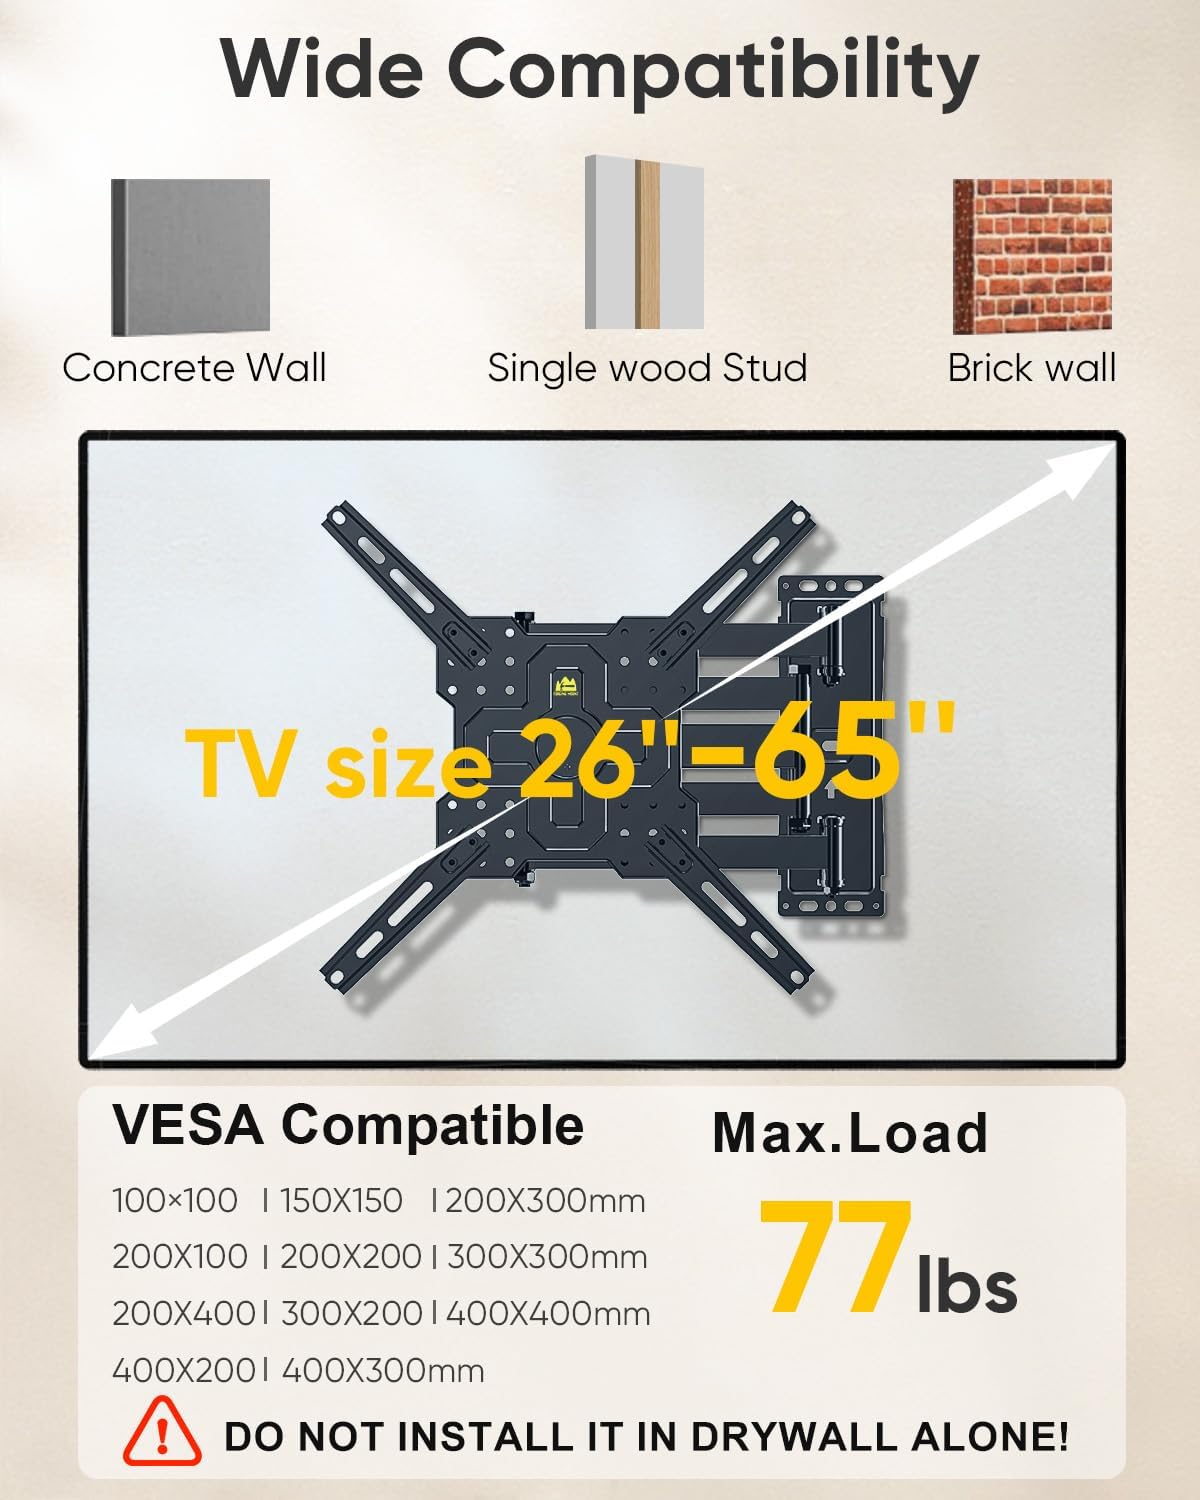
Image 1.1: FORGING MOUNT HY9281 Corner TV Wall Mount, showcasing its full motion design.
2. Safety Information
WARNING: Failure to read and follow these instructions may result in personal injury, property damage, or voiding of your warranty. If you do not understand these instructions or have doubts about the safety of the installation, please contact customer service or a qualified installer.
- This product is intended for installation on solid concrete walls, brick walls, or wood stud walls. DO NOT install on drywall alone.
- Ensure the mounting surface can safely support the combined weight of the mount and the television.
- Use a stud finder to locate wood studs accurately.
- Do not exceed the maximum weight capacity of 35 kg (77 lbs).
- Always use the provided mounting hardware. If your installation requires different hardware, consult a professional.
- Keep children and pets away during installation.
- Periodically check all screws and connections to ensure they remain secure.
3. Package Contents
Please verify that all components are present and undamaged before installation. Refer to the product packaging for a complete list of included hardware, which typically includes the wall plate, TV brackets, various screws, washers, spacers, and anchors for different wall types.
4. Specifications
| Feature | Specification |
|---|---|
| Model Number | HY9281 |
| TV Size Compatibility | 26 - 65 inches |
| VESA Compatibility | 75x75mm to 400x400mm |
| Weight Capacity | Up to 35 kg (77 lbs) |
| Arm Extension | 80mm (retracted) to 1035mm (extended) |
| Tilt Angle | +5° (up) / -10° (down) |
| Swivel Angle | Up to 180° (left/right) |
| Rotation | 90° (landscape to portrait) |
| Level Adjustment | +/-3° after installation |
| Material | Alloy Steel |
| Color | Black |
| Compatible Wall Types | Concrete Wall, Single Wood Stud, Brick Wall |

Image 4.1: Compatibility details including wall types, TV size range (26-65 inches), VESA patterns, and maximum load capacity (77 lbs).
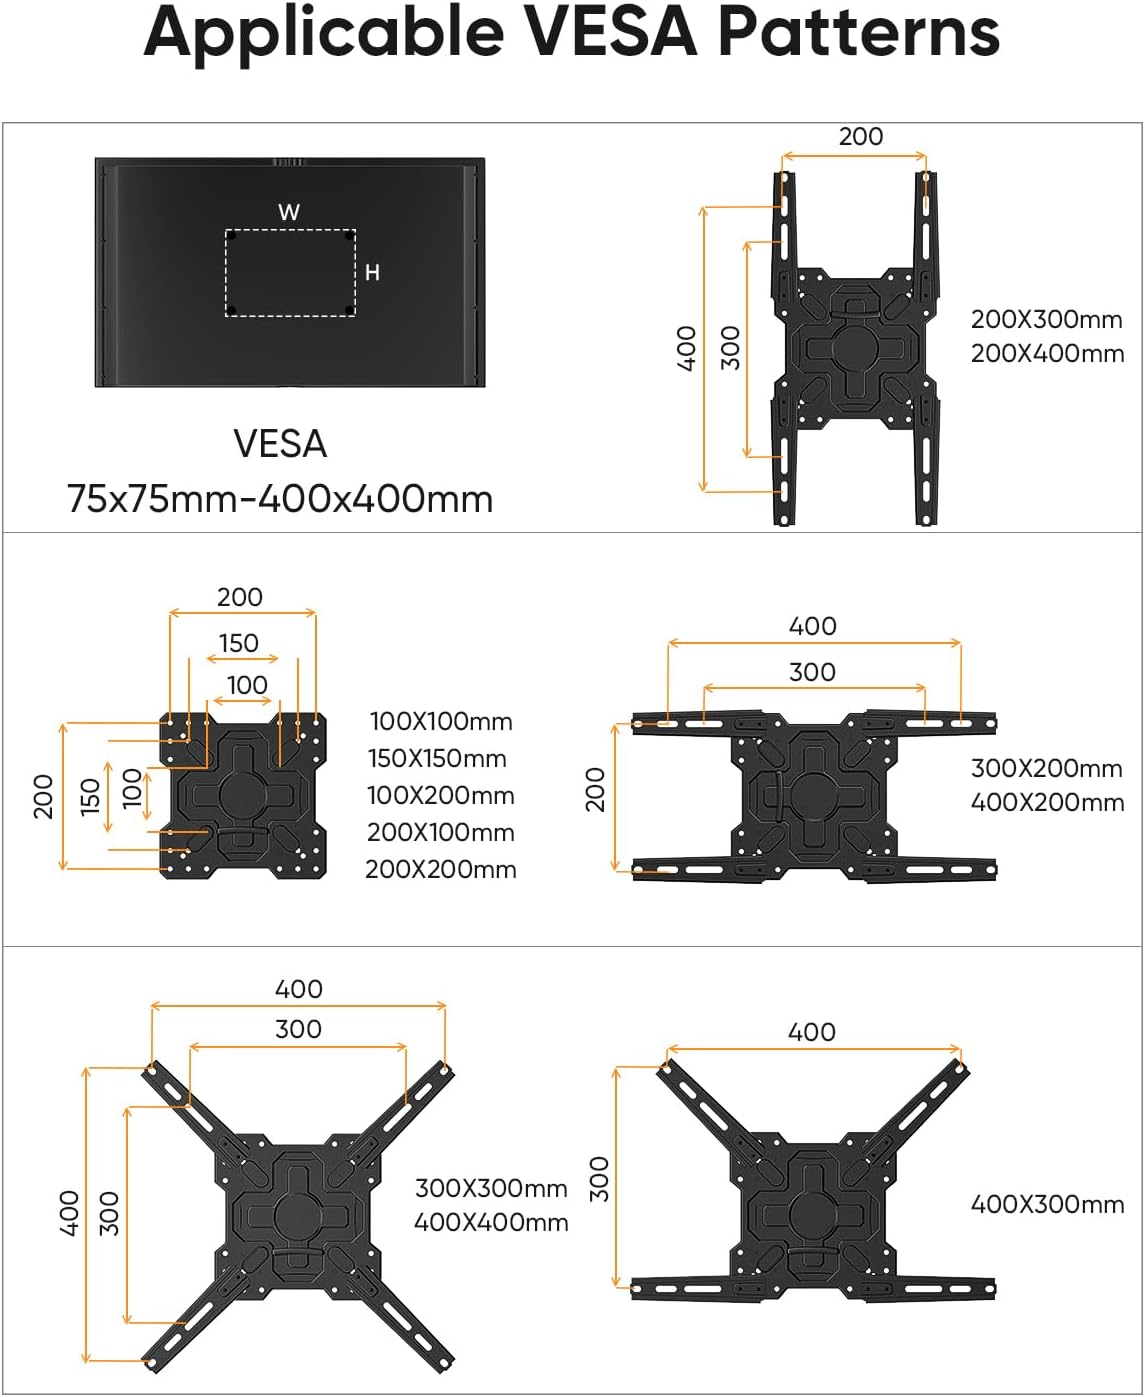
Image 4.2: Detailed diagrams of supported VESA mounting patterns from 75x75mm to 400x400mm.
5. Setup and Installation
Before beginning, ensure you have all necessary tools (e.g., drill, level, stud finder, screwdriver, wrench) and that your wall type is compatible. Follow the step-by-step instructions provided in the product packaging for detailed guidance.
5.1 Pre-Installation Checks
- Wall Type: Confirm your wall is concrete, brick, or a wood stud. Avoid drywall-only installations.
- Stud Location: Use a reliable stud finder to accurately locate the center of the wood stud if mounting to wood.
- TV Weight and Size: Ensure your TV is within the 26-65 inch range and weighs no more than 35 kg (77 lbs).
- VESA Pattern: Check the VESA mounting holes on the back of your TV. They should match one of the supported patterns (75x75mm to 400x400mm).
5.2 Mounting the Wall Plate
- Mark the desired height and position for the wall mount. Use a level to ensure accuracy.
- Drill pilot holes according to the wall plate's mounting pattern and your wall type.
- Secure the wall plate to the wall using the appropriate anchors and screws. Ensure it is firmly attached and level.
5.3 Attaching TV Brackets to the TV
- Carefully place your TV face down on a soft, clean surface.
- Attach the TV brackets to the back of your TV using the correct screws, washers, and spacers for your TV's VESA pattern. Do not overtighten.
5.4 Mounting the TV to the Wall Plate
- With assistance, carefully lift the TV with the attached brackets and hook them onto the wall plate.
- Secure the TV to the wall plate using the safety screws or locking mechanisms provided.

Image 5.1: Example of corner installation, demonstrating the mount's flexibility for optimal placement.
6. Operating Instructions (Adjustments)
The FORGING MOUNT HY9281 offers a range of adjustments to optimize your viewing experience.
6.1 Swivel Adjustment
Gently push or pull the TV to swivel it left or right. The mount allows for up to 180 degrees of swivel, depending on TV size and wall distance, enabling viewing from various positions in a room.

Image 6.1: Illustrates the 180-degree swivel capability, allowing the TV to be viewed from multiple angles.
6.2 Tilt Adjustment
The TV can be tilted +5 degrees upwards and -10 degrees downwards. Loosen the tilt adjustment knobs on the TV brackets, adjust to the desired angle to reduce glare or improve viewing, and then tighten the knobs to secure the position.
6.3 Level Adjustment
After installation, you can make a fine-tune level adjustment of +/-3 degrees to ensure the TV is perfectly horizontal. Refer to the product's specific instructions for the mechanism to adjust the level.

Image 6.2: Shows the tilt range (+5°/-10°) and the level adjustment feature.
6.4 90-Degree Rotation (Landscape to Portrait)
This mount supports a unique 90-degree rotation, allowing you to switch your TV between landscape and portrait orientations. This feature is useful for specific content viewing or digital signage applications. Carefully rotate the TV to the desired orientation.
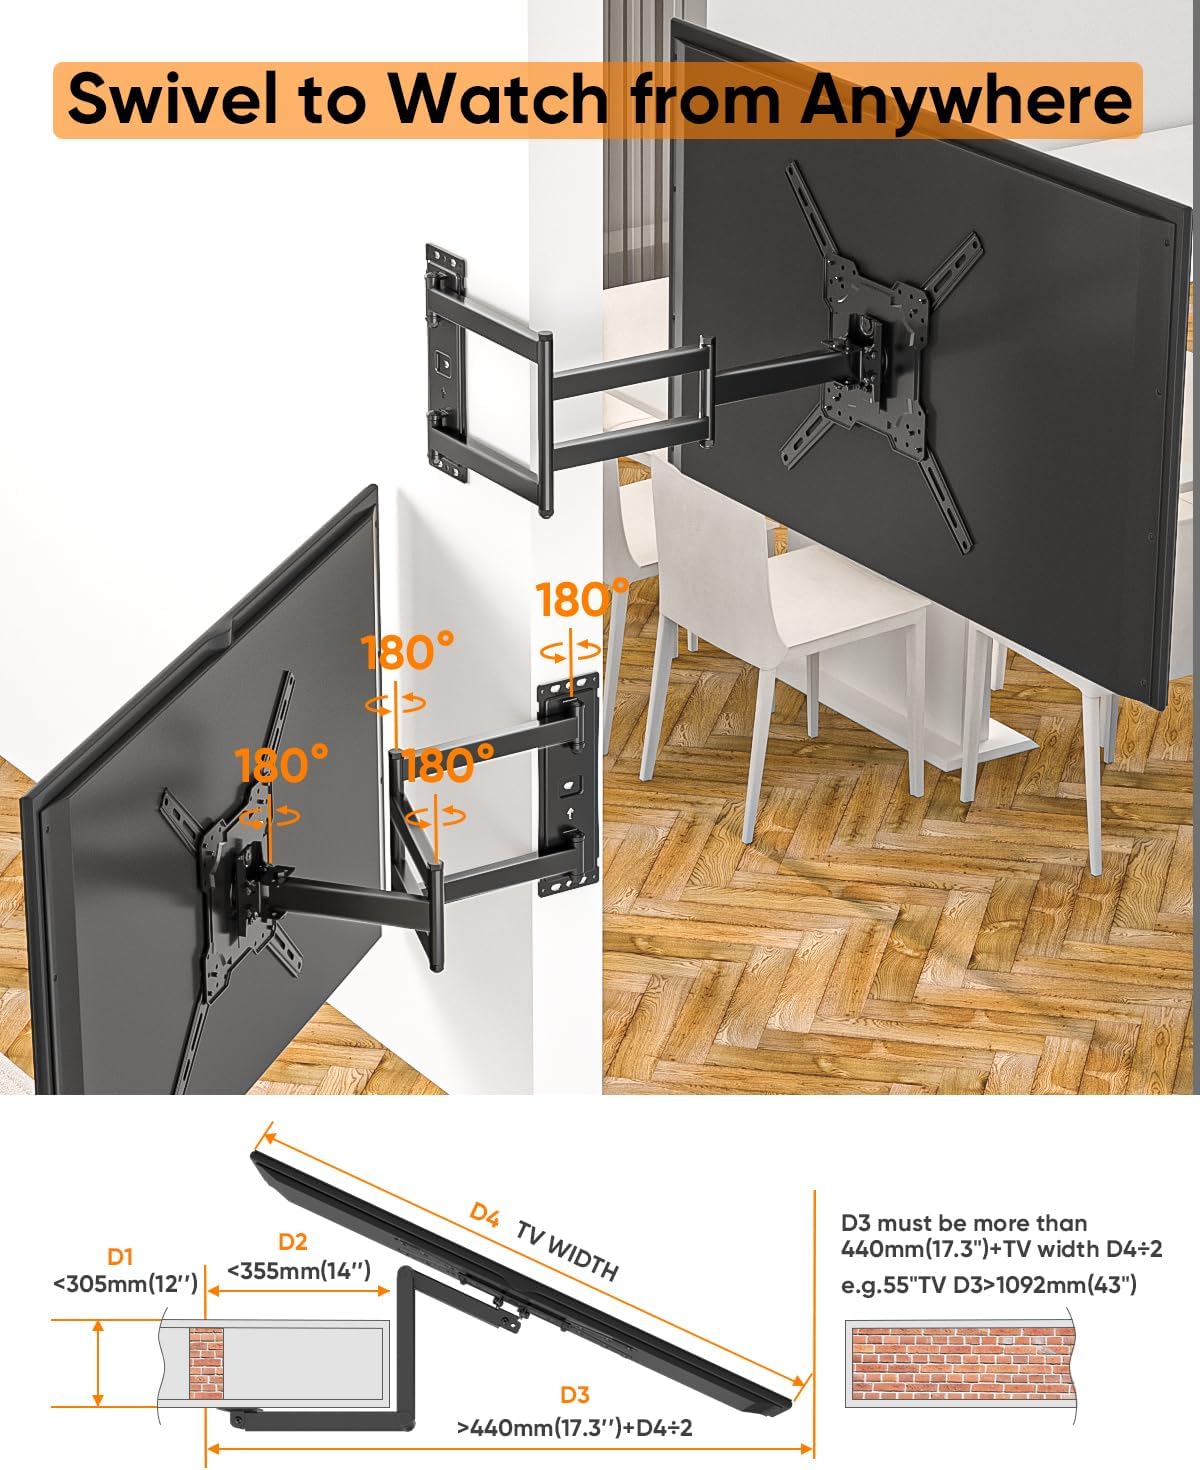
Image 6.3: Demonstrates the 90-degree rotation capability, allowing the TV to be oriented vertically.
6.5 Arm Extension and Retraction
The articulated arm can extend up to 1035mm from the wall and retract to a minimum of 80mm. Gently pull or push the TV to extend or retract the arm to your preferred viewing distance or to save space.

Image 6.4: Shows the mount retracted to minimize space, illustrating the 80mm minimum distance from the wall.
7. Maintenance
- Cleaning: Wipe the mount with a soft, dry cloth. Avoid abrasive cleaners or solvents.
- Inspection: Periodically (e.g., every 6 months) check all mounting screws and connections to ensure they are tight and secure.
- Lubrication: If the articulated arms become stiff or difficult to move, apply a small amount of silicone-based lubricant to the pivot points and joints. Avoid oil-based lubricants that may attract dust.
8. Troubleshooting
- TV is not level: Use the post-installation level adjustment feature (+/-3°) to correct the tilt. Ensure all mounting screws are tightened evenly.
- Mount is difficult to move: Check if any cables are snagged. If the joints are stiff, apply a small amount of silicone lubricant as described in the Maintenance section.
- Mount feels unstable: Immediately remove the TV from the mount. Re-check all wall and TV connections. Ensure the wall type is appropriate and that the weight capacity has not been exceeded. If unsure, consult a professional installer.
9. Warranty and Support
FORGING MOUNT products are manufactured with quality and durability in mind. This product typically comes with a 1-year warranty from the date of purchase, covering manufacturing defects. For specific warranty details, please refer to the documentation included with your product or contact FORGING MOUNT customer service.
If you have any questions, require assistance with installation, or need to report a missing/damaged part, please contact FORGING MOUNT customer support. Our team is dedicated to providing quick responses and support to meet your needs.


