
DAYBETTER CSG1215025-ASB3
DAYBETTER 50ft Solar String Lights User Manual
Model: CSG1215025-ASB3
Introduction
Thank you for choosing DAYBETTER 50ft Solar String Lights. This manual provides essential information for the safe and efficient use of your solar-powered outdoor lighting system. Please read these instructions carefully before installation and operation.

Image: Overview of the DAYBETTER 50ft Solar String Lights, including the string of 25 bulbs, solar panel, remote control, and mounting accessories.
Package Contents
Ensure all components are present before installation:
- 1 x 50ft String Lights with 25 G40 LED Bulbs (2700K Warm White)
- 1 x 5W Solar Panel with 5400mAh Battery
- 1 x Remote Control
- 1 x Spare G40 LED Bulb
- Mounting Accessories (Clip, Stake, Screws, Wall Anchors, Cable Ties)

Image: Detailed diagram illustrating the string light length, bulb spacing, individual bulb dimensions (1.7in width, 2.4in height), and key features of the solar panel including the USB port and power switch.
Setup and Installation
The DAYBETTER Solar String Lights are designed for easy installation without the need for electrical outlets. Follow these steps for optimal performance.
1. Solar Panel Placement
The solar panel must be placed in a location that receives a minimum of 6-8 hours of direct sunlight daily. This ensures the battery charges sufficiently for extended nighttime illumination.
- Optimal Angle: Adjust the solar panel to face the sun directly. The panel features a 180-degree adjustable bracket for flexible positioning.
- Avoid Obstructions: Ensure no shadows from trees, buildings, or other structures fall on the solar panel throughout the day.
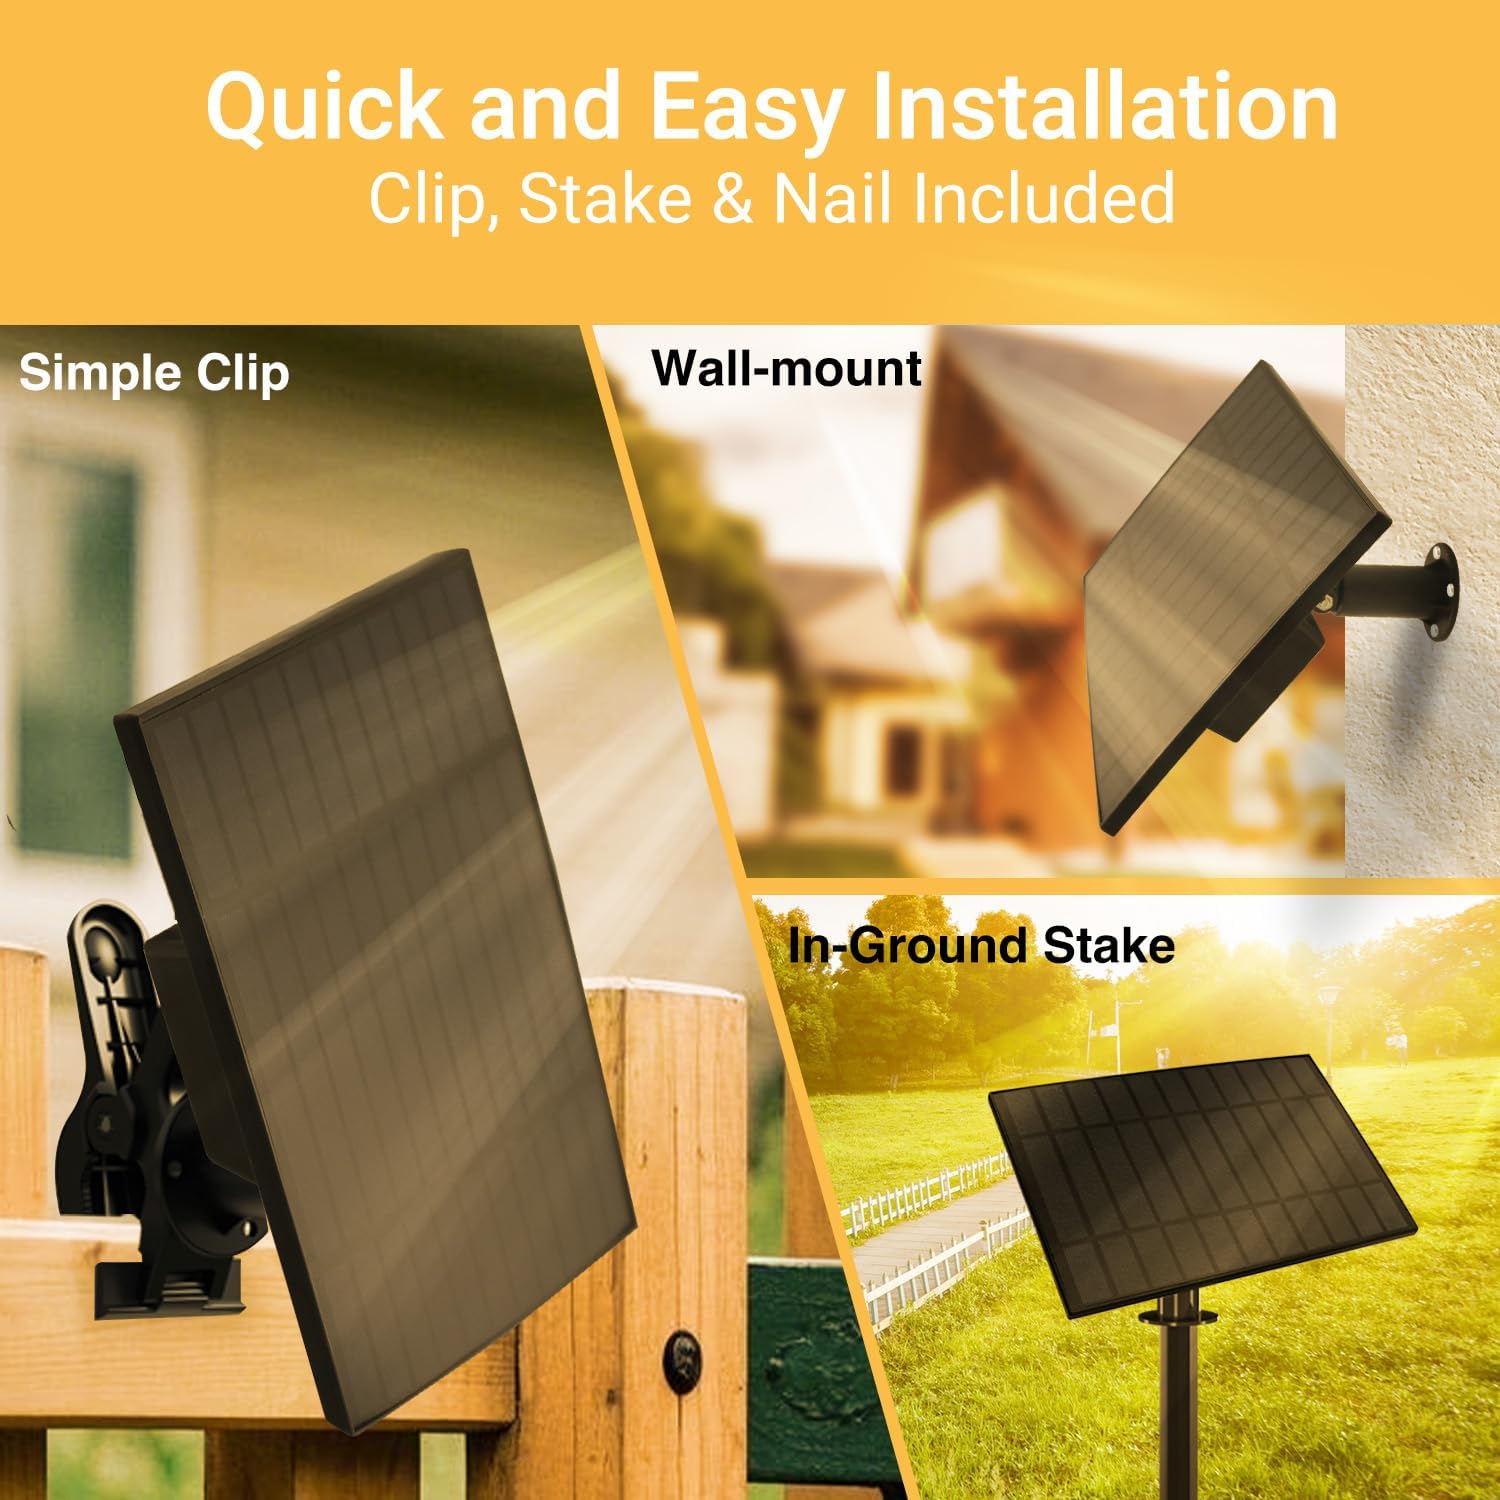
Image: Demonstrates three versatile installation options for the solar panel: attaching to a fence with a simple clip, mounting to a wall, and securing into the ground with a stake.

Image: Close-up of the solar panel showing its 180-degree adjustable bracket, allowing for optimal positioning towards sunlight.
2. Mounting the String Lights
The string lights can be effortlessly wrapped, hung, or staked. Each bulb socket includes a small hook for easy hanging.
- Hanging: Use the integrated hooks on each bulb socket to hang the string lights on wires, nails, or hooks.
- Wrapping: Wrap the string lights around trees, pergolas, or railings.
- Securing: Use the provided cable ties or other fasteners to secure the string in place, especially in windy areas.
3. Initial Charge
Before first use, ensure the solar panel is switched ON and allowed to charge in direct sunlight for a full day (8 hours). For faster initial charging or during prolonged cloudy periods, the solar panel also supports USB charging (approximately 4 hours).

Image: Illustrates the two charging methods for the solar panel: 8 hours via solar power and 4 hours via USB for faster charging or during low sunlight conditions.
Operating Instructions
The DAYBETTER Solar String Lights feature automatic operation and remote control functionality.
1. Power On/Off
- Manual Switch: Locate the ON/OFF switch on the back of the solar panel. Ensure it is in the 'ON' position for automatic operation.
- Automatic Operation: With the switch ON, the lights will automatically turn on at dusk and turn off at dawn, thanks to the integrated light-sensing technology.

Image: A detailed view of the solar panel's rear, highlighting the physical ON/OFF switch for manual control of the lighting system.

Image: Depicts the automatic functionality of the lights, showing them illuminating at night and turning off during daylight hours, powered by the solar panel.
2. Remote Control Functions
The included remote control allows for customization of lighting modes, brightness, and timing.
- Timing: Set the lights to operate for 6, 8, or 10 hours. After the set duration, the lights will automatically turn off.
- Dimming: Adjust brightness levels to 25%, 50%, 75%, or 100%.
- Lighting Modes: Choose from three modes:
- Breath Mode: Lights gently fade in and out.
- Flash Mode: Lights flash intermittently.
- Steady On: Lights remain continuously lit.
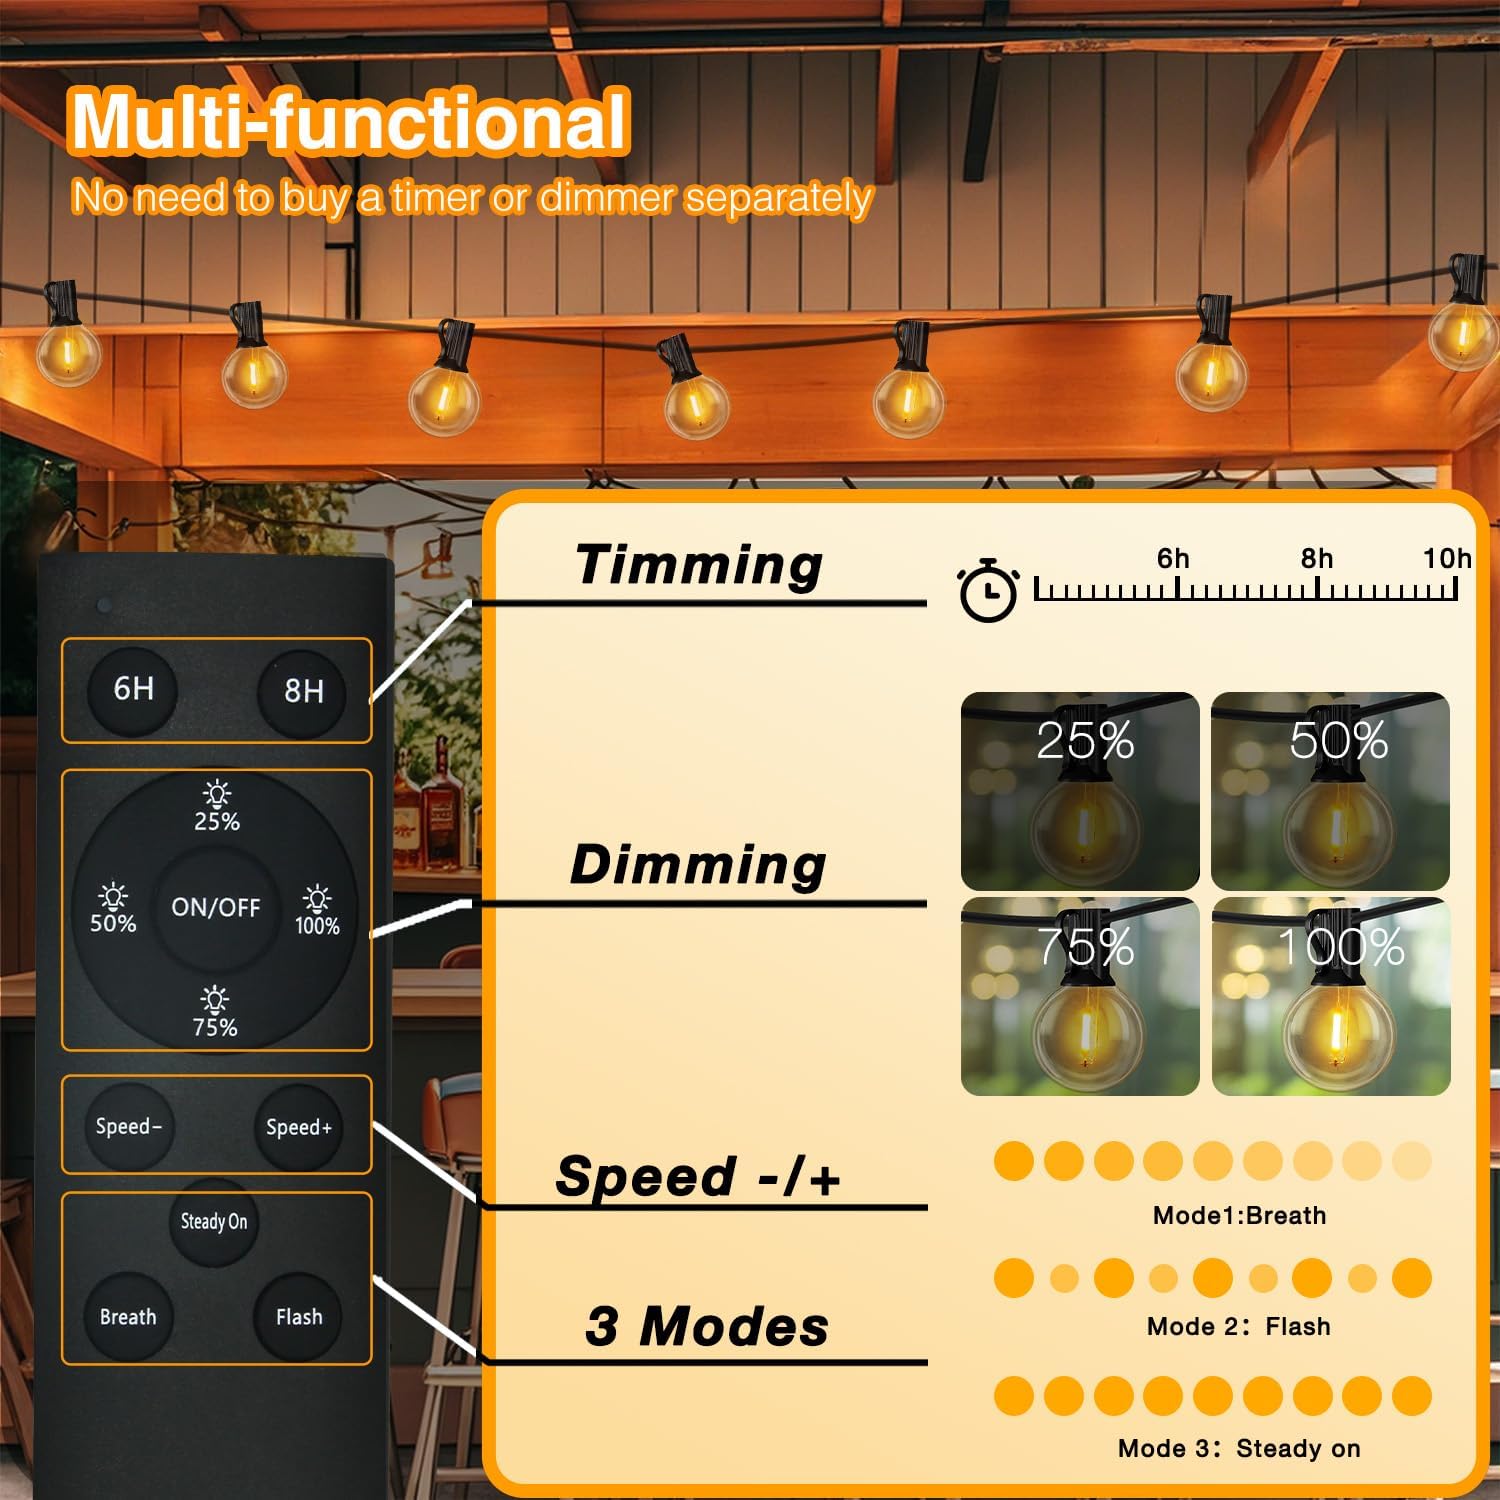
Image: A visual representation of the remote control, detailing buttons for setting timing (6H, 8H, 10H), adjusting brightness (25%, 50%, 75%, 100%), and selecting lighting modes (Breath, Flash, Steady On).

Image: Illustrates the brightness adjustment feature, with visual examples of the lights at 25%, 50%, 75%, and 100% intensity.

Image: Displays the timing function, indicating options for the lights to stay on for 6, 8, or 10 hours before automatically turning off.

Image: Shows examples of the three available lighting modes: Breath (fading), Flash (blinking), and Steady On (constant illumination).
3. Charging Indicator
The solar panel has an indicator light to show its status:
- Blue Light: Dusk to Dawn Lighting (normal operation).
- Red Light: Low power or during charging.
- Green Light: Fully charged.

Image: Close-up of the solar panel's indicator light, explaining the meaning of blue (dusk to dawn), red (low power or charging), and green (fully charged) light states.
Maintenance
The DAYBETTER Solar String Lights are designed for durability and minimal maintenance.
- Solar Panel Cleaning: Periodically wipe the solar panel with a soft, damp cloth to remove dust, dirt, or debris. A clean panel ensures maximum charging efficiency.
- Bulb Replacement: The G40 LED bulbs are shatterproof. In the event a bulb needs replacement, use the provided spare bulb or contact customer support for compatible replacements. Ensure the string is off before attempting to replace any bulb.
- Weather Resistance: The lights are IP65 waterproof and designed to withstand rain, snow, wind, and UV exposure. No special weather-related maintenance is typically required.

Image: Collage demonstrating the lights' resilience against various weather conditions: waterproof (rain), sunproof (bright sun), windproof (windy conditions), and snowproof (snowfall).
Troubleshooting
If you encounter issues with your DAYBETTER Solar String Lights, refer to the following common solutions:
| Problem | Possible Cause | Solution |
|---|---|---|
| Lights do not turn on at night. | Solar panel not receiving enough sunlight. Power switch is OFF. Insufficient initial charge. | Relocate solar panel to an area with direct sunlight for 6-8 hours daily. Ensure the ON/OFF switch on the solar panel is in the 'ON' position. Allow the solar panel to charge for a full day in direct sunlight or use USB charging for 4 hours. |
| Lights are dim or runtime is short. | Insufficient solar panel charge. Dirty solar panel surface. Prolonged cloudy weather. | Ensure solar panel is in direct sunlight. Clean the solar panel surface regularly. Use USB charging to fully charge the battery during extended cloudy periods. |
| Remote control not working. | Battery in remote is depleted. Obstruction between remote and solar panel. | Replace the remote control battery. Ensure a clear line of sight between the remote and the solar panel. |
| Individual bulb not lighting up. | Damaged or loose bulb. | Carefully check if the bulb is securely screwed in. Replace with the spare bulb if damaged. |
Specifications
Detailed technical specifications for the DAYBETTER 50ft Solar String Lights:
| Feature | Detail |
|---|---|
| Model Number | CSG1215025-ASB3 |
| String Length | 50 feet |
| Number of Bulbs | 25 + 1 Spare |
| Bulb Type | G40 LED |
| Light Color | 2700K Warm White |
| Solar Panel Power | 5W |
| Battery Capacity | 5400mAh |
| Charging Time (Solar) | 8 hours (direct sunlight) |
| Charging Time (USB) | 4 hours |
| Illumination Time | 8-12 hours (on full charge) |
| Water Resistance | IP65 Waterproof |
| Special Features | Shatterproof bulbs, Auto On/Off, Remote Control (Timing, Dimming, 3 Modes) |
| Material | LED (bulbs) |
| Item Weight | 2.7 pounds |
| Package Dimensions | 10.71 x 6.77 x 6.65 inches |

Image: Details the solar panel's high capacity (5400mAh battery, 5 Watts enhanced power) and efficient 21.5% conversion rate, contributing to over 20 hours of illumination on a full charge.

Image: A comparative graphic illustrating the advantages of the G40 LED bulbs (0.3W, energy-saving, plastic, shatterproof) over traditional incandescent bulbs (5W, not energy-saving, glass, not shatterproof).
Warranty Information
Specific warranty details for the DAYBETTER 50ft Solar String Lights are not provided in this manual. For information regarding warranty coverage, duration, and claims, please refer to the product packaging or contact DAYBETTER customer support directly.
Customer Support
For further assistance, technical support, or inquiries about your DAYBETTER Solar String Lights, please contact DAYBETTER customer service through their official website or the contact information provided on the product packaging.
Ask a question about this manual
Ask about setup, troubleshooting, compatibility, parts, safety, or missing instructions. Manuals+ will review the question and use this page’s manual context to help answer it.