1. Product Overview
The PROAIM Zoom Controller P-ZC-IF01 is a compact, ultra-slim remote lens controller designed for DV camcorders equipped with a 2.5mm jack. It provides comprehensive control over essential camera functions including zoom, focus, recording, and iris adjustments. The controller features intuitive thumb control for smooth zoom ramping and a side-mounted speed adjuster knob for precise zoom progression. Dedicated buttons allow for real-time adjustments, and an LED indicator provides visual feedback on button activity. Its built-in clamp plate facilitates easy mounting on various camera rigs and stabilizers with a 30mm diameter.
2. What's in the Box
Please verify that all items listed below are included in your package:
- Lanc Zoom Controller
- 1-meter Wire
- 15-meter Wire
- Clamp Plate
- 2 x Allen Bolts (Size - 5 x 59mm)
3. Setup Instructions
3.1 Mounting the Controller
The PROAIM Zoom Controller features a built-in clamp plate for secure attachment to various camera support systems.
- Identify a suitable mounting point on your tripod pan bar, camera handle, or stabilizer. The clamp is designed to fit diameters up to 30mm.
- Loosen the clamp using the provided Allen bolts if necessary.
- Position the controller's clamp around the desired bar or handle.
- Tighten the Allen bolts to secure the controller firmly in place. Ensure it is stable and does not rotate or slide during operation.

Image: The PROAIM Zoom Controller mounted on a tripod pan bar, demonstrating its secure attachment mechanism. The clamp fits bars up to 30mm in diameter.
3.2 Connecting to Your Camcorder
The controller connects to your DV camcorder via a 2.5mm TRS (LANC) input jack.
- Locate the 2.5mm LANC input jack on your DV camcorder.
- Select the appropriate cable length (1-meter or 15-meter) based on your setup requirements.
- Insert one end of the 2.5mm cable into the input port on the PROAIM Zoom Controller.
- Insert the other end of the 2.5mm cable into the LANC input jack on your camcorder.
- Ensure both connections are secure.
Note: Compatibility with certain functions may vary depending on the specific camcorder model. Refer to your camcorder's manual for LANC compatibility details.

Image: A hand connecting the 2.5mm TRS cable into the input jack of the PROAIM Zoom Controller, highlighting the wide camera compatibility.
4. Operating Instructions
The PROAIM Zoom Controller provides intuitive controls for various camera functions. Familiarize yourself with the button layout and their respective functions.
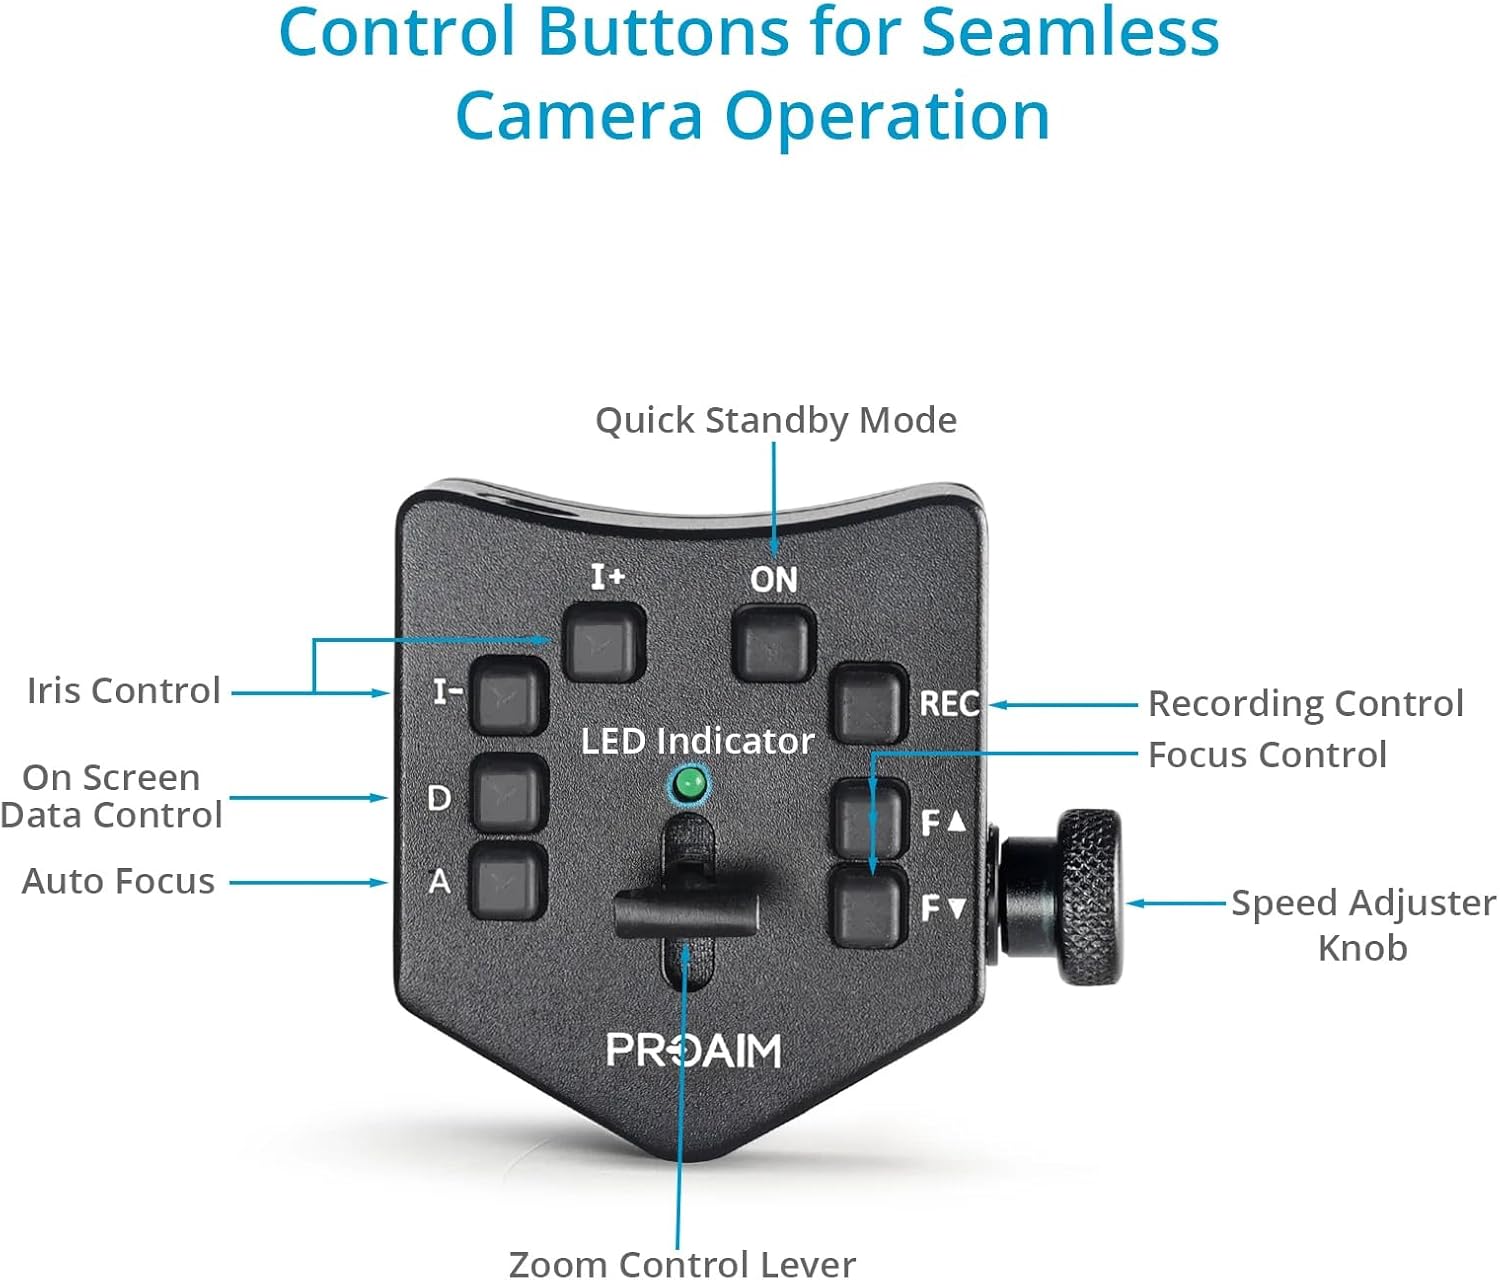
Image: A detailed diagram illustrating the control buttons on the PROAIM Zoom Controller and their corresponding functions for seamless camera operation.
4.1 Power On/Off and Standby
- ON Button: Press this button to power on the controller.
- Quick Standby Mode: The controller features a quick standby mode to conserve power when not actively in use.
4.2 Zoom Control
- Zoom Control Lever: Push the lever forward for telephoto zoom (zoom in) and pull it backward for wide-angle zoom (zoom out). The further you push/pull, the faster the zoom speed.
- Speed Adjuster Knob: Rotate this knob on the side of the controller to precisely set the maximum zoom speed. This allows for fine-tuning of zoom progression.
4.3 Recording Control
- REC Button: Press this button once to start recording. Press it again to stop recording.
4.4 Iris Control
- I+ Button: Press to increase the iris (open aperture), allowing more light into the lens.
- I- Button: Press to decrease the iris (close aperture), allowing less light into the lens.
4.5 Focus Control
- FA Button: Press to adjust focus further away (infinity).
- FV Button: Press to adjust focus closer (macro).
- A Button (Auto Focus): Press to engage or disengage the camcorder's auto-focus function.
4.6 On-Screen Data Control
- D Button: Press this button to hide or display on-screen data from your camcorder's display.
4.7 LED Indicator
The integrated LED indicator provides visual confirmation of button activity and controller status.

Image: A close-up view of the PROAIM Zoom Controller, highlighting the green LED indicator which shows button activity and operational status.
5. Maintenance
To ensure the longevity and optimal performance of your PROAIM Zoom Controller, follow these maintenance guidelines:
- Cleaning: Use a soft, dry cloth to clean the exterior of the controller. Avoid using harsh chemicals, solvents, or abrasive materials, as these can damage the finish or internal components.
- Storage: When not in use, store the controller in a clean, dry place, away from direct sunlight, extreme temperatures, and high humidity.
- Cable Care: Avoid kinking or sharply bending the connection cables. Store them neatly coiled to prevent damage.
- Inspection: Periodically inspect the cables and connectors for any signs of wear or damage. If any damage is found, discontinue use and contact support.
6. Troubleshooting
If you encounter issues with your PROAIM Zoom Controller, please refer to the following common troubleshooting steps:
- Controller Not Responding:
- Ensure the controller is powered on (check the ON button and LED indicator).
- Verify that the 2.5mm cable is securely connected to both the controller and the camcorder.
- Check if your camcorder's LANC port is enabled or functioning correctly.
- Specific Functions Not Working (e.g., Iris, Focus):
- Confirm that your camcorder model supports remote control of these specific functions via its 2.5mm LANC port. Compatibility can vary.
- Ensure the camcorder is not in a mode that overrides remote control (e.g., full auto mode for iris/focus).
- Zoom Speed Inconsistent:
- Adjust the side-mounted Speed Adjuster Knob to fine-tune the zoom speed.
- Ensure the zoom control lever is being moved smoothly and consistently.
- LED Indicator Not Lighting Up:
- Ensure the controller is powered on.
- If the issue persists after checking connections and power, contact customer support.
If these steps do not resolve your issue, please refer to the Warranty & Support section for further assistance.
7. Specifications
| Feature | Specification |
|---|---|
| Construction | High-Grade CNC Aluminum |
| Compatible Cameras | DV Camcorders with 2.5mm Jack |
| Control Features | Zoom Control, Zoom Speed Control, Start/Stop Recording, Iris Control, Focus Control, Auto Focus Control |
| Connectivity Inputs/Outputs | 1x 2.5 mm TRS Input |
| Cable Lengths | 1-meter, 15-meter |
| Mounting Clamping Range | Up to 30mm |
| Attachment Method | Rod Clamp |
| Product Weight (without Packaging) | 0.475 kg / 1.05 lb |
| Gross Weight (with Packaging) | 0.56 kg / 1.23 lb |
| Item Model Number | P-ZC-IF01 |
| Color | Black |
8. Warranty & Support
PROAIM stands behind the quality of its products. This product comes with a 100% Customer Satisfaction Guarantee. For any technical assistance, troubleshooting, or warranty claims, please contact PROAIM customer support through their official channels. Please retain your proof of purchase for warranty validation.


