1. Product Overview
The KAWA Dash Cam Hardwire Kit (Model PT01) provides a continuous power supply to your compatible dash camera, enabling features such as 24-hour parking monitoring and low voltage protection. This kit is designed for use with KAWA D11, MINI 3, and MINI 3Pro dash cameras in vehicles with a 12V or 24V power system.
This hardwire kit connects directly to your vehicle's fuse box, ensuring a stable power source without occupying the cigarette lighter socket.
2. Package Contents
- KAWA Dash Cam Hardwire Kit (Type-C connector)
Please inspect all components upon unboxing. If any items are missing or damaged, contact customer support.
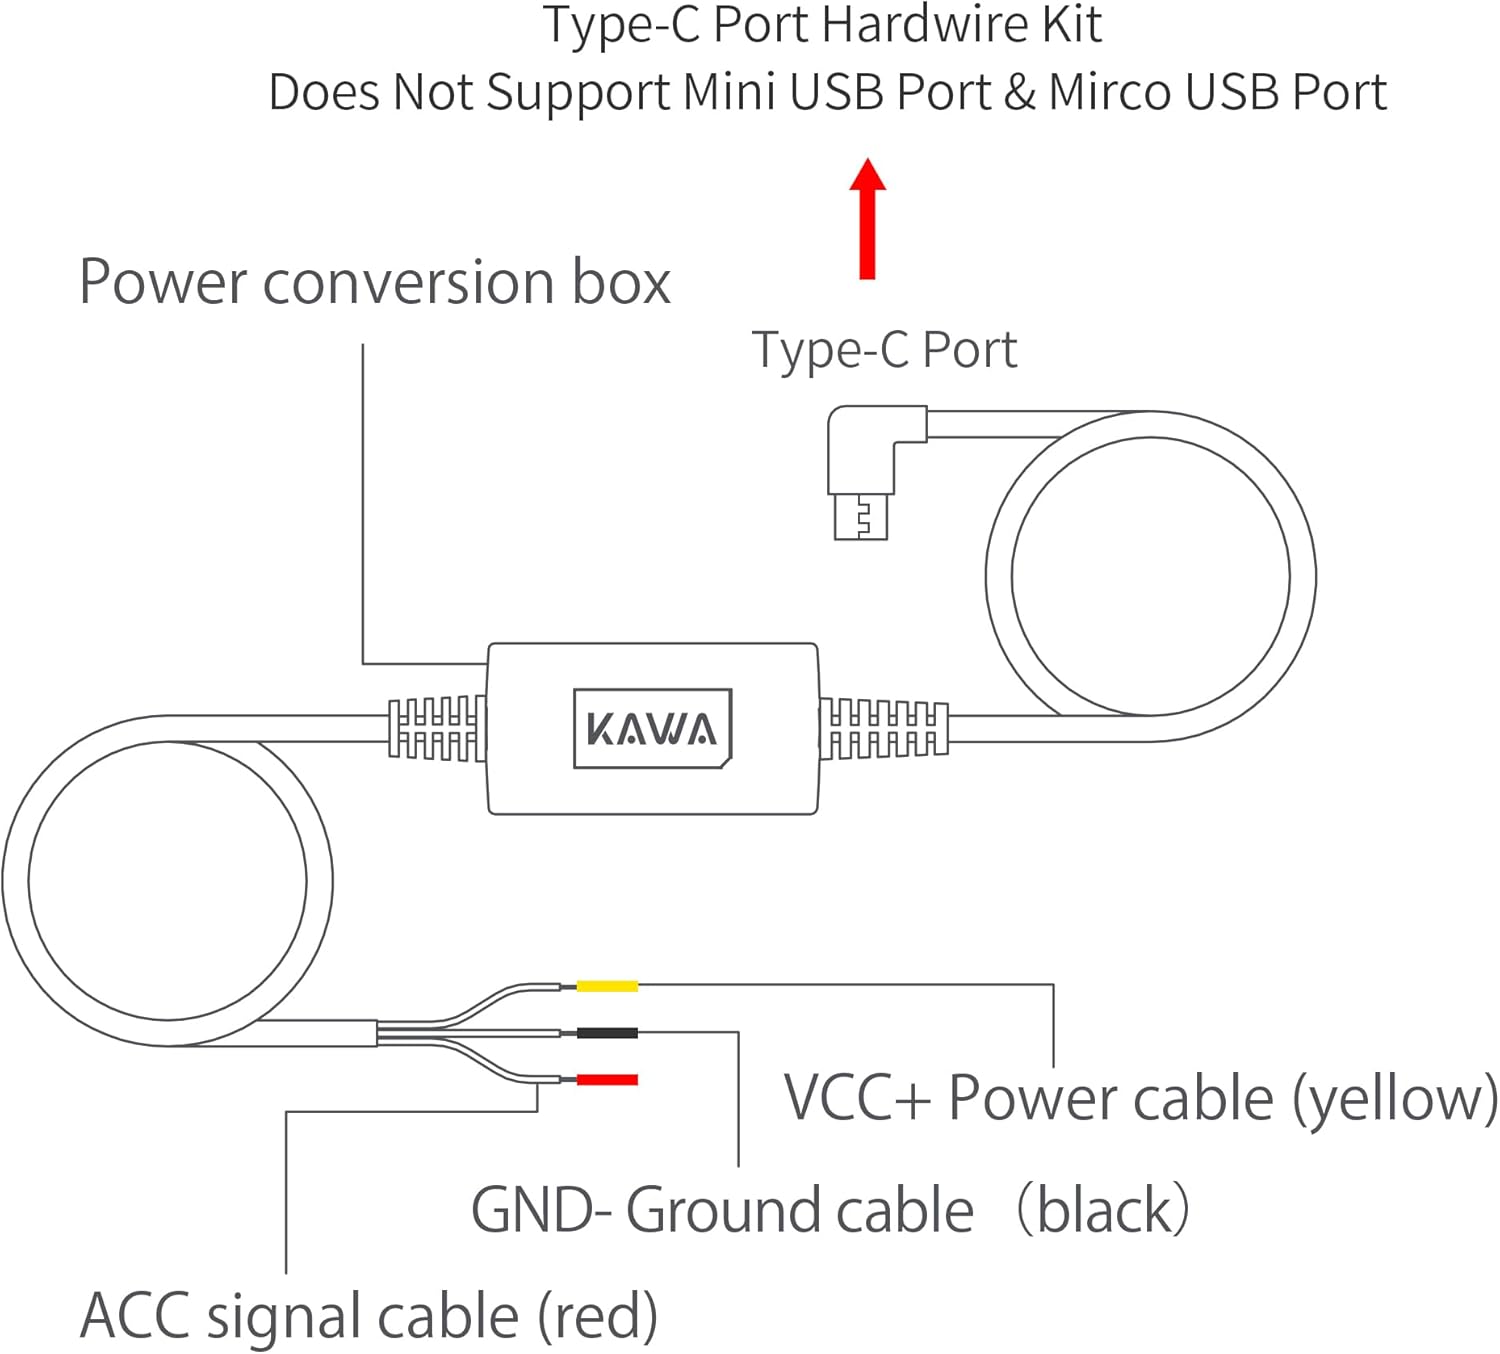
Image: The KAWA Dash Cam Hardwire Kit packaging, showing the hardwire cable and the KAWA brand logo.
3. Installation Guide
Before beginning installation, ensure your vehicle is turned off and the ignition key is removed. It is recommended to disconnect the vehicle's battery to prevent electrical shorts during installation. If you are unsure about any steps, consult a professional.
3.1 Compatibility Check
This hardwire kit features a Type-C USB connector. It is not compatible with dash cameras requiring Mini USB or Micro USB power inputs.

Image: Diagram illustrating the Type-C connector of the hardwire kit and explicitly showing incompatibility with Mini USB and Micro USB connectors.
3.2 Wiring Diagram
The hardwire kit consists of three wires for connection to your vehicle's fuse box:
- VCC+ (Yellow Wire): Connects to a constant power fuse (12V or 24V) that remains active even when the vehicle is off.
- ACC (Red Wire): Connects to an accessory power fuse that is only active when the vehicle's ignition is on.
- GND- (Black Wire): Connects to a metal ground point on the vehicle chassis or a ground bolt in the fuse box area.

Image: A detailed diagram showing the hardwire kit's control box, Type-C output, and the three input wires (yellow VCC+, red ACC, black GND-).

Image: A close-up view of the hardwire kit's three wires: yellow (VCC+), red (ACC), and black (GND-).
3.3 Connecting to the Fuse Box
- Locate your vehicle's fuse box: This is typically found under the dashboard, in the glove compartment, or in the engine bay. Refer to your vehicle's owner's manual for the exact location.
- Identify appropriate fuses:
- VCC+ (Yellow Wire): Use a multimeter or test light to find a fuse that provides 12V or 24V constant power even when the ignition is off. This is crucial for parking monitoring.
- ACC (Red Wire): Find a fuse that receives power only when the ignition is on (e.g., radio, accessory outlet).
- Connect the wires:
- Connect the yellow VCC+ wire to the chosen constant power fuse using a fuse tap (not included).
- Connect the red ACC wire to the chosen accessory power fuse using a fuse tap.
- Connect the black GND- wire to a clean, unpainted metal bolt or screw on the vehicle's chassis for a secure ground connection.

Image: A diagram illustrating the connection points for the VCC+ (yellow), ACC (red), and GND- (black) wires within a vehicle's fuse box.

Image: A view of a vehicle's fuse box, typically located under the dashboard, indicating where connections are made.
3.4 Cable Routing
Carefully route the hardwire cable from the fuse box to your dash camera's mounting location. Tuck the cable along the edges of the dashboard, A-pillar, and headliner to keep it hidden and secure, preventing interference with driving controls or airbags.

Image: An illustration demonstrating how to route the parking monitor cable neatly along the vehicle's interior trim, from the fuse box to the dash cam location.
3.5 Connect to Dash Cam
Once the hardwire kit is securely installed and routed, connect the Type-C end of the hardwire kit to the power input port on your compatible KAWA dash camera.

Image: A dash camera mounted on the vehicle's windshield, showing the hardwire kit connected and neatly tucked away.
4. Operating Features
4.1 24-Hour Parking Monitoring
When connected via the hardwire kit, your dash camera can continuously monitor your vehicle even when the ignition is off. This feature typically utilizes time-lapse recording to conserve storage space and can trigger emergency recordings upon detecting significant impacts (G-Sensor activation).

Image: A graphic depicting 24-hour parking monitoring, showing a car under both day and night conditions, with a '24h' shield icon indicating continuous surveillance.

Image: A view from inside a car in a parking garage, with the text '24hours' overlaid, emphasizing continuous monitoring.
4.2 Low Voltage Protection
The hardwire kit includes built-in low voltage protection. This feature automatically cuts off power to the dash camera if your vehicle's battery voltage drops below a safe threshold (typically 11.8V). This prevents the dash camera from draining your car battery completely, ensuring your vehicle can still start.

Image: A graphic illustrating the low voltage protection feature, showing a car on a road and a battery icon indicating automatic power cut-off when voltage is below 11.8V.

Image: A simplified wiring diagram showing the hardwire kit's control box connected to a 12-24V power source and a dash camera, illustrating the power flow.
5. Maintenance
The KAWA Dash Cam Hardwire Kit requires minimal maintenance. To ensure optimal performance:
- Periodically check all connections to the fuse box and the dash camera to ensure they remain secure.
- Inspect the cable for any signs of wear or damage. If damage is found, replace the kit immediately.
- Ensure the fuse taps are correctly seated and the fuses are intact.
6. Troubleshooting
If you encounter issues with your hardwire kit, refer to the following troubleshooting steps:
6.1 Dash Cam Not Powering On
- Check Fuse Connections: Ensure the yellow (VCC+) and red (ACC) wires are securely connected to their respective fuses in the fuse box.
- Verify Fuses: Check if the fuses used with the fuse taps are blown. Replace if necessary.
- Ground Connection: Confirm the black (GND-) wire has a solid connection to a metal ground point on the vehicle chassis.
- Dash Cam Connection: Ensure the Type-C connector is fully inserted into the dash camera's power port.
- Vehicle Battery Voltage: If the vehicle battery is low, the low voltage protection may prevent the dash cam from powering on. Charge your vehicle's battery.
6.2 Parking Monitoring Not Working
- Constant Power (VCC+): Double-check that the yellow VCC+ wire is connected to a fuse that provides constant power even when the ignition is off. This is essential for parking mode.
- Dash Cam Settings: Ensure parking monitoring mode is enabled in your dash camera's settings. Refer to your dash camera's manual for specific instructions.
- Low Voltage Protection: If your car battery voltage is too low, the hardwire kit will cut power to protect the battery, disabling parking monitoring.
If problems persist after performing these checks, contact KAWA customer support.
7. Specifications
| Feature | Specification |
|---|---|
| Model Number | PT01 |
| Input Voltage | DC 12V - 24V |
| Output Connector | Type-C USB |
| Cable Length | 3.5 meters (11.5 feet) |
| Low Voltage Protection | Automatic cut-off below 11.8V |
| Product Dimensions | 5.5 x 2 x 2.2 inches (Control Box) |
| Item Weight | 4.6 ounces |
| Manufacturer | KAWA |
| Compatible Dash Cams | KAWA D11, MINI 3, MINI 3Pro (with Type-C port) |
8. Warranty and Support
For warranty information and customer support, please refer to the documentation included with your purchase or visit the official KAWA website. You can also contact KAWA customer service through their Amazon store page:


