
1. Introduction
The LAUNCH X431 Creader 5011 V2 is a comprehensive diagnostic tool designed for automotive professionals and enthusiasts. It integrates advanced Tire Pressure Monitoring System (TPMS) functions, standard On-Board Diagnostics II (OBDII) capabilities, and 12 essential reset services. This device supports activation, reading, relearning, and programming of 315MHz and 433MHz TPMS sensors, offers full OBDII engine diagnostics, and provides various maintenance resets. Operating on Android 8.1, it features Wi-Fi connectivity for lifetime free software updates, ensuring broad vehicle compatibility and up-to-date functionality.

Image: The LAUNCH X431 Creader 5011 V2 device, along with its included diagnostic cable, charging cable, and user manual.
2. What's in the Box
Upon unboxing your LAUNCH X431 Creader 5011 V2, please verify that all the following items are present:
- Diagnostic equipment (Main unit)
- Charging data cable
- Diagnostic mainline (OBDII cable)
- Instructions (User Manual)
3. Setup
- Initial Charging: Connect the device to a power source using the provided charging data cable. Ensure the device is fully charged before first use.
- Power On: Press and hold the power button to turn on the device. Follow the on-screen prompts for initial setup, including language selection.
- Wi-Fi Connection: Navigate to 'Settings' on the device and connect to an available Wi-Fi network. This is crucial for software updates and accessing online features.
- Software Update: After connecting to Wi-Fi, go to the 'Upgrade' section to check for and install the latest software updates. Regular updates ensure optimal performance and expanded vehicle coverage.
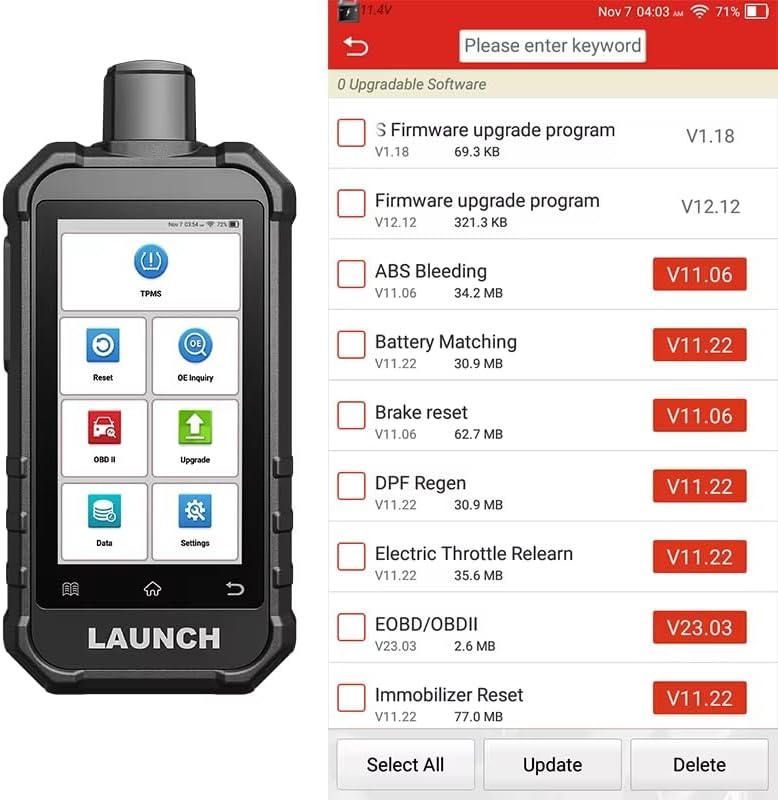
Image: The device display showing available firmware and diagnostic software updates, ready for selection and installation.
4. Operating Instructions
4.1. TPMS Functions
The Creader 5011 V2 provides comprehensive TPMS services for 315MHz and 433MHz sensors.
- Sensor Activation: Easily activate most OEM 315/433MHz TPMS sensors to read sensor ID, tire pressure, and temperature.
- Sensor Reading: Read sensor data directly from the activated sensors.
- TPMS Relearn: Supports three relearn methods: OBD Relearn, Automatic Relearn, and Stationary Relearn. This registers new sensor IDs to the vehicle's ECU.
- Sensor Programming: Program LAUNCH LTR-03 sensors using various methods including automatic creation, manual creation, OBD copy ID, and active copy ID. Note: This feature is exclusive to LAUNCH LTR-03 sensors.
- TPMS Diagnostics: Perform a comprehensive health check of the TPMS system and turn off TPMS Malfunction Indicator Lamps (MILs).

Image: The device displaying TPMS functions, including support for 315/433MHz sensors, 99% vehicle coverage, sensor check, activation, diagnosis, relearn, OE number check, read/write sensor ID, and warning light turn-off.
TPMS Operation Steps
- Select vehicle brand, series, and year.
- Activate and detect all four sensors.
- Replace any faulty sensors as needed.
- Measure tire pressure.
- View process description for guidance.
- Activate all four tire sensors again.
- Connect the vehicle with the OBDII diagnostic mainline.
- Perform learning process to register sensor IDs into the TPMS ECU.
- Conduct an on-road test to confirm proper operation.

Image: Detailed screenshots illustrating the step-by-step process for TPMS activation, programming, and learning on the device interface.
4.2. Standard OBDII/EOBD Functions
The device supports all 10 modes of OBDII/EOBD tests for engine systems.
- Read Codes: Retrieve generic (P0, P2, P3, and U0), manufacturer specific (P1, P3, and U1) codes, and pending codes.
- Clear Codes: Erase Diagnostic Trouble Codes (DTCs) and reset the Check Engine Light (MIL).
- I/M Readiness: Check the readiness status of emission-related monitors.
- Data Stream: View live data parameters from the vehicle's sensors in real-time.
- View Freeze Frame Data: Display a snapshot of operating conditions at the time an emission-related fault occurred.
- O2 Sensor Test: Retrieve O2 sensor monitor test results.
- Vehicle Information: Retrieve vehicle identification number (VIN), calibration ID, and calibration verification number (CVN).
Note: Standard OBD software is primarily for gasoline vehicle engines and does not support diagnosis of other gasoline vehicle systems or JOBD diagnosis for Japanese brand car engines.
4.3. 12 Service Reset Functions
The Creader 5011 V2 offers 12 commonly used maintenance reset functions:
- Brake Reset
- Oil Reset
- Battery Reset
- SAS (Steering Angle Sensor) Reset
- ABS Bleeding
- Throttle Reset
- DPF (Diesel Particulate Filter) Regeneration
- Injector Coding
- Seats Calibration
- Sunroof Reset
- Windows Calibration
- IMMO (Immobilizer) Reset

Image: Visual representation of the 12 service reset functions, each with an illustrative icon, including Brake Reset, Oil Reset, Battery Reset, SAS Reset, ABS Bleeding, Throttle Reset, DPF Regeneration, IMMO Reset, Injector Coding, Seats Calibration, Sunroof Reset, and Windows Calibration.
5. Maintenance
- Software Updates: Regularly connect the device to Wi-Fi and check for software updates in the 'Upgrade' section. This ensures access to the latest vehicle models, diagnostic functions, and bug fixes.
- Cleaning: Use a soft, dry cloth to clean the device. Avoid using abrasive cleaners or solvents that could damage the screen or casing.
- Storage: Store the device in a cool, dry place, away from direct sunlight and extreme temperatures.
- Battery Care: For optimal battery life, avoid fully discharging the device frequently. Charge it regularly, especially if storing for extended periods.
6. Troubleshooting
- Device Not Powering On: Ensure the device is sufficiently charged. Connect it to the charging cable and allow it to charge for at least 30 minutes before attempting to power it on again.
- Connection Issues (OBDII): Verify that the diagnostic mainline is securely connected to both the device and the vehicle's OBDII port. Ensure the vehicle's ignition is on.
- Wi-Fi Connection Failure: Check your Wi-Fi network settings and ensure the password is correct. Try restarting the device and your Wi-Fi router.
- Software Update Problems: Ensure a stable Wi-Fi connection during updates. If an update fails, try restarting the device and attempting the update again. Contact support if issues persist.
- Inaccurate Readings/Functions: Ensure the vehicle's ignition is on and the device is properly connected. For TPMS, confirm sensors are activated and relearned correctly.
If you encounter issues not covered here, please refer to the detailed instructions within the device's software or contact customer support.
7. Specifications
| Feature | Specification |
|---|---|
| Brand | LAUNCH |
| Model | Creader TPMS 5011 V2 |
| Product Dimensions | 9.8"L x 6.9"W x 3"H |
| Operating System | Android |
| Automotive Fit Type | Universal Fit |
| Item Weight | 1.75 pounds |
| Batteries | 1 P76 battery required (included) |
| UPC | 884508004490 |
8. Warranty and Support
The LAUNCH X431 Creader 5011 V2 comes with a 2-year warranty, ensuring peace of mind regarding product quality and performance. LAUNCH provides dedicated customer support with 7*24 technical assistance to address any inquiries or issues you may encounter.
For further assistance or to explore other LAUNCH products, please visit the official LAUNCH Store.


