Introduction
Thank you for choosing the DreamSky Wooden Digital Alarm Clock. This manual provides essential information for setting up, operating, and maintaining your new alarm clock. Please read these instructions carefully before use and retain them for future reference.

Figure 1: Front view of the DreamSky Wooden Digital Alarm Clock.
Safety Information
- Ensure the power adapter is correctly connected to a suitable power outlet.
- Do not expose the device to water, moisture, or extreme temperatures.
- Avoid dropping or subjecting the clock to strong impacts.
- Keep out of reach of children.
- Use only the provided power adapter.
Package Contents
- DreamSky Wooden Digital Alarm Clock (Model DS2208)
- 5V/1.2A Power Adapter
- Instruction Manual
Product Overview
Controls and Display
The DreamSky alarm clock features an intuitive control panel on the back and a clear LED display on the front.

Figure 2: Rear view of the alarm clock with control buttons labeled.
- TIME SET: Press and hold to enter time setting mode.
- ALARM SET: Press and hold to enter alarm setting mode.
- ON/OFF (Alarm Bell Icon): Press to toggle alarm on/off.
- +/- Buttons: Adjust values during setting modes.
- 12/24HR: Toggle between 12-hour and 24-hour time formats.
- DST ON/OFF: Toggle Daylight Saving Time on/off.
- VOL+ / VOL-: Adjust alarm volume.
- DIMMER: Adjust display brightness levels.
- SNOOZE: Large button on top for snooze function.
- DC 5V Port: Power input.
- USB Port: For charging external devices.
- Battery Compartment: For battery backup (2x AAA batteries, not included).
Setup
1. Power Connection
The DreamSky alarm clock is primarily a plug-in device. Connect the provided 5V/1.2A power adapter to the DC 5V port on the back of the clock and then to a wall outlet. The display will light up once powered.

Figure 3: Alarm clock connected to power, displaying the time.
2. Battery Backup Installation
For alarm and setting backup during power outages, install 2 AAA batteries (not included) into the battery compartment on the back of the clock. Note that batteries only operate the alarm and save settings; the time display will not be lit during a power cut.

Figure 4: Battery backup functionality during a power outage.
Operating Instructions
1. Setting the Time
- Set Time: Press and hold the TIME SET button. Use the +/- buttons to adjust the hour, then press TIME SET again to confirm and move to minutes. Adjust minutes with +/-, then press TIME SET to save.
- 12/24 Hour Format: Press the 12/24HR button to switch between 12-hour (with AM/PM indicator) and 24-hour (military) time formats.
- Daylight Saving Time (DST): Press the DST ON/OFF button to activate or deactivate Daylight Saving Time. The display will adjust by one hour forward or backward accordingly.
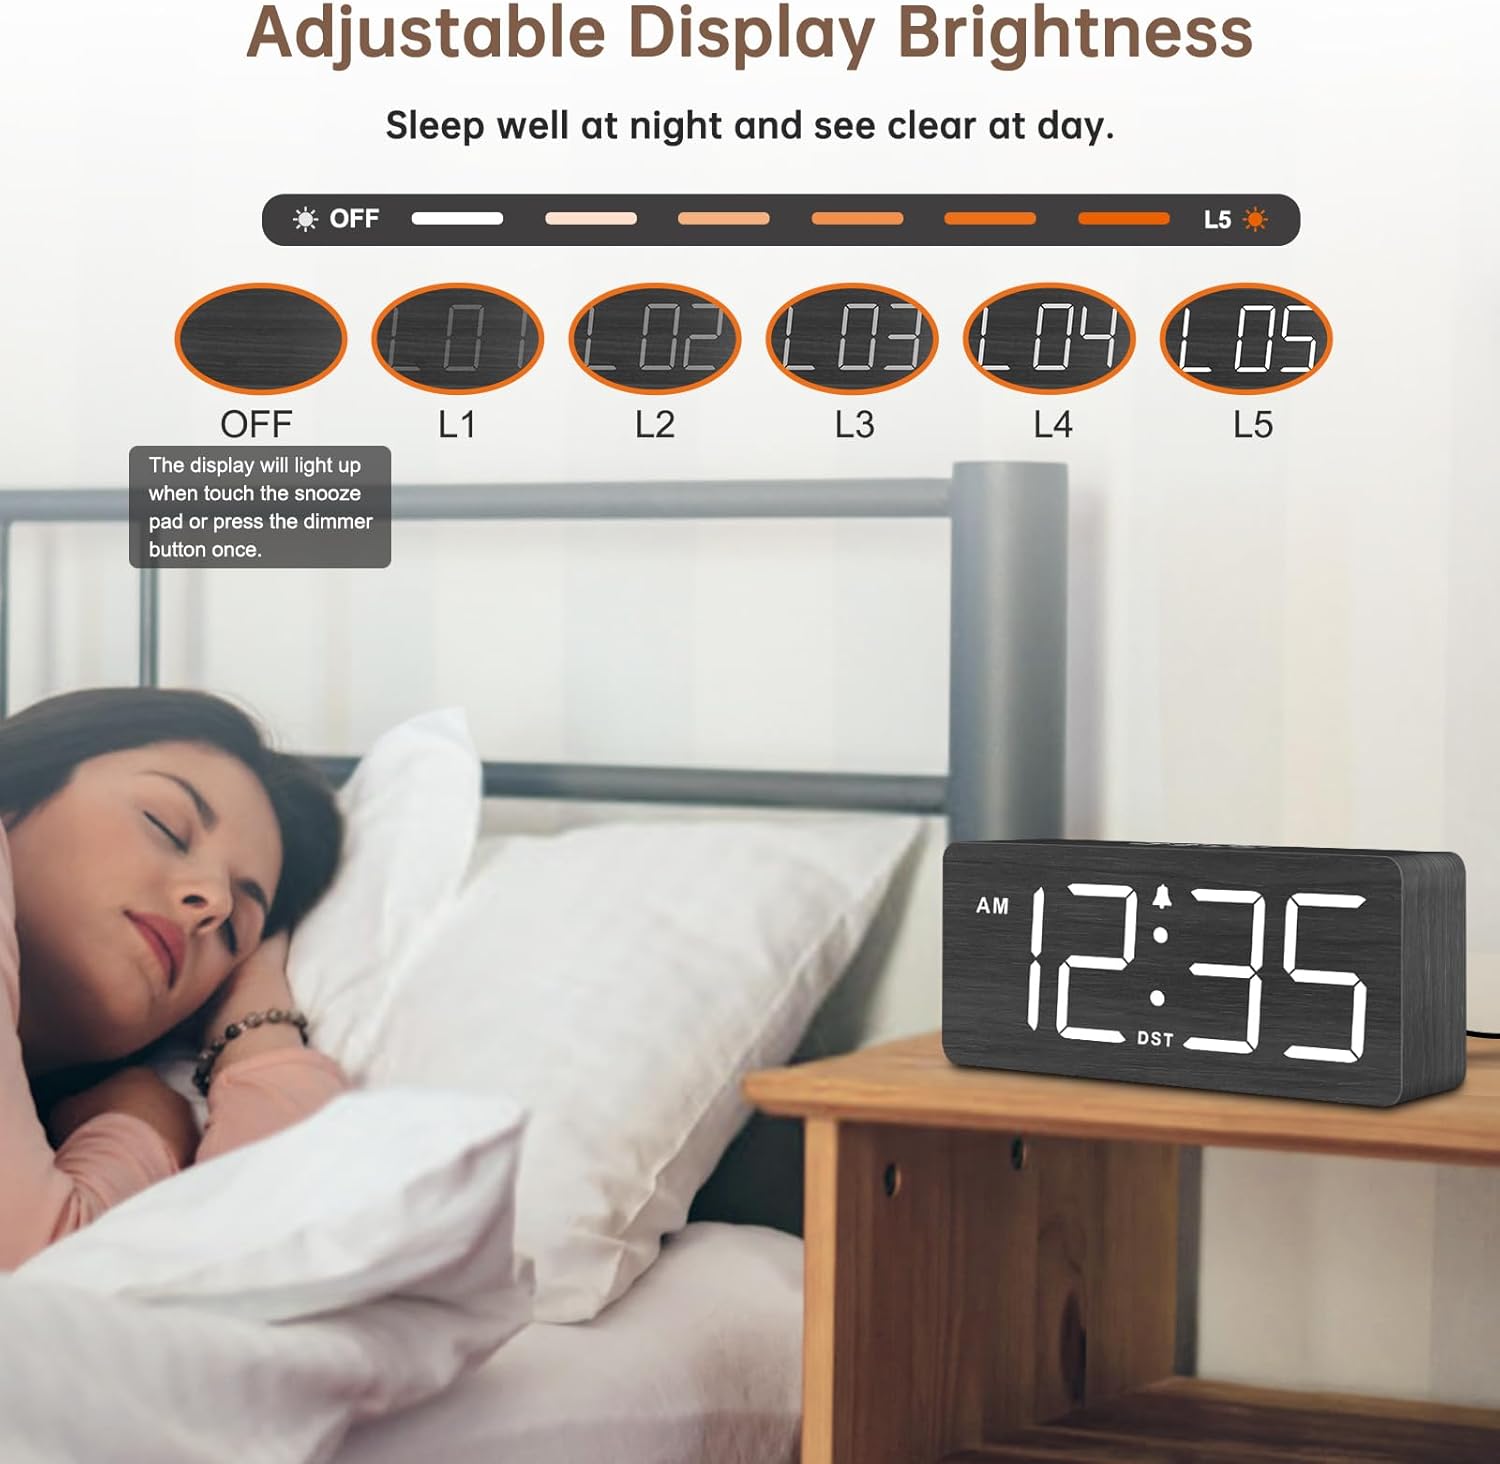
Figure 5: Manual adjustment for Daylight Saving Time.

Figure 6: Switching between 12-hour and 24-hour time display.
2. Setting the Alarm
- Set Alarm: Press and hold the ALARM SET button. Use the +/- buttons to adjust the alarm hour, then press ALARM SET again to confirm and move to minutes. Adjust minutes with +/-, then press ALARM SET to save.
- Alarm ON/OFF: Press the ON/OFF (Alarm Bell Icon) button to activate or deactivate the alarm. An alarm icon will appear on the display when the alarm is active.
- Alarm Volume: Use the VOL+ and VOL- buttons to adjust the alarm volume from level 1 (70dB) to level 5 (105dB).
- Snooze Function: When the alarm sounds, press the large SNOOZE button on top of the clock to temporarily silence the alarm for 9 minutes. The alarm will sound again after 9 minutes.

Figure 7: Alarm volume adjustment and snooze feature.
3. Adjusting Display Brightness
Press the DIMMER button repeatedly to cycle through 6 brightness levels (L1 to L5, and OFF). Select the desired brightness for day or night viewing. The display can be turned completely off if preferred.
Figure 8: Adjustable display brightness levels.
Maintenance
- Clean the clock with a soft, dry cloth. Do not use abrasive cleaners or solvents.
- Ensure the clock is unplugged before cleaning.
- Replace backup batteries annually or when the low battery indicator appears.
Troubleshooting
- Display is off: Ensure the power adapter is securely plugged into both the clock and the wall outlet. If using battery backup, the display will not be lit.
- Alarm not sounding: Check if the alarm is activated (alarm icon on display). Verify the alarm volume is not set to minimum.
- Incorrect time: Re-set the time following the instructions in the 'Setting the Time' section. Check DST setting if applicable.
- Buttons unresponsive: Unplug the clock, remove backup batteries, wait a few minutes, then reconnect power and reinsert batteries.
Specifications
| Feature | Detail |
|---|---|
| Model Number | DS2208 |
| Dimensions | 6.1"W x 2.8"H x 1.6"D |
| Display Type | Digital LED (1.8-inch numbers) |
| Power Source | Corded Electric (DC 5V/1.2A adapter included) |
| Battery Backup | 2x AAA batteries (not included) - for alarm and settings only |
| Alarm Volume | 5 adjustable levels (70-105dB) |
| Display Brightness | 6 adjustable levels (L1-L5, OFF) |
| Time Format | 12-hour / 24-hour selectable |
| Special Features | DST function, Snooze, USB charging port |
Warranty
This DreamSky product comes with a 1-year replacement warranty from the date of purchase. Please retain your proof of purchase for warranty claims. The warranty covers manufacturing defects and malfunctions under normal use. It does not cover damage caused by misuse, accidents, unauthorized modifications, or improper installation.
Support
For any questions, technical assistance, or warranty inquiries, please contact DreamSky Customer Support:
- Email: info@dreamsky4u.com


