
1. Introduction
Thank you for choosing the SideKing 3.2 Gallon Battery Powered Backpack Sprayer. This upgraded electric sprayer is designed for efficient and comfortable use in various lawn and garden tasks, including watering, weed control, and fertilizing. Featuring a 7.4V motor, 3 adjustable spray speeds, a real-time battery indicator, and a telescopic wand, this sprayer simplifies your outdoor work. Please read this manual thoroughly before operation to ensure safe and effective use.

Figure 1.1: SideKing 3.2 Gallon Battery Powered Backpack Sprayer and included accessories.
2. Important Safety Information
Always follow basic safety precautions when using this product to reduce the risk of fire, electric shock, or injury.
- Read all instructions before using the sprayer.
- Wear appropriate personal protective equipment (PPE) such as gloves, eye protection, and a mask, especially when handling chemicals.
- Do not spray flammable liquids or use the sprayer near open flames or sparks.
- Keep children and pets away from the spraying area.
- Ensure the tank lid is securely fastened before operating.
- Do not immerse the handle or battery compartment in water. The integrated design is water-resistant, but not fully submersible.
- Use only the charger provided or recommended by the manufacturer.
- Store the sprayer in a cool, dry place, away from direct sunlight and extreme temperatures.
- Always clean the sprayer thoroughly after each use to prevent chemical residue buildup and clogging.
3. Product Components
The SideKing 3.2 Gallon Battery Powered Backpack Sprayer comes with the following components:
- 3.2 Gallon (12L) Tank with Padded Straps
- Rechargeable Handle with 3 Spray Speeds and Battery Indicator
- 41-inch Telescopic Wand
- 5 Mist Nozzles (Windproof, F Type Dual, Cone, 6 Hole Pattern, Fan)
- USB Type-C Charging Cable
- Wide-mouth Lid with Measuring Cup and Filter Screen
- Anti-kinking Hose Connector

Figure 3.1: Ergonomic design with wide padded breathable adjustable backpack straps and back cushion for comfort.
4. Setup and Assembly
Follow these steps to assemble your SideKing Backpack Sprayer:
- Install the Nozzle: Select your desired nozzle and screw it onto the end of the telescopic wand until tight.
- Install the Extension Rod: Insert the telescopic wand into the handle and tighten the nut to secure it.
- Connect the Hose to the Handle: Unscrew the nut on the tail end of the handle. Thread the nut through the hosepipe first, then insert the hosepipe into the tail end of the handle, and tighten the nut to seal the hosepipe. Ensure the coil spring is correctly positioned to prevent kinking.
- Connect the Water Pipe to the Tank: Insert the water pipe into the spout of the tank and tighten the nut securely.
- Attach Backpack Straps: Connect the padded backpack straps to the designated attachment points on the sprayer tank. Adjust the strap length for a comfortable fit.

Figure 4.1: Visual guide for sprayer assembly.

Figure 4.2: Anti-kinking hose connector detail.
5. Operating Instructions
5.1 Charging the Battery
The sprayer features a built-in rechargeable battery. Use the provided USB Type-C cable to charge the handle. A full charge typically provides 2-3 hours of continuous spraying. The battery indicator on the handle displays the real-time battery level.

Figure 5.1: USB Type-C charging port on the handle.
5.2 Filling the Tank
The 3.2-gallon tank has a wide opening for easy filling and mixing. It also includes a filter screen to prevent clogging. Use the integrated measuring cup in the lid for precise chemical mixing.
- Unscrew the wide-mouth lid.
- Use the measuring cup to add the desired amount of concentrate.
- Fill the tank with water, ensuring the filter screen is in place. The translucent tank has gallon scales for easy monitoring of liquid levels.
- Securely fasten the lid before use.

Figure 5.2: Wide-mouth lid with measuring cup and filter screen.
5.3 Attaching and Adjusting Nozzles
The sprayer comes with 5 adjustable nozzles to suit various spraying needs, from a fine mist to a direct stream.
- Select the appropriate nozzle for your task (Windproof, F Type Dual, Cone, 6 Hole Pattern, or Fan).
- Screw the chosen nozzle onto the end of the telescopic wand.
- Some nozzles allow for pattern adjustment by twisting the nozzle head.
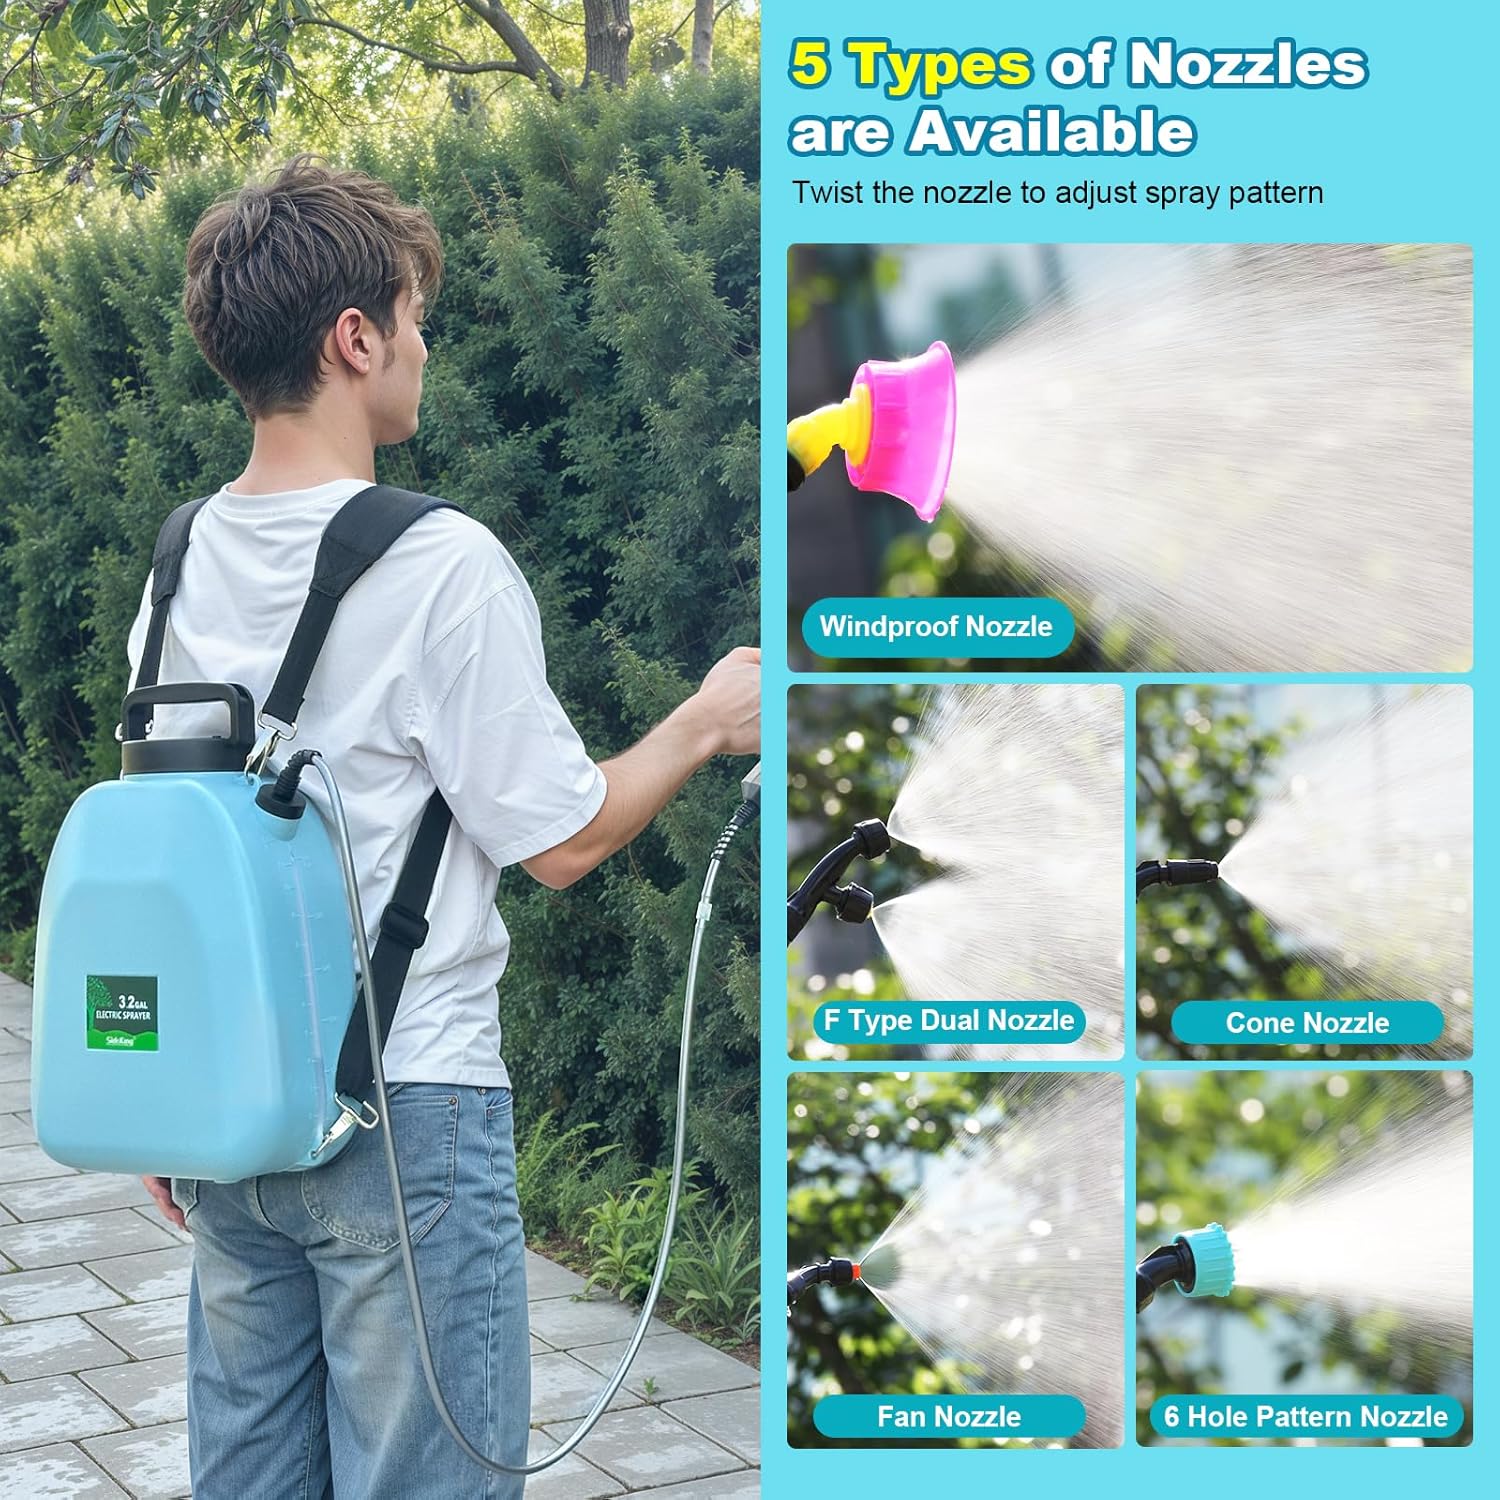
Figure 5.3: The 5 adjustable nozzles for versatile spraying.
5.4 Adjusting Spray Speed/Intensity
The handle features a button to select one of 3 adjustable spray speeds, allowing precise control over water pressure.
- Press the 'ON' button to start the sprayer.
- Press the 'Speed' button to cycle through the three intensity levels (Low, Medium, High). The indicator lights will show the selected speed.
- Press the 'OFF' button to stop spraying.

Figure 5.4: Handle with battery indicator and 3-speed control.
5.5 Using the Telescopic Wand
The 41-inch telescopic wand extends to reach hard-to-access areas, making it ideal for spraying taller plants or distant spots.
- Loosen the locking mechanism on the wand.
- Extend the wand to the desired length.
- Tighten the locking mechanism to secure the wand in place.
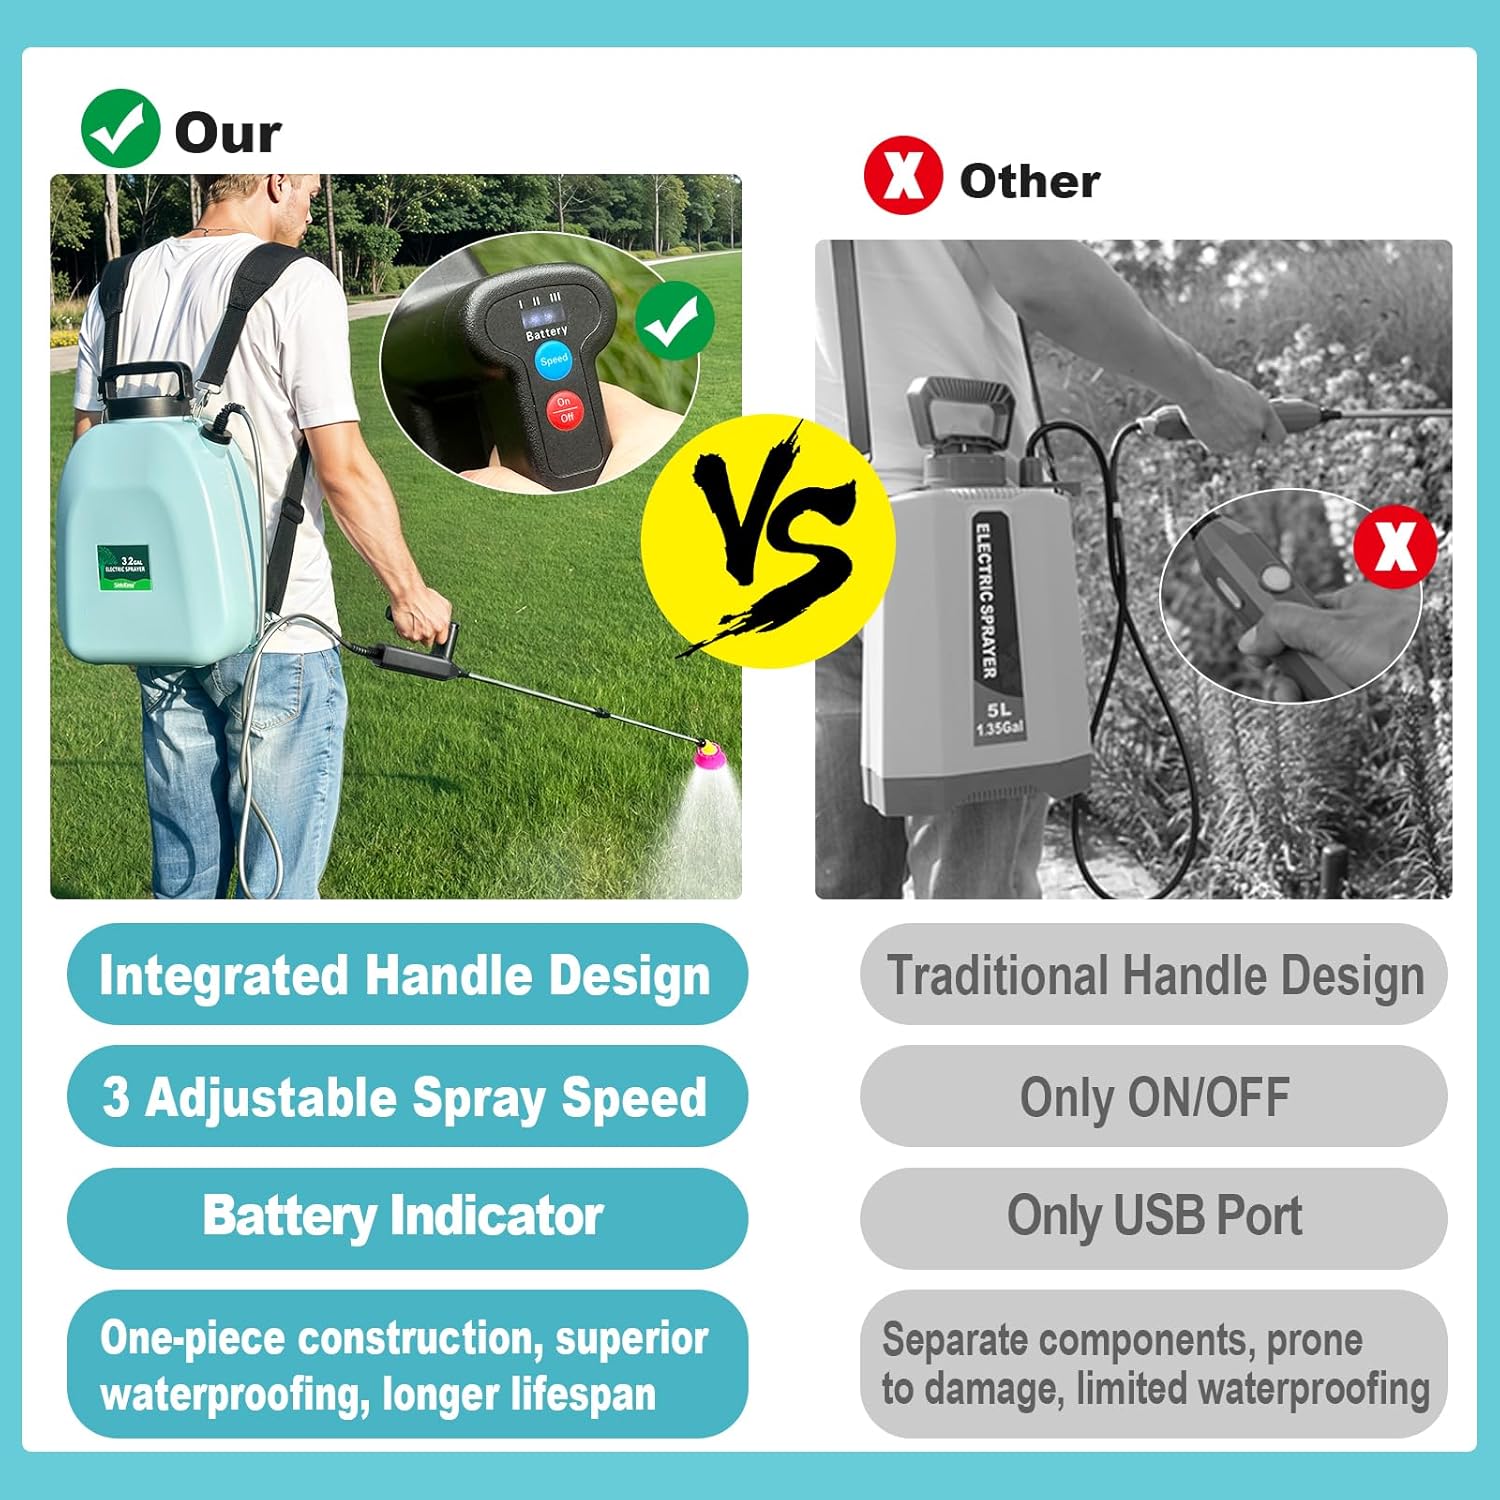
Figure 5.5: Telescopic wand in use.
5.6 Product Videos
Video 5.6.1: Official SideKing 3.2 Gallon Battery Powered Backpack Sprayer demonstration.
Video 5.6.2: SideKing 2 Gallon Battery Powered Sprayer overview, showcasing similar features and operation.
Video 5.6.3: VAXMAY Battery Backpack Sprayer demonstration, highlighting PSI adjustment and ergonomic features.
6. Maintenance and Storage
Proper maintenance ensures the longevity and optimal performance of your sprayer.
- Cleaning: After each use, empty any remaining liquid from the tank. Rinse the tank thoroughly with clean water. Operate the sprayer with clean water for a few minutes to flush out the hose and wand. The sprayer disassembles for quick rinsing and hassle-free upkeep.
- Nozzle Care: Clean nozzles regularly to prevent clogging. If a nozzle becomes clogged, remove it and rinse it under running water. Use a small brush or pin to clear any blockages.
- Battery Care: Charge the battery fully before storing for extended periods. Avoid completely draining the battery to prolong its lifespan.
- Storage: Store the sprayer in a cool, dry, and frost-free location. Ensure the tank is empty and clean. Keep it out of reach of children and pets.
7. Troubleshooting
If you encounter issues with your sprayer, refer to the following common problems and solutions:
- No Spray/Weak Spray:
- Check battery level and recharge if necessary.
- Ensure the tank has sufficient liquid.
- Inspect nozzles for clogs and clean them.
- Check all hose connections for tightness to prevent air leaks.
- Verify the filter screen in the tank is not clogged.
- Leaking:
- Ensure all connections (nozzle, wand, hose, tank lid) are securely tightened.
- Check for any damage to hoses or O-rings.
- Sprayer Not Turning On:
- Confirm the battery is charged.
- Ensure the 'ON' button is pressed firmly.
8. Product Specifications
| Brand | SideKing |
| Model Name | ST12L-7.4VDXD |
| Tank Volume | 3.2 Gallons (12 Liters) |
| Power Source | Battery Powered (1 Lithium Ion battery included) |
| Motor Voltage | 7.4V |
| Continuous Spray Time | 2-3 hours (approx.) |
| Spray Speeds | 3 Adjustable Speeds |
| Wand Length | 41 inches (Telescopic) |
| Nozzles Included | 5 (Windproof, F Type Dual, Cone, 6 Hole Pattern, Fan) |
| Material | High-Density Polyethylene (HDPE) and Acrylonitrile Butadiene Styrene (ABS) |
| Item Weight | 4.71 pounds (2.14 Kilograms) |
| Product Dimensions | 11.5"W x 15.5"H |
9. Warranty Information
This SideKing electric backpack sprayer is backed by a 1-year warranty, ensuring dependable performance. For specific details regarding warranty claims or product returns, please refer to your purchase documentation or contact customer support.
Standard return policy allows for returns/replacements within 30 days of purchase.
10. Customer Support
For any questions, technical assistance, or warranty inquiries, please contact SideKing customer support through the retailer where the product was purchased or visit the official SideKing website for contact information.