
1. Product Overview
The Redragon GMK914 Single Monitor Mount Stand is designed to enhance your workspace ergonomics and efficiency. This gas spring adjustable arm provides flexible positioning for monitors ranging from 13 to 32 inches, supporting weights between 4.4 to 17.6 pounds. It features VESA 75x75 mm and 100x100 mm compatibility, along with versatile C-clamp and grommet base installation options. Integrated cable management helps maintain a tidy desk environment.

Figure 1.1: Redragon GMK914 Single Monitor Mount Stand with C-clamp and grommet base options.
2. Key Features
- Wide Compatibility: Supports monitors from 13 to 32 inches, weighing 4.4 to 17.6 lbs. Compatible with VESA 75x75 mm and 100x100 mm mounting patterns.
- Effortless Adjustability: Offers tilt from +90° to -45°, 180° swivel, and 360° rotation for optimal viewing angles.
- Ergonomic Height and Reach: Adjustable height up to 16.3 inches and a maximum reach of 19.3 inches to promote better posture.
- Space-Saving Design: Provides two installation options: heavy-duty C-clamp (0.39-4.53" desk thickness) and grommet base (0.39-2.36" hole diameter).
- Integrated Cable Management: Keeps cables organized and out of sight, enhancing workspace aesthetics.

Figure 2.1: Diagram illustrating universal compatibility with monitor sizes (Max 32"), weight capacity (4.4-17.6 lbs), and VESA patterns (75x75/100x100mm).

Figure 2.2: Illustration of the integrated cable management system, showing cables routed neatly along the arm.
3. Package Contents
Please verify that all components are present before beginning installation. If any parts are missing or damaged, contact Redragon customer support.
- Monitor Arm Assembly
- VESA Plate
- C-Clamp Base
- Grommet Base
- Mounting Hardware (various screws for VESA, washers, spacers)
- Hex Keys / Allen Wrenches (for assembly and adjustment)
- Instruction Manual
4. Setup Instructions
4.1. Pre-Installation Checklist
- Ensure your monitor's size is between 13-32 inches.
- Verify your monitor's weight is between 4.4-17.6 lbs.
- Confirm your monitor has VESA 75x75mm or 100x100mm mounting holes.
- Check your desk thickness and type for compatibility with C-clamp or grommet mount.

Figure 4.1: Guide to checking monitor size, weight, VESA pattern, and desk compatibility before installation.

Figure 4.2: Detailed desk compatibility for C-clamp installation, showing requirements for desks with underframes, side panels, and back panels.
4.2. Installation Options
The Redragon GMK914 offers two primary installation methods:

Figure 4.3: Visual representation of the C-Clamp Mount and Grommet Mount options.
4.2.1. C-Clamp Mount
This method is suitable for desks with a thickness between 0.39 and 4.53 inches (10-115mm).
- Attach the C-clamp base to the main pole of the monitor arm.
- Position the C-clamp on the edge of your desk.
- Tighten the clamp screw until the mount is securely fastened to the desk. Ensure it is stable and does not wobble.
4.2.2. Grommet Mount
This method requires a pre-drilled hole in your desk with a diameter between 0.39 and 2.36 inches (10-60mm), and is suitable for desk thicknesses between 0.39 and 3.15 inches (10-80mm).
- Disassemble the C-clamp components from the base if they are attached.
- Insert the grommet base through the pre-drilled hole in your desk.
- Secure the grommet base from underneath the desk using the provided plate and tightening knob/screw.
4.3. Attaching the Monitor
- Attach the VESA plate to the back of your monitor using the appropriate VESA screws (M4 or M6, depending on your monitor). Ensure the screws are tightened securely but do not overtighten.
- Slide the monitor (with the attached VESA plate) onto the VESA head of the monitor arm until it clicks into place.
- Secure the monitor to the arm by tightening any safety screws or clips on the VESA head.

Figure 4.4: The Redragon GMK914 monitor mount installed on a desk with a monitor attached, demonstrating a clean workspace.
5. Operating Instructions
5.1. Adjusting Monitor Position
The gas spring arm allows for smooth and flexible adjustments to achieve your optimal viewing angle.
- Height Adjustment: Gently push or pull the monitor up or down to adjust its height. The gas spring mechanism will hold it in place. The arm allows for up to 10 inches of height adjustment, with a minimum height of 6.3 inches and a maximum height of 16.3 inches from the desk surface.
- Extension/Retraction: Push or pull the arm horizontally to extend or retract the monitor's distance from you, up to a maximum extension of 19.27 inches.
- Tilt: Tilt the monitor screen up (+90°) or down (-45°) to reduce glare and optimize viewing.
- Swivel: Swivel the monitor left or right up to 180° at the arm's base and at the VESA plate connection.
- Rotation: Rotate the monitor 360° to switch between landscape and portrait orientations.
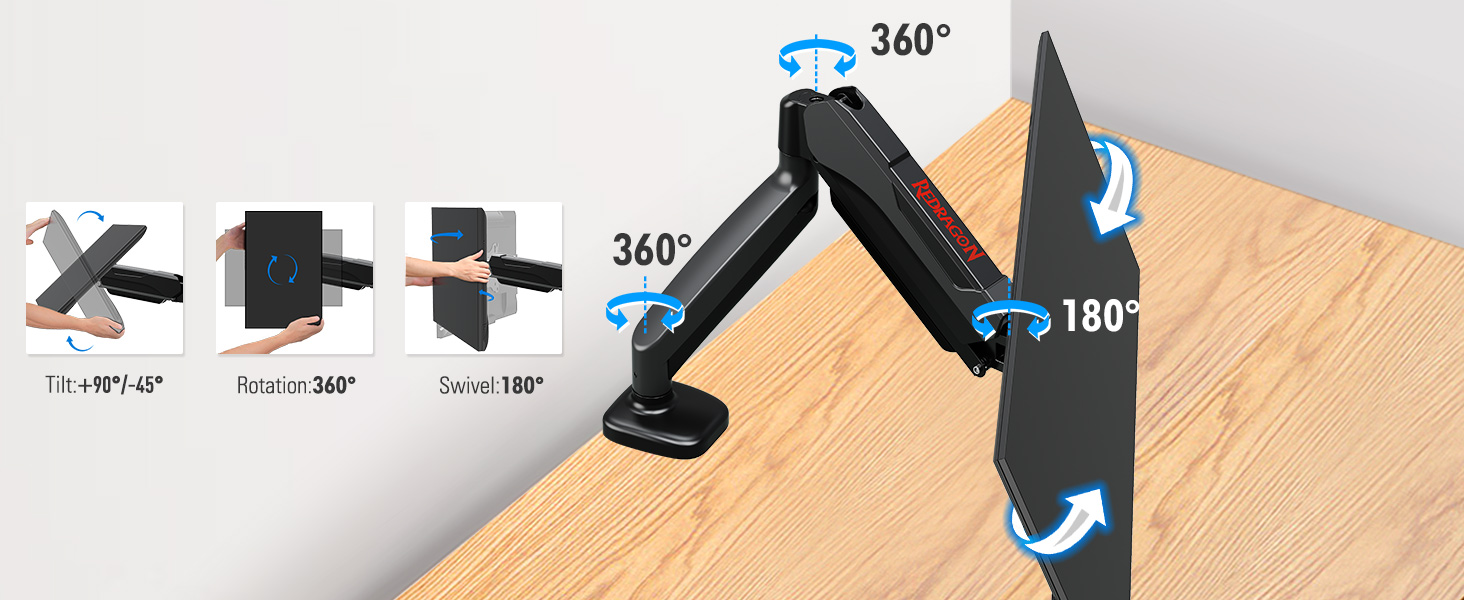
Figure 5.1: Diagram illustrating the full range of motion, including 360° swivel, 180° swivel, and 360° rotation capabilities.

Figure 5.2: Visual guide to the height adjustment range (10" adjust, 6.3" min, 16.3" max) and max extension (19.27").

Figure 5.3: Detailed view of tilt (+90°/-45°), rotation (360°), and swivel (±90°) capabilities.
5.2. Gas Spring Tension Adjustment
The gas spring tension may need to be adjusted to properly support your monitor's weight. This ensures the monitor stays at the desired height without drifting up or down.
- Hold the monitor arm in a horizontal position.
- Locate the gas spring adjustment screw on the arm (usually covered by a cap).
- Use the provided hex key to turn the screw:
- Turn clockwise ("-" direction) to reduce tension for lighter monitors (monitor raises up).
- Turn counter-clockwise ("+" direction) to increase tension for heavier monitors (monitor drops down).
- Adjust gradually and test the arm's movement. It may take several turns (up to 17 turns) to find the correct tension.

Figure 5.4: Instructions for adjusting the gas spring tension and tilt angle bolt. Note: Hold the arm horizontally when adjusting gas spring.
6. Maintenance
Regular maintenance ensures the longevity and optimal performance of your monitor mount.
- Cleaning: Wipe the mount with a soft, damp cloth. Avoid using abrasive cleaners or solvents that could damage the finish.
- Check Connections: Periodically check all screws and bolts, especially those securing the mount to the desk and the monitor to the arm, to ensure they remain tight.
- Gas Spring Check: If the monitor begins to sag or rise unexpectedly, re-adjust the gas spring tension as described in Section 5.2.
7. Troubleshooting
| Problem | Possible Cause | Solution |
|---|---|---|
| Monitor sags or does not stay at desired height. | Gas spring tension is too low for monitor weight. | Increase gas spring tension (turn "+" direction) using the hex key. Refer to Section 5.2. |
| Monitor floats up or is difficult to push down. | Gas spring tension is too high for monitor weight. | Decrease gas spring tension (turn "-" direction) using the hex key. Refer to Section 5.2. |
| Mount is unstable or wobbles. | C-clamp/Grommet base not tightened sufficiently. | Re-tighten the C-clamp or grommet base screws securely to the desk. Ensure desk compatibility. |
| Monitor cannot be tilted or is too loose. | Tilt joint screw is too tight or too loose. | Adjust the tilt joint screw on the VESA head. Loosen slightly if too stiff, tighten if too loose. Refer to Figure 5.4. |
8. Specifications
| Attribute | Value |
|---|---|
| Brand | Redragon |
| Model Number | GMK914 |
| Mounting Type | Tabletop Mount (C-Clamp / Grommet) |
| Movement Type | Rotate, Swivel, Tilt, Height Adjustment |
| Material | Metal |
| Color | Black |
| Compatible Devices | Monitor (13-32 inches) |
| Weight Capacity | 4.4 - 17.6 lbs (2 - 8 kg) |
| VESA Compatibility | 75x75 mm, 100x100 mm |
| Maximum Tilt Angle | +90 Degrees / -45 Degrees |
| Swivel Range | 180 Degrees (at arm base and VESA plate) |
| Rotation Range | 360 Degrees |
| Height Adjustment Range | Up to 16.3 inches (from desk surface) |
| Max Extension | 19.3 inches |
| C-Clamp Desk Thickness | 0.39 - 4.53 inches (10-115mm) |
| Grommet Desk Thickness | 0.39 - 3.15 inches (10-80mm) |
| Grommet Hole Diameter | 0.39 - 2.36 inches (10-60mm) |
| Item Weight | 5.1 pounds |
| Package Dimensions | 16.77 x 5.83 x 5.39 inches |
9. Warranty & Support
Redragon products are manufactured to the highest quality standards. This product is covered by a manufacturer's warranty against defects in materials and workmanship. For specific warranty terms and conditions, please refer to the warranty card included with your product or visit the official Redragon website.
For technical support, troubleshooting assistance, or to inquire about replacement parts, please contact Redragon customer service through their official website or the contact information provided in your product packaging.
Website: www.redragonusa.com