
1. Introduction
Thank you for choosing the Yamnweo GH10 10-Channel Portable Audio Mixer. This manual provides essential information for the safe and effective use of your device. Please read it thoroughly before operation and retain it for future reference.
The GH10 mixer is designed for various audio applications, including recording, live performances, DJ sets, and karaoke. It features multiple input channels, Bluetooth connectivity, USB playback/recording, and built-in effects to enhance your audio experience.
2. Product Overview
The Yamnweo GH10 is a versatile 10-channel audio mixer equipped with a range of features for comprehensive sound control. It includes 10 MIC/LINE mono inputs, 1 stereo input, and individual channel adjustments for gain, equalization, and effects. The mixer also offers +48V phantom power for condenser microphones, Bluetooth wireless connectivity, and a USB interface for direct recording or playback.
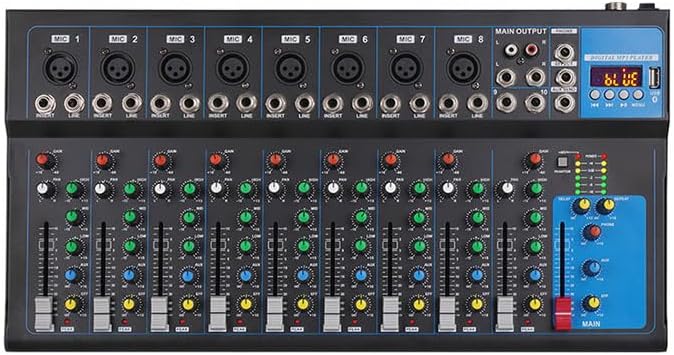
Key Features:
- 10 MIC/LINE Mono Inputs: Accommodates a variety of microphones and line-level instruments.
- +48V Phantom Power: Essential for condenser microphones.
- 3-Band Equalization: High, Mid, and Low frequency adjustment on each channel for precise tone shaping.
- Built-in Reverb/Delay Effects: Adds depth and ambiance to vocals and instruments.
- Bluetooth Wireless Connectivity: Stream audio from smartphones, tablets, and other Bluetooth-enabled devices.
- USB Interface: For direct recording to a computer or playing audio from a USB drive.
- Real-time Monitoring: Dedicated headphone output for monitoring audio signals.

3. Component Identification
Familiarize yourself with the various controls and connections on your GH10 mixer using the diagrams below.

Rear Panel Connections:

- POWER Switch: Turns the mixer on or off.
- AC IN: Connects to the power adapter.
Input/Output Section:

- MIC Inputs (XLR): For connecting microphones.
- LINE Inputs (1/4" Jack): For connecting line-level instruments or audio sources.
- INSERT Jacks: For connecting external effects processors to individual channels.
- MAIN OUTPUT (RCA/1/4" Jack): Connects to amplifiers or recording devices.
- MONITOR HEADPHONE Jack: For connecting headphones for monitoring.
Control Section:

- GAIN Knobs: Adjusts the input sensitivity for each channel.
- HIGH/MID/LOW EQ Knobs: Adjusts the treble, midrange, and bass frequencies for each channel.
- PAN Knob: Adjusts the stereo position of the channel signal.
- AUX/EFF Knobs: Controls the send level to auxiliary outputs or internal effects.
- Channel Volume Faders: Adjusts the individual channel volume.
- +48V PHANTOM Power Switch: Activates phantom power for condenser microphones.
- MP3 Control Area: Controls USB playback and Bluetooth functions.
- MAIN Volume Fader: Controls the overall output volume.
4. Setup
4.1 Power Connection
- Ensure the mixer's POWER switch is in the OFF position.
- Connect the provided power adapter to the AC IN port on the rear panel of the mixer.
- Plug the power adapter into a suitable electrical outlet.
4.2 Connecting Microphones and Instruments
- Microphones: Connect dynamic microphones using XLR cables to the MIC inputs. For condenser microphones, connect via XLR and activate the +48V PHANTOM power switch (see section 5.3).
- Line-Level Devices: Connect instruments (e.g., keyboards, guitars with preamps) or other audio sources (e.g., media players) to the LINE inputs using 1/4" jack cables.

4.3 Connecting Output Devices
- Connect the MAIN OUTPUTs (RCA or 1/4" jacks) to your amplifier, powered speakers, or recording interface.
- For personal monitoring, connect headphones to the MONITOR HEADPHONE jack.
5. Operating Instructions
5.1 Powering On and Basic Volume Adjustment
- Before powering on, ensure all channel volume faders and the MAIN volume fader are set to their minimum positions.
- Flip the POWER switch to the ON position.
- Gradually increase the MAIN volume fader to a comfortable listening level.
- Slowly raise the individual channel volume faders for the active inputs.
5.2 Channel Control Adjustments
- GAIN: Adjust the GAIN knob for each channel to achieve an optimal input level. The PEAK LED should flash only occasionally during the loudest parts of the signal.
- Equalization (EQ): Use the HIGH, MID, and LOW EQ knobs to shape the tone of each channel. Turn clockwise to boost frequencies, counter-clockwise to cut.

- PAN: Adjust the PAN knob to position the sound source within the stereo field (left to right).
- AUX/EFF: Use these knobs to send a portion of the channel's signal to the auxiliary output or the internal effects processor.
5.3 +48V Phantom Power
The +48V PHANTOM power switch provides power to condenser microphones. Ensure that only condenser microphones are connected when activating this feature. Dynamic microphones do not require phantom power and can be damaged if connected while it is active.
- Connect your condenser microphone to an XLR input.
- Press the +48V PHANTOM power switch to activate. The indicator light will illuminate.
- When finished, turn off the +48V PHANTOM power before disconnecting the microphone.
5.4 Bluetooth Connectivity
The GH10 mixer allows wireless audio streaming via Bluetooth.

- Press the MODE button in the MP3 control area until "BLUE" appears on the display.
- On your Bluetooth-enabled device (smartphone, tablet), search for available devices and select "GH10" (or similar name).
- Once paired, audio from your device will play through the mixer. Use the controls in the MP3 section to play/pause or skip tracks.
5.5 USB Playback and Recording
The USB interface supports playing audio from a USB flash drive and recording audio to a computer.
- USB Playback: Insert a USB flash drive containing MP3 files into the USB port. The mixer will automatically switch to USB mode or you may need to select it using the MODE button. Use the MP3 control buttons for playback.
- USB Recording (to PC): Connect the mixer to your computer using a USB cable. The mixer will function as an audio interface. Select the mixer as your input device in your computer's sound settings or recording software.
5.6 Effects (Reverb/Delay)
The GH10 mixer includes built-in reverb and delay effects.
- Adjust the EFF knob on each channel to send the desired amount of signal to the effects processor.
- Use the REVERB SETTING and REVERBERATION CONTROL knobs in the main section to adjust the characteristics and overall level of the effect.
5.7 Monitoring
Connect headphones to the MONITOR HEADPHONE jack to listen to the main mix or specific channels.

- Adjust the MONITOR HEADSET VOLUME knob to control the headphone output level.
6. Troubleshooting
If you encounter issues with your Yamnweo GH10 mixer, refer to the following common problems and solutions:
- No Sound Output:
- Check if the mixer is powered on.
- Ensure the MAIN volume fader is raised.
- Verify individual channel volume faders are raised and GAIN knobs are set appropriately.
- Check connections to output devices (amplifiers, speakers).
- Ensure input sources are active and connected correctly.
- Distorted Sound:
- Reduce the GAIN knob for the affected channel if the PEAK LED is constantly lit.
- Lower the channel volume fader or MAIN volume fader.
- Check for faulty cables or connections.
- Bluetooth Connection Issues:
- Ensure the mixer is in Bluetooth mode ("BLUE" on display).
- Make sure your device's Bluetooth is enabled and within range.
- Try unpairing and re-pairing the device.
- Hissing Noise from MP3 Player:
- If the built-in MP3 player is not in use and you experience a persistent hiss, consider disconnecting its internal module if you are comfortable with internal modifications. This typically involves opening the unit, locating the small PCB for the MP3 player, and carefully disconnecting its connectors. This action should only be performed by qualified personnel.
7. Specifications
| Feature | Specification |
|---|---|
| Model Number | GH10 |
| Product Dimensions | 8.97 x 8.34 x 1.61 inches (22.78 x 21.18 x 4.09 cm) |
| Number of Channels | 10 |
| Power Source | Corded Electric |
| Voltage | 110 Volts |
| Connectivity Technology | Bluetooth, USB |
8. Safety Information
- Do not expose the mixer to rain or moisture.
- Avoid placing the mixer near heat sources or in direct sunlight.
- Do not open the mixer casing; there are no user-serviceable parts inside. Refer all servicing to qualified personnel.
- Use only the provided power adapter.
- Ensure proper ventilation around the unit.
- Keep out of reach of children.
9. Warranty and Support
For warranty information or technical support, please refer to the documentation included with your purchase or contact Yamnweo customer service through the retailer where the product was purchased. Please have your model number (GH10) and purchase date available when contacting support.