1. Introduction
This manual provides essential information for the proper installation, operation, and maintenance of your new SOCKIR Headlight Assembly. These headlight assemblies are designed for direct replacement in 2015-2017 Subaru Outback vehicles equipped with factory halogen headlamps. They are not compatible with HID models.
Please read these instructions thoroughly before beginning installation to ensure safe and correct usage.

Figure 1: Front view of the SOCKIR Headlight Assembly pair.
2. Safety Information
- Always disconnect the vehicle's battery before performing any electrical work to prevent electrical shock or damage.
- Wear appropriate personal protective equipment, such as safety glasses and gloves, during installation.
- Ensure the vehicle is parked on a level surface with the parking brake engaged.
- Allow the vehicle's engine and existing headlight bulbs to cool down completely before handling to avoid burns.
- If you are unsure about any step of the installation process, it is highly recommended to seek professional assistance.
3. Package Contents
Verify that all components are present and undamaged before proceeding with installation.
- 1x Passenger Side Headlight Assembly (Model SU15-17)
- 1x Driver Side Headlight Assembly (Model SU15-17)
- Integrated LED Daytime Running Lights (DRL)
- Note: High beam (HB3), Low beam (H11), Turn Signal (7440A), and Side Marker (168) bulbs are not included and must be purchased separately or transferred from your original assembly.
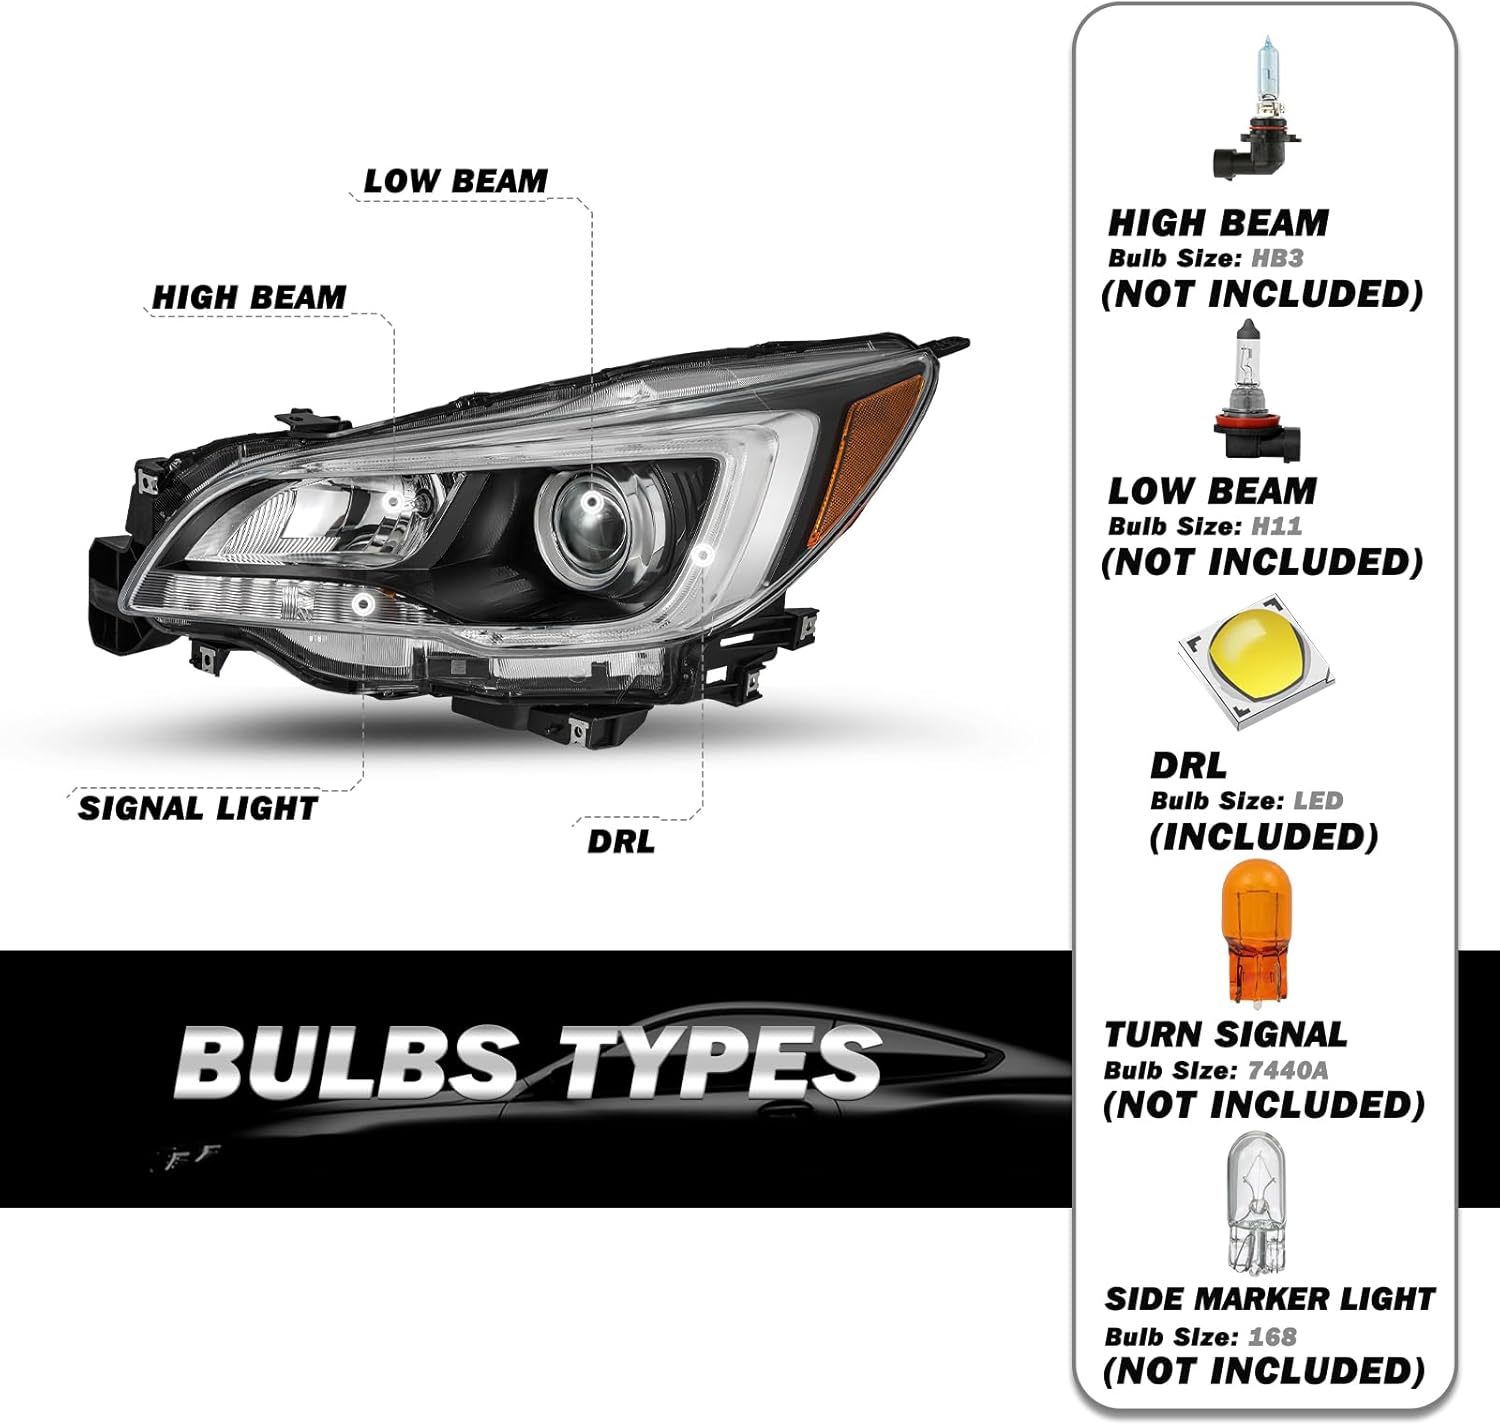
Figure 2: Bulb type specifications for the headlight assembly.
4. Installation Guide
The SOCKIR Headlight Assembly is designed for direct bolt-on, plug-and-play installation. No modification or drilling is required. However, professional installation is highly recommended to ensure proper fitment and functionality.
General Installation Steps:
- Prepare the Vehicle: Park the vehicle on a level surface, engage the parking brake, and turn off the engine. Disconnect the negative terminal of the battery.
- Access the Headlight: Depending on your Subaru Outback model, you may need to remove the front bumper cover or other surrounding components to access the headlight assembly mounting bolts. Consult your vehicle's service manual for specific removal procedures.
- Remove Old Headlight: Disconnect all electrical connectors from the existing headlight assembly. Unscrew any mounting bolts or clips securing the assembly. Carefully remove the old headlight.
- Transfer Bulbs (if applicable): If your new assembly did not come with bulbs, carefully transfer the high beam (HB3), low beam (H11), turn signal (7440A), and side marker (168) bulbs from your old assembly to the new SOCKIR assembly. Ensure bulbs are handled by their base to avoid touching the glass.
- Install New Headlight: Connect all electrical connectors to the new SOCKIR Headlight Assembly. Position the new assembly into the vehicle's headlight opening and secure it with the mounting bolts and clips.
- Reassemble and Test: Reinstall any removed bumper covers or components. Reconnect the vehicle's battery. Test all headlight functions: low beam, high beam, turn signals, and DRLs.
- Aim Headlights: After installation, it is crucial to properly aim your headlights to ensure optimal visibility and to avoid blinding oncoming traffic. Refer to your vehicle's service manual or consult a professional for correct headlight aiming procedures.

Figure 3: Compatibility with 2015-2017 Subaru Outback.
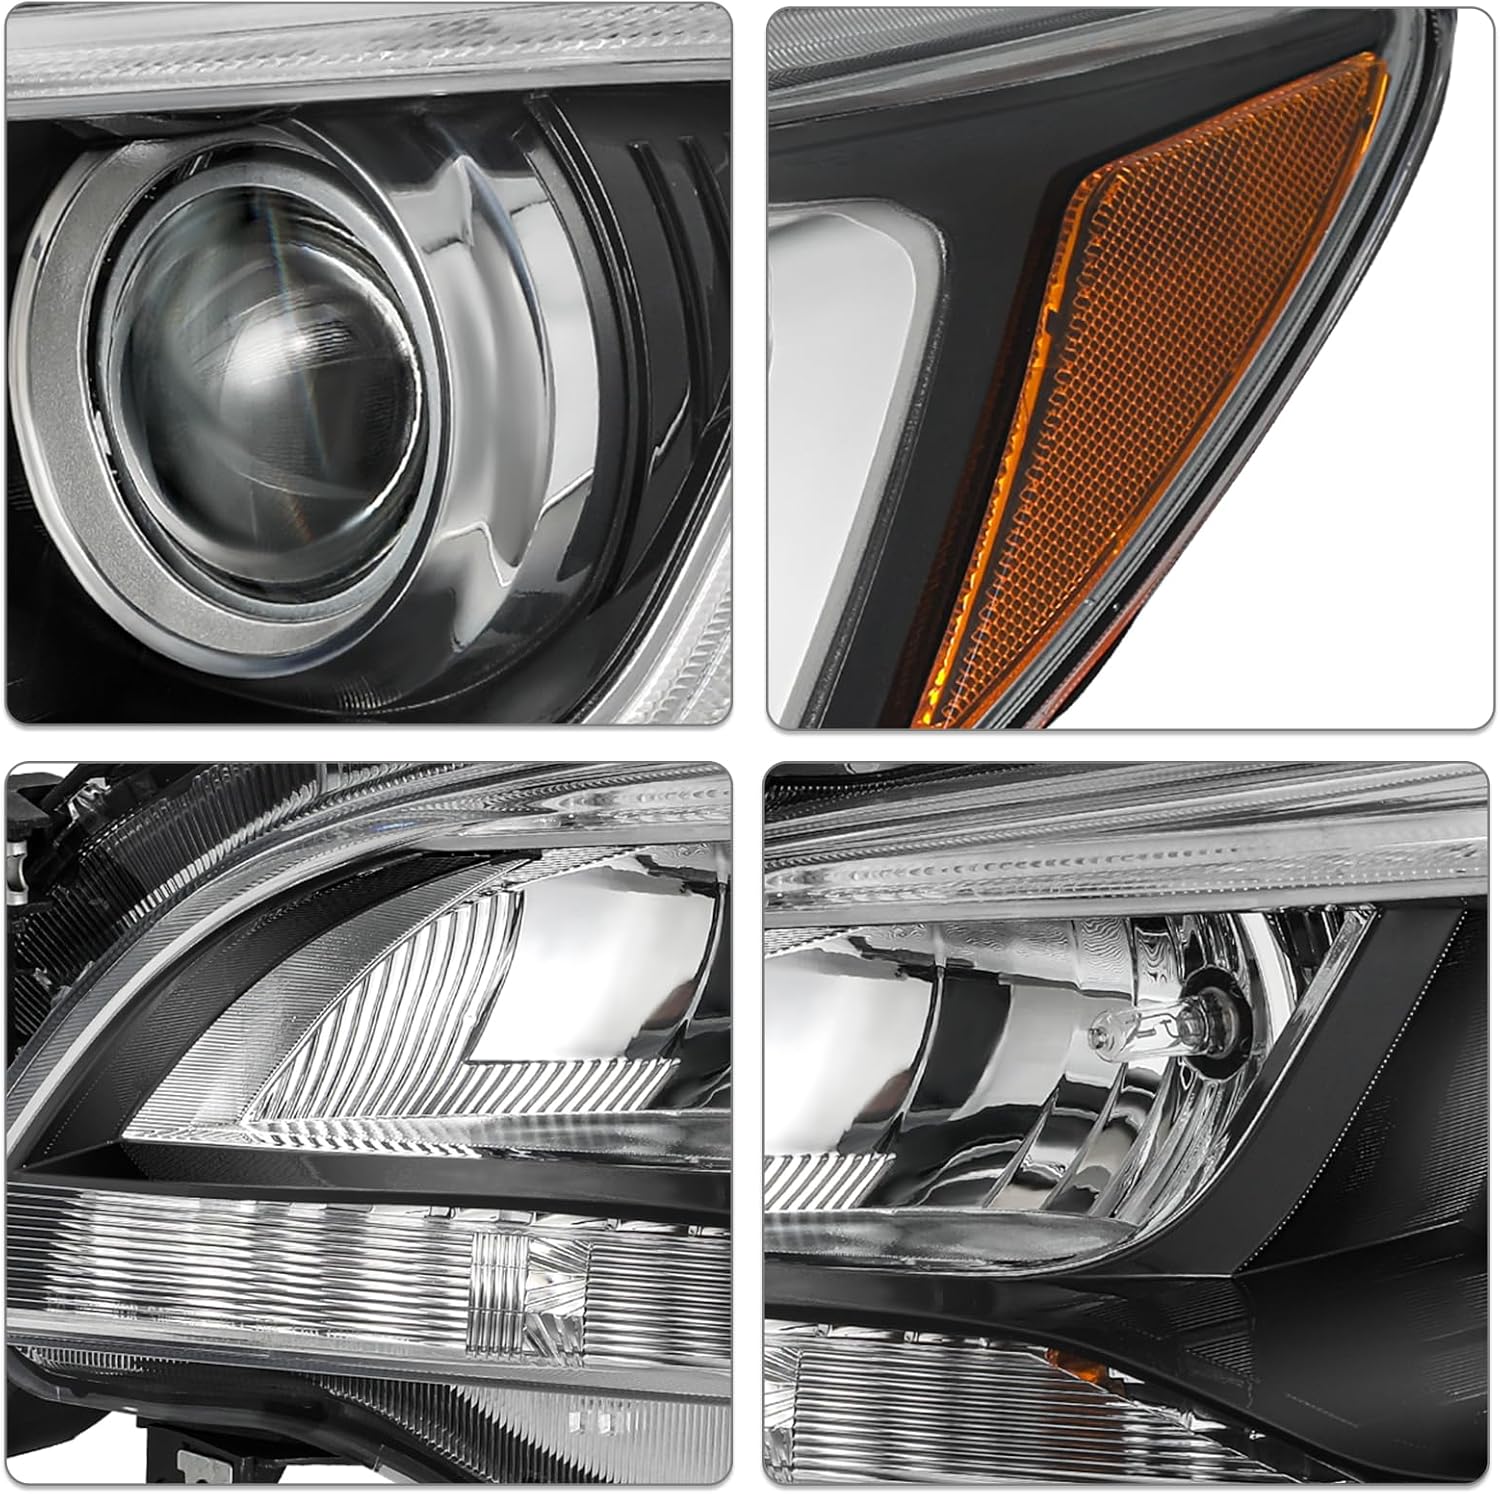
Figure 4: Rear view of the headlight assembly showing key components like the adjusting screw and one-way vent.
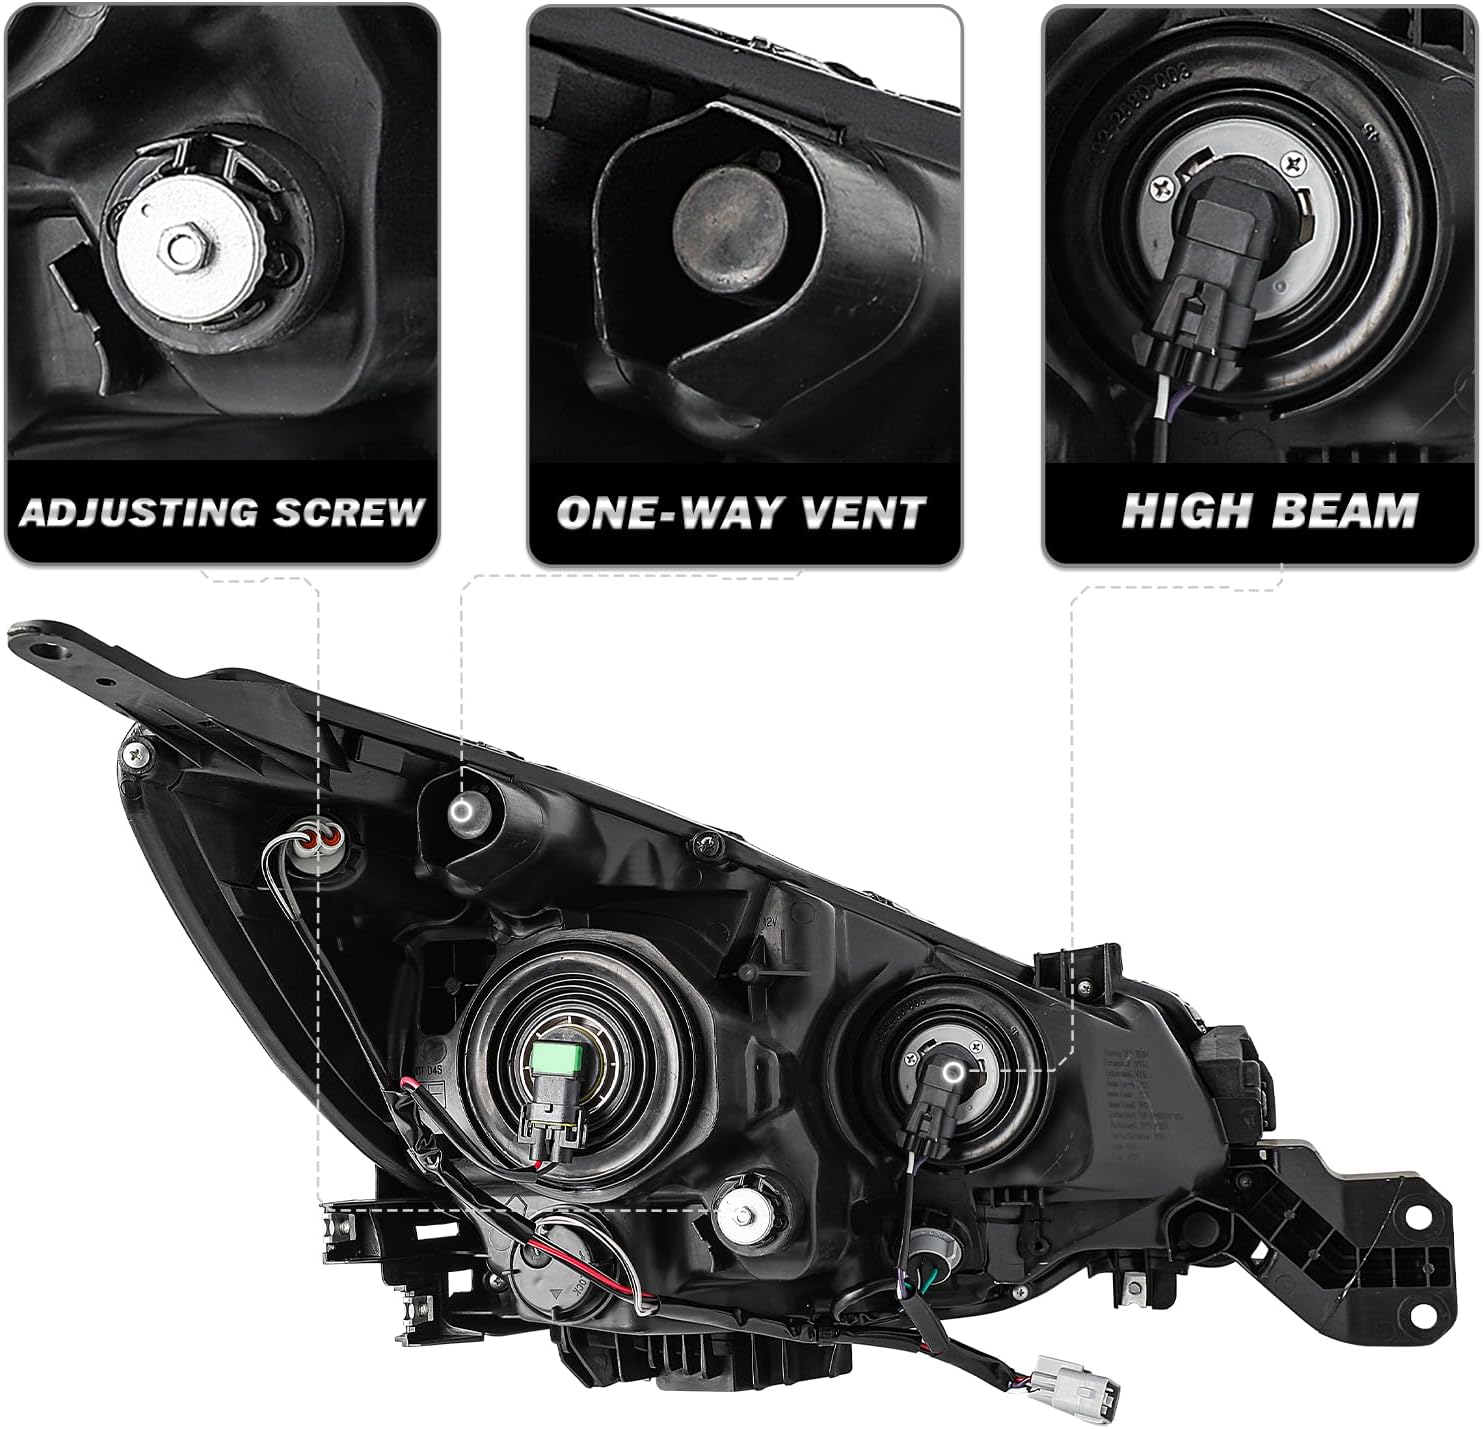
Figure 5: Detailed views of the headlight lens, reflector, and internal structure.
Installation Video Reference:
Video 1: Demonstration of SOCKIR Headlight Assembly features and compatibility with 2015 Subaru Outback.
5. Operation
The SOCKIR Headlight Assembly operates in conjunction with your vehicle's existing lighting controls. Ensure your vehicle's light switch is set to the appropriate position for desired lighting functions.
- Low Beam: Provides standard illumination for general driving conditions.
- High Beam: Offers maximum illumination for improved visibility on unlit roads. Use with caution to avoid blinding other drivers.
- Daytime Running Lights (DRL): The integrated LED DRLs activate automatically with the vehicle's ignition, enhancing daytime visibility.
- Turn Signals: The amber reflector functions as a turn signal indicator.
- Adjustable Beam Angle: The headlight assembly includes an adjuster for high/low beam angle customization. This allows you to fine-tune the lighting direction according to your driving needs and local regulations. (Refer to Figure 4 for adjuster location).
6. Maintenance
Regular maintenance helps ensure the longevity and optimal performance of your headlight assemblies.
- Cleaning: Clean the outer lens regularly with a soft cloth and mild automotive soap or glass cleaner. Avoid abrasive materials or harsh chemicals that could scratch or damage the lens.
- Inspection: Periodically inspect the headlight assemblies for any signs of damage, cracks, or loose connections. Check for moisture accumulation inside the housing. The integrated one-way vents are designed to expel moisture, but persistent fogging may indicate an issue.
- Bulb Replacement: If a bulb fails, replace it with a bulb of the correct type (HB3 for high beam, H11 for low beam, 7440A for turn signal, 168 for side marker). Refer to your vehicle's service manual for specific bulb replacement procedures.

Figure 6: Headlights designed for reliable performance in various weather conditions.
7. Troubleshooting
If you encounter issues with your headlight assembly, refer to the following common troubleshooting tips:
| Problem | Possible Cause | Solution |
|---|---|---|
| Headlight not working | Blown fuse, faulty bulb, loose electrical connection. | Check vehicle fuses. Replace faulty bulb. Ensure all connectors are securely attached. |
| Moisture inside the lens | Condensation (normal in some conditions), compromised seal. | Small amounts of condensation should dissipate. If persistent or excessive, inspect the seal for damage. Ensure the one-way vent is clear. |
| Improper beam aim | Incorrect adjustment after installation. | Adjust the beam angle using the adjusting screw (refer to Figure 4). Consult a professional for precise aiming. |
| Flickering or dim lights | Loose connection, weak ground, failing bulb, vehicle electrical issue. | Check all connections and ground points. Replace bulb. Consult a mechanic for vehicle electrical diagnosis. |
8. Specifications
| Feature | Detail |
|---|---|
| Brand | SOCKIR |
| Model Number | SU15-17 |
| Compatibility | 2015-2017 Subaru Outback (Halogen Models Only) |
| OEM Part Number | 84001AL03A, 84001AL02A |
| High Beam Bulb Type | HB3 (Not Included) |
| Low Beam Bulb Type | H11 (Not Included) |
| DRL Bulb Type | LED (Included) |
| Turn Signal Bulb Type | 7440A (Not Included) |
| Side Marker Bulb Type | 168 (Not Included) |
| Lens Material | Polycarbonate |
| Waterproof Rating | Fully sealed design with one-way vents |
| Assembly Required | No (Direct Replacement) |
| Item Weight | Approximately 10 pounds (for the pair) |
| Package Dimensions | Approximately 31.1 x 11 x 7.5 inches |
9. Warranty and Support
For warranty information, technical support, or any questions regarding your SOCKIR Headlight Assembly, please contact the manufacturer directly through their official channels or the retailer from whom the product was purchased.
Always provide your product model number (SU15-17) and purchase details when seeking support.


