1. Introduction
This manual provides detailed instructions for the DreamSky Kids Alarm Clock Model DS3301. This device is designed to assist children in developing healthy sleep habits through visual cues and an alarm function. It features a night light and an intuitive interface for easy setup and operation.

Image 1.1: Front view of the DreamSky Kids Alarm Clock DS3301, displaying the time and a smiling face.
2. Product Features
- Robot Design: Features a friendly robot shape with facial expressions to engage children.
- Sleep Training: Utilizes color-changing lights and facial expressions (closed eyes for bedtime, smiling face for wake-up) to signal sleep and wake times.
- Adjustable Alarm: Includes an audible alarm with 5 adjustable volume levels (L1-L5). The alarm cannot be muted.
- Night Light: Provides a single-level white night light to comfort children.
- Display Brightness: Offers 5 levels of display dimmer for optimal visibility.
- Time Format: Supports both standard (12-hour) and military (24-hour) time formats.
- Child Lock: A lock button prevents accidental adjustments by children.
- Power Source: Operates via a Type-C adapter (included) with AAA battery backup (not supplied) to retain settings during power outages.
3. Package Contents
Upon opening the package, please verify that all items listed below are present and in good condition:
- DreamSky Kids Alarm Clock (Model DS3301)
- Type-C Power Adapter
- Screwdriver (for battery compartment)
- User Manual (this document)

Image 3.1: Contents of the DreamSky Kids Alarm Clock package, including the clock, screwdriver, user manual, and power adapter.
4. Setup
4.1 Power Connection
- Locate the Type-C power port on the back of the alarm clock.
- Insert the included Type-C adapter cable into the port.
- Plug the power adapter into a standard electrical outlet. The clock display will illuminate.
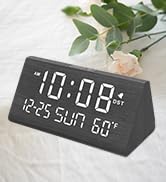
Image 4.1: The DreamSky Kids Alarm Clock connected to a power outlet via its Type-C adapter.
4.2 Battery Installation (Backup)
Two AAA alkaline batteries (not supplied) are required for backup to preserve settings during power interruptions. The battery compartment is secured with a screw for child safety.
- Using the provided screwdriver, carefully open the battery compartment cover located on the back of the clock.
- Insert two AAA alkaline batteries, ensuring correct polarity (+/-).
- Replace the battery compartment cover and secure it with the screw.
5. Operating Instructions
5.1 Setting the Time
- Press and hold the 'TIME SET' button (usually located on the back) until the hour display flashes.
- Use the '+' or '-' buttons to adjust the hour.
- Press 'TIME SET' again to confirm the hour and move to minute adjustment.
- Use the '+' or '-' buttons to adjust the minutes.
- Press 'TIME SET' a third time to confirm minutes and move to 12/24-hour format selection.
- Use the '+' or '-' buttons to select '12H' for standard time or '24H' for military time.
- Press 'TIME SET' to save all time settings.
5.2 Setting Bedtime (Red Light)
The clock signals bedtime with a soft red light and a closed-eye expression on the robot's face.
- Press and hold the 'SLEEP SET' button until the bedtime hour flashes.
- Use the '+' or '-' buttons to set the desired bedtime hour.
- Press 'SLEEP SET' again to confirm the hour and move to minute adjustment.
- Use the '+' or '-' buttons to set the desired bedtime minutes.
- Press 'SLEEP SET' to save the bedtime setting.

Image 5.1: The alarm clock displaying a red light and closed eyes, indicating it is bedtime.
5.3 Setting Wake-Up Time (Green Light & Alarm)
The clock signals wake-up time with a green light, a smiling face, and an audible alarm.
- Press and hold the 'WAKE SET' button until the wake-up hour flashes.
- Use the '+' or '-' buttons to set the desired wake-up hour.
- Press 'WAKE SET' again to confirm the hour and move to minute adjustment.
- Use the '+' or '-' buttons to set the desired wake-up minutes.
- Press 'WAKE SET' to save the wake-up setting.
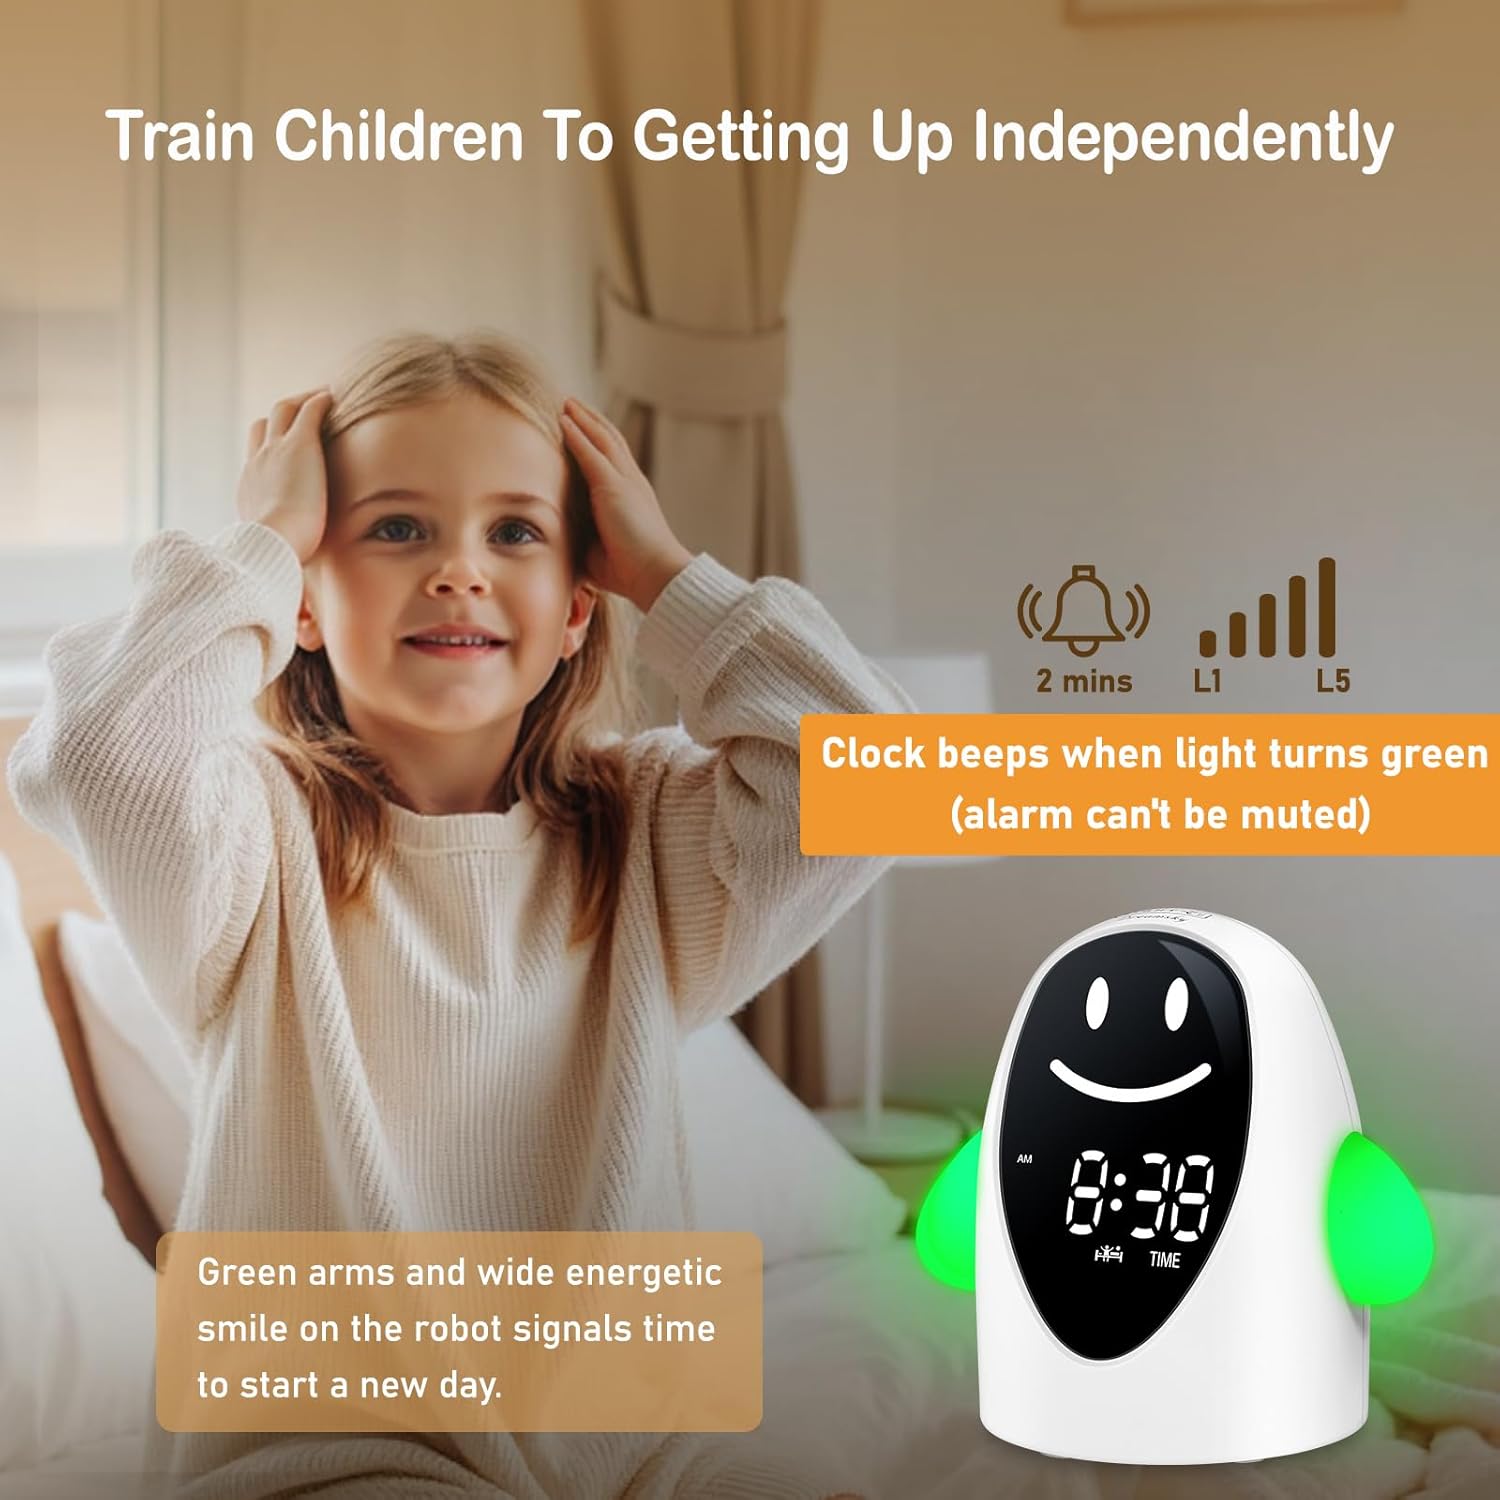
Image 5.2: The alarm clock displaying a green light and a smiling face, indicating it is time to wake up.
5.4 Adjusting Alarm Volume
The alarm volume can be set to one of 5 levels (L1-L5). The alarm cannot be silenced.
- While in normal time display mode, press the 'VOLUME' button.
- The current volume level (L1-L5) will be displayed.
- Use the '+' or '-' buttons to cycle through the volume levels.
- The selected volume level will be automatically saved after a few seconds of inactivity.
5.5 Adjusting Display Brightness
The display brightness has 5 adjustable levels.
- While in normal time display mode, press the 'DIMMER' button.
- The display brightness will cycle through the 5 levels (L1-L5) and an 'OFF' setting.
- Select the desired brightness level. The setting will be saved automatically.

Image 5.3: Illustration of the 5-level dimmable display brightness feature of the alarm clock.
5.6 Using the Night Light
The clock features a soothing white night light.
- Press the 'NIGHT LIGHT' button to turn the night light on or off.
- The night light operates independently of the sleep/wake training functions.

Image 5.4: The alarm clock functioning as a night light in a child's bedroom.
5.7 Lock Function
To prevent children from accidentally changing settings, use the lock function.
- Press the 'LOCK' button (usually located on the back). A lock icon may appear on the display.
- To unlock, press the 'LOCK' button again.
6. Maintenance
- Cleaning: Wipe the clock with a soft, dry cloth. Do not use abrasive cleaners or solvents.
- Storage: If storing the clock for an extended period, remove the AAA backup batteries to prevent leakage.
- Environment: Keep the clock away from direct sunlight, extreme temperatures, and moisture.
7. Troubleshooting
| Problem | Possible Cause | Solution |
|---|---|---|
| Clock display is off. | No power connection. | Ensure the Type-C adapter is securely plugged into the clock and a working power outlet. |
| Settings are lost after power outage. | No AAA backup batteries installed or batteries are depleted. | Install two fresh AAA alkaline batteries or replace existing ones. |
| Alarm does not sound. | Alarm is not set or volume is too low. | Verify the wake-up time is correctly set. Adjust the alarm volume to a higher level (L1-L5). |
| Buttons are unresponsive. | Child lock function is active. | Press the 'LOCK' button to deactivate the child lock. |
8. Specifications
- Model Number: DS3301
- Dimensions: 4.6 inches (Width) x 4.5 inches (Height)
- Material: Plastic
- Display Type: Digital
- Power Source: Corded Electric (Type-C adapter included), 2 x AAA batteries (for backup, not included)
- Special Features: Kids sleep training, night light, facial expressions, adjustable alarm volume (5 levels), display dimmer (5 levels), lock button.
9. Warranty and Support
This DreamSky Kids Alarm Clock Model DS3301 comes with a 1-year replacement warranty from the date of purchase.
For technical support, troubleshooting assistance, or warranty claims, please contact DreamSky customer service through the retailer's platform or visit the official DreamSky website.
Please retain your proof of purchase for warranty validation.


