
Introduction
This manual provides comprehensive instructions for the setup, operation, and maintenance of your Deco Gear 49-inch QD-OLED Curved Ultrawide Gaming Monitor, model DGOLED49. Please read this manual thoroughly before using the product to ensure proper function and to prevent damage. Keep this manual for future reference.

Image: The Deco Gear 49-inch QD-OLED Curved Ultrawide Gaming Monitor, showcasing its expansive display and sleek design.
Package Contents
Verify that all items listed below are present in your product packaging. If any items are missing or damaged, please contact customer support.
- Deco Gear 49-inch QD-OLED Curved Ultrawide Gaming Monitor
- Monitor Stand (Base and Neck)
- Power Cable
- HDMI Cable
- DisplayPort Cable
- USB-C Cable
- USB-B to USB-A Cable (for KVM functionality)
- User Manual
Setup Instructions
1. Stand Assembly
- Carefully remove the monitor and stand components from the packaging.
- Attach the stand neck to the monitor panel using the provided screws.
- Secure the stand base to the stand neck. Ensure all connections are firm.
- Place the assembled monitor on a stable, flat surface.
2. Connecting to Power
Connect the power cable to the monitor's power input and then to a grounded electrical outlet.
3. Connecting to Source Devices
The monitor supports multiple input types. Choose the appropriate cable for your device:
- HDMI: Connect an HDMI cable from your computer's HDMI output to one of the monitor's HDMI 2.1 ports.
- DisplayPort: Connect a DisplayPort cable from your computer's DisplayPort output to the monitor's DisplayPort 1.4 input.
- USB-C: Connect a USB-C cable from your compatible device to the monitor's USB-C port. This port supports video, data, and 90W Power Delivery.
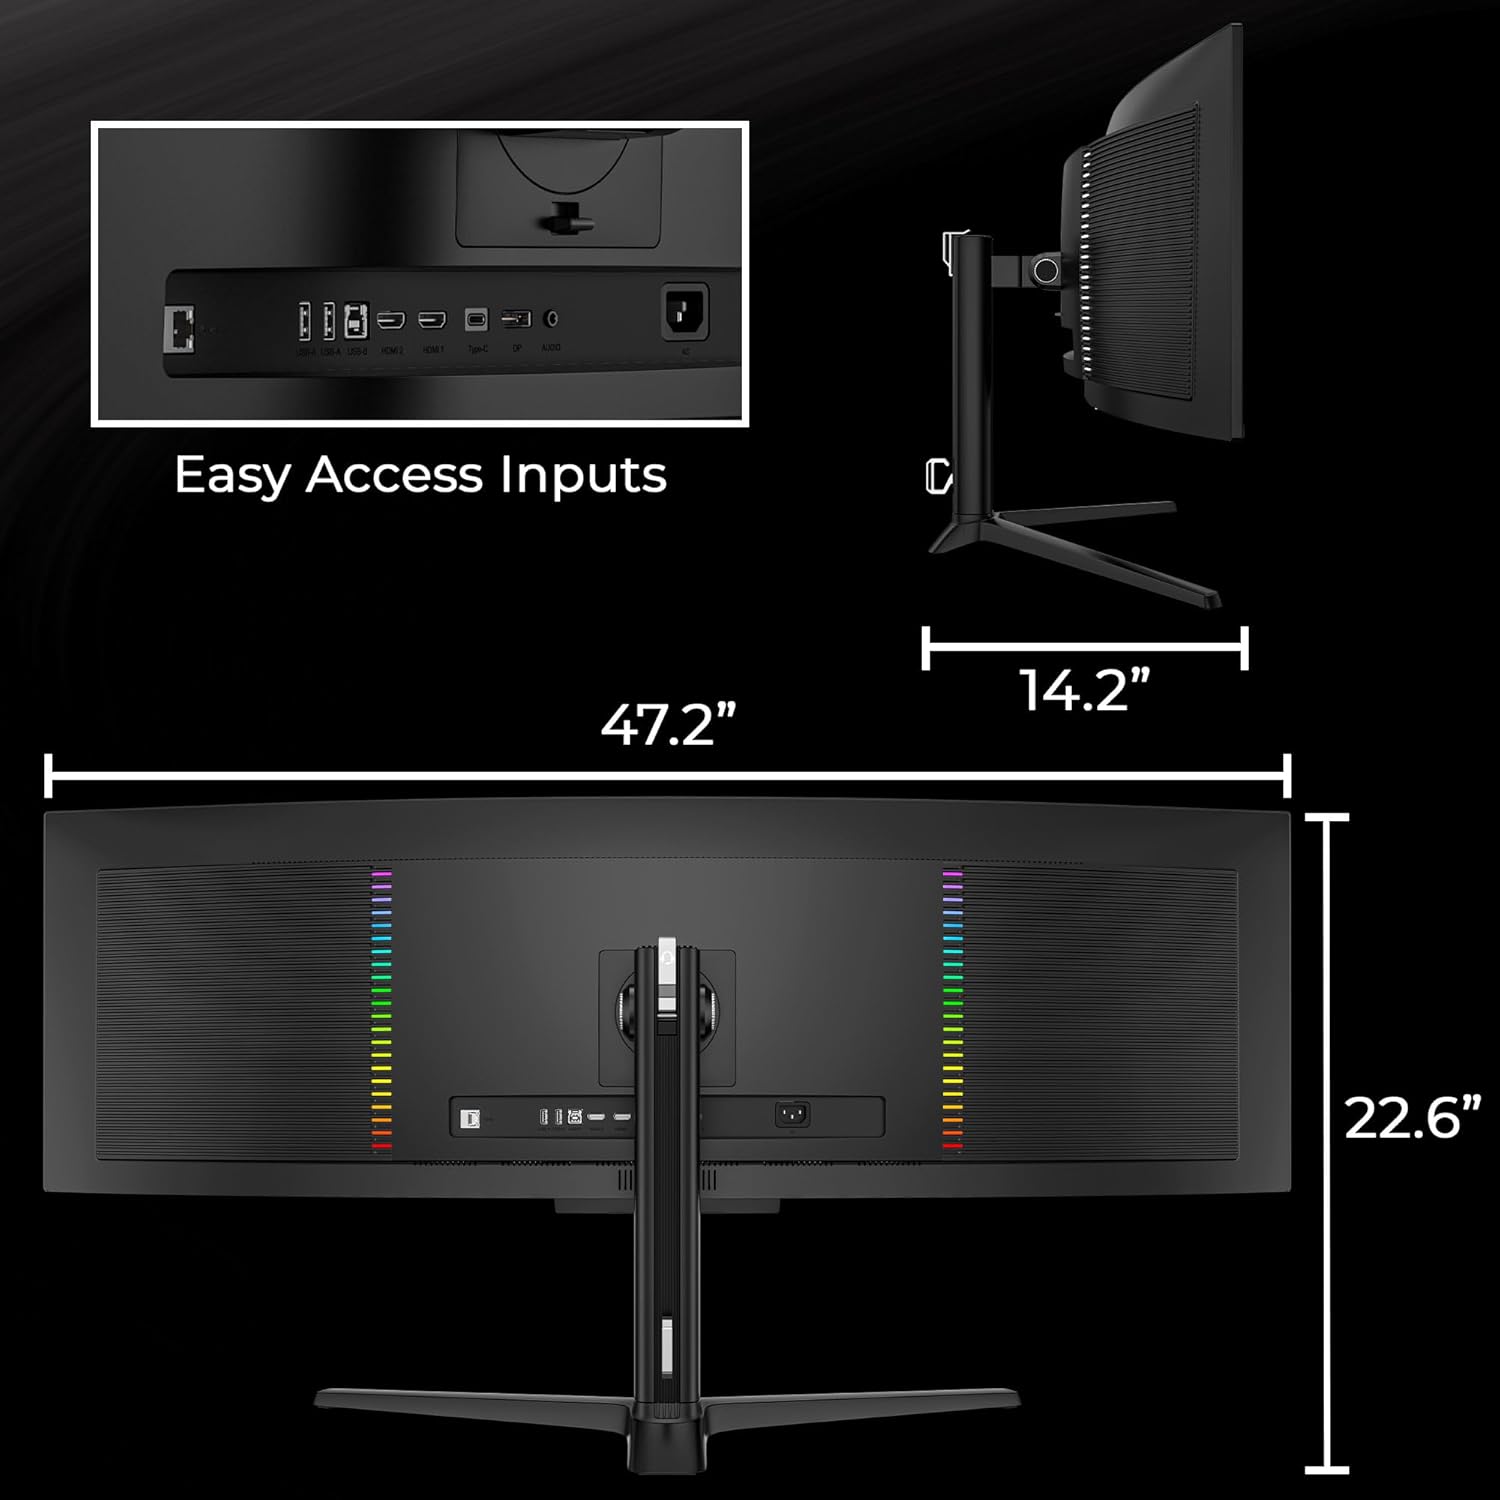
Image: Rear view of the monitor displaying various input ports including HDMI, DisplayPort, and USB-C, along with product dimensions.
4. KVM Switch Configuration
The integrated KVM switch allows you to control multiple computers with a single keyboard and mouse connected to the monitor. To use this feature:
- Connect the USB-B to USB-A cable from the monitor's USB-B upstream port to a USB-A port on your primary computer.
- If connecting a second computer via USB-C, the USB-C cable will handle the KVM data connection.
- Connect your keyboard and mouse to the USB-A downstream ports on the monitor.
- Switch between connected computers using the monitor's On-Screen Display (OSD) menu or a dedicated KVM hotkey (if available).

Image: A diagram showing how to connect a desktop and a laptop to the monitor to utilize the KVM switch functionality.
Operating Instructions
1. Power On/Off
Press the power button located on the monitor to turn it on or off. The power indicator light will illuminate when the monitor is active.
2. OSD Menu Navigation
Use the joystick or buttons on the monitor's rear or bottom to access and navigate the On-Screen Display (OSD) menu. This menu allows you to adjust various settings.
3. Input Selection
From the OSD menu, select 'Input Source' to choose between HDMI 1, HDMI 2, DisplayPort, or USB-C inputs based on your connected device.
4. Display Settings
Adjust settings such as brightness, contrast, color temperature, and gamma through the OSD menu to optimize your viewing experience. The monitor supports a 144Hz refresh rate and 0.03ms response time for smooth motion display.

Image: A visual comparison demonstrating the difference between 144Hz and 60Hz refresh rates, highlighting the smoother motion at higher refresh rates.
5. OLED Care Protection
This monitor incorporates advanced features to enhance the longevity of the OLED panel and mitigate the risk of burn-in. These features include:
- Burn-in Protection: Images are shifted slightly at regular intervals to prevent static elements from causing permanent image retention.
- Static Screen Detection: The monitor can detect static elements like icons and taskbars and automatically reduce their brightness to minimize burn-in risk.
- Panel Maintenance: Users can manually activate panel maintenance through the OSD menu. The monitor may also provide optional notifications to initiate protective measures after extended use. This process can take 4-20 minutes, during which the display will turn off and LED lights will blink.
- Heat Dissipation: A heat dissipation array and graphene cooling film are integrated to manage the monitor's temperature, further reducing the risk of burn-in and extending the monitor's lifespan.

Image: A visual representation of how burn-in protection works by slightly shifting the displayed image over time.

Image: An illustration demonstrating the automatic brightness reduction for static screen elements to prevent burn-in.

Image: A screenshot of the on-screen prompt for initiating panel maintenance, indicating the duration and process.

Image: A diagram illustrating the internal heat dissipation array designed to manage monitor temperature.

Image: A layered diagram showing the integration of graphene cooling film within the monitor's display structure.
Maintenance
Cleaning the Monitor
- Always power off the monitor and disconnect the power cable before cleaning.
- Use a soft, lint-free cloth lightly dampened with water or a non-abrasive screen cleaner.
- Do not spray cleaner directly onto the screen.
- Avoid using harsh chemicals, solvents, or abrasive materials, as these can damage the screen and casing.
Troubleshooting
If you encounter issues with your monitor, refer to the following common problems and solutions:
| Problem | Possible Solution |
|---|---|
| No image on screen | Ensure power cable is securely connected. Verify video input cable (HDMI, DP, USB-C) is properly connected to both the monitor and the source device. Select the correct input source via the OSD menu. |
| Image is flickering or distorted | Check video cable connections. Try a different cable. Ensure your graphics card drivers are up to date. Adjust refresh rate settings on your computer. |
| Colors appear incorrect | Adjust color settings (brightness, contrast, color temperature) in the OSD menu. Ensure your graphics card color settings are properly configured. |
| KVM switch not working | Ensure the USB-B upstream cable is connected from the monitor to the primary computer. If using USB-C, ensure it supports data transfer. Verify keyboard and mouse are connected to the monitor's USB-A downstream ports. Select the correct KVM input in the OSD. |
Specifications
The following table outlines the technical specifications for the Deco Gear 49-inch QD-OLED Curved Ultrawide Gaming Monitor (Model DGOLED49):
| Feature | Specification |
|---|---|
| Screen Size | 49 Inches |
| Panel Type | QD-OLED |
| Resolution | 5120 x 1440 Pixels (5K QHD 1440p) |
| Aspect Ratio | 32:9 |
| Curvature | 1800R |
| Refresh Rate | 144Hz |
| Response Time | 0.03ms |
| HDR Support | HDR400 True Black |
| Contrast Ratio | 1,500,000:1 |
| Color Gamut | 100% sRGB, 95% Adobe RGB, 99% DCI-P3 |
| Brightness | 250 Candela (typical) |
| Adaptive Sync | Yes |
| Connectivity | 2x HDMI 2.1, 1x DisplayPort 1.4, 1x USB-C (90W PD), 2x USB-A (downstream), 1x USB-B (upstream), Audio Out |
| Built-in Speakers | Yes |
| Stand Adjustments | Height, Tilt, Swivel, Pivot |
| Product Dimensions (with stand) | 14.2 x 47.2 x 22.6 inches |
| Item Weight (with stand) | 21.1 pounds |
Warranty and Support
For warranty information and technical support, please refer to the warranty card included with your product or visit the official Deco Gear website. Keep your purchase receipt as proof of purchase for warranty claims.