
1. Introduction
The MLEEDA USB 3.0 KVM Switch is designed to allow up to four computers or laptops to share three monitors and four USB 3.0 devices, such as a keyboard, mouse, printer, or hard drive. This device supports resolutions up to 4K@60Hz and 2K@120Hz, offering both mirror and extended display modes. It is a plug-and-play solution compatible with Windows, Mac, Linux, and Chrome OS, making it ideal for home, office, and gaming environments.
2. Package Contents
Please verify that all items are present in the package:
- 1 x MLEEDA USB 3.0 KVM Switch (4 PC 3 Monitor)
- 4 x USB 3.0 Cables (1.5m)
- 1 x Wired Remote Control (1.5m)
- 1 x Power Adapter (12V)
- 1 x User Manual

3. Product Features
- Multi-PC, Multi-Monitor Support: Connects up to 4 PCs to share 3 monitors and 4 USB 3.0 devices. Supports both mirror and extended display modes for versatile setups.
- Ultra HD 4K Resolution: Supports resolutions up to 4K@60Hz and 2K@120Hz, ensuring high-quality visual output. Compatible with DP1.2 and HDMI 2.0 cables.
- High-Speed USB 3.0 Ports: Features 4 integrated USB 3.0 ports for ultra-fast data transfer speeds of 5 Gbps, which is 10 times faster than USB 2.0. Ideal for connecting various peripherals.
- Broad Compatibility: Driver-free operation for Windows, Mac, Linux, Raspberry Pi, DVR, and NVR systems.
- EDID Emulation: HDMI input ports feature EDID emulators to store display resolution and refresh rate information, ensuring correct display settings for connected PCs. Note: DisplayPort does not support EDID emulation.


4. Setup Guide
Follow these steps to connect your MLEEDA KVM Switch:
- Power Connection: Connect the provided 12V power adapter to the DC/12V port on the KVM switch and plug it into a power outlet.
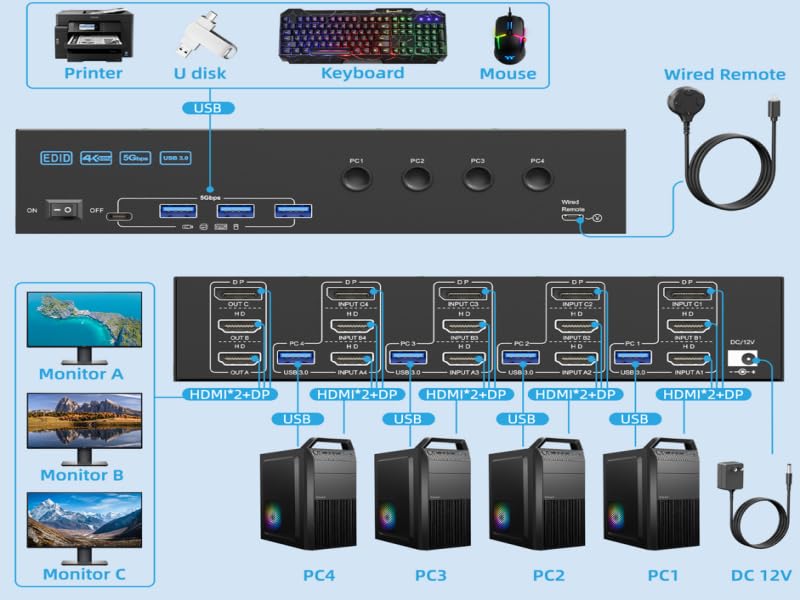
- Monitor Connections: Connect your three monitors to the KVM switch's output ports (OUT A, OUT B, OUT C) using appropriate HDMI and DisplayPort cables. Ensure you use DP1.2 and HDMI 2.0 cables for optimal performance.
- PC Video Inputs: For each PC (PC1, PC2, PC3, PC4), connect its video outputs (HDMI and DisplayPort) to the corresponding INPUT ports on the KVM switch (e.g., PC1's HDMI and DP to INPUT A1, B1, C1).
- PC USB Connections: For each PC, connect one end of the provided USB 3.0 cable to a USB 3.0 port on your PC and the other end to the corresponding USB 3.0 INPUT port on the KVM switch (e.g., PC1's USB to INPUT A1 USB 3.0).
- Peripheral Connections: Connect your keyboard, mouse, printer, or other USB 3.0 devices to the 4 USB 3.0 ports on the front of the KVM switch.
- Wired Remote Connection: If desired, connect the wired remote control to the dedicated port on the KVM switch for convenient switching.
5. Operating Instructions
The MLEEDA KVM Switch offers two convenient methods for switching between connected PCs:
- Button Switch: Press the corresponding PC button (PC1, PC2, PC3, PC4) on the front panel of the KVM switch to switch to the desired computer. An LED indicator will show the active PC.
- Wired Remote Control: Use the included wired remote control to switch between PCs. Simply press the button on the remote to cycle through the connected computers.

6. Specifications
| Feature | Detail |
|---|---|
| Model Number | KVM403DH2 |
| Product Dimensions | 21 x 7.8 x 4.5 cm |
| Weight | 580 g |
| Max Resolution | 4K@60Hz, 2K@120Hz |
| Video Inputs | 2 x HDMI, 1 x DisplayPort per PC (4 PCs) |
| Video Outputs | 3 x Monitor (HDMI + DisplayPort) |
| USB Ports | 4 x USB 3.0 (for peripherals) |
| Data Transfer Speed | 5 Gbps (USB 3.0) |
| Power Supply | 12V Power Adapter |
| Switching Modes | Button Switch, Wired Remote Control |
| Material | Metal |
| Operating Mode | ON-OFF |
| Compatibility | Windows, Mac, Linux, Raspberry Pi, DVR, NVR |
7. Troubleshooting
- No Display Output:
- Ensure all HDMI and DisplayPort cables are securely connected to both the KVM switch and your monitors/PCs.
- Verify that the KVM switch is powered on and the correct PC input is selected.
- Check monitor input settings to ensure they are set to the correct HDMI/DisplayPort input.
- Try using different HDMI/DisplayPort cables, especially high-quality DP1.2 and HDMI 2.0 cables.
- Restart the KVM switch and connected PCs.
- USB Devices Not Working:
- Ensure the USB 3.0 cables from your PCs are connected to the corresponding USB 3.0 INPUT ports on the KVM switch.
- Verify that your USB devices are properly connected to the USB 3.0 ports on the front of the KVM switch.
- Try connecting the USB device directly to the PC to confirm it is functional.
- Some high-power USB devices may require external power or a powered USB hub.
- Resolution Issues / Flickering Screen:
- Ensure your graphics card drivers are up to date on all connected PCs.
- Verify that your monitors support the desired resolution and refresh rate.
- Use certified DP1.2 and HDMI 2.0 cables, especially for 4K@60Hz. Longer or lower-quality cables can cause signal degradation.
- For HDMI connections, the EDID emulation should help maintain stable resolution. For DisplayPort, manual adjustment might be needed if issues persist.
- Switching Delays:
- A slight delay during switching is normal as the KVM re-establishes connections.
- Ensure all cables are securely connected. Loose connections can cause inconsistent switching.
8. Maintenance
To ensure the longevity and optimal performance of your MLEEDA KVM Switch, follow these maintenance guidelines:
- Cleaning: Use a soft, dry cloth to clean the exterior of the device. Avoid using liquid cleaners or abrasive materials, as they may damage the surface or internal components.
- Ventilation: Ensure the KVM switch is placed in a well-ventilated area to prevent overheating. Do not block any ventilation openings.
- Storage: When not in use for extended periods, store the device in a cool, dry place away from direct sunlight and extreme temperatures.
- Cable Management: Keep cables organized and untangled to prevent strain on ports and accidental disconnections.
9. Warranty & Support
The MLEEDA USB 3.0 KVM Switch comes with a 12-month warranty from the date of purchase. This warranty covers manufacturing defects and malfunctions under normal use.
If you encounter any issues or have questions regarding your KVM switch, please do not hesitate to contact our customer support team. We are committed to providing comprehensive after-sales service, including technical assistance and product replacement if necessary.
Contact Information: Please refer to the contact details provided on the product packaging or the official MLEEDA website for the most up-to-date support information.


